Beton-House.com
Website about concrete: construction, characteristics, design. We combine the experience of professionals and private craftsmen in one place
Any concrete surface requires leveling before further finishing work.
Finishing work is the final and most beautiful stage of any renovation. Regardless of how you decide to decorate the walls: paste wallpaper, lay tiles or simply paint, you need to prepare a flat surface.
In this article we will tell you how to level concrete walls, what materials and technologies to use, and we will pay attention to one very important point - even corners. Despite the apparent complexity of finishing work, it is quite possible to level concrete walls with your own hands. So let's get started.
- Work on beacons Installation of permanent beacons
- Basic rules for puttying
- Working with gypsum boards
Leveling technologies
Before deciding on the leveling method and material, it is necessary to assess the scale of the work.
In this case, you should carefully study the level of unevenness:
- depressions of more than 5 cm are the best way to level drywall;
- difference less than 5 cm - plaster is suitable;
- Small irregularities up to 5 mm can be removed with putty.
In practice, puttying is almost always used, even if the walls were previously covered with plasterboard or covered with plaster mixture. The joints between the sheets are sealed with putty and small roughnesses of the plaster are smoothed out.
Important! Any leveling technology will increase the thickness of the concrete wall, so before starting work it is recommended to dismantle all layers of the old decorative finish.
Drywall
If the walls have significant flaws on the surface, the easiest way is to create a smooth surface using sheets of plasterboard using a frame or frameless method.
Separate sheets for finishing walls and ceilings, as well as moisture-resistant material
In a situation with deep potholes, the following correction:
- most effective;
- least time-consuming;
- economically beneficial.
The frameless method is technically not entirely correct, but amateur builders use it very often. With this finish, sheets of plasterboard are glued directly to the wall. If the surface has significant flaws, it is unlikely to be done efficiently.
Frame device
The surest way to level out significant defects is to construct a frame to which the sheets will be attached. The frame is assembled from aluminum rack profiles and guides or wooden beams.
Accordingly, wooden structures should not be used in rooms with high humidity. This frame is less durable, susceptible to microorganisms and prone to deformation.
The rack profiles are rotated to the surface of the concrete wall, taking into account the vertical and horizontal levels. The distance between the profiles is set depending on the size of the sheet. The guides are attached every 50 - 60 cm, depending on the size of the gypsum board (plasterboard sheet).
The pitch of the profiles should be selected based on the sheet size
On a note! After the frame is installed, measures can be taken to install thermal insulation using mineral wool or polystyrene foam.
Drywall sheets are attached to the frame using self-tapping screws. It is better to use screws made of oxidized metal. The fastening pitch is 15-18 centimeters - the screws rotate into the profile. The head of the screw must be flat; during installation, it is slightly recessed into the sheet.
The structure of the frame allows you not only to create a perfectly flat surface for decorative material, but also to hide communication cables. Wiring in a concrete wall requires channeling, a very noisy and messy process. The structure of the frame allows you to lay communications at minimal cost, while all wires will be completely hidden.
On a note! Using a similar technology, you can cover the walls with sheets of plywood or plastic. But with these materials, taking into account their physical properties, it is better to use wooden beams to assemble the frame.
All necessary communications can be laid in the chamber of the frame device
Plaster
The use of plaster mixtures for leveling concrete surfaces involves the following preparatory measures:
- In order for the new plaster to adhere perfectly, it is necessary to clean the wall down to the concrete.
- You should get rid of all layers of old finish, and then carefully inspect the surface for defects.
- Delaminations and cracks must be eliminated.
- For better adhesion, the concrete wall is treated with a deep penetration primer.
Before starting work, it is necessary to dismantle the old decorative coating
Depending on the room in which the work is carried out, a plaster mixture based on cement or gypsum is selected:
| Binding material of the mixture | Main characteristics |
| Cement | The surface will require putty and will be rough. The price of the cement composition is lower than that of the gypsum mixture. It is permissible to apply the solution in a thick layer, which is sometimes of decisive importance. If you need to apply a layer more than 20 mm thick, you should use a plaster mesh. |
| Gypsum | The final surface is quite smooth. Should not be used in rooms with high humidity levels. A polymer mesh is suitable for reinforcing a thick layer. |
Work on lighthouses
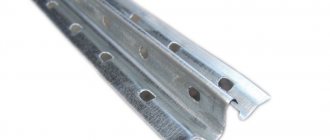
Before applying plaster to reinforced concrete walls, beacons should be installed on the surface - guides or limit strips that serve to control the surface level of the liquid mortar. Typically, a metal perforated profile is used for plastering work.
On a note! Metal beacons must subsequently be removed from the walls, but plastic ones can be left, since they do not corrode.
It is better for a non-specialist to use a system of non-removable beacons
Installation of permanent beacons
Installing volume limiters is a very important part of the job. The smoothness and quality of plastering work depends on the correct installation of the beacons.
Beacon perforated profile
Step-by-step instructions for installing limit bars:
- Using a building level, mark vertical lines for holes for fastenings.
- The first line is marked at a distance of no more than 20 cm from the corner.
- The distance between vertical marks is chosen based on the size of the rule.
- Holes are drilled in the wall along the marking lines and chokes are driven in.
- The planks are secured into the prepared holes using self-tapping screws.
- It is better to screw in the screws with a screwdriver, controlling the vertical level of the bar.
- Before attaching the vertical planks, it is recommended to stretch a horizontal thread along the wall to control the level of the surface as a whole.
- For final fixation of the planks, a plaster solution is used, which is applied in a small amount to the profile.
After the solution under the beacons has set, you can begin plastering the surface. The rule regulates the level of plaster, the volume of which should not exceed their boundaries. You can learn more about the process of installing restrictive profiles for plastering work by watching the video in this article.
Applying plaster
Plaster mortar is poured onto the surface of the wall between the profiles - marking. The mortar is applied using a trowel and a falcon. Working with a falcon allows you to significantly speed up the process and reduce costs.
Important! The volume of the marking exceeds the required amount of plaster mixture to level a certain area.
After the required amount of the mixture is applied to the wall, work begins as a rule. With zigzag movements of small amplitude, the solution is distributed over the surface in the direction from bottom to top.
To simplify and speed up the process, first cast a rough layer of basting, below the level of the beacons. Then, after setting, a finishing mark is applied. If necessary, the plaster layer is reinforced with mesh.
In the photo, leveling the surface with plaster mortar using the rule from bottom to top
How to level walls - leveling walls with your own hands (4 photos)
Paint, wallpaper, ceramic tiles - in a word, any finish fits well only on a perfectly flat surface. That is why any uneven walls in the apartment cannot be ignored.
Moreover, the walls occupy the largest surface of the apartment and are always visible! If there is even the slightest flaw on the load-bearing surface, then sooner or later the decorative finish may lose its appearance, and you will have to take on repairs again.
Even novice home craftsmen can level the walls with their own hands. Let's talk about how to level walls using plaster or drywall.
Small cracks or unevenness will help hide expensive wallpaper with a corrugated pattern, but if the walls in your apartment are “wavy”, then only leveling will help.
Depending on the types of materials used, there are two types of wall leveling - dry (installation of various plasterboard structures) and wet (using building mixtures). Each of these methods is effective only if a strict sequence of work is observed, but has its own characteristics.
Thus, leveling walls with plaster is used for small differences in “heights” - from 30 to 60 mm. If necessary, you can level walls with greater curvature using the raw method, but this will require more time and money spent on material and work. In this case, it is better to give preference to installing the frame and then covering it with plasterboard.
But whatever method you choose, the main thing is to pay maximum attention to aligning the corners. Curvature, invisible to the eye, will manifest itself when gluing borders and installing baseboards.
Immediately before leveling the wall, it is necessary to carry out a number of preparatory work.
First of all, you need to determine the size of the wall irregularities. When measuring horizontally, you can use a cord, pulling it tightly along the wall, or use a building level, the length of which should not be less than 1.5 m. Vertical unevenness is measured with a plumb line. If the differences are no more than 3 - 5 cm, then this wall defect is corrected using building mixtures.
Leveling walls with plaster
Before starting work, turn off the power supply to the room. Then thoroughly clean the surfaces of old wallpaper, paint, flaking plaster, etc. After this, the cleaned walls are treated with a primer.
This must be done so that the building mixture is better fixed to the wall. In addition, the use of a primer prevents delamination of materials and increases their moisture resistance.
For cement mixtures I use the so-called “cement laitance”, consisting of a solution of cement, sand and water.
In order for the wall to be level, it is necessary to install beacon lines. The installation of beacon strips begins with the installation of profiles on different sides of the wall. To check the verticality of the beacons, use a plumb line.
Next, we dilute approximately 10 liters of cement mixture and apply it to the wall with large strokes between the beacons using a construction spatula. Then we take a rule or an even stick of a suitable size and level the applied mixture, drawing from bottom to top or vice versa (as is convenient for you) along the beacon lines.
Add mixture until the wall surface is leveled in accordance with the beacon lines. Level the corners with a spatula.
When choosing a dry building mixture, you need to pay attention to both the thickness of the applied layer and the type of “binding” material (cement or gypsum).
Gypsum-based compositions are used to decorate walls in living rooms, since gypsum maintains the microclimate of the room well.
Cement-based mixtures are usually used in damp areas - kitchens and bathrooms.
Leveling walls with plasterboard
Another way to correct the curvature of the walls is to level it with drywall. This method is used when the differences in unevenness on the wall are more than 5 cm.
When using plasterboard for wall cladding, pay attention to the base - it should not have crumbling fragments and be durable.
A wall lined with plasterboard must be protected from excess moisture. This wall also cannot be subjected to spatial deformation. Do not allow the wall to freeze and condensation to appear.
And in order for the plasterboard sheets to last better and longer, the wall must be cleaned of any remaining mortar, oil, wax and other substances that impair the contact properties of the adhesive. After this, the wall must be primed.
On very porous, loose surfaces it is necessary to apply deep penetration primer using a brush or spray.
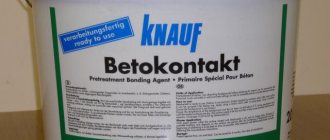
For walls that do not absorb moisture – concrete and other dense, low-porous surfaces – use a special primer marked “betonactive”.
Before installing plasterboard sheets, do not forget to install hidden wiring. Mounting boxes for sockets should not protrude above the wall surface by more than 20 mm.
Pros and cons of leveling walls with plaster and drywall
The use of building mixtures does not reduce the living space of the apartment. But this method is quite labor-intensive; during the work, a lot of dirt - debris and dust - remains.
When covering walls with plasterboard, no preliminary cleaning of the surface is required. In addition, heat and sound insulation materials can be placed behind the frame, as well as various communications can be hidden. But walls covered with plasterboard “eat up” part of the usable area of the apartment and can withstand significantly less load compared to a wall covered with building mixture.
When purchasing material, pay attention to the color of the drywall sheets. Its moisture-resistant varieties can be distinguished by their green cardboard covering, while regular sheets will be grey. For cladding the walls of the bathroom, kitchen and other rooms with high humidity, choose gypsum board sheets.
Source: https://www.kvartirobus.ru/remont-kvartiri/remont-sten/29-kak-vyrovnyat-krivuyu-stenu
Puttying
As an independent method of leveling, puttying is used very rarely. Typically, leveling with putty is the final stage of a multi-step process. As in the situation with plaster, the surface is primed before applying the putty.
To work with the putty mixture, use a flat-bottomed ditch and spatulas of various widths.
On a note! The readiness of the mixture for use can be checked using the cone method. Stir the mixture in the cuvette with a stick and remove it. The stirring cone should remain intact when the stick is removed.
When working, cover the cuvette with a wet rag to increase the life of the solution. At the same time, the thickened putty is periodically diluted with a primer or water. The correct putty holds well in a vertical position without falling off the spatula.
Basic rules for puttying
Leveling the surface with putty with your own hands is not difficult, but it is worth considering that this process requires skills, without which the work will proceed very slowly.
Place a small amount of solution on a spatula
Beginners should note that:
- The putty is applied to the surface with small strokes.
- The composition is distributed over the wall surface with confident horizontal and vertical movements.
- The thickness of the putty layer should not exceed 2 mm.
- The spatula is held at an angle to the wall surface. The larger the angle, the smaller the thickness of the putty layer.
On a note! When starting work, you can help hold the spatula blade with your second hand.
After the surface has been treated with putty, it is left to set. The dried layer is “dispersed” with water or a primer using a brush. This allows you to get rid of small irregularities and remove smudges. After drying, the putty is smoothed with sandpaper or a zero mesh.
On a note! If necessary, a second coat can be applied. In this case, before starting work, the surface is primed again to avoid delamination.
Leveling a concrete wall
Leveling a concrete wall for painting is a little different than a brick base. Those who do not know how to level concrete walls for painting can use the step-by-step guide:
- The walls are cleaned of old coating.
- A primer is applied to the surface, which is intended only for concrete.
- After 6 hours, this is exactly the time needed for the primer to dry, you should dilute the starting putty and begin applying it to the walls.
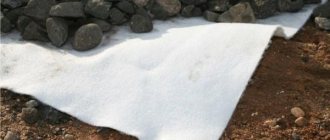
- After the first layer of plaster has been laid, you will immediately need to apply a nylon mesh directly onto it, the cells of which are 2 x 2 cm. Such a mesh will not allow the plaster to crumble over the years and will keep it in a heap.
- A second layer of solution is applied on top of the mesh. In this case, there is no need to wait until the previous layer hardens.
- The movements of the spatula should only be cross-shaped, gradually stretching and leveling the putty. It is better to use wide types of spatulas.
- When the second layer is laid, the wall should be allowed to dry for 24 hours.
- To ensure the most even surface possible, apply finishing plaster in a very thin layer. She will be able to level out and remove even minor holes.
- After another day, the walls are sanded with sandpaper to give them perfect smoothness and evenness. Watch all the intricacies of concrete leveling in this video:
Now the concrete base is ready for painting. To improve the adhesion of materials, primer is used before applying paint, and the surface is left to dry for the time specified in the instructions.
For concrete walls, gypsum-based plasters are used. Such mixtures are inexpensive and show excellent performance characteristics. They are flexible, easy to work with and adhere well to the surface.
Aligning corners
Once you have decided on the surface leveling method, it is worth understanding how to level the corner of a concrete wall. Even if, as a result, you get perfectly smooth wall surfaces, but the corners will collapse - the overall impression of the renovation will be ruined. It is worth noting that this process requires the presence of certain skills and abilities and it will be quite difficult to complete it yourself without experience.
There are various ways to align angles; you should decide on the method before starting work. Usually the same material is used as when processing straight surfaces. Depending on the method, you should prepare materials and tools.
Basic methods:
- alignment of corners with plasterboard;
- drawing out corners with plaster using a plumb line or level;
- the use of a counter-shultz - a perforated corner aluminum profile.
Working with gypsum boards
As in the situation with walls, in practice there are 2 methods of leveling corners using sheets of plasterboard: framed and frameless. Again, we'll cover both, but we highly recommend using a frame device.
The frameless method can be used if the difference in wall unevenness is no more than 7 mm. GKL sheets are glued overlapping, i.e. First, the sheet is glued onto one plane, end-to-end against the wall. Then, a perpendicular sheet is glued close to the sheet at the end. The evenness of the angle is checked with a square. The joining seam is glued with a special reinforcing mesh.
On a note! While arranging internal corners using this method has its advantages, external corners formed using the frameless method are quite fragile and quickly lose their evenness when the room is used.
When constructing a frame, the angle is determined using profiles. At the corner itself, a special perforated corner post is mounted, which simultaneously sets the level of the corner and performs a reinforcing function. Sheets of plasterboard are rolled onto this profile, and the joining seam is also glued with mesh.
Installation can be carried out end to end
When installed in a butt joint, the sheets do not require additional processing
Or the T-shaped method.
When constructing a corner from gypsum plasterboard using a T-shaped connection, it is recommended to cut a chamfer from the sheet
Important! When constructing a corner from gypsum plasterboard using any possible method, the formation of cross seams should not be allowed. Sheets must be mounted offset from the center.
Plaster with plumb line
To level the corners of concrete walls with plaster mortar, it is necessary to install limiting strips. In this case, fastening the beacons with self-tapping screws is not necessary; the profiles are fixed to the solution and leveled.
On a note! If the levels are observed when leveling the walls, then the angle will be ideal without additional alignment.
Plastering corners with a plumb line is recommended when forming internal corners.
The stages of work in this case are as follows:
- We inspect the unevenness of the adjacent walls and make marks in the area of the corner using a building level.
- We prime the corner.
- Preparing the plaster solution.
- According to the established marks, carefully apply a layer of plaster mixture.
- Using a spatula and a trowel, distribute the solution over the surface of the wall, in the area of the corner.
- After drying, repeat similar steps on the adjacent wall.
It is recommended to plaster nearby corners in one step
On a note! Aligning angles using a plumb line or marks is a very labor-intensive process and in the absence of experience, the result is unlikely to be satisfactory.
What is a contraschultz?
The method of leveling corners using a perforated corner - a counter-shoulder - is suitable for beginners in finishing. Such a corner can be installed on gypsum board sheets as a reinforcing element and on plaster corners as a method of leveling.
Kontraschultz - aluminum corner with reinforcing mesh
Working with a profile is quite simple:
- Profile pieces of the required length are cut.
- The adhesive or plaster solution is mixed.
- The prepared mixture is applied to the entire surface of the corner.
- The contra-shultz is attached and pressed down, strictly observing the vertical level.
- Use a spatula to remove excess solution.
- After setting, the corner is puttied and leveled with the wall surface.
Leveling walls with plaster
Plaster has two binders: cement-based and gypsum-based. Gypsum dry faster, but the maximum layer that can be applied is about 50 mm. Cement-based plasters can be applied in a layer of up to 10 cm, but they take longer to dry.
Beacon plaster is a reliable way to level walls
In addition to the thickness of the layer, when choosing the type of plaster mixture, it is necessary to take into account which of the finishes will be used later, as well as the conditions of the rooms in which you are going to level the walls. Gypsum is hygroscopic, so it is not used in damp rooms: the bathroom and kitchen must be plastered with a cement-based composition. Rooms and an entrance hall remain for plaster. That's basically what they do.
In our description we will use plaster plaster - Rotband - a popular brand that has good reviews from both amateurs and professionals.
Surface preparation
Removing everything that doesn’t stick well to the wall: beat it off, pick it out, clean it off with a spatula. If there are cracks, we repair them. Then we evaluate the degree of curvature. If there are very large protrusions that stand out too much, it is advisable to remove them (with a hammer and chisel or a hammer drill).
First we clean off everything that falls off
Often when starting to level the walls in an old house, they decide whether to knock down the old plaster if it does not fall off. In principle, the master should evaluate it, but you can try it yourself. Knock the wall. If there are places that differ in sound - they sound duller - then the layer here has moved away from the main wall. If you “hang” another layer of plaster on it, there is a high probability that the whole thing will collapse together. It will be much worse. So it is better to plaster previously plastered walls down to the base material.
If, during preparation, individual potholes that are too large appear, it is better to repair them separately. Putties have a minimum and maximum layer limit. Too much layer may fall off. Therefore, it is better to pre-fill holes or holes.
If the wall surface is too smooth, notches are made on it
When leveling a concrete wall or a surface painted with a film-forming composition, another problem arises: it is too smooth, which is why adhesion to the plaster may be poor. This can be helped by treating a primer such as “Betonokontakt”, which leaves a rough film on the surface, improving adhesion.
Another way out is to make notches. Once upon a time they were made with an axe, now they often use a hammer drill or grinder. With their help, a notch is applied. According to the norm, there should be about 100 notches per square meter.
Primer
Depending on the type of plaster chosen (gypsum or cement), a primer is selected. Its main task is to improve the adhesion of the wall and plaster. Read the instructions for using the primer carefully. Some require the base to be moistened before application, some require dust removal, etc.
Priming walls before plastering
There are two favorites in this group: Cerezit 117 and Betonokontakt. There are others, but these are used more often: good reviews. The composition may be ready for use or require dilution (concentrate). It can be applied with a roller or brush, a spray bottle, or even a garden sprayer to speed up the process.
Door installation
Another aspect of finishing work, which is very closely related to the evenness of surfaces, is attaching the door frame to the concrete wall. In this article, we will not consider in detail the process of installing doors in concrete walls, but we will note the importance of leveling the frame, which means the need to level the area of the doorway.
It is necessary to level the surfaces of the doorway
To ensure that the door leaf does not sag over time, and also to ensure that the locking mechanisms work correctly, it is very important that the door frame is positioned strictly vertically. And here, it would seem, there is no obvious connection, because you can position the box correctly even in a crooked opening, why is it so important to level the walls?
The fact is that if you install the door correctly, but at the same time block the corners or do not level the wall, you will get the visual chaos of Salvador Dali’s paintings. A straight door, due to irregular angles and surfaces, will appear blocked or mounted crookedly.
In order for the door to serve for a long time, the frame must be level