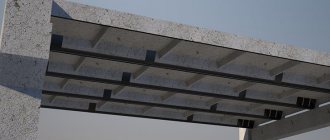
During operation, any durable concrete coating in a garage is subject to mechanical stress. Concrete is a porous material; when the top layer is destroyed, it turns into dust. Regular cleaning does not help, as the next layer begins to deteriorate. Cement dust rises into the air and settles everywhere, which is very unsafe for health and equipment. The question arises - how to cover the concrete floor in the garage to prevent dust?
There are different materials and technologies that can solve this problem. Some of them are added directly during the manufacturing process of the coating, others can be applied to an already used floor.
Having a smooth, durable, dust-free garage floor is the dream of every car owner.
Impregnations (primers, primers)
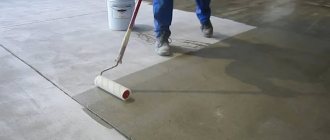
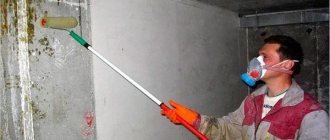
If you don’t know how to cover the concrete floor in the garage so that it doesn’t get dusty, doesn’t get too dirty, and spend a little time doing it, pay attention to concrete impregnations (also called concrete primers). These are multicomponent polymer-based compositions. They come on an organic and inorganic basis. Since these are impregnations, they do not form any film on the surface, and therefore cannot peel off or come off. Their components penetrate into concrete and bind molecules with polymer chains. As a result, the strength of the surface becomes 2-3 times stronger, resistance to aggressive environments (acidic and alkaline), temperature changes increases, it tolerates frost better, and the formation of dust is also eliminated.
In general, there are three types of primers for concrete:
- Polyurethane. Their main purpose is waterproofing; they are also used to make repair mortar: the primer is mixed with sand and cracks and chips are repaired with this mixture.
- Water-dispersed. They do a good job of dust removal and slightly strengthen the concrete surface. Their prices are average.
- Epoxy. For the most part, they are two-component, prepared before application, and their main purpose is waterproofing.
After two layers of concrete impregnation, the floor does not generate dust at all
If, after treating with a primer, you will not paint the floor or fill it with any other finishing coating, then water-dispersion primers are best suited for dust removal of garage floors. For paint or other coatings, primers of the same type are used: for polyurethane paint for concrete of the same composition, preparation is used, etc.
Polyurethane (polymer) impregnation for concrete
This garage coating is good for everyone, except for the price - 1 liter costs about $5. You can find packaging of 3 kg and 20 kg. Impregnation consumption when applying the first layer is 0.25-0.5 kg/m², for the second - 0.15-0.2 kg/m².
When processing, do not dilute, smear generously, at least twice. Polyurethane impregnation for concrete binds particles without forming a film. Such a concrete floor will stop generating dust and will absorb less liquid. The same compounds are used to strengthen crumbling concrete surfaces. If the process has already gone far, they will not help, but if only traces of abrasion are visible, impregnation will help delay the process.
Application of polyurethane impregnation
Polymer impregnations are applied only to dry surfaces. The moisture content of the concrete should be no more than 5% (at least 28 days must pass from the moment of pouring). The composition is poured onto the floor in portions, spreading with a roller or a special mop over the entire surface. Some companies can add color, so you can get a colored garage floor at the same time. This treatment can be used as a preparation for the subsequent application of paint or polymer floor covering.
Application features: temperature should be from 0 °C to 17 °C, air humidity not lower than 70%. If the humidity is lower, it must be moistened artificially - with electric humidifiers or by hanging wet rags in the garage, constantly making sure that they do not dry out. Only under such conditions will polymerization be good.
Epoxy primers
This type of impregnation consists of two components that are mixed immediately before use. You can work with them at temperatures above +5°C, there are no other requirements. The cost is higher than polymer ones - $7 per kg, consumption is almost the same.
Epoxy impregnation for dust removal of garage floors
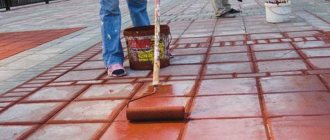
Paints for concrete
Special paints for concrete can be applied over the primer. They last a long time - these are the compounds used to paint floors in service stations, garages, etc. These are far from ordinary paints, but multicomponent polymer-based compositions into which coloring pigments are added. You need to choose depending on the tasks that the floor covering in the garage should perform:
- PVC-based concrete paints are suitable for dust removal.
- Polyurethane paint is suitable for protection against acids, alkalis and other aggressive substances.
- Increased strength and abrasion resistance - two-component epoxy paints.
If we talk specifically about garages, then epoxy compounds are probably more suitable. They create a durable film that adheres very well to the concrete base. This paint does not swell or fly off. Over time, it may wear out a little, and then in places of very heavy load. It can be used in service stations, basements and garages.
Paint for concrete will simultaneously remove dust, give an attractive appearance, and reduce moisture absorption
Epoxy concrete paint is applied to the prepared concrete base. The floor must be dry (at least 30 days must pass from the moment of pouring). If the screed has been poured recently, remove cement laitance from the surface with a hard (steel) brush. If the floor is old, there are chips and cracks, repair them and remove grease stains. After processing, remove debris.
Before applying paint, the floor is washed with PVA diluted with water. The second option is a weak aqueous solution of hydrochloric acid (1:9). After a day, clean the surface with a vacuum cleaner or soft brush. After this, the concrete floor is ready for epoxy paint.
The base and hardener are brought into a warm room a day before. The temperature must be above 18°C. Mix each component separately in its own container. Then the hardener is added to the container with the base according to the norm and the composition is mixed. If necessary, you can use the solvent specified in the instructions. The viability of such paint is short (time before hardening), so you need to work quickly.
Rubber paint
This type of paint has increased waterproofing characteristics, good hiding power, high wear resistance, it is easy to wash, even with the use of detergents, and is resistant to alkalis. Can be used at temperatures from -50 °C to +60 °C. When painted, it creates a coating very similar to rubber, with practically the same properties. There are also disadvantages - the surface is too smooth and can be slippery in winter. The second unpleasant moment is when the car drives into the garage and slips a little; the wheels can tear off pieces of paint. The solution is to place rubber bands under the wheels. the most popular option is from the conveyor. They do not wear out for years, and will coexist perfectly with rubber paint.
Rubber paint can be used as a garage floor covering
Surface preparation consists of removing old peeling coatings, chalk, dust, and greasy stains. If the floor has a glossy finish, sand it until matte. The last step is to wash the floor with a soda solution, then rinse with water and dry.
The paint should be applied in 2-3 layers. Stir before use; dilution is not recommended, but in extreme cases, you can use the solvent specified in the instructions. Stir the paint regularly while working.
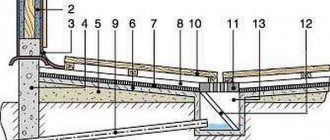
Painting waterproofing, step-by-step instructions
Primer of a concrete floor before applying waterproofing
Let's consider the stages of coating waterproofing with our own hands. So, the concrete floor in the garage is ready for work to begin - swept and vacuumed.
- Apply 2-3 layers of primer using a roller until the surface is completely saturated;
- We apply sealing tape at the junctions of walls and floors and in corners;
- We dilute the mastic in the required ratio; the consistency should ideally resemble pliable plasticine;
- We apply the mastic with a roller, and use a brush to paint the corners;
- We make an overlap: we process the walls 20 cm from the floor;
- Leave it for a day and wait for it to dry completely.
Sometimes, to fully understand the nuances of the process of creating a barrier against water vapor with your own hands, you need audiovisual instructions, which are demonstrated in the video.
Rubber flooring in garage
A rubber floor covering will be comfortable and practical. Its disadvantage is the solid price - from $18 per square meter, if we talk about rubber modular coating.
Today rubber coating is available in three versions:
- modular slabs of different sizes;
- rolled rubber coating;
- crumb rubber with a polymer binder.
Roll and modular coatings differ in the type of installation and release form. Other characteristics are similar. The installation method is practically the same, only in one case the coating is assembled from fragments, most often square in shape, with edges designed in the form of locks of different configurations. The roll covering is rolled out on the floor. Both types are glued with polyurethane glue. Concrete preparation is standard: repairing chips and dents, removing dust and dirt, priming (with polymer impregnation).
Laying a rubber modular floor - dovetail joints
When choosing a modular or roll rubber covering, pay attention to the thickness of the rubber. It can be from 4 mm to 50 mm. A very thick garage floor covering is not suitable for it, but too thin one can be damaged by wheels. The optimal thickness is 10-15 mm. The price is not very expensive, and the characteristics are more than sufficient.
Crumb rubber or also called rubber asphalt is a two-component coating. The crumb itself comes in bags and is black. There are dyes to give it some other color. They are added to the dry crumbs and mixed until they are completely colored. Then the binder is added. This is usually polyurethane glue. The mass is stirred until smooth. But the process must happen quickly - the hardening time is very short. The crumbs with polyurethane are laid out on a prepared base (leveled, primed, covered with a layer of polyurethane glue), leveled and pressed down with a roller.
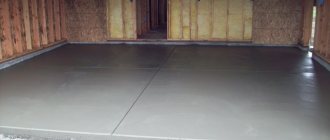
Pros and cons of concrete garage floors
Before you dust off the floor by choosing a suitable solution, you need to understand its operating conditions. You definitely need to study the features of this type of coating.
The benefits of a concrete garage floor include the following:
- Strength, resistance to mechanical wear. Concrete is suitable for rooms with intense loads.
- Durability. If you follow the installation rules, the service life in the room is 20-30 years. The material is abrasion resistant.
- Practicality. The ingredients to create a concrete floor are readily available and inexpensive. And in order to eliminate the defects, it is necessary to fill in a new screed, but the layer thickness is small.
- Safety and hygiene. By using concrete to create a floor, there is no static electricity. In addition, its structure is such that fungus, bacteria and other microorganisms do not get into the screed.
But at the same time, concrete floors also have disadvantages. These include the following:
- The material has a porous structure, so dust forms in the event of mechanical damage.
- The dust itself can affect the respiratory system. When the floor peels, it disperses over all surfaces.
- Gray concrete floors in a garage don't look pretty.
- Cracks, chips and other defects may appear.
- Waterproof, susceptibility to some chemicals that are part of oils, fuels, and various automotive products. If the concrete floor is constantly exposed to their influence, then after a few months it will begin to collapse.
These features must be taken into account when building a garage.
PVC tiles
This type of flooring has appeared recently; it is made from polyvinyl chloride (PVC) with various additives. There are both options for home (PVC laminate) and for technical and industrial premises. If we talk about properties, the floor covering in a garage made of PVC tiles absorbs sounds, makes the floor warmer, is not afraid of the effects of gasoline, solvents, acids, fats, alkalis, is completely waterproof, and durable. The price is comparable to the cost of commercial linoleum.
According to the installation method, there are two types of PVC tiles - a modular covering, which is simply connected with locks and is not attached to the base, and a covering, which is glued with polymer glue. A flat base with differences of no more than 5 mm/m² is required for installation. This is perhaps the only drawback of this material: such a flat floor in a garage is the exception rather than the rule.
PVC tiles are used in commercial garages and service stations, where the load is much higher
What does moisture protection provide in a garage?
Advantages of waterproofing:
- insulation of garage and basements;
- preventing the formation of cracks and other defects in concrete walls;
- good conditions for storing the car, spare parts and components;
- increasing the service life of the entire building.
A set of works that help protect walls and ceilings from the destructive effects of rain and groundwater can be done on your own if you know how to waterproof a garage floor correctly.
There are many methods of waterproofing, let’s get acquainted with the main ones.
Tile garage floor
Quite understandable, but not the best choice. Firstly, debris constantly accumulates in the seams. Secondly, the coating is slippery, unless you take special tiles with an anti-slip surface, but they are expensive. Thirdly, falling heavy objects cause the tiles to crack. Nevertheless, they make a tile floor in a garage, because there are also advantages: easy to clean, well-known installation technology.
If we talk about choosing tiles, then the best option would be technical porcelain tiles. It is not as beautiful as a decorative one, but it is also more affordable in price. Its unpolished surface does not slip and is laid using conventional tile technology. You can only try to make smaller seams so that there are fewer problems with them.
Technical porcelain tiles can be used to cover garage floors
There is a very inexpensive option for finishing the garage floor with tiles - buy a brick and make a “mosaic”. True, such artistic work will require more time, but tiles are sold for almost nothing.
Wooden floor in the garage: features of the coating
There are both pros and cons of wood garage floors as there are pros and cons.
Positive include :
- durability if properly processed;
- ease of updating and replacing failed areas;
- environmentally friendly, thanks to the ability of wood to absorb moisture. In addition, unlike concrete, a wooden floor does not create dust and is easy to clean;
- high thermal insulation qualities;
- ease of installation. The ability to perform work in several stages, which cannot be done, say, when pouring concrete.
At the same time, this coating has significant disadvantages:
- active absorption and long-term retention of odors;
- ability to rot with poor ventilation;
- fire hazard in case of lack of impregnation.
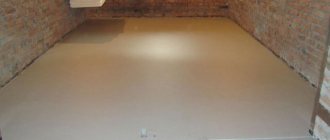
Self-leveling floors
Self-leveling floors have very good technical characteristics and appearance. They are very resistant to external influences, strong and durable. Their disadvantage is a very high price. Especially for polymer and epoxy ones. The third type - concrete self-leveling floors - has a more affordable price. It is usually used to make a durable and dust-free floor covering for the garage.
They got their name because they have a liquid consistency and spread over the base. These compositions are also called self-leveling, since due to their high fluidity they are distributed over the surface. But don’t think that they don’t need to be leveled at all. Having poured the composition in one place, it must be “dispersed” over the surface with a spatula or some similar tool, more or less evenly distributed. Ultimately, the solution will level itself, but different compositions have different degrees of fluidity, but manual distribution will never hurt (usually expensive brands spread better).
This type of garage flooring requires a flat, primed base. The primer is selected on the same basis as self-leveling floors. Since the finishing composition is not cheap, they try to level the base as best as possible in order to reduce the consumption of the self-leveling floor.
Choosing a garage floor covering is not easy - there are many materials that meet the requirements. The only thing that can stop you is a limited budget and the need to have a level base (also requires considerable expenses). From this point of view, the most democratic option is impregnation and paint for concrete.
Tools and materials for work
The work of installing the floor will go faster if you prepare and purchase everything you need in advance so that the process does not drag on due to the lack of any parts. To install garage floor
- crushed stone and sand for a cushion under the screed;
- M400 cement and clean sand for concrete mortar;
- metal mesh or rods with a cross section of 7-8 mm;
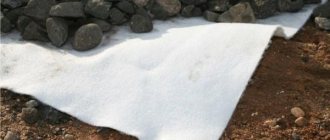
- waterproofing material;
- insulation;
- beam 200 mmX200 mm;
- screwdriver;
- hacksaw;
- screws or nails;
- dowels for attaching joists to concrete;
- building level.
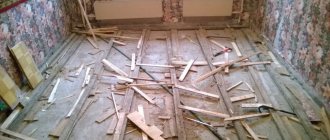
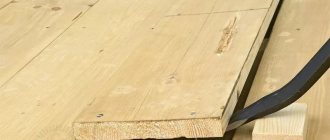
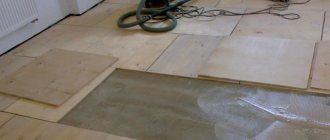
The photo below shows a wooden floor in a garage:
Wood
Before installing the floor itself, it is necessary to make the right choice of material. strongly advise against using walnut and mahogany for these purposes. softwood boards , as they have high strength and resistance to external influences.
The ideal choice for the floor would be oak boards . This is the most durable type of wood and such floors will last you the maximum amount of time.
The floor board should be:
- Well dried, but not overdried. A coating made from damp or too dry boards will deform after some time under the influence of increased loads, and cracks and cracks will appear in it.
- 50 mm thick.
- Without knots and blue.
The boards must be treated on the reverse side with an antiseptic and on both sides with fire-fighting solutions. For installation without gaps, it is better to purchase special tongue and groove boards . The special grooves with which they are equipped will ensure the strength of the coating and also ensure its tightness.