The tiles are laid on a perfectly flat surface. First, depending on the condition of the rough foundation, either a cement screed or a self-leveling floor is made. The first option is more budget-friendly, but a beginner cannot cope with it. But correctly pouring a self-leveling floor under the tiles is a little easier, but experience in handling dry building mixtures and knowledge of technology are also welcome.
Types of self-leveling floors for tiles
To decide which self-leveling floor is suitable for tiles, you need to understand what type it is - polymer (two-component) or mineral.
The first type is prepared on the basis of epoxy resins, polyurethane compounds and other polymers. This floor is practically a ready-made finishing coating, as it has a mirror-like glossy surface and looks beautiful without further finishing. But it is very expensive and does not fit under tiles. Such costs for leveling the surface are not justified.
Mineral self-leveling flooring is a different matter. Ideal for tiling. Unlike traditional cement screed, in addition to sand, it contains various additives, plasticizers, and emulsifiers, which allow the solution to spread evenly and ideally.
Mineral self-leveling floors are divided into the following types:
- Basic, for leveling large differences in height (up to 80 mm);
- Medium (up to 30 mm);
- Finishing, for final finishing.
Leveling the floor with tile adhesive under tiles: step-by-step instructions
The cement-sand screed is in good contact with the tile adhesive.
First of all, the base for laying the tiles must be in good contact with the tile adhesive. Therefore, most often, during its manufacture, a screed is made under the tiles from cement-sand mortar. This coating will ensure reliable adhesion to the adhesive layer.
If necessary, the surface of the screed can be treated with concrete contact. This composition will make the surface rough, which will ensure more reliable contact of the tile adhesive with the rough coating.
It is required to make the roughest possible base. Minor differences in height are acceptable. Large differences can be eliminated using an adhesive layer, but this is not the best solution. Firstly, tile adhesive is more expensive than cement-sand mortar, and secondly, with a large layer of adhesive it is more difficult to lay tiles.
The tiles should only be laid on a flat surface, otherwise the coating will crack over time.
The base for ceramic flooring material should be as stable as possible. When installing tiled floors on concrete floors, this is practically no problem. In situations where there is a desire or need to make a tiled floor in a country house with wooden floors, it is necessary to give paramount importance to the stability of the structure. Also, when making a base on wooden beams, it is necessary to ensure complete waterproofing.
On a poorly prepared surface, the tiles will simply crack.
Depending on the size of the ceramic material, the optimal height of the tile adhesive is selected. This sequence can be traced from the table.
| Tile size, mm | Height of the adhesive layer, mm | Glue consumption per 1m2, kg |
| 25*25 | 4 | 1,6 |
| 50*50 | 4 | 1,6 |
| 100*100 | 4 | 1,6 |
| 100*200 | 6 | 2,2 |
| 150*150 | 6 | 2,2 |
| 250*125 | 8 | 2,7 |
| 250*200 | 8 | 2,7 |
| 300*300 | 10 | 3,4 |
The table shows that for tiles measuring 300 x 300, the recommended thickness of the adhesive layer is only 10 mm. This size should be taken into account when installing the screed. The height difference must be within this value.
The tiles are laid with a small gap between the edges, which is regulated by special crosses that are installed in the corners and prevent the tiles from meeting. After laying the tiles, they are carefully removed and the seams are rubbed.
Initially, all adhesive compositions were not used for finishing surfaces, so the use of tile adhesive is an example of folk ingenuity, and not the characteristics declared by the manufacturer.
In what cases can you level the floor with tile adhesive for tiles:
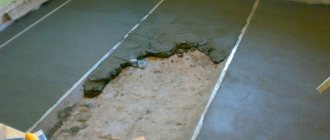
- The screed has cracked and uneven shrinkage has occurred due to technology violations and the use of low-quality or unsuitable compounds.
- The thickness of the fill is not suitable for the use of self-leveling mixtures; the distance to the door opening is less than 2 - 2.5 cm.
- Peeling of the layer occurred in some areas, while the main part meets all the stated requirements.
- After pouring, enough time has passed and the top layer begins to crumble and crumble.
- It is necessary to prepare the floor from the door array before finishing cladding.
- The height of the room does not allow the floor to be filled with conventional mixtures.
It should be noted that leveling the floor with tile adhesive does not solve serious problems, so it is not used so often. If possible, special bulk mixtures are best suited for this, which provide a more durable and reliable coating.
The strength of the coating is ensured by careful preliminary preparation. It is also important to consider the characteristics of the adhesive composition that are suitable for the selected finish.
In the recommendations, the manufacturer must indicate for what coating the mixture is used.
The fundamental differences are in the brand of cement included in the composition. When further laying laminate, linoleum, and other relatively light coatings, so-called lightweight mixtures are used.
If you plan to tile the surface in the future, the composition should be more reliable and durable. The heaviest mixture is used when installing artificial stone, porcelain stoneware and other composite materials.
Don’t play it safe and use glue with maximum strength for lightweight materials. This is not only economically unprofitable, but can also lead to damage during the final hardening of the solution.
Before starting work, you should definitely inspect the starting surface, remove all uneven surfaces, and clear the site of dust and construction debris. For this, a handy tool is used, sometimes preliminary grinding is required.
After cleaning the installation site is completed, guide beacons are installed. The stage of marking the highest level is carried out, you can pull the thread, use a long rule, mark the level of filling the floor along the walls.
Preliminary priming will avoid premature drying of the solution, strengthen it and provide antibacterial impregnation.
READ MORE: Kitchen floor tiles modern materials installation
For this purpose, special solutions are used for deep penetration cement-sand mixtures.
The primer consumption is determined by the standards indicated on the packaging; it is advisable to provide a small reserve, because the porous surface absorbs liquid well.
If necessary, repeat priming, maintaining the specified drying time.
Experts practice two methods of applying tile adhesive to level the floor. The first involves the simultaneous installation of ceramic tiles, while the adhesive layer is adjusted manually.
It is advisable to start work from the highest level, in this way differences can be adjusted to 1 - 1.5 cm.
The second method is recommended for beginners and non-professional tilers.
In this case, first of all, the floor surface is leveled, for which the installed beacons serve as a guide. After this, the tiles are laid.
Leveling the floor screed with tile adhesive under the wooden covering is more than justified. In this case, the consumption of the mixture will be much less, and the relatively light floor covering does not require special precision of work.
Preliminary preparation is carried out, all large cracks and holes are sealed, the prepared surface is carefully primed. After this, the operating algorithm coincides with the one described above, the thickness is adjusted manually
After applying tile adhesive, it is not recommended to use particleboard flooring, as they absorb moisture well and can lead to destruction of the applied layer.
An alternative could be the use of waterproofing materials; all work is carried out after the surface has completely dried and hardened.
Work on leveling the floor with tile adhesive often occurs with the simultaneous laying of ceramic tiles. In this case, a lot of time is saved, and it is also possible to adjust the applied layer locally.
Execution algorithm:
- After preparing the screed, removing construction debris and priming, marking the floor level is carried out.
- The glue is prepared according to the manufacturer's recommendations. It is important to strictly observe the proportions of water. If you add too much liquid, the coating will become brittle. If there is a lack of water in the solution, the glue is more difficult to apply, and its polymerization will not provide the necessary adhesion.
- A portion of the glue is used at a time; the finished solution cannot be stored and quickly loses the necessary properties.
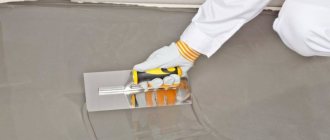
- The mixture can be applied in different ways. It is more convenient to work on a small surface with a construction trowel. The glue can also be poured directly from the bucket, filling all areas and leveling with a notched trowel.
- The tiles are laid according to basic standards, starting from the highest point.
It is necessary to make even seams, and also to monitor the position of the sides of the products. Installation of cut tiles near the entrance and on the side open to view is not allowed. - After laying and leveling the tile layer, the surface should dry well. This will take from a day to three, depending on the air temperature in the room.
After installation, ensure good ventilation in the room. Forced drying and heating of the air can lead to a deterioration in the quality of the finished coating, so natural hardening of the coating is preferable.
Important: until the final polymerization of the glue, you should not walk on the surface or place heavy objects on it. This will lead to inevitable deformation of the layer and will reduce all efforts to nothing.
Carrying out tiling work in rooms with high humidity often requires installing ceramic tiles on the wall. In this case, a completely logical question arises: is it possible to level the surface of the walls, also using tile adhesive.
The opinions of experts on this matter differ radically; basically, there are no special obstacles to this, except for significant financial investments.
When installing wall tiles, differences of up to 1 cm can be automatically eliminated, so such work usually does not cause difficulties.
As for the strong curvature of surfaces, it is recommended to pre-plaster, after which you can begin tiling work.
The adhesive layer is also applied according to the established marks. For large surfaces and cladding areas, this will entail serious financial expenses, so this method is used only when other options are impossible.
Tile adhesive for leveling the floor is used quite often, because it forms a solid base for further finishing.
The algorithm of work can be carried out even by non-professionals; the main thing is to have at least minimal skills in working with the tool and arm yourself with the necessary knowledge about the characteristics of the materials used.
Is it possible to level the floor or walls exclusively with tile adhesive, as well as the possible nuances of such work are discussed in the information provided.
Tool
Once you have decided which self-leveling floor is ideal for the tiles, you need to assemble the tool. To work on leveling the surface you will need:
- Paint shoes so that you can walk without fear and level the poured mixture;
- A needle roller equipped with a fairly long handle;
- Plastic bucket or container capable of holding 25 liters;
- Construction mixer or drill with a special attachment;
- Vacuum cleaner;
- Primer to protect, strengthen the surface, increase adhesion;
- Paint roller or brush;
- Notched trowel;
- Dry construction mixture.
When the tool has been assembled and all the necessary material has been purchased, it is necessary to begin dismantling the old coating. That is, thoroughly prepare the surface for pouring.
Preparing the base
To install screeds under tiles, as with other types of screeds, you need to start by preparing the floor surface. The base under the screed must be cleared of debris and dust; for this, large dirt can be removed with your hands or a broom, and dust can be removed using a vacuum cleaner. For greater efficiency, the base must be wiped with a wet rag, but work on the screed cannot begin until the floor is completely dry.
Only after cleaning the base can you begin the following work. The surface must be checked using a hydraulic level, it will help determine whether there are unevennesses on the ground. After you check the base for unevenness, you should choose the type of screed that best suits the tiles. If your base is fairly level, then you can use a simple self-leveling mixture to install the screed, but if significant differences in height are noticeable on the base, then it’s worth creating a cement-sand screed.
Step-by-step floor filling
It is important, first of all, to first read the manufacturer’s instructions, which indicate both the consumption of the mixture and the proportions that must be observed when preparing the solution. Also, the room should be free of drafts, and the air temperature should not exceed the recommended one (5 - 25°C).
The entire work process is divided into 3 stages:
- Preparation of the rough base: dismantling the old coating, removing debris, sanding potholes, sealing cracks, priming and waterproofing (for example, coating).
- Preparing the mixture for pouring. For convenience, prepare the solution in 25 liter portions.
- Filling, distribution of the solution over the surface.
It is important to organize a continuous process of kneading and pouring, that is, you need to work together. One prepares the solution, the other puts on paint shoes, pours the mixture and levels it with a needle roller.
If a quick-hardening self-leveling floor is used, then everything must be done quickly so that the new portions adhere well to the old ones and there are no bubbles, unevenness or visible joints.
From practice we can say that the consumption of the mixture with a layer thickness of 6-7 mm will be 9 kg/sq.m.
It is important to pre-calculate how much material you will need so that you don’t have to buy anything urgently later.
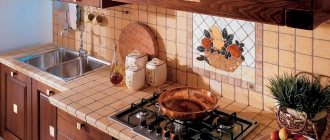
Ultimately, the finished self-leveling floor for tiles should look like this:
Screed device in the bathroom
The bathroom is one of the most inconvenient places when finishing finishing work in an apartment. There is little space in it and there are engineering communications that only complicate the work.
Screeding in the bathroom will require time and money; to do this work correctly, you need to familiarize yourself with the basic procedure.
Preparatory work
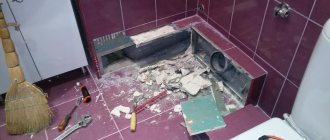
Before you screed the floor in the bathroom, you need to do a large amount of preparatory work. It is required to completely free the space from all unnecessary things. Then it is necessary to carry out dismantling work and remove the existing floor covering. If, after removing the top layer, an old cracked screed is found in the bathroom, it must be removed.
Related article: The best way to sheathe a balcony
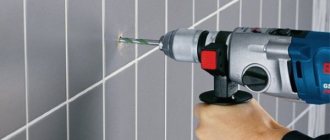
Often during dismantling work it is necessary to use mechanical equipment, hammer drills, etc. Where pipes pass through the ceiling, old material must be removed very carefully so as not to damage the water supply and drainage systems.
After removing the old coating, it is advisable to inspect the utilities. If possible, it is better to repair them so as not to return to this issue later. After solving all the preparatory tasks, you can do the screed in the bathroom.
Installation of cement-sand screed
This work can be done independently without the involvement of specialized organizations or private craftsmen, since almost anyone with at least a little knowledge of construction work can fill the bathroom floor. For details on the construction of this rough coating, see this video:
After removing the old covering, the floor must be thoroughly swept. Places where there are deep holes and cracks must be leveled with cement-sand mortar. Thus, the first preliminary leveling of the most problematic areas is carried out. Next, a layer of roll waterproofing is laid, since bathrooms are narrow in most cases, you can choose the width of the roll so that it does not require additional joining.
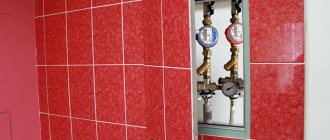
The level of the screed must be lower than the floor level in the adjacent room
The floor screed in the bathroom under the tiles should be lower than the level of the existing floor in the corridor exactly to the height of the tiles themselves and the adhesive layer. To make it level, you need to install special beacons, which serve as guides when pouring the solution.
Beacons can be installed on plaster, glue or another base, the main thing is to maintain one horizontal plane. After the guides are secured, the sand-cement mortar is laid.
Screeding in the bathroom with your own hands can be done in a fairly short time. To quickly complete the work, it is necessary to have all materials and tools available at the workplace.
And of course, you can’t do without someone’s help when dismantling an old bathtub, especially if it’s cast iron.
Related article: Antennas for a TV in the country
Drying time
The self-leveling floor under the tiles usually begins to set and harden after 15 minutes. after filling. Final hardness occurs after 8 hours. Usually the manufacturer indicates in the instructions how long you need to wait before starting to lay the tiles.
On average you need to wait 1-3 days. But it all depends on what components are in the solution, what type of mixture, and the thickness of the applied layer. If the self-leveling floor is quick-hardening, then you can start installing the finishing coating much earlier.
The question of whether a self-leveling floor is needed under tiles is still relevant. Some make do with a concrete screed, others with a substrate. Be that as it may, you need to understand that self-leveling flooring under tiles will significantly speed up the tiling work and make it much easier. And when everything is done correctly, the result will please you for many years.
Preparing a wooden floor for tiling
You can lay tiles on a wooden floor. Laying tiles on a wooden floor requires more than just preparation.
Option 1: Installing a screed on a wooden floor
- The wooden floor must be soaked with an antiseptic and dried;
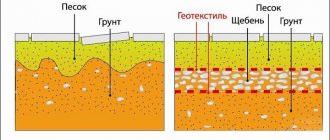
- Lay two or three layers of roofing material on a wooden base for waterproofing.
- Raise and stretch the reinforcing mesh with 100 mm cells 1 cm above the waterproofing;
- Next, a cement-sand semi-dry screed is made with the addition of fiber fiber to the solution.
Note: Tiles cannot be laid directly on rolled floor coverings: linoleum, carpet, carpet. They must first be removed and the remaining glue must be thoroughly cleaned. Although, on a durable and level floor covered with linoleum, you can lay cement-fiber slabs and safely lay tiles.
Option 2: Laying moisture-resistant gypsum fiber sheets (GVLV) on a wooden floor
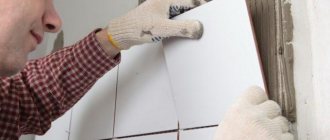
The tiles fit perfectly onto GVLV sheets.
- The wooden floor must be soaked with an antiseptic and dried;
- GVLV sheets need to be laid on top of the wooden floor. The sheets are spread out, like brickwork, and attached to the wooden floor with screws, every 40-50 cm;
- Before laying the tiles, the surface of the sheets is primed.
Preparatory work for installing tiles
As always, before starting work it would be a good idea to refer to the basic standard SNiP 3.04.01-87/SP 71.13330.2011 “Insulating and finishing coatings”. The surface of the concrete floor must meet the basic requirements of this document and be:
- Clean - traces of oil, old paints, bitumen mastics, soot, soot and anything that interferes with adhesion are not welcome.
- Dry – concrete moisture content should not exceed 4%. Highly absorbent surfaces are treated with a deep penetration primer, and wet surfaces are treated with special primers for substrates with a high level of residual moisture.
Cleaning the base.
- Dust-free – fine dust and sand reduce the level of adhesion of the base to the tile adhesive. Therefore, the surface must be thoroughly cleaned with a construction vacuum cleaner or at least swept.
- Durable - at least 150 MPa, which provides good load-bearing capacity, as well as almost zero deformability.
- Flat - the permissible difference is up to 2 mm for every meter of surface. Before laying tiles, it is recommended to trim off bumps, ridges and other protrusions. And fill the holes, cavities, cracks with cement-sand or any other repair mixture from a series of quick-drying ones (compositions based on gypsum, cement or gypsum-cement).
Modern adhesives are mixtures of cement, mineral fillers and modifying additives. Therefore, it is allowed to level the floor with tile adhesive if there are uneven surfaces of up to 5 mm.
It would be useful to remind you that before starting all work you need to read the instructions for using dry building mixtures for tiles and porcelain stoneware. This will help avoid many mistakes during the installation process.
We also note that this article discusses preparing the floor for laying tiles in the kitchen, bathroom, hallway or any other room. When installing a shower in a bathroom, the technology becomes more complicated due to:
- the need to maintain slopes of 2-4%;
Arrangement of the floor in the shower room. - installation of plumbing equipment to ensure water drainage.