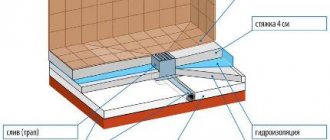
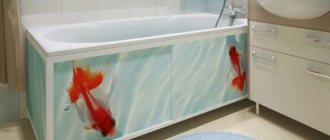
In most cases, utility networks are installed in bathrooms. They need to be serviced periodically and readings from various meters are taken. In addition, access to water shut-off valves is necessary when performing repair work or connecting new plumbing equipment. Such hatches are located on the wall of the room, but there is another place for installing inspection hatches - under the bathtub on a decorative screen. These hatches are designed for repairing and cleaning the bathtub siphon; the method of placement differs from those installed on the wall.
Bathroom hatch
Inspection hatch
Material for secret hatch
At the first stage, we will decide on the material from which the secret hatch under the tiles will be made with our own hands. Depending on how the wall or floor is finished, these could be:
- Plywood. We use it if you insulated the walls or floor of a room using mineral wool, cellulose fiber, polystyrene foam or polyurethane, and used plywood sheets as a covering layer, followed by the application of a decorative layer.
- OSB. We use this material if pressed chipboards are used to cover the walls and floors of the room.
- Drywall. The simplest and most effective way to level the surfaces of walls, build decorative partitions or walls when remodeling the space of an apartment, and arrange niches for laying communications is plasterboard. If this is your case, this is the material that will become the basis of a hidden hatch under the tiles, made by yourself.
- Metal. The hatch under the floor tiles must be made of strong, impact-resistant material that can withstand heavy loads. An iron door will have all these properties.
Let us fully explain the question that arises - what difference does it make, with the exception of the floor, what material the homemade inspection hatch will be made of? The difference is in the adhesive composition with which you will stick the tiles to the door. For drywall, for example, traditional tile adhesive is used. But ceramics are installed on an OSB board using a polyurethane-based mixture.
Sliding design
In order to open the niche, you need to push the door forward and then move it to the side, parallel to the wall. In such models, three-link hinges are used; the design itself is quite complex, which affects the price of the bathtub hatch.
To fix the door, a wedge or push-action roller mechanism is used. They are used in cases where limited space does not allow opening the doors in the traditional way.
Soap in the bathroom: features of placement of soap dishes and dispensers. Tips for choosing a storage location for solid and liquid soap
Bathroom restoration with acrylic - description of surface restoration. Professional advice, pros and cons of applying acrylic to the bathroom (110 photos and videos)
Bathroom towels - tips on choosing, storing and placing towels. 135 photos of the best ideas for a modern bathroom
Fastening the inspection hatch with long screws
Installation of an invisible hatch under the tile in an inconspicuous place (behind the toilet, under the bathtub, in a hard-to-see corner), on drywall, can be done using long screws. Let's do it as follows.
- At the stage of assembling the frame from metal profiles for plasterboard, we install additional jumpers in the place of the planned inspection hatch, on which it will subsequently rest. When screwing the gypsum panels onto the frame, we leave an opening in a certain place so that the profiles for installing the door remain open and accessible for fastening.
- We cut out a door from drywall that will be 2-3 millimeters smaller than the left opening on each side, that is, the thickness of the tile seam. Looking ahead, we note that the size of the hidden hatch should be such that a whole tile or several tiles can be glued onto it, without trimming, in order to organically blend into the overall order of the rows. The easiest way to achieve this result is to first mark out a diagram for laying decorative tiles on the wall.
- We try on the cut out fragment to the opening. If everything is in order with the dimensions, we prepare the tiles. We try it on the door and make a drawing on the surface, according to which holes for mounting screws will be drilled - they should fit into the metal profiles of the frame. If the viewing window is small, and its location requires cutting the tiles, cut it exactly to the size of the door using a tile cutter or grinder. Mark the mounting holes.
- Using a drill, carefully drill holes. They must be done in 2 stages: first we drill a hole through for the body of the screw, and then we drill it out a little to a larger diameter - to hide the screw head. Soak the ceramics for 7-10 minutes in water. Then we apply the adhesive mixture to it, spreading it with a comb and gluing it to the base. Carefully remove any remaining glue from the ends - they should be clean.
- After the glue has dried, we apply the finished structure to the prepared opening, cleared of any remaining mortar, and attach the screws. First, carefully roll them through the plasterboard base, and then screw them into the profile. After making sure that the hatch is in its place, we tighten the fasteners.
Work is done. All that remains is to sand the seams - but more on that a little later, since this procedure is the same for all types of installation of inspection hatches under tiles. A similar procedure for making a door from plywood or OSB board, depending on what became the basis for the decorative layer.
Fastening the inspection hatch using dowels
If a niche for laying communications is cut directly into the wall, and the inspection hatch under the tiles will be mounted directly on the plastered wall, we will do the following.
- From the material at hand: plywood, OSB board or moisture-resistant plasterboard, we cut out a door that will cover the niche so that holes for fasteners can be drilled in the corners.
- We deepen the door into the wall so that during installation the decorative fragments glued to it are flush with the rest of the decorative layer.
- As in the previous method, we mark the tiles and drill holes in order to hide the heads of the screws.
- Place the tile on the door and let it dry. After this, we drill the mounting holes right through the base.
- We place the structure on the installation site, level it and mark the places for fastening on the wall.
- Using a Pobedit drill, we drill holes with a diameter that corresponds to the size of the dowel. We take a plastic dowel without a cap (which fits flush into the hole) and hammer it into place.
- We fasten the hatch into place through the mounting holes.
It is best to install the hatch under the tiles on the floor using this method, since only in this case the device is securely fixed and will not become loose or move if people walk on it.
Making facade tiles with your own hands
What needs to be accessed
To make repair work easier, the pipeline supplying water to an apartment or house is divided into sections convenient for maintenance. Each individual section, if necessary, is cut off by a valve or ball valve installed on the pipe. If such a possibility exists, most of the shut-off valves are installed in one place.
Manifold wiring is a convenient way to divide the system into separate circuits. Advantage - autonomous use of individual lines when neighboring lines fail; disadvantage - more expensive installation
When all the important shut-off, regulating and water supply devices are disguised behind a false wall, but concentrated in one place, it is much easier to build a hatch to access them. The door will be larger in size, but this will not damage either the appearance of the partition or the functionality of the hatch.
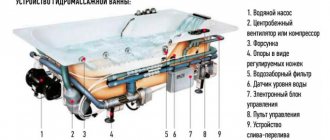
Modern apartments are equipped with so-called blocks or input nodes. In addition to ball valves, the standard unit includes a water purification filter, a pair of metering devices, and a pressure reducer.
The filter is often installed on a bypass to be able to be flushed with a reverse flow of water. All devices are equipped with ball valves for quick removal for repair or replacement.
The entrance unit with filters and other devices is hidden behind a partition, which protects the equipment and helps to maintain the bathroom interior in the same style
There is a sewer riser in the combined bathroom or toilet. The pipes of the centralized cold water and hot water supply systems are located parallel to it.
If a corner with vertically placed highways is covered with a decorative and protective box, then a hatch is also installed on it - opposite the shut-off valves. As you can see, there are several options for placing an inspection hatch in the bathroom, as well as in the toilet.
Installation with magnets
Making a magnetic hatch under a tile with your own hands is quite simple. The only way this method of fixation differs from previous methods is that instead of drilling holes for self-tapping screws, magnets are glued to the door, as you already guessed.
Learn more about how to drill tiles correctly.
A hatch is cut to the size of the niche, lined with tiles and installed in place. Along the edges of the opening, matching parts of magnets, or simply metal plates, are glued, which, when closed, fit tightly with the door magnets.
This method does not ensure complete immobility and the device can move downward under its weight. One little trick will help you avoid such problems. During installation, on the lower edge of the opening (this is the upper end of the tile located under the inspection window), it is enough to attach a fragment of a cross for seams using an adhesive mixture, with the help of which the size of the gap is adjusted. The door will rest on it and will not disturb the general order of the rows of cladding.
You can open such a hatch using a suction cup or a decorative handle attached to the surface (this option can be considered if the surface is rough and the suction cup does not stick to it). In the same way, you can install a floor hatch under the tiles, but only on the condition that it will not be walked on.
Dimensions
Plumbing hatches come in square or rectangular shapes. The dimensions are usually standard and do not depend on the design features and materials used.
Typical sizes look like this:
- 100x100 mm.
- 150x150 mm.
- 150x200 mm.
- 200x200 mm.
- 200x250 mm.
- 200x300 mm.
- 250x300 mm.
- 250x400 mm.
- 300x300 mm.
- 300x400 mm.
- 400x500 mm.
- 400x600 mm.
The planting depth for all products is 35 millimeters.
Considering that the given dimensions may not meet the necessary requirements, some companies manufacture plumbing hatches to individual sizes. For example, for the installation of a large communication center, where repair and maintenance work is carried out by two specialists. Production times vary from 3 to 6 days, the cost of such products differs significantly from standard models.
USEFUL INFORMATION: What to choose for the floor in your apartment: linoleum, carpet, cork or laminate?
Grouting joints
The seams are rubbed with gypsum grout.
With the exception of those located around the perimeter of the door. They are sealed with silicone sealant, the color of which is matched to the color of the grout. The seam is filled with silicone, and after complete drying it is cut with a knife at an angle of 45 degrees. As you may have already noticed, there is nothing difficult about making and installing an inspection hatch yourself. You need a little experience, useful tips and information (you can always find them on our website), and most importantly, desire. And then everything will work out for you.