Artyom Lodvig
CEO .
Renovating a bathroom costs more than finishing other areas of the apartment. There is a lot of complex and dirty work here: laying pipes, laying tiles, installing equipment. And the consequences of mistakes can be severe - from flying tiles to flooding the neighbors below. Such troubles can be avoided if you follow the recommendations of specialists.
Take care of waterproofing
Waterproofing is an essential stage of bathroom renovation. If you skip it, if there is a leak, water will penetrate through the cracks in the tile joints. The result is mold, mildew, or a bill for ceiling repairs for the neighbors downstairs.
To protect the rooms below from flooding, roll, coating and impregnating materials are used. In bathrooms, coating waterproofing is most often done or combined with roll waterproofing. The floor and walls need treatment. There is no need to protect the ceiling: waterproofing in the apartment from above should prevent leaks.
Ventilation
First of all, inspect the box that was removed in preparation for the repair. Often, after cleaning and repainting, they are suitable for further use. Just install it back. It will be better if you additionally install a flapper valve in it to avoid cold air flows in winter. It is recommended to install a fan for the ventilation system; this will ensure better air circulation in the apartment and prevent fungus from appearing on the walls.
Don't skimp on pipes
Pipes made of cross-linked polyethylene bend, so they are easy to install, and the system turns out to be reliable / Photo: Mitrofanov.vd / Wikimedia Commons They
usually try to save money on pipes in three ways: buy cheaper, order a simpler circuit and ignore unnecessary parts. But sometimes such frugality can have not very pleasant consequences.
- Polypropylene water supply pipes are cheaper. But they do not bend, so they have to be cut and connected with fittings. As a result, connections become weak in places and leaks occur. I recommend cross-linked polyethylene pipes: they are more expensive, but the material itself is more reliable. It is also easier to work with such elements because they are flexible and do not require additional connections, which eliminates installation errors.
- Pipes are combined in a series or parallel (collector) way. The first option is cheap, but inconvenient: if the faucet in the bathroom breaks, the water will have to be turned off in the kitchen. With manifold wiring, each device functions separately, so if something fails, the rest of the plumbing can be used.
- A coarse filter must be installed on water supply pipes, which traps large impurities such as grains of sand. A fine filter is sometimes added to it - it copes with smaller particles. Thanks to it, sanitaryware, faucets, fittings and pipes last longer, and softer and cleaner water flows from the tap.
- Sometimes there are different pressures in the hot and cold water supply pipes, which is why the heated stream flows back through the cold pipes: this results in an overconsumption of hot water according to the meter. To prevent this, you can install a check valve: it prevents the hot flow from entering the cold water supply pipes.
Saving on pipes leads to leaks, unnecessary expenses or inconvenience in everyday life. It is better to reduce expenses on tiles or expensive accessories than on communications.
Leave pipes accessible
Even if you use high-quality pipes and check them in advance, you will not be able to completely get rid of the risk of leakage: there may be a problem with public utilities or a leaking connection. To avoid having to dismantle the surrounding area and redo repairs in the event of an accident, pipes should not be tightly sewn into the wall.
Access is provided through plumbing hatches. In order not to sacrifice aesthetics, they can be covered with invisible doors or roller shutters, or disguised as a cabinet by installing a furniture door. All this is made to order according to the size of the opening.
Let's also mention electrical appliances:
In the bathroom it is permissible to install such stationary electrical appliances as an exhaust fan; the cord must be three-core, have a protective conductor and a Euro plug with a sealed entry into the housing, and a ceiling lamp that requires a waterproof design. The washing machine is a topic for a separate discussion, since it is not a stationary appliance.
Install a leakage protection system
This is an optional but useful device that costs from 8,000 rubles and will prevent a flood if a leak appears. The protection system consists of three components: a control module, automatic valves and sensors. Automatic taps are installed in the water supply channel, and sensors are installed on the floor, in places where water is most likely to accumulate in the event of a leak.
When liquid hits the sensor, it transmits a signal to the control module. The module sends a command to the automatic tap, and it turns off the water. This way the system will prevent home flooding.
Choose non-slip floor tiles
Rough matte tiles are well suited for the bathroom floor / Photo: midascode/Pixabay
Glossy tiles on the bathroom floor threaten the health of the residents: such a surface is slippery in itself, and if it is also wet... sooner or later this can lead to injuries. Therefore, it is better to choose rough tiles or porcelain stoneware. And if you do use gloss, treat the material with a special anti-slip compound - these are sold in hardware stores.
Wall covering
Tiles are usually used for wall cladding. Porcelain tiles have similar properties, but are more expensive; the advantages that were mentioned when choosing tiles for the floor do not matter for walls. Covering bathroom walls with plastic panels is becoming common; it is quite cheap and meets hygiene rules, but in this article we will not consider how to work with such material.
When laying tiles on walls, the joints must be cut. To do this, crosses are used, inserted between the tiles using glue and immediately removed as described above. The adhesive is applied using longitudinal strokes of a spatula, with an average tile size of 30 by 30 centimeters - 0.25-0.35 square meters each. The presence of voids under the tiles is unacceptable, so apply glue so that the rustications are parallel to each other and not too deep. Each tile you lay should be tapped next to it with a rubber hammer from the previous tile to the free edge. On those tiles that will go to the outlets of the wiring pipes, you need to pre-drill holes with a diamond core bit. Once the glue has set, seal the corners with silicone. The method is simple - a thin polyethylene film is applied to the silicone, then a piece of electrical cable is applied.
Apply pressure and then remove any silicone streaks with vinegar. A smooth concave surface should form. If desired, the corner seam can be covered with a decorative overlay using the same silicone. On a plane, seams are cut using a special compound, which is cheaper than silicone. The cross is removed, the remaining seam is filled and pressed down with a cable - the film is not necessary in this procedure - the drips are removed. Do not cut the seams with your finger - there will be irregularities inside the seam that are invisible to the eye, in which dirt tends to accumulate. The technology for laying wall and floor tiles does not differ in itself; a small feature for the floor will be discussed in the next section.
Please note that if you use a mixer with decorative caps, then you should buy a crown with a larger diameter than the pipes. Otherwise, you will have to measure the places for the holes, which requires jewelry work.
Choose grout for tiles
There are two types of grout available at retail outlets: cement and epoxy. The cement version is used for ceramic tiles and porcelain stoneware. This grout is easy to apply, but over time it cracks and begins to leak water. Usually it lasts for 10 years, but it can become unusable earlier: it depends on the shrinkage of the house, the temperature and humidity in the room.
Epoxy grout is used in conjunction with glass mosaic. Application is more difficult, but this material does not allow water to pass through and remains in its original form much longer than the cement version. However, you should not use epoxy grout for ordinary ceramics: the composition will clog into pores and irregularities and will not wash off from the surface. And cement grout will ruin the look of the glass mosaic - the finish will fade.
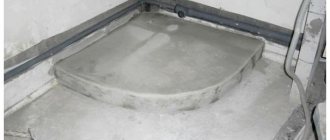
Use mosaic tiles for your shower tray
Shower with mosaic floor / Photo: Random Sky / Unsplash
Homemade shower trays are usually lined with tiles or mosaics. I recommend the second option. The pallet is assembled at a slope towards the drain; because of this, the tiles for facing are cut at an angle and the result, even with careful execution, is not very aesthetically pleasing. And there is no need to cut the mosaic - it is small, so it can easily be laid on surfaces of complex shapes.
Another bonus of this material is epoxy grout, which provides additional waterproofing of the pallet.
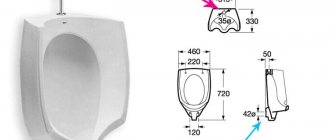
Plumbing
It has no fundamental features. Often with new products you can even find instructions on the sequence of actions for its installation. Your actions include installing a bathtub (you won’t be able to do it yourself without an assistant) or a shower stall, as well as a sink. Then come the faucets, then the water meter. If you wish, you can connect a water heater to your bathroom.
Install the bath correctly
The upper edges of the bathtub should be positioned strictly horizontally / Photo: jarmoluk/Pixabay
The bathtub is installed so that its upper edges are positioned strictly horizontally: this line is oriented towards when laying tiles on the walls. There is no need to tilt the bowl towards the drain, because its bottom is already cast at an angle.
The place where the bathtub comes into contact with the wall is sealed with sealant. An important point: before starting work, you should fill the bathtub with water. Then drain when the material has hardened. This way the sealant layer becomes elastic and does not move away from the edge of the bathtub when it sags under the weight of water.
Select protected outlets
Conventional bathroom options are not suitable: if water gets on them, a short circuit may occur. Therefore, it is necessary to install waterproof sockets with covers. However, remember that even they should not be placed close to faucets or the floor, otherwise, in the event of a leak, the electrical points may flood.
In conclusion, here is a short checklist with the most important rules for renovating a bathroom:
- Plan for future additions and possible accidents.
- Do not skimp on communications - pipes and electricity.
- Take care of protection against leaks and their consequences.
- Do not skip important stages of finishing work.
- Choose materials wisely based on the situation and your needs.
- Don't forget about safety and comfort.
Sequence of work
In order to carry out a quality bathroom renovation, you need to carefully study the details of each stage. Now we will briefly describe the sequence of these stages, note the key points and talk about the finishing options that are most popular.
In what order are repairs carried out?
- A detailed project plan is drawn up. The design of the bathroom is being developed, both the main points and minor details are thought through. In accordance with the drawn up project, the repair budget is planned - specific materials are selected in the required quantity.
- Materials are purchased. This is one of the most important stages - here you need to carefully compare offers from different manufacturers and prices, study reviews of materials, and understand what the difference between them is.
- The repair itself begins with the floor . The old covering is removed, a new screed is poured, waterproofing is applied, on top of which a new porcelain stoneware floor is laid.
- After installing the floor, it is recommended to do electrical wiring - in order to replace it, you need access to the rough walls. After installing the wiring, you can proceed directly to wall cladding. Also, if the water supply and sewerage pipes are planned to be hidden, at this stage they need to be “walled up” in the walls.
- Then they move on to the ceiling and ventilation. Since the bathroom is a room with high humidity, it is fundamentally important not only to install a new ventilation grille, but also to make sure that the ventilation hole has sufficient draft.
- The penultimate stage is the installation of water and sewer pipes - if they pass over the walls.
- And finally, the very last step is to install fresh fixtures and other equipment in the updated bathroom.
See also: DIY shower cabin
Let's look at each point in a little more detail.