The opinions of experts regarding the use of gypsum board sheets in rooms with high humidity are contradictory. Some argue that the use of this material is undesirable, while others, on the contrary, completely trust their characteristics and give some advice during installation in order to protect them as much as possible from the harmful effects of moisture. Drywall in the bathroom is used by many finishers; it is mainly used to level walls, which are later suitable for finishing with tiles, painting and other finishing coatings. Can it be used? We will study all the arguments and make a detailed analysis of the use of plasterboard in bathrooms.
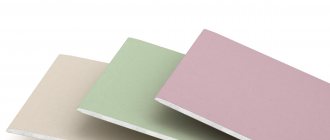
Moisture resistant sheets
Craftsmen citing the undesirability of using gypsum boards explain that at the joints with floors, ceilings and joints in corners, cut parts where the material remains open to water will begin to swell over time or lose its waterproof qualities, and perhaps their conclusions are not unfounded, having a certain work experience.
Many finishers working with this material claim that the correct installation approach protects against all risks, and it is quite acceptable to use it in bathrooms, showers, and any other rooms where there is contact with water.
Can I use drywall in the bathroom?
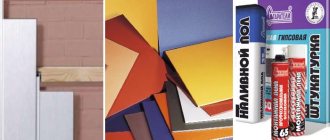
Drywall is produced in various types. It is distinctive in size, thickness, and accessories. There are 3 common and frequently used types:
- Regular plasterboard is gray. The sheet size reaches a maximum of 4.8 m, its width is 1.2 m, and its thickness is from 8 to 24 mm. We can use it as dry plaster for leveling walls, ceilings, creating niches and other objects.
- Green moisture-resistant gypsum plasterboard. Drywall sheets are treated with moisture-resistant agents. They are used to create niches, level walls, ceilings, and produce boxes for pipes in wet rooms. These are bathrooms, toilet, balcony, attic.
- Fire-resistant gypsum board - drywall that does not burn. Used for finishing fireplaces and walls near stoves. It is also used in areas with a high fire hazard.
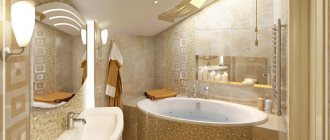
In the bathroom you need to use gypsum plasterboard. Proper installation will allow you to maintain a neat appearance for 15-20 years. Tiles are laid on the drywall and covered with paint. You can hang shelves and drawers for bath accessories on the wall made of gypsum plasterboard.
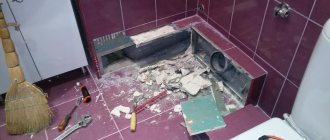
Niches and boxes
The bathroom is perhaps the most saturated with all kinds of communications. For laying pipes, special boxes are often installed, which make it possible to hide the serpentine weaves of metal or plastic from view, and at the same time make the cleaning process easier. At the same time, you need to ensure that access to important nodes is easily accessible. Bringing in a water supply for the sake of aesthetics is a big risk of losing money if something ever leaks.
Related article: Features of use and technical characteristics of hardboard
Boxes, niches and other structures in bathrooms are allowed only using moisture-resistant materials.
Which drywall to choose
To level the wall in the bathroom, 2 options of drywall are used:
- GKLV - green. Sheet thickness 12.5 mm. Height and width depend on the manufacturer. This type is used for leveling walls, hiding pipes, and creating a suspended ceiling.
- Fire and moisture resistant GKLVO. This type is produced by Knauf. It has the property of both resisting moisture and not burning. It is also used for leveling walls and ceilings. In those places where there is a danger of fire in the wiring (old) or in a private house the wall is rough, then this type is applicable.
You cannot use gray plasterboard in the bathroom. Soon it will swell and become deformed. The finishing will become unusable. There is a high probability of fungus appearing.
Under tiles
Moisture-resistant gypsum plasterboard sheets are chosen for tiles on the bathroom floor. It is denser and more durable. Sheets with a thickness of 12.5mm are suitable for walls. There are nuances here:
- GKLV cannot be glued in the bathroom. They are mounted on a metal frame. The frame base is made with transverse horizontal profiles. This serves as a reinforcement for the base, capable of supporting the weight of the tiles and the adhesive.
- The joints must be reinforced. To do this, use reinforcing tape and putty for joints. The putty should be moisture resistant. Let’s say Knauf “Uniflot” is universal, “Fugen” is moisture resistant.
- All metal elements - profiles, fasteners, connectors must be galvanized or coated with an anti-corrosion compound.
- Before creating the frame, the rough base is treated with a hydrobarrier.
If these rules are not followed, moisture will get onto the subfloor and fungus will begin to multiply. The finishing coating will become unusable.
For painting
Green plasterboard is chosen for painting in the bathroom. Installation is carried out on a frame base. The sequence of work will allow you to make high-quality repairs with a shelf life of up to 15 years.
It is necessary to follow several rules that will ensure the duration of the repair:
- Drywall and its components must be from the same company.
- Before creating the frame, be sure to cover the rough surface with a water barrier.
- All joints are reinforced. All fastening points are covered with moisture-resistant putty for joints.
Before painting, coat the surface with a primer for wet areas. This will protect against moisture and give a beautiful appearance to further finishing.
For alignment to the frame
To level the walls with moisture-resistant plasterboard, you need to create a frame base.
But before that, work on the rough foundation. The entire surface is dried. After this, they are covered with waterproofing material and allowed to dry. The frame base is created from galvanized profiles. It is also necessary to install transverse strips, which will give strength and rigidity to the entire structure.
Fasteners must be treated with an anti-corrosion agent. Mostly they are sold in black.
Drywall is fixed with a chamfer and gaps of 2-3 mm. The joints are covered with reinforcing tape and moisture-resistant putty. The fastening points are also covered.
You cannot fix plasterboard sheets with glue in the bathroom. This will shorten the service life.
Advantages of plasterboard partitions
Basically, designers and planners use such structures for zoning, that is, the room is divided into several zones (recreation, entertainment, work), which can differ not only in size, but also in style.
Most often they find their application in small spaces, where every square meter counts, and it is the creation of zones that allows you to use the entire area rationally, with maximum functionality.
Before agreeing to install a plasterboard partition, you should familiarize yourself with the features, evaluate its pros and cons, and also determine the extent to which it is needed in the room. Among the advantages of such structures, experts include:
- Soundproofing properties. Thanks to the thickness of the sheets, as well as the technical space that can be filled with building components, it is possible to achieve an optimal sound barrier in the room.
- The weight of the entire assembled structure does not have a significant impact on the load-bearing slabs, in comparison with building materials that can be used for similar purposes (brick, gas, foam blocks).
- The evenness of the surface allows you to save on plastering, as well as perform any decorative and finishing work (painting, wallpapering, installation of wall panels, gypsum tiles, etc.).
- Installation does not require special knowledge or significant effort, so it can be done independently. It is also worth noting the speed of installation and relative cleanliness.
- The technical parameters of drywall provide the required level of resistance to fire, moisture, and temperature changes.
- Dismantling does not take much time, and a minimal amount of construction waste is generated in the room.
- In the technical space, between the drywall, you can easily hide engineering systems and communication networks.
- Flexibility allows you to create products of any shape and size.
- “Breathable properties” - allows steam to pass through, absorbs moisture, and returns it when the temperature rises or the humidity level in the room decreases.
Despite the large number of positive qualities, there are also a number of disadvantages:
- Fragility. The material is not characterized by high strength, in comparison with natural building materials (brick, stone, wood). Therefore, under mechanical stress or strong physical stress, deformations can form on the surface.
- Low resistance to moisture. With excessive exposure to liquid, drywall loses its original shape, which entails deformation of the entire partition.
How to sheathe
The wall is leveled with plasterboard, which is fixed to a frame made of galvanized profiles. To do this, carry out a strict phased work:
- The surface must be prepared. Dry, clean, cover with waterproofing material.
- After this, precise measurements are taken to calculate the number of required elements.
- The next step is marking. To do this, use a laser level, plumb lines, upholstery cord or marker. It is important to ensure the evenness of the intended stripes.
- The profiles are fixed according to the markings. The guides are attached to the floor and ceiling with dowel nails. Hangers are attached to the wall along the markings in 40 cm increments. The PS (CW) rack profile is fixed to them.
- Between the rack profiles horizontally, with a step of 40 cm, transverse ones are attached. They are cut from a rack profile. Crabs are used for fixation.
Each attached element must be checked with a level for evenness.
- The entire created frame is tested for strength and rigidity.
- Sheets of plasterboard are fixed to a metal base. First they are whole, and then they close the remaining windows. The sheets must be fastened in a checkerboard pattern so that the horizontal joints do not coincide.
- Afterwards, the plasterboard wall is coated with a primer and allowed to dry.
- The joints are reinforced, the fasteners are covered with joint putty.
- Next, the entire surface must be puttied and coated with primer again.
The wall is ready for finishing. If everything is done correctly, the surface will be smooth, durable, and able to withstand a certain load.
Tool
To carry out the work you will need:
- water level;
- plumb line;
- roulette;
- hammer drill or impact drill;
- metal scissors;
- screwdriver or screwdriver;
- putty knife;
- knife;
- hammer;
- paint roller.
Method of installing plasterboard partitions on a metal profile
Care
A plasterboard wall does not require special care.
The tiled wall should be wiped clean from water droplets and water should not be allowed to collect on the floor. You can use non-acid detergents as they will corrode the grout between the tiles.
If the wall is painted, you must avoid getting water on it. Otherwise, wipe immediately. Do not use detergents containing acids and alkalis.
Moisture-resistant green plasterboard is installed in the bathroom. It is fixed to a frame base made of galvanized profiles and the frameless method is not used.
Proper installation of the lathing and gypsum boards will make it possible to cover the wall with tiles and hang shelves or drawers for bath accessories on it.
Pipeline installation
Imagine a situation in which pipes with hot and cold water are hidden behind a plasterboard partition. What happens if you put them “as they are”? Let's get a look. In summer, the supplied water is much colder than room temperature. Condensation forms on the surface of the pipe. Where will he go? It will gradually evaporate from the pipe and be absorbed into the drywall.
How to avoid this? Quite simple. It is enough to put thermal insulation on all pipes. In this case, condensation will not form. And for us this means that the wall will remain dry and comfortable for a long time. This is what we are trying to achieve.
Recently, few people use metal pipes when replacing pipes. But still. If you wish to use metal pipes, they must be covered with several layers of paint and insulated. This can be a “shell” made of foam insulation, foil or mineral wool.
For plastic, thermal insulation will also not be superfluous. You just need to add noise-absorbing materials to it. Then the operation of the sewer system will occur quietly and unnoticed. You can combine these two operations with one movement of your hand. It is enough to wrap the pipe with mineral wool, which will eliminate noise and save heat.
Attention! Polystyrene foam is not suitable for this situation. It has a high density and does not protect against noise.
How to paint a bathroom
Safe formulations
With the variety of colors offered, it is not so easy to choose the right one for your bath. It is better to paint this room with water-soluble paints. Their advantages:
- moisture resistance,
- quick drying,
- ability to pass air,
- UV resistance,
- ease of application,
- possibility to wash.
Ideal for painting a bathroom are paints with a water-dispersion composition and solid polymers, created using the latest technologies. They do not contain harmful solvents.
Wall tiling
Tiles are a very necessary means of waterproofing, since they do not absorb water, and also have a pleasant appearance, unlike various compositions. You can buy tiles of any appearance, it’s just a matter of your taste. Tile adhesive also needs to have water-repellent properties so that the tiles do not fall off the wall in the future.
The glue is diluted in such a volume that working with it does not take more than 30 minutes, then it will simply harden and can be thrown away. When the surface of the wall is tiled, you can begin to make seams between the tiles. To process them, grout is used, which is applied using a small spatula in an even layer. Please note that it is better to apply the grout in two or even three layers, so it will penetrate deeper into the seam and will not leave room for water to accumulate.
Now all you have to do is wait for all the applied compounds to dry and, if you did everything correctly, you don’t have to worry about the condition of such walls for at least 5-7 years. You should only occasionally check them for the presence of fungus, because this way you can protect yourself from unexpected water leaks.
Where to do waterproofing?
It is necessary to seal all wet areas, that is, places most susceptible to moisture, as well as surfaces that receive water. First of all, this is the floor and walls around the shower stall and bathtub.
The insulation is placed on the wall at a height of at least 20 cm above the mixer or the place where the shower head is attached. If, during operation, a place in a wet area (for example, a wall around a washbasin) will be in constant contact with water, a layer of waterproofing material must also be laid there. You may find it easier and easier to install insulation throughout the entire bathroom than in individual areas, so it is often installed right up to the ceiling.