Most of the mistakes made when installing electrical networks are related to incorrect connection of wires. The lack of current is explained by unreliable contacts or their failure in junction boxes, sockets, and devices. Before starting work, you need to carefully study all the cable installation methods and choose the most suitable one.
Types of conductors for connection
The most common type of cable (among those used in domestic conditions) is considered to be PVS. It consists of many copper wires covered with double braid. The conductors are twisted along the central axis. The product is flexible and can be used to form different branches of the electrical network. The cable is designed to operate under voltage from 220 to 380 V. When choosing a cross-section, take into account the current strength:
| Permissible load, A | Section, sq. mm |
| 6 | 0,75 |
| 10 | 1 |
| 16 | 1,5 |
In addition to PVS, stranded wires KG, PRS, PUGNP, ShVVP are found in connections. When installing a home electrical network, these types are used less frequently.
Welding – high reliability in any conditions
When connecting wires by welding, the conductors are twisted and their ends are welded. As a result, a metal ball is formed, which provides a stable and very reliable connection in any conditions. Moreover, it is reliable not only in terms of electrical characteristics, but also mechanically - the metal of the connected wires after melting forms a monolith and it is impossible to isolate a separate conductor.
Welding - it is important to heat the metal, but not melt the insulation
The disadvantage of this type of wire connection is that the connection is 100% permanent. If you need to change something, you need to cut off the fused piece and do it all over again. Therefore, for such connections, a certain supply of wires is left in case of possible alterations.
Other disadvantages include the need for a welding machine, appropriate electrodes, flux and operating skills. In addition, welding takes a lot of time, it is necessary to protect surrounding objects, and it is also inconvenient to work with a welder at height. Therefore, electricians practice this type of connection in exceptional cases. If you are doing it “for yourself” and know how to handle a welding machine well, you can practice on scraps. The main trick is to not melt the insulation, but to weld the metal.
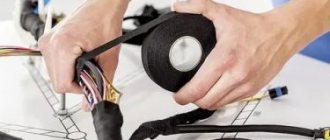
After cooling, the welding site is isolated. You can use electrical tape, you can use heat shrink tubing.
Methods for connecting conductors in a house or apartment
Correct cable splicing involves:
- reliable contact with a minimum resistance difference close to the parameter of a solid section of wiring;
- strength, resistance to vibration and tearing;
- homogeneity of metals (copper cannot be combined with aluminum).
Not all methods ensure that these requirements are met. The best are considered:
- soldering;
- twist;
- welding;
- crimp;
- use of terminal connectors.
Soldering
First, about soldering technology. The connected conductors are stripped of insulation, cleared of the oxide film to bare metal, twisted, and then tinned. To do this, the conductors are heated with a soldering iron and applied to rosin. It should cover the joint completely. Tinned wires are twisted first with your fingers, then pressed using pliers. Instead of tinning, you can use soldering flux. They wet the wires well, but after twisting.
Then, in fact, the soldering process begins: the joint is heated with a soldering iron or narrow torch. When rosin or flux begins to boil, take some of the solder onto the soldering iron tip and bring it into the soldering zone, pressing the tip against the conductors. The solder flows to fill the gaps between the wires, making a good connection. When using a torch, solder is simply added little by little into the torch.
Next, after the soldering area has cooled, according to the technology, it is necessary to wash off the remaining flux (they accelerate oxidation), dry the joint, cover it with a special protective varnish, and then insulate it with electrical tape and/or heat-shrinkable tubes.
Now about the advantages and disadvantages of this method of connecting wires. In low-current systems, soldering is one of the most reliable methods of connecting wires. But, when installing electrical wiring in a house or apartment, it is criticized mercilessly. The thing is that solder has a low melting point. When large currents periodically pass through the connection (this happens if the circuit breakers are incorrectly selected or faulty), the solder gradually melts and evaporates. Over and over again, the contact becomes worse and the connection heats up more and more. If this process is not detected, the matter may well end in a fire.
The second negative point is the low mechanical strength of soldering. It's the tin again - it's soft. If there are a lot of wires in a soldered joint, and if they are also rigid, when you try to pack them, the conductors often fall out of the solder joint - the elastic force is too great, which pulls them out. That is why it is not recommended to use soldering connections when wiring electricity: it is inconvenient, time-consuming and risky.
Removing the insulating layer from conductors
The copper portion of a stranded cable consists of many intertwined wires. Sometimes they are covered with a polymer layer and combined with nylon threads. This makes it difficult to remove the insulation. Depending on the connection method, the braid is removed by 0.2-5 cm. The insulation is carefully cut and removed, trying not to damage the core. When working with coaxial products, carefully remove the shielding layer, opening the barrel.
When working with thin enameled wires, use a soldering iron. The remaining coating is carefully removed with an abrasive material.
Purpose
Any connection method requires stripping the wire - exposing the metal core. The insulation is made of fluoroplastic, polystyrene, rubber. The inner layer may consist of varnish, silk or polyethylene. Removing the braid creates the contact needed to conduct electricity.
Required tools for stripping
To remove insulation use:
- loop burner or soldering iron;
- side cutters;
- construction knife;
- stripper.
GOST classifications and requirements
The classification of electrical connectors is given in GOST 10434-82, according to which they are divided into classes (1, 2, 3) and groups (A, B). In addition, in accordance with current standards, they differ in the type of contact formed and the method of fixing the cores.
GOST requirements stipulate the conditions for the use of various types of connecting products and also their technical characteristics that ensure the required quality of switching. Before dealing with all these issues, it is advisable to familiarize yourself with the existing methods of connecting conductors recommended by the PUE.
Is it possible to connect conductors by twisting
Electrical Installation Rules (ELR) prohibit the use of this method separately. Twisting is combined with other methods. It is not used for combining cores made of different materials.
Methods
The following methods are used for twisting wires:
- Standard method. Before starting work, de-energize the network, remove the insulation by 5 cm. Unwind the conductors by 2 cm, connect them until the whole parts are joined. Next, twist it with your fingers and clamp it with pliers. Isolate the exposed area.
- Fastening cables of different sections. It is prohibited to use products with very different parameters. This makes contact unreliable. The cores of the twisted wires must be wound one on top of the other.
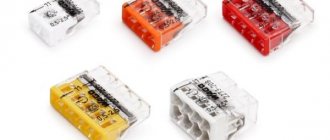
- Use of caps. Such elements well insulate the place where the conductors are combined. They are made of fire-resistant material. To perform twisting, the ends of the wires are stripped and connected. A cap is placed on the joint and turned until the exposed area is covered.
- Application of contact clamps. The element includes a base, a washer, a screw and a conductive core. The connection begins with stripping the wires. The ends free from insulation are inserted into the hole in the clamp. This method is used when working with single- or multi-core cables.
Brewing
After twisting, the wires are soldered. They are pre-tinned and treated with a heated soldering iron tip immersed in rosin. After this, the joint is coated with tin and heated until the melt begins to penetrate into the thickness of the cable. The method is time-consuming, but it helps to obtain the most reliable pairing.
How to connect wires and cables of different sections
It happens that when installing electrical wiring you have to connect wires of different sections. And there seems to be no problem here, because there are many different ways to do this. However, in each specific case, one of the options will be the most successful. We may be talking about installing a distribution box, while installing a wall socket is a completely different matter, where good contact and possibly the lowest transition resistance at the point of fixation are very important.
From ancient times to this day, ordinary twisting has not lost its popularity. Using twisting, you can easily connect wires of similar cross-sections, for example 1 sq. mm and 1.5 sq. mm. What if the sections are very different? Then a good twist will not work, since the wires will not fit equally tightly to each other.
In order for the twist to be of high quality, the wires must evenly wrap around each other; it should not be that a thin wire is simply wound on top of a thick one, because then the contact will be poor and unreliable. Moreover, even the correct twist must always be soldered or welded upon completion, then the connection will be durable and reliable, one might say - for centuries.
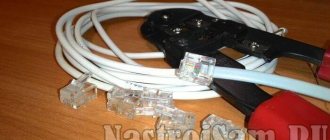
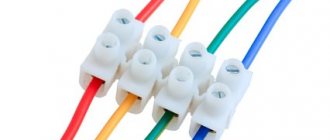
A contact screw clamp or terminal block is another time-tested method of connecting wires of different cross-sections. There are rows of clamping screws on both sides of the block, so that wires of different sections can be inserted on both sides of the block, so that each wire is clamped with an individual screw.
Wires of similar cross-sections are well connected using such clamps; you just need to take into account the current load and select the correct size block for the appropriate current, with the appropriate diameter of the contact tubes and screws.
Typically, the value of the maximum permissible continuous current is indicated directly in the marking of the screw terminal. The wire is stripped of insulation to the length of half the terminal, inserted, fixed, and clamped with a screw. The connection is ready.
Methods for connecting wires or cables to each other
To avoid emergency situations, the elements must be firmly fastened. It’s not just soldering that will help achieve this result. Using special tools allows you to quickly align the wires.
Crimping
The method involves the use of a special tool. Crimping with sleeves is performed when working with aluminum or copper. The connection is made like this:
- remove the braid by 2-3 cm;
- clean the core to a metallic shine;
- twist the conductors and insert them into the sleeve;
- crimp the connection with a special tool.
The main difficulty is the selection of the sleeve. Using an element with a smaller or larger diameter makes the bond weaker.
Bolted connection
To fasten the wires, washers, bolts and nuts are used. The design is reliable, but it takes up a lot of space. The cables are connected in this way as follows:
- remove insulation;
- the cleaned ends are folded into a loop, the diameter of which coincides with that of the bolt;
- put on the washer, put on the first conductor;
- install the second fastening element, put on the next cable;
- secure the structure with a nut.
Bolts are often used to hold together three or more wires. The nut is tightened with a wrench.
Terminal blocks
The element is made in the form of a metal plate enclosed in a dielectric housing. Connecting cables with terminal blocks does not cause any difficulties even for a novice master. The work is done like this:
- Clean the ends of the cables from the braid.
- Remove the oxide film with sandpaper.
- Insert the conductors into the sockets. Screw in the bolts.
The method is used when working with products of different sections. Terminal blocks can only connect two cables.
Self-clamping terminal blocks Wago
There are 2 types of such elements:
- Flat spring terminal blocks. They are disposable and cannot be reused after dismantling. The terminal block is equipped with a plate with flexible petals. When inserting the wires, they are pressed out, the cable is securely fixed by the device.
- With lever mechanism. It is considered the best type of fasteners. The stripped cable is inserted into the terminal, after which the lever is clamped. The device can be used several times.
Tips
You can connect the cable using 2 types of elements:
- when using the first type, the cables are connected in the cavity of the tip;
- in the second case, the wires are combined using different elements.
The first method helps to obtain a more durable joint. Manufacturers offer special tips for working with wires made of different materials.
Soldering tips
The element on the wire is clamped with a press. If it is not available, use the soldering method. The end of the cable and the clamp are tinned from the inside. The core is inserted into the tip. The structure is wrapped with fiberglass thread and heated until the solder melts.
Connecting a chandelier with a ground wire
If the lighting fixture has a metal casing, it must be grounded. In new apartments, all electrical networks, including lighting, according to standards, must have a yellow-green grounding conductor. If your network meets this requirement, then to connect the chandelier it is enough to connect the wires with the corresponding color markings using a terminal block or twist.
If the networks are old, and the insulation of all wires is the same color, then you should proceed in the following sequence:
Conductor Connectors
This is the name for devices that facilitate the installation of electrical wiring consisting of several lines. They are either clamp or screw.
Couplings
The device looks like a hollow tube. It is used when working with cables with a cross-section of up to 16 square meters. mm. The wire is secured in the coupling by crimping. The device is not used when connecting single-core wires.
Clips
Before inserting the cable, the clamp of this device is installed vertically. Moving the element to a horizontal position helps secure the cores. Using a clip allows you to add additional wires.
Screw terminals
The elements are designed to combine conductors from different metals. The main advantage is ease of use.
Screw terminals
Used to work with cables made of copper and aluminum. They are not suitable for multi-core wires. Also, the clamp can contribute to the breakage of the aluminum core, so it is better not to combine it with this material.
Power clamps
The stripped wire is inserted into such a device until it stops. The pressure plate lowers, securing the cable. Power clamps are used when working with products made of different metals.
Spring terminals
Such elements make the connection strong and reliable. However, over time the spring may overheat.
Spring clamps
PPE caps are used as these elements. They help to quickly connect 2 conductors of the same diameter. It is important to choose the correct size of the device, otherwise there will be no contact.
Connection clamps
There are electrical and electrical types of devices. The difference lies in the permissible load. The wires are combined inside the clamps.
Piercing clamps
An improved model of nut cable compression are piercing clamps. Disposable products, however, allow you to make a wire branch without cutting and even without peeling off the insulating layer when splicing. The design of the clamp is represented by a hexagonal head, which tightens the conductors, as well as contact plates with teeth, which actually pierce the insulating material.
They are most often used to branch from an overhead line laid with SIP wire without relieving the voltage.
The advantage of these products is as follows:
- You can branch wires from an overhead line (OHL) even under voltage, without fear for your safety. This is due to the fact that the contact plate is reliably insulated from the clamping bolts.
- The housing of the products is sealed and reliably protects the connection point from bad weather conditions.
- The clamps are easy to use and have a long service life.
- Low cost of production.
- Possibility of bonding copper and aluminum conductors.
As for the disadvantages, the main thing is only the “disposability” of the product, but this point is very controversial, given the durability of this method of branching wires without breaking.
Installation is carried out as follows:
Video instructions for installing a piercing clamp
Selecting a connection method
There are a lot of methods for combining cables. The desired option is chosen taking into account the situation. For temporary mating, the bolting method or twisting is used, for permanent mating, soldering or crimping is used.
Stranded and single-core conductors
In this case, work begins with choosing the ratio of conductor sections. The multi-core element should not be thinner than a single element. In this case, the contact may be destroyed. The wires are fastened by welding, soldering or crimping. When using a soldering iron, the ends of the cables are cleared of braid. The multi-core element is wound onto a single element.
The soldering area is carefully insulated. When crimping, a sleeve is put on the ends of the wires, which is clamped with pliers.
Wires with cross-sections of different diameters
The connection in this case requires calculation of the current density. If the parameter is acceptable, the elements are fastened with bolts, clamps, soldering or twisting. The process is no different from that when working with the same conductors.
Large conductors
The connection is difficult to make due to the large contact area. Fixing thick wires is only possible by welding. It cannot be done at home, since the conductors must be heated to a high temperature. After welding is completed, check the functionality of the wiring. When splicing thick cables, you can use a coupling.
Broken wires in the wall
Wiring in the pipe may be damaged during repair work. Troubleshooting begins after the power supply is turned off. The broken wires are connected like this:
- Using special tools, they look for the break point. Remove the layer of plaster, gaining access to the desired area.
- Remove insulation from the ends of the damaged cable. Treat bare areas with molten solder.
- Select a second cable of the appropriate cross-section. It is cut off and soldered to both ends of the damaged wire. The length being extended should not be too short or long.
- Insulate the soldering area. To do this, use a heat-shrink tube, which is put on the repaired area. When heated with a hair dryer, the material tightly envelops the joint.
Welding
In order for the connection of electrical wires to be as reliable as possible, the considered twisting method must be subsequently secured by welding. It is similar to soldering, only now a welding machine is used instead of a soldering iron.
Positive sides
This method is most preferable to all others, since it meets all regulatory requirements in terms of reliability and quality.
The welding method is based on contact heating of the ends of the wires with a carbon electrode until a ball (contact point) is formed. This ball is obtained as a single unit from the fused ends of all connected cores, which ensures safe and reliable contact; it will not weaken or oxidize over time.
Negative sides
The disadvantage of welding is that such work requires certain knowledge, experience, skills and special equipment; you often have to turn to specialists.
Installation
In order to connect wires using welding, you will need the following devices, tools and materials:
- welding inverter with a power of at least 1 kW, its output voltage must be up to 24 V;
- carbon or graphite electrode;
- goggles or eye mask;
- welding leather gloves to protect hands;
- a mechanic's knife or stripper for removing the insulating layer from conductors;
- sandpaper (for cleaning the conductive surfaces to be connected);
- insulating tape for further insulation of the welding joint.
The sequence of work is as follows:
- Free each connected wire from 60-70 mm of insulation.
- Sand the exposed wires until they are shiny using sandpaper.
- Twist, after biting, the length of its ends should be at least 50 mm.
- Attach grounding clamps to the top of the twist.
- To ignite the arc, bring the electrode to the bottom of the twist and lightly touch the connected wires with it. Welding happens very quickly.
- It turns out to be a contact ball, give it time to cool, and then insulate it with tape.
As a result, an almost solid wire is obtained at the end, that is, the contact will have the lowest transition resistance.
If you connect copper wires in this way, then choose a carbon-copper electrode.
I would like to recommend that if you purchase a welding machine (it will be useful not only for connecting wires, but also for many other purposes), then choose the inverter option. With small dimensions, weight and electrical energy consumption, it has a wide range of welding current adjustment and produces a stable welding arc. And this is very important to be able to regulate the welding current. If you choose it correctly, the electrode will not stick and the arc will hold steady.
Watch how welding is done in this video:
We looked at the main types of wire connections. Now let’s briefly talk about methods that are used less frequently, but also guarantee quality and reliability.
How to connect headphone wires
It is recommended to repair broken cables by soldering. To do this, perform the following steps:
- Cut off the damaged piece. Remove the braid by 2-3 cm. The number of cores depends on the type of headphones. The simple device has 4 wires insulated with multi-colored rubber. A twisted pair cable consisting of grounding and signal cables is connected to the microphone. The first one is covered with yellow insulation.
- After stripping all the conductors, twist the copper hairs. Burn the contacts with a lighter, removing the varnish coating. It not only prevents soldering, but also impairs current conduction.
- Treat bare areas with tin. Heat shrink tubing is placed over the wire braid. The same material is used to insulate each core.
- Tinned sections are twisted taking into account the color of the insulation. The connections are heated with a soldering iron until the tin is evenly distributed.
- Check that the work is being done correctly. When sound appears in the speakers, a bandage is applied to the repaired area. To do this, put heat-shrinkable tubes on the twists and heat them with fire. Insulation prevents short circuits.
- Tie the wiring harness together with a thread and slide the thick heat-shrinkable tube that was put on earlier.
Wires on the chandelier
Connecting a chandelier with 2 wires is simple: screw one of them to phase, the other to zero. Which one goes where - it doesn’t matter. If there are two phases on the ceiling, and the switch on the wall is two-key, there are options:
How to connect a chandelier if it only has two wires? To the same wires on the ceiling in random order
On multi-arm chandeliers there are definitely more than two wires. We have decided on the purpose of yellow-green. This is grounding. If the same wire is on the ceiling, connect it to it. The rest also need to be dealt with.
A chandelier with 3 wires is not much more difficult to connect. If one of them is grounding (yellow-green), it can be:
Actually, there are no other options. Three wires are mainly used for lamps with one bulb. With two, this is an outdated design, with three, a more modern design that complies with current recommendations.
Connection to double switch
They connect a five-, four-, three-arm chandelier to a two-key switch according to the same principle. From each of the horns there are two different colored wires. Most often these are blue and brown wires, but there are other variations. To connect to a double switch, they all need to be divided into three groups: two phases and one zero.
READ How to activate the promised payment service on Beeline
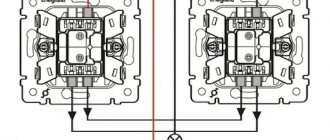
Connecting a five-arm chandelier to a double (two-key) switch
First, all the blue wires are combined with each other and twisted well. This is zero. In principle, you can take wires of a different color - it doesn’t matter for lighting fixtures. But according to the standard, “zero” is indicated in blue. It is only important that conductors painted in a different color do not get into the twist. In the photo below you see that all blue conductors are combined into one group. This is “zero”.
Before connecting the chandelier, the conductors are grouped
Now divide the remaining ones into two groups. The breakdown is arbitrary. One group of light bulbs will turn on from one key, the second - from another. A five-arm chandelier usually combines 2+3, but 1+4 is also possible. The four-arm version also has two options - 2+2 or 1+3. But with three light bulbs there are no options: 1+2. Twist the separated wires together. We received two groups, which we connected to the “phases” on the ceiling.
How to connect a chandelier to a single switch
If there are only two wires on the ceiling, but there are many on the chandelier, but only in two colors, everything is simple. Twist all the conductors of the same color with their bare parts and connect them to one of the wires on the ceiling (it doesn’t matter which). Collect all the conductors of the second color into one bundle and connect them to the second ceiling one. The chandelier connection diagram in this case is shown in the figure below.
Connection diagram of a chandelier to a single-key switch
When turned on in this way, all the lights will light up at the same time.
Additional recommendations
When fastening cables, you should follow these tips:
- Welding or soldering ensures a permanent connection. You don't have to worry about the reliability of the contact. This option is well suited for large cross-section conductors.
- Terminals help speed up wiring work. This method can be used when connecting sockets or lights.
- PPE clamps make the connection not only strong, but also safe. The items are not expensive.
- Do not immediately place the fastened elements into the junction box. It is necessary to check whether they get hot during operation.
The correct choice of connection method and compliance with safety precautions prevent injury to people or damage to property.
Electrical wire connectors - types and methods
The main task to be solved during electrical installation is to choose the right wire connector that is optimally suited for current operations. The reliability and safety of operation of any electrical wiring depends on the quality of this element. This explains the desire of users to understand in detail what types of these products are most often used in practice and what wiring they are suitable for. In addition, it is important to familiarize yourself with how to properly connect conductors, as well as the features of using different types of connectors for electrical wires.