Electrical wiring in a house and apartment from A to Z
You are here:
Stages of drawing up a wiring diagram with your own hands. An example of designing electrical wiring in a one-room apartment.
Errors during electrical installation work in a house and apartment. Find out what not to do during electrical wiring!
If you are making repairs, then you need to decide what to do first - install wiring or plaster the walls. We compared both options in this article.
What series and types of VIKO sockets and switches are there? Detailed product review.
note
What series and frame colors are there for Werkel sockets and switches? Detailed product review.
The PRKS wire is used in rooms with elevated temperatures, for example, in baths and for connecting heating devices. The characteristics and typical cross-sections of the PRKS wire are presented in the article.
One of the reasons for increased noise from neighbors is pass-through sockets. Learn about effective methods for soundproofing sockets from our article!
Stages of laying electrical wiring in a dacha: choosing the cross-section and type of cable, ratings of circuit breakers, RCDs and other protective equipment, choosing an installation method.
What are the Schneider Electric series of sockets and switches and what makes each series stand out? Price overview for 2021.
Review of popular series of Legrand sockets and switches. Features of each model and comparison of prices relevant in 2019.
6 popular shield assembly schemes with non-switchable lines. Why do you need to make groups that are not switched off by the input machine?
Let's look into a fairly popular question among home craftsmen. What should be the position of the light switch when turning it on and off?
Important
Review of the characteristics and design features of the most popular brands of heat-resistant wires and cables.
List of materials required for installation of electrical wiring in an apartment and private house. What materials are needed for the input of electricity and the electrical installation itself.
Why do you need to ground your computer and how to properly organize grounding in an apartment or private house. How not to ground your PC.
Which brand of wire is best to choose for connecting spotlights in suspended and suspended ceilings? How to lay wires to lamps.
The working principle of a Scotchlok connector. How to use Scotchlocks and what types of products there are.
Correct placement of sockets in the children's room. How many sockets should be installed and how to protect a child from electric shock.
Description of the characteristics of the installation wire PuV. Field of application of the conductor and main sections.
Reasons for replacing electrical wiring in Khrushchev. Stages of replacing old wiring with new one. Rules for searching for electrical wiring in Khrushchev.
Advice
Comparison of characteristics of PVS wire and ShVVP cord. What is better to choose for installing lighting or assembling an extension cord?
Layout of sockets in the bedroom. Where is the best place to install sockets for charging phones, connecting lamps and TV.
PUE requirements for the location of sockets in the bathroom. Where and how best to place sockets so that they can be used safely.
Diagram of the correct placement of sockets in the kitchen. Requirements for installing sockets, as well as tips for choosing a suitable housing option.
What characteristics does the PuGV wire have, where is it used and what is it used for. PuGV wire cross-section table.
The MGTF wire is used in rooms with elevated temperatures, and it is also popular among radio amateurs. The characteristics and typical cross-sections of the MGTF wire are presented in the article.
One of the main directions of the Sam Electric website is to consider all the nuances of installing electrical wiring on your own. In fact, anyone can conduct electricity through rooms, even without professional skills in the field of electrical installation work.
It is very important to study all the nuances, from choosing a suitable electrical wiring diagram to testing work. It is for this purpose that a separate section of the project was created, in which only aspects related to electricity in everyday life are discussed in detail.
note
The first thing you should study is the section that tells you how to make electrical wiring in a house, apartment or country house.
You should look at all possible ways to lay a cable line - under plaster, on top of decorative wall decoration, under drywall, in the floor and even behind a suspended ceiling.
All these nuances are very important, because the correct choice of technology will determine the durability and, no less important, the safety of electrical wiring in the house.
When you learn how to install wiring yourself, we recommend that you familiarize yourself with the main protective devices installed in the panel - circuit breakers, RCDs and various relays. A block of topical articles will help you choose the right parameters for switching devices that will service and protect your home electrical wiring.
Delve into the main benefits and applications of each device and decide whether it should be installed in your distribution panel. In addition, choose a suitable electricity meter, which can be single-tariff or multi-tariff, electronic or induction.
A lot will depend on this moment, in particular, the efficiency of energy saving in the house.
Based on this knowledge, it will be possible to move on to the next stage - drawing up a power supply diagram. To do this, we recommend viewing typical electrical wiring diagrams for houses and apartments (both one-room and three-room).
It is also necessary to familiarize yourself with the connection diagrams for all wiring elements, from the meter to the sockets.
The diagram is best made in a special program, but a small drawing on a sheet will also work if you correctly indicate on it all the symbols and network parameters.
Important
The last stage is the selection of switches, sockets and cable products. We talked a lot about sockets and light switches, providing installation instructions and connecting products. After looking at the reviews, it will be easier for you to decide which sockets are best to choose for the bathroom, kitchen, children's room and even bedroom. The situation is similar with light switches.
As for cable products, we talked about them in detail in the wires and cables category, where the technical characteristics of the most popular brands of conductors were separately discussed.
We advise you not to ignore this point, because if you choose the wrong cross-section or brand of cable, in the future this may cause failure of the electrical wiring or, even worse, electric shock.
Having studied all these sections, you can move on to calculation and electrical installation work.
I would like to note that the lighting section will also be useful for you, which clearly tells home electricians how to install light into a house and garden buildings, as well as the best way to connect lamps in rooms! We hope that after reading our instructions for installing electrical wiring in a house from A to Z, you will be able to do it!
Source: https://samelectrik.ru/elektroprovodka
How much does an electrician cost per hour?
An electrician's cost per hour ranges from $50 to $100.
This will depend on your location and the type or professional you hire. Areas with a higher cost of living can expect to score higher on this scale. Licensing levels can also increase the price. Typically you pay a higher rate for the first hour. This covers their travel and time costs. Emergency or after-hours rates tend to be higher, too—expect to pay an emergency fee of up to $300, plus more hourly rates.
5 Quick Tips for Hiring an Electrician
Electrical panel
Electrician services are a necessary part of home ownership. No matter the job, big or small, the bill can add up quickly. Since these services are expensive, here are some tips on how to get the most for your money:
1. Don’t be fooled by an electrician’s hourly rate.
Many people pay too much attention to electrician hourly rates. This amount can range from $50 to $100. The hourly rate only matters when it is considered alongside the quality of work, equipment and experience of the firm. A truly experienced, well-equipped professional with a truck full of parts that costs $100 an hour may be a much wiser choice than an inexperienced hacker working with inadequate tools and no parts but charging a lot less. Often, more experienced professionals will complete the job quickly with a guaranteed job.
2. Compare travel costs
Prices reflect travel time. Travel expenses can have a big impact on your costs and are easier to compare than hourly rates. Many electricians spend a third or more of their time navigating the way to the job site. Every contractor must find a way to pay for driving expenses every day.
Travel expenses include:
- higher rate for the first hour
- fixed fare per trip
- minimum for each visit
- higher overall hourly rate.
When you first call a professional, ask how and what they charge for and see if it makes sense for your situation.
For example, travel fees and a relatively low hourly rate make sense on longer-term jobs. For a shorter job, you'll do better with someone paying travel expenses by charging a higher hourly rate. 3. Joint repair work
To save money and time on electrical repairs, combine projects. Any time you find an electrical problem, add it to the list.
When you feel like it's time to call a professional, go through the list and then do a mini-inspection of your home. Look for faulty switches and faulty or overcrowded outlets. When the electrician arrives, you will save money and time by taking care of everything at once.
4. How to prepare and what you need to know before the electrician arrives
The less time an electrician spends fixing inconveniences, the more money you'll save.
Some preparation tips:
Be as detailed as possible in describing your needs to your contractor. The more they know, the faster the work will go. Before they arrive, prepare an exact list of the items you want to serve. The electricians scheduled their time to call the service. They don't have time to make additional requests while they're on the site.
Make sure the electrical panel is accessible. You will pay for the time it takes to access it. Remove fragile items, knick-knacks and furniture from areas where you expect them to work. If you have questions about the project, ask them before you start. Most will be happy to walk you through the problem and the process of fixing it. Ask about possible problems after the job is completed. During a service call, a professional will identify any potential hazards. You will lose power to parts of your home while they are working. Be prepared to pause everything you are doing during a support call. In most cases, you have the option to either pay at the time of service or have an invoice sent to you. You can pay with cash, credit, and sometimes a check.
A typical project includes:
- Cleaning or gaining access to the problem area.
- Diagnosis of the problem.
- Power off at the service panel.
- Repair or installation. This may also include maintenance of the parts.
- Cleaning
5. Install Efficient Electric Lights
By switching from conventional incandescent or incandescent light bulbs to fluorescent or LED lights, you can significantly reduce your home's energy consumption. Motion detector switches can help you save money on your outdoor lighting while providing very cost-effective security for your home. Creative landscape lighting and interior accent lighting can make your home more attractive to you, your guests and potential future buyers.
Need to find a professional for your electrical work?
Kitchen electrics from A to Z
A modern kitchen is the main consumer of electricity in any home, since it contains the largest number of fairly powerful electrical appliances.
Cooking has recently become a whole science, and the equipment located in the kitchen simplifies and automates this scientific work.
In order to avoid, after a major renovation of this room, troubles with wiring burnout or a fire, you need to think through all the nuances and calculate the number of sockets for the kitchen, the cross-section of the wiring and the approximate number of major electrical appliances, with an eye to the future prospects.
Types of kitchen electrical appliances and their connections
Electrical equipment in any kitchen is divided into two main parts:
- Powerful - devices with power supply of more than 2 kW via one line;
- Devices with low energy consumption up to 2 kW.
One of the most powerful and frequently used appliances is an oven, hob or electric stove. To connect them to a 220V network, you need a special socket for the oven, which is powered by a separate line.
This socket for the hob has a special design, since the power of such electrical equipment reaches 7 kW.
The oven is less powerful and its consumption is in the region of 3-4 kW, but all such fairly powerful devices should go on a separate line and preferably on a separate machine, also with a device for protecting people from electric shock called an RCD.
This miracle device will turn off the power if there is even a slight breakdown of current on the body of the electrical device. If you pay attention to the labels on the sockets, they indicate the operating current for which the socket is designed. For example, an oven must be connected to a 16 A outlet, and a hob or electric stove must be connected to power outlets with an operating current of at least 32 A. As for the wiring for powering these outlets, it should be chosen as follows:
- for 16 A sockets, it is recommended to choose a copper cable with a cross-section of 2.5 mm square;
- with a rated current of the socket of 32 A, the cross-section must be at least 6 mm square.
Such powerful electrical equipment can be connected to both a 220V network and a three-phase 380V network. A three-phase network has a higher efficiency, but the single-phase power supply method is still more common.
All electronic appliances in the kitchen can be connected through regular sockets, but not electric stoves, ovens, and refrigerators.
Installing a socket for an electric stove is necessary after the meter through a separate machine, preferably of high quality and with an RCD.
Hobs and ovens must be connected using a protective ground wire in the sockets.
Each of the phase, neutral and ground wires must be, according to the standards, of different colors. Phase is red, neutral is blue, and ground is green.
Under no circumstances should the ground wire be connected to the neutral wire. For grounding, it is advisable to need a separate grounding circuit.
note
Sometimes it is possible to connect an electric stove or oven directly from a separate machine without an outlet directly to the consumer.
But this is a special case, very rarely used, although the reliability of such a connection is quite high, but there is a problem with disconnecting it if the switchboard and its circuit breakers are located at the entrance to the site.
Installing a socket for an electric stove requires little skill and therefore you do not always need to contact specialists.
Devices with low current consumption are connected to a set of two, three or four sockets.
However, you need to understand that the sum of powers and currents simultaneously connected to the outlet should not exceed the maximum permissible current of the cable connected to it.
The wire should not overheat, otherwise over time the insulation will dry out and a short circuit will occur, which is extremely undesirable and dangerous.
According to the design and fastening of kitchen sockets, they are all divided into:
- Hidden;
- Invoices;
- Retractable.
Hidden installation of sockets has found wider application, since their aesthetic appearance is more attractive and practical, and the installation of the socket itself and the socket is carried out in a specially prepared hole in the wall.
How to divide electrics into zones/branches
You need to estimate the approximate power of the devices and divide the zones so that the total power of one zone, which is protected by a separate circuit breaker, does not exceed 3500 watts (this is 3.5 kilowatts or 16 amperes at a voltage of 220 volts). If there are devices that consume more current/power, then a separate branch with a separate machine is needed (for example, an electric stove).
In order not to be confused about power and currents, I recommend that all calculations be reduced to current. How to find out the rated current consumed by the device? If the current consumption is not always indicated on the device or in its documentation, then its power must be indicated. To find out how much current a device consumes in amperes, you need to divide its power in watts by the operating voltage in volts. For example: the kettle says 2200 W (2.2 kW), divide the power by the operating voltage 220 volts - 2200/220 = 10 A, this is the current consumed by the kettle from the network.
The following situations often occur: for example, several powerful appliances are planned in the kitchen - a microwave, a kettle and a washing machine; you don’t even need to start counting to understand that the total power goes beyond 3.5 kW. A wire cross-section of more than 2.5 mm2 seems to solve the problem, but then the above rule is violated: then you will have to install a more powerful machine and standard 16 A sockets are not suitable. You can distribute these sockets into different branches that do not have other powerful devices in the future.
However, such a solution is not always practical, maybe in the apartment there are only 2 branches for lights and sockets and a separate one for the stove, so running a separate line for the kettle is somehow expensive. The solution is simple - you can make all three sockets from one line, protected by a 16 A circuit breaker, all you risk is that the circuit breaker will sometimes trip if the devices are working properly. After all, these devices usually consume less power than stated on their labeling; current surges occur only when the heating elements are turned on. From practice, the following combination often worked for me: a water heater (2.2 kW), a kettle and a washing machine, and with all the appliances turned on, the machine thought for a while and only then turned off.
In general, as a rule, electrical appliances with a standard plug have a rated power of no more than 2200 W; more powerful ones are equipped with special plugs/sockets and require a separate branch. In general, electrics should be designed so that there are no more than two such powerful devices per branch. If it so happens that, contrary to all the advice, you have powered many such devices from one branch, you should not install a more powerful circuit breaker; if it trips frequently, you should replace the circuit breaker with one that is less sensitive to short-term current surges and you will be happy, and you will not comply with the electrical installation rules violate.
Do-It-Yourself Electrics
The last notes
All about security devices
A two-key light switch is a mechanical device designed to switch a lighting circuit; it has two control keys designed to perform six operations. 1-2 operations are intended for key one: in the “on” position, the circuit connected to this control element is closed; in the “off” position it opens; 3-4 for key two: in ...
Read completely "
A single-key light switch is a switching lighting control device designed to perform two operations, closing and opening an electrical circuit.
It is used exclusively for work in lighting circuits with voltages up to 1000 V. It has a manual control drive. Does not have protection functions against overloads and short circuit currents. Not equipped with arc extinguishers.
..
Read completely "
A motion sensor (also known as a presence sensor) is a device used to automatically turn on and off the light.
The device is triggered when movement appears in the sensitivity zone and turns off when there is no movement.
Motion sensors installed in rooms to regulate lighting contribute to significant energy savings and increase the level of comfort (no need...
Read completely "
The wiring diagram for a pass-through switch is considered by many to be considered aerobatics in electrics.
In fact, anyone can install it from start to finish; to do this, you just need to have a visual and detailed manual at hand. This is exactly the guidance outlined in this article.
In order to understand how the wiring diagram of the pass-through is arranged and executed...
Read completely "
The question of how to connect a two-key light switch seems to be a huge problem for many.
There are no problems with a single-key switch, everything is clear and easy, but here many people have difficulties. In fact, the wolf is not as scary as it is portrayed.
Advice
Connecting a two-button light switch is as easy as hammering a nail into a wall. In this article we will look at an example in detail...
Read completely "
The wiring diagram for a two-key switch can cause difficulties for many unprepared people. However, in reality everything is very easy and simple.
You can verify this by reading the detailed installation and connection instructions presented in this article.
By following it, you can easily not only understand the circuit, but also perform independent installation...
Read completely "
The light switch connection diagram usually causes difficulties for many unprepared people, although in principle there is nothing complicated about it. I will try to convince you of this.
This article presents detailed step-by-step photo instructions, in which the complete process of installing and connecting the circuit, as well as connecting its main elements, is described step by step.
The main misunderstanding...
Read completely "
In this article we will take a closer look at the question of how to install a light switch. There is no need to rack your brains about who to contact with this problem or where to find an electrician.
There is no need to waste time searching and spending money on calls; all this is done easily and simply. You just need to follow the detailed instructions given in this article and the question is how to install the switch...
Read completely "
Surely it happened while doing repairs that you encountered the problem of how to change a switch.
It doesn’t seem like a tricky thing, but it’s scary, there’s still electricity, and suddenly you won’t be able to deal with the wires. Well, it’s not clear what to connect where and what to screw to what.
In fact, there is nothing complicated here and there is nothing to be afraid of, everything is as simple as hammering a nail into a wall. After reading this article, in which everything is detailed...
Read completely "
Do-it-yourself electrics are accessible to everyone!
Using high-quality and proven material, collected in detailed step-by-step photo instructions, doing electrical work yourself will not be difficult for you.
Source: https://elektrika-svoimi-rykami.com/
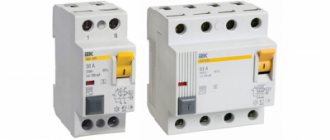
Knocks out the machine gun. What to do?
In fact, the question is more complex than the one considered before. The fact is that there are different types of automatic machines, RCDs and circuit breakers. The former are triggered by leakage current, the latter protect against overload and short circuit. Let's focus on the second option. If you are interested in how the RCD behaves, write on the wall, I will answer.
So, the machine gun knocks out. This can happen in two ways: it knocks out instantly or after some time, it knocks out periodically. In the first case, there is a short circuit in the network between the phase and neutral wires. The location of this short circuit may be a faulty household appliance, socket, lamp, or an unsuccessfully driven nail into the wall. We unplug all devices from the sockets, turn off the lights and cock the machine again. If it is cocked, voltage enters the apartment and only faulty devices are to blame. We begin to connect devices one by one to the network, to sockets, and gradually turn on the lights in the rooms. If at the moment of switching on the machine was knocked out due to a certain device, then the problem has been found. You should call an electrician to replace the found outlet, lamp or other equipment.
If the machine doesn’t go off right away? We should call an electrician, but we will try to “diagnose” ourselves. Gently touch the machine with your fingertips. If it is hot, then it turned off due to overload; you turned on too much equipment in the apartment. The machine performs its function as a protective device and prevents the electrical wiring from burning out. Disconnect part of the load. Otherwise the wiring will be in disrepair.
If the machine is cold and it knocks out periodically, and we agreed that it is not the RCD, but the machine, then it should be changed. In most cases, this will solve the problem. If this does not help, you cannot avoid meeting with an electrician. It is necessary to diagnose the cause; only a professional can handle this.
Machines can also be knocked out due to poorly screwed wires. They start to warm up, the contact is poor, the light blinks, the light goes out, the machine goes out. To solve the problem yourself, turn off the machine, remove the wire connected to it, loosen the screw clamp with a screwdriver, clean the wire from carbon deposits and burnt insulation by 10-12 mm and clamp it into the machine. We turn it on and continue to successfully operate the TV and other household appliances.
As a piece of advice, I recommend having your panel inspected by calling an electrician. Replace outdated plugs with automatic machines, change wires from meters to automatic machines. It should cost 1500 - 2000 rubles. Often you have no idea what quiet horror is happening behind the doors of the electrical panel, in this dusty corner, where a lonely spider with cold interest has long been watching a small smoldering spark..
All about electricians: power supply, electrical equipment, electrical installation | Electrician's Notes
“Electrician's Notes” is an informational author's blog, the purpose of which is to provide you with useful, valuable and interesting information on the following topics - electricians in everyday life and at work (electrical supply, electrical equipment, electrical installation, electrical measurements and tests, electrical safety, energy saving and much more .
All materials are presented in the form of detailed articles and manuals with visual diagrams, photographs and videos. I provide free consultations on any of your questions, give advice and recommendations.
Hello, dear readers and guests of the Electrician's Notes website.
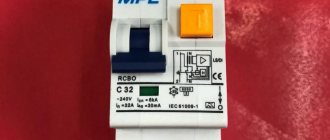
I continue experiments with our circuit breakers and today it’s time to test them with a current of 1.45 of the rated current (1.45 In), i.e. current of their conditional release.
Let me remind you that last time I checked the machines with a conditional non-disconnection current, i.e. current 1.13 from the nominal (1.13·In), with measurement of their heating temperature (part 1 and part 2).
note
Then, for all machines, I measured the transition resistance with further calculation of the voltage drop and power dissipation at the pole.
Read more "
Hello, dear readers and guests of the Electrician's Notes website.
More and more often on the Internet I began to come across advertisements and sites selling converted circuit breakers.
Almost all manufacturers on the market are being redesigned: IEK, EKF, TDM, ABB, Schneider Electric, Legrand, DEKraft, EATON, KEAZ, etc.