Installing concrete floors in a bathhouse is the most optimal option, thanks to which it is possible to create a strong, reliable, resistant to various influences and durable coating in a fairly humid room. Despite the fact that a concrete floor requires quite complex and time-consuming work, it is quite possible to complete the task yourself.
For rooms with high humidity levels, a wooden floor is often chosen, which requires regular maintenance, repair and replacement. At the same time, the concrete floor in the bathhouse is of high quality, warm, and can last as long as possible without any manipulation.
Why is concrete flooring preferable?
Concrete floors in a bathhouse on the ground today are considered the most appropriate option.
For a bathhouse, one of three floor options is usually chosen: adobe, wood and concrete. To understand why the latter option is preferable, it is worth taking a closer look at the features of all materials.
What kind of floors can be made in a bathhouse:
- Clay - the oldest option, made in the format of a compacted dense layer of clay and acting as a water seal, where a drain was created outside the building. A layer of wood was laid on top of the clay, which had to be dried and ventilated after each visit to the bathhouse. Today, clay is no longer relevant, as it is not very comfortable to use.
- Wooden floors are made from species that are resistant to water. They are easy to install, warm, and make it easy to install a water drainage system. But in any case, wood and water interact poorly - wood is susceptible to the spread of insects, rodents, and microorganisms. It would be possible to protect the material from these influences with special impregnations, but they can be dangerous to human health.
- A concrete floor on the ground in a bathhouse is the most relevant option today: it demonstrates excellent strength, resistance to moisture, lasts a very long time, provided that a layer of thermal insulation is installed or a floor heating system is installed, it is comfortable to use. You can lay any coverings on concrete or leave the surface in its original form by installing wooden flooring.
Finish coating
It is allowed to use a special stable varnish as a finishing coat. Before application, the surfaces should be sanded and the dust thoroughly vacuumed. For grinding, it is better to use an electric machine; it not only makes the work easier, but also significantly improves the quality. You can never make such a smooth surface with your hands.
Floor sanding
Alternatively, you can sand the floor by hand.
Acrylic wear-resistant varnishes have proven their good performance in practice. If the manufacturers are responsible, then the floor will be used for a long time; no periodic repair work will have to be done due to wear and tear of the finishing coating.
You can cover it with an ordinary paint brush, the number of layers is at least two. Moreover, when covering with the second layer, the brush should move in a perpendicular direction to the first. For steam rooms, it is recommended to apply three or four layers of varnish, which increases the service life. Each subsequent one is applied only after the previous one has completely dried; there is no need to try to reduce the number of layers by increasing the thickness of each. Such a gross violation of coating technology has extremely negative consequences.
The floor is covered with wear-resistant acrylic varnish
After completing the work, it is recommended to ventilate the steam room for several days, during which time unpleasant odors and harmful chemical compounds will be completely removed. After the first warm-up, ventilation also needs to be repeated, and only then is it allowed to enter the steam room.
Drainage arrangement
Layout of the drain for draining water in the floor
There are recommendations from some builders to make the floor in the bathhouse heated. Of course, you can listen to them, but we do not recommend doing so. Why? Firstly, the floor in the bathhouse is already warm; in principle, it cannot be cold. Secondly, electrically heated floors require special wiring; the total installation power exceeds 5–7 kW.
We suggest you familiarize yourself with How to properly make a door to a bathhouse
For rooms with high humidity, there are very strict safety requirements of the PUE; it is difficult and expensive to comply with them in full. Thirdly, if you are afraid that your feet will freeze, then it is much easier to make wooden grates. Place them not only in the bathhouse, but also in the dressing room and other rooms. It will be very cheap and will make washing comfortable.
Wooden grate on the floor
Drawing of a wooden grate for a bath
Keep in mind that the larger the tiles, the more difficult it is to lay them on a slope. All corners are located in different planes; it will not be possible to make the joints smooth. The best option is to use mosaic tiles. This material makes it possible to make any turns and tilts; a large number of small plates correct minor errors.
Step 1. Take four tiles, place them with corners on the drain and mark the diameter of the hole on them. Using a grinder with a diamond blade, carefully cut out the holes.
Step 2. All tiles near the drain should have a slope in two directions. We have already mentioned that there is no need to make a large angle, a few millimeters are enough. Small slopes can be made with glue; for larger ones, you will first have to screed or use cement-sand mortar for gluing.
Step 3. Throw the material under the surface of the first tile, put it in place and gradually push it in with your hands so that the drainage point is the lowest. Immediately control the amount of tilt. Place the remaining tiles near the drain in the same way, making sure that they all slope towards the hole.
Checking the levelness of the floor
Application of the solution
Leveling the solution
Step 4. Finish the first row, while controlling only one plane between adjacent tiles. This is much easier than setting two planes at the same time.
Applying mortar to tiles
Tile laying process
Step 5. The position of the tiles of the second row must be controlled according to two parameters. The edges must be located in the same plane as the first row and be parallel to each other.
First, it is recommended to lay four tiles around the perimeter of the drain and allow time for the glue to harden. The fact is that these tiles will be used as a template in the future; any displacements are strictly not allowed. The position of the others is constantly monitored using the first tiles; the load on them during the work is the greatest.
Trimming tiles
Slope check
Step 6. It is recommended to continue further work in parallel rows. If you have concerns about your qualifications, you can increase the area of the square plot by alternately laying tiles on each side of the square. This algorithm requires much more time, but allows you to correct mistakes in a timely manner. For beginners, it is advisable to first lay out the tiles dry and use supports of varying thicknesses instead of glue.
Tile marking
The process of laying tiles near the ladder
Tiles laid near the ladder
Laying is controlled by level
Drain in the corner, tiling completed
The larger the floor area, the longer the level should be. The tool must simultaneously control the position of at least three tiles; this is the only way to avoid kinks. The seams are sealed after the glue has completely hardened; with their help, you can slightly smooth out the sharp joints of the tiles.
Tile grout
At this point, the work on pouring the concrete floor in the bathhouse is completed, and you can begin finishing the interior surfaces of the room.
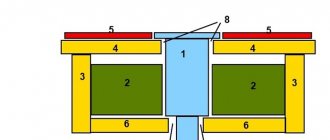
Floor Pie Composition
Before pouring the floor in a concrete bathhouse with your own hands, you need to thoroughly study the technology. In order for the floor to be durable and warm, a structure is made of several layers: the compacted soil is covered with a layer of sand, then gravel, a dense polyethylene film is laid, a rough screed is applied, a layer of waterproofing and thermal insulation is installed, and the process is completed with a finishing screed. This option is suitable for arranging a floor on any type of soil.
Today, there are two methods by which a concrete floor in a bathhouse is poured: directly on the ground or on special logs (creating a ventilated subfloor). The choice of technology depends on the budget, requirements and conditions of the work.
Installation of a concrete floor on the ground
You can make a concrete floor in a bathhouse on the ground with your own hands directly on the base, having first removed a layer 40-50 centimeters thick. After compaction, gravel is poured into the hole in a layer of 15 centimeters, compacted, then sand is poured in a layer of up to 50 centimeters and compacted again. A screed is poured onto the sand at a certain slope, in accordance with the design and markings.
Usually two layers of screed are poured - one rough, the second finishing, always laying layers of thermal insulation and waterproofing between them.
Concrete floor with ventilated subfloor
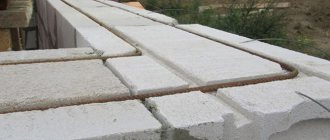
The concrete floor on wooden joists in the bathhouse is made to create a ventilated space under the floor. Thus, there is no need to install additional ventilation systems in the concrete screed. Wooden logs are pre-treated with special antiseptics, and then mounted in a system of beams with a diameter of 10x20 centimeters in the form of a grid.
A plank subfloor made of boards 2-4 centimeters thick is attached to the joists. A layer of waterproofing and thermal insulation is also performed. Only after this is the concrete screed reinforced with steel mesh poured.
Installation of wooden floors in a bathhouse: features and recommendations
Installing a wooden floor in a bathhouse has both advantages and disadvantages. The advantages include relatively small financial investments and ease of installation. But the main disadvantage is the fragility of wood due to high levels of humidity and temperature changes; a wooden floor can begin to rot and will have to be re-laid.
Floor on joists in the bathhouse
When installing wooden floors in a bathhouse, it is better to use boards made from coniferous trees - pine, fir, larch and others. Due to the high resin content, such wood is more resistant to moisture, and the essential oils that are released from the wood will be useful in terms of therapeutic effect. It is also important that boards made of coniferous trees do not become slippery when wet, this will protect those washing from falling.
Video - Do-it-yourself bathhouse floor
The wooden floor in the bathhouse can be made leaky or non-leaky.
- The non-leakage floor is laid on a concrete screed with a slope at a slight angle. The slope is made so that the water can flow freely, after which it is discharged into a special sump.
- A leaking wooden floor consists of a plank flooring in which gaps about 3 mm wide are formed to drain the water. Its main advantage is the ability to remove and dry, as a result of which such a floor will not rot and will last longer.
When installing a leaking wooden floor in a bathhouse, it is necessary to provide for a gap underneath it. It is recommended to leave about 50 cm of free space - this way the air can blow freely and from all sides on the boardwalk.
A slope for water drainage is formed under a wooden floor, on a clay or cement surface. There is also supposed to be a pit through which the flowing water will be drained into a filter well. To form an inclined line, gravel is used, which is evenly placed under the clay layer. If the screed is made of cement, the pit must be sealed with waterproofing.
Floor drainage devices
To improve the ventilation of the boards of a leaking floor, you can use the blower of a stone stove if it is installed under the floor, and also vent air from under the floor to the roof using asbestos-cement or plastic pipes.
It is not recommended to paint wood floors or treat them with any compounds. This will not add durability to the tree, but the fact that the boards will stop breathing is a fact. Thus, instead of a rich and healthy pine aroma, there will be a persistent smell of chemical solutions in the bathhouse. Wood is susceptible to decay in any case, so the best option is to thoroughly sand the boards before using them in construction.
Preparation of the finishing coating (carried out in advance)
The boards must be dried before laying. If this stage is canceled, there is a high probability of deformation of the floor if natural moisture leaves the trees quickly. They can decrease in volume and bend.
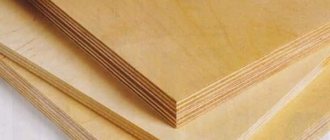
Edged aspen boards for bath floors
Solid boards are more susceptible to deformation. They take longer to dry, and the risk of deformation is greater. The situation is saved by the possibility of laying thin beams. They can withstand less load, but this disadvantage is compensated by laying transverse joists (an additional layer). The tendency for a 2.5 cm thick board to deform is practically negligible, so it is advisable to choose approximately the same (or slightly larger) boards for joists. The optimal thickness is up to 4 cm.
Planed board, larch
Composition and design features of a wooden floor
In order to correctly and quickly create the elevation required in the steam room, additional bars are used for lining. The optimal cross-section is approximately 7×10 cm. With their help, the composition of the base is strengthened, because the beams carry a significant part of the load.
How to properly make wooden floors in a bathhouse
How to lay a classic wood floor.
- The base is pre-coated with several layers of roofing material.
Waterproofing and laying beams
Massive bars are laid along the perimeter of the foundation. They pass through a certain distance, occupying the entire future floor. Each beam located in the center is supported by support from two opposite walls. It is additionally supported by specially installed two massive pillars.
Installation of wooden floors
- The logs are installed on the beams. They are systematically trimmed, creating an artificial slope towards the sewer outlet. It is desirable that the total difference in slope be at least 2 cm. Before installing the logs, cranial bars are nailed down, together they form the subfloor.
- The moisture-proof membrane is attached to the logs, while the free ends remain 20-30 cm in order to later attach them to the waterproofing layer of the walls.
- A layer of insulation pre-cut to size is laid in the gap of the subfloor boards. It is advisable to combine protection from cold and moisture in one covering. Now there is a large selection of such materials. It is preferable to use mineral wool.
Scheme for laying thermal insulation of the floor in a steam room of a Russian bath
- The finished floor is laid from tongue-and-groove boards and must be done as carefully as possible.
Wooden floor in the bathhouse
Required clearances
The ventilation gap between the vapor barrier membrane and the floor is at least 2-3 cm. This layer has additional outlets that need to be connected to the wall vapor barrier. This is necessary to connect free air under and above the membrane, ensuring free air circulation. The warm air flow, when circulating under the floor, will displace cool and damp air, which will ensure dry floors for the entire duration of the bath’s operation.
The backing beams are made of such a size that the gap from them to the logs is more than 1 cm. If the log house shrinks slightly, then this distance will compensate for the pressure on the floor and protect the structure from deformation.
Fastening elements
The quality and reliability of the floor depend not only on the selected materials, but primarily on compliance with the standards for their fastening. Possible ways to connect parts.
We recommend: What is a self-leveling polyurethane coating?
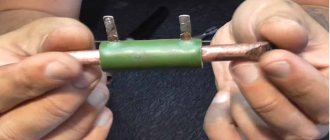
Connecting elements
- The beam is fastened to the foundation using anchors. The cross-section is approximately 12 mm, and the length should be at least 14 cm. When drilling a hole for the fastening element, you need to insert the drill carefully and absolutely evenly to prevent cracking of the foundation structure.
- Fastening can be done on top of the beam or through it. If the second option is used, you need to make the length of the anchor a little shorter. To install one beam, 4 fasteners are enough.
- The beam is attached to the support post with small metal corners 6x6 cm. First, the beam itself is attached to the metal corner using self-tapping screws, and then to the post with screws. For one side of the bar you will need one fastener.
- The logs with bars are also fastened with corners. If the floor is not made of solid logs, then the connections are fixed with additionally purchased log holders.
- Tongue boards are usually inserted into grooves. The screw caps should fit snugly against the wood so as not to interfere with the fastening of subsequent boards.
Installation of a wooden floor in a bathhouse
Preparing the base
Before pouring concrete on the bathhouse floor, it is necessary to properly prepare the base. Otherwise, the floor will have low strength and reliability characteristics, will last much less and is unlikely to provide adequate comfort.
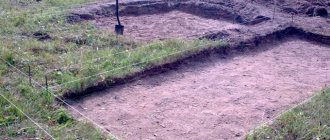
Alignment
Before starting work, remove a layer of soil from the base along with any remaining organic matter. Usually 40-50 centimeters is enough. Then the surface is leveled, making sure to make a pit in the center of the room where the water from the bathhouse will go.
Drainage from the pit is carried out beyond the foundation and is realized through a drainage pipe with a cross-section of 10-20 centimeters dug in the corner under a slope. Thanks to this design, it will be possible to ensure maximum comfort in the operation of the bath and avoid the accumulation of large volumes of water.
Seal
Before concreting, the surface must be compacted with a vibrating plate or a manual tamper made from scrap timber or logs. Sand is poured onto the compacted soil in a layer of 5-10 centimeters, then a layer of gravel 10 centimeters thick.
Both layers must be thoroughly compacted. They will protect the concrete floor in the bathhouse from rising moisture from the soil and other troubles.
Rough screed
Before making a concrete floor in a bathhouse, it is necessary to perform a rough screed. Typically, the thickness of such a layer is no more than 10 centimeters (optimally 5-7).
Mixture recipe
To prepare the mixture, you will need sand, cement, gravel, crushed stone. When wondering what kind of concrete is needed for the foundation of a bathhouse (base), it is better to choose M400. Saving on materials can cause poor quality coatings.
Concrete mortar recipe:
- Cement M400 – part
- River sand – 1.2 parts
- Crushed stone, gravel fraction 5-10 millimeters - 2.7 parts
If M500 cement is used for pouring, the volume of gravel and sand can be increased to 3.2 and 1.6 parts.
Mixing
All components must be carefully measured and then mixed. The volume of water is determined during the process: the solution must be of optimal consistency: exceeding the permissible volume of water prolongs the hardening period and leads to cracks, while reducing it makes leveling the surface impossible.
When pouring the floor in a bathhouse with concrete with your own hands, you usually add water in portions and mix the mixture until a thick, plastic, evenly moistened consistency is obtained.
Insulation
Before pouring the rough screed, a polyethylene film with a density of 200 microns is laid on the gravel. It will not allow water and solution to penetrate into the gravel, eliminating the risk of a bridge for capillary moisture and reducing the strength level of the concrete screed.
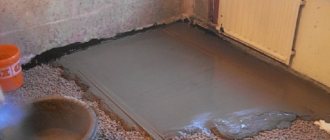
After the insulation layer has been laid, the floor in the concrete bathhouse can be poured. Filling is carried out layer by layer and quickly, carefully leveling the surface with the desired slope. Then they pause in work, waiting for the screed to harden and gain strength (2-3 days). These days the floor is moistened by spraying water or covered with a damp cloth.
Bath sewer theory
Amateur photo showing the principle of pouring a floor with a slope towards the drain hole
Step by step process
Considering that all such structures are made mainly of wood, it is necessary to take this type of floor as a basis. It is also worth noting that a concrete surface, which can later be sewn up, is best suited for a bathhouse.
It is much easier to make subfloors at the stage of wall construction, since this is not only convenient, but will also provide the support necessary for installation
It's no secret that many owners dream of having their own bathhouse; some of them even do most of the work with their own hands. Below we will describe one of the most important elements of a bathhouse. Namely, how to drain water in a bathhouse without the help of specialists, so that the result is a high-quality design, no fungus forms in the system and no unpleasant odor emanates.
The collection of bath wastewater can be carried out in different ways. Determining the best method usually depends on the type of installation of the future floor. If the floor is leaking, you will need to install a special tank to collect water, from which the waste will move into the sewer.
If you plan to lay a non-leaky floor, you will need a concrete drain in the bathhouse with a slope, equipped with gutters and ladders, designed to drain water. It is worth noting that the slope of the floor in the bathhouse for water drainage must be taken into account.
However, it is worth understanding that the sewerage system must be done before laying the floors.
So, you decided to build a bathhouse. Where to begin? Of course, with planning. Because without planning, the end result is not at all what you wanted at the very beginning.
In order for your bathhouse to please you with its characteristics, you need to write down all the important points before you start building it:
- How many people should the steam room and washing area be designed for?
- How quickly should the steam room warm up and how long should the temperature be maintained?
- In what seasons should the bathhouse be used or should it be ready for year-round use?
These are just a few questions from a large list that you must answer before starting bath construction.
So, what should a bath sewer be like, how should it be equipped - here is a small list of questions that you should answer before you start installation:
- Will you make a bathroom in a bathhouse or will you only have a washing area?
- Will the bathhouse be heated year-round, will there be above-zero temperatures in the bathhouse rooms?
- What materials will be used in the construction of the bathhouse, what will the walls, rough and finished floors be made of, what waterproofing materials will be used?
- How far is the house from the future building site, how far is the septic tank, at what distance from the future bathhouse is the drainage ditch?
- How far is a well, borehole, or any other source of drinking water located from the future bath complex?
- Is there an open body of water near the construction site - a river, lake or pond?
- Will there be a plunge pool installed next to the bathhouse or a swimming pool?
READ MORE: How to waterproof a bathroom floor and how to do it
Having answered the above questions, you can fill the floor with a drain yourself or make a pouring structure, as well as install a water drain in the bathhouse with your own hands.
How is a bath sewer installed, and what theoretical aspects are important here?
Firstly, at the time of the start of the implementation of the bath water drainage system, you must have completed all foundation work. In strip and slab foundations, holes for future sewer pipes are prepared in advance. Columnar foundations do not require such preparation.
Secondly, a place must be selected for a pit with a crushed stone filter for bath water. Many owners build a pit right under the bathhouse, but this is the wrong decision. In this case, the lower crowns of the bath house and the subfloor will constantly be affected by wastewater, even if the base is made high and the waterproofing preparation is not forgotten.
Thirdly, before starting the project, it is necessary to choose what type of floor will be used - solid or poured. This determines how the power structure of the lower floor of the bathhouse will be implemented, how the subfloor will be implemented and, most importantly, how wastewater will be collected from the washing compartment.
In order for your bath furniture to last for many years, you need to study some recommendations for caring for it. The basic rule to remember: after each session in the steam room, the room must be ventilated. This procedure will allow you to quickly remove excess moisture from the room. Sometimes a sauna stove is used for drying, which is turned on for some time after the sauna procedures.
A bathhouse is a room in which sanitary and hygienic procedures are carried out. Therefore, cleanliness in the steam room should be monitored as carefully as in the bathroom. Regular cleaning helps prevent the accumulation of dirt and the development of bacteria on the shelves in the steam room.
The most important rule is the mandatory drying and ventilation of the room after each session in the steam room
After each procedure, it is recommended to wipe all surfaces using a dry towel. This measure will significantly speed up the drying process of wooden boards. It is worth remembering that natural materials cannot be treated with cleaning products containing active chemical compounds. The best option in this case is to use laundry soap.
Self-assembly of bath furniture requires careful preparation. Before starting work, you will need to complete a drawing that includes all the necessary dimensions and data about the room and the structure of the shelf itself. If you are not confident in your own abilities, you can always use the services of specialists.
Step by step process
Performing hydro- and thermal insulation
When studying the issue and trying to understand how to properly pour a concrete floor in a bathhouse, you cannot ignore the laying of layers of insulation. Without proper protection, the floor will not last long and will not provide comfort. Protection is needed both inside the room itself from moisture and from the ground.
Laying roofing felt
Waterproofing is usually made of roofing felt, which is laid in two layers. The roofing material is rolled out over the entire area of the room, overlapping with a bend on the walls of 3-5 centimeters. Where the sheets adjoin the walls and overlap, they are coated with bitumen mastic.
The second layer of waterproofing is laid in the same way, slightly moving it tangent to the first. The bottom and walls of the pit must also be covered with two layers of waterproofing.
Installation of EPS
Before pouring a concrete floor in a bathhouse, you also need to take care of thermal insulation. It is best to choose extruded polystyrene foam, which comes in slabs 5 centimeters thick. The material is not afraid of moisture and demonstrates good mechanical strength and density. Along the perimeter, the slabs have tongue-and-groove projections, thanks to which you can easily and quickly create a continuous thermal insulation layer.
Work begins from the pit, then the walls are lined flush with the floor, then the slabs are mounted on the floor itself. Any gaps between the material are carefully filled with polyurethane foam to create a monolithic layer of thermal insulation.
Finishing screed
To properly fill the floor in a bathhouse with concrete, two screeds are made. After the rough and insulating layers, the finishing coating is poured. The solution is prepared in the same way as for a rough screed; the layer is made up to 10 centimeters, remembering the need for a floor slope towards the water drainage.
Reinforcement
To strengthen the screed, a reinforcing mesh of steel rods with a cross section of 5 millimeters is used. In some cases, it is possible to replace the steel mesh with fiberglass, which is explained by the absence of serious loads on the floor of the bathhouse. The screed is made 7-10 centimeters thick, the reinforcement frame should be located in the middle, and be filled with a layer of concrete of at least 3 centimeters on all sides.
Preparation of the solution
When choosing a brand of concrete for the foundation for a bathhouse (finishing layer of the floor), preference is given to M400 or M500. The proportions are the same as when preparing the mixture for rough filling. It is better to prepare the mixture in a concrete mixer.
You can use a mixture of cement and sand in a ratio of 1:3 for pouring, or ready-made dry mixtures created for use in rooms with high humidity levels.
Work progress
The installation of a concrete floor in a bathhouse (finishing layer) begins with a pit. First, a finishing screed is made on the bottom, then wooden formwork is created and the walls are poured at the level of the thermal insulation layer. Here, be sure to ensure that the mixture does not get inside the drainage pipe (it must be covered with a lid or a rag).
Next, the mixture must be distributed evenly over the entire surface of the floor in a layer up to 7 centimeters thick, lay out the reinforcing frame, and fill it with a solution of the required thickness (at least 3-4 centimeters).
Drying and removing imperfections
The final screed takes 2-3 days to dry, with the layer always being moistened during the process. If cracks begin to appear as the concrete dries, it is most likely due to the rapid evaporation of moisture. In this case, the coating can be repaired - carefully open the cracks, fill with a special repair composition of sand and cement mixed in equal volumes.
Installing a floor in a steam room with your own hands: a step-by-step guide
The steam room is the central room in the bathhouse. The air temperature in it can reach 70°C with a humidity of 80%. In a Finnish sauna, the air is 10–20°C hotter, but the humidity is noticeably lower.
A steam room with a wooden, leaking plank floor is ideal for relaxing outside the city.
The requirements for the floor structure in the steam room and washroom are almost the same. Water and condensed moisture must be freely removed from the surface, while heat must be retained and the lining must have anti-slip properties.
According to the type of arrangement, the floor in the steam room is also divided into two types: leaking and non-leaking.
In the steam room, the floor can be additionally insulated
The best option for bathhouses on a pile foundation would be the construction of an insulated leaky floor with board or grating flooring. The most common layout of such a floor will consist of:
- Floor beam.
- Skull block.
- Plank flooring subfloor.
- Pit for forming a drain hole;
- Drainage polypropylene pipe.
- Water drain.
- Expanded clay insulating pillow.
- Reinforced concrete screed.
- Wooden lattice flooring.
- Waterproofing with an overlap on load-bearing walls.
When installing the floor, you can use expanded clay backfill and concrete screed. This is a labor-intensive process that requires certain skills in working with cement mixture.
Expanded clay can be replaced with conventional mineral insulation, and instead of a screed, a sheet of galvanized steel can be used.
Selection and calculation of material
The size of the steam room directly affects the amount of material required. Therefore, as an example, a calculation is given for arranging a floor in a 3x3 m room.
A block of wood and an edged board can be used to lay the subfloor in a steam room
To make a leaking floor you will need:
- The skull block is used for laying the subfloor. Typically, material with a cross section of 30×30 or 40×40 mm is used. The length of the beam depends on the size of the supporting beam. For a room of 3x3 m, the pitch of the beams is 50 cm. Therefore, 30 m of timber will be required.
- An unplaned board from which the subfloor is made. It is recommended to take material 20–25 cm wide and 2–2.5 cm thick. To cover one span you will need: (300/20)*0.5=7.5 m of boards. For 6 spans: 7.5*6 = 25 m.
- The guide block is used to form a slope towards the drain hole. You can use timber with a cross section of 20×30 or 30×30 mm.
- Finishing timber is used as load-bearing joists for laying floorboards. It is better to choose larch with a cross section of 70×70 mm. The quantity depends on the step. For example, when installing material every 70 cm, 15 m of timber will be required.
Galvanized sheet is laid on logs made of 70×70 mm bars - Ruberoid acts as an insulating material. The standard roll width is 1 m. To insulate the floor in a 3x3 m steam room, you will need 15–17 m of roofing material, taking into account overlaps.
- Insulation. For a bath, 10 cm thick basalt wool, which is available in rolls, is suitable. It is calculated depending on the total floor area, but it is better to purchase with a reserve.
- Cink Steel. It is recommended to lay a whole sheet on the floor without joints or seams. Sheet thickness - 0.7 mm. To cover a floor with an area of 9 m2, a sheet of 10.5 m2 is required.
We recommend: What factors influence the height of the window sill from the floor in a private house?
A polypropylene pipe, an elbow for drainage and a drain are purchased taking into account the installation location of the drain hole. To organize a drain in the middle of the room, you will need to lay a pipe, put on a swivel elbow at an angle of 90°C, and make an extension to drain the drain flush with the floor surface.
How to lay the floor in a frame bath on a pile foundation
Before installing the floor, you will need to carefully inspect the lower crown and supporting beams. If there is any damage or signs of rotting, then this element requires partial or complete replacement.
The support beam may need to be replaced or a subfloor may need to be installed.
The technology for making a pouring floor in a steam room consists of the following:
- Rough bars are attached to the lower part of the supporting beams, embedded in the crown. To fix the elements, galvanized nails 60–70 mm long are used. The fastening step is 50 cm.
- A rough flooring made from edged boards is laid on the support bars. To do this, it is sawn off to a size corresponding to the width of the opening between the beams. No fasteners are used during installation. A hole is cut in the rough flooring for the entry of the drain pipe.
- After laying the flooring, the floor surface is covered with roofing felt with an overlap of 15–20 cm on the wall and an overlap of 10 cm with each other. The joining seam is coated with bitumen mastic.
Laying insulation and installing beveled guides will help create the desired slope - The space between the logs is filled with thermal insulation material. Most often, basalt wool is used in rolls, but you can also make an expanded clay pillow.
- The guides are laid from timber or thick boards. To do this, the material is laid in such a way that a slope is formed, for which you can use pads under the beam at the base.
- The guides are attached directly to the support beams using galvanized nails or self-tapping screws 50–80 mm long. After this, the space between them is filled with basalt wool.
Laying galvanized sheet metal on the floor in the steam room is mandatory - A galvanized sheet is laid on top of the guides with an overlap of 15–20 cm on the wall. For fastening, only special self-tapping screws with a flat head are used. The mounting step along the wall is 15–20 cm, along the guides — 20–30 cm. After installation, a small hole is carefully made in the center of the sheet to drain the water.
- The support beams are being fastened under the plank poured floor. To do this, a beam with a cross-section of 70×70 mm is attached to the wall using an “L”-shaped galvanized corner with a pitch of 70–100 cm. Floorboards made of polished boards are laid on top of the beams (it is better to use larch). The distance between them should be 3–5 mm.
Galvanized sheets are used infrequently, but this is a fairly good solution that allows you to relieve the load-bearing structure of the floor. If the bathhouse is built on a strip foundation or is located in the basement of a house, then it is better to give preference to a grate with further pouring of a concrete screed.
Floor making tool
You will need the following tool:
- jigsaw or wood saw;
- construction knife;
- metal scissors;
- screwdriver;
- electric plane;
- hammer;
- square;
- chisel.
To install the floor in a steam room, you must prepare all the necessary tools in advance.
Video: how to make a plank floor with a slope in a larch steam room
How to prevent rotting of joists and floorboards
To treat the floor in the steam room, a heat-resistant (withstands up to 120°C) water-based varnish is used. This is an elastic coating that protects wood from penetration of moisture, vapor and dirt.
Applying a water-based varnish after laying a plank floor is a mandatory protective measure.
The composition is applied to the prepared floor covering using a paint brush in 2 layers. Application is carried out in a ventilated area at a temperature of 5–30°C. When installing a leaking floor, treatment should begin after laying the load-bearing joists. Only after the composition has dried (2-3 hours should pass) can you proceed to laying the floor covering and impregnating it.
This composition is not suitable for treating furniture in a steam room. Benches, stools, and chairs cannot be covered with it.
The average consumption of the mixture is 18 m2/l.
Installing a floor in a bathhouse is a technologically complex and labor-intensive process, largely dependent on the individual characteristics of the structure, its dimensions and the type of supporting base. Before performing this work, it is recommended to draw up a diagram where you need to identify its main elements and components. This will allow you to more accurately think through the flooring technology specifically for the parameters of your bathhouse.
Other types of floors in the washing room
Those who honor long-standing bath traditions install an earthen floor in the wash room. The process of laying it is extremely simple - cut off the top layer of soil by approximately 15 cm around the entire perimeter of the room and compact the remaining soil.
If you really respect the customs of your ancestors, then you need to dig a pit half a meter deep and fill it with a mixture of fine sand and gravel. If desired, you can lay boards on top.
Previously, bathhouse floors were installed directly on the ground, after first cutting off its top layer and compacting the base
We have already talked about clay floors, but despite all the advantages of clay itself, such a floor has a big drawback - clay does not dry well, and when dry, it forms cracks into which water seeps. As a result, a persistent unpleasant swampy smell appears in the wash room over time.
In a word, wood is the best choice, although it can be combined with other materials.
Finishing options for further use
When studying the question of how to make concrete floors in a bathhouse, every master thinks about further finishing. Concrete allows you to implement any option - leave the screed in its original form and arrange wooden pallets or cover the floor with any material.
Ceramic tiles (an ideal choice in terms of durability, environmental friendliness, and resistance to moisture), a wooden false floor, or simply wood flooring (a less durable option) are perfect for a bathhouse.
When planning to create concrete floors in a bathhouse with your own hands, you need to study the whole process very carefully. Subject to compliance with technology and established rules, as well as the selection of high-quality materials, it will be easy to create a durable and durable floor covering.