Connecting a heated towel rail: DHW or heating
Before installing a water heated towel rail in the bathroom, you need to decide on the method of connecting it.
Two options are available:
- Connection to the DHW system . The method guarantees year-round heating. The device heats up when hot water is consumed - the heated towel rail cools down overnight even when turned on directly through the riser.
- Connection to the heating system . This option is relevant in the absence of a centralized hot water supply network. Thanks to the forced circulation of the coolant, the coil remains warm around the clock. The disadvantage is that the dryer functions only in the cold season.
When replacing a heated towel rail in an apartment building with a change in the way it is connected, a project will need to be developed and approved by the housing and communal services department. It will take about a month to complete the package of documents.
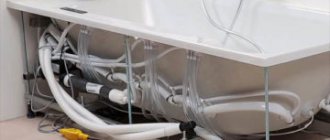
The insertion points of the water device into the heating or hot water riser can be hidden behind a screen or box constructed from plasterboard
Easy replacement
First of all, it's a simple replacement. In this option, the old heated towel rail is immediately replaced with a new one without major work on the common hot water pipe. For this:
- Select a connection diagram depending on the type of new heated towel rail and the location of the outlets to it from the common hot water pipe;
- The hot water riser is turned off;
- The old device is removed;
- From the place of the old connection point, a new water supply is laid according to the diagram to the installation site of the new device;
- Install and connect a new heating device;
- Turn on the hot water supply.
These works are the simplest, although it is important to choose the right connection diagram and correctly route the pipes to the heating device.
General installation requirements
Installation of a heated towel rail with a “water” operating principle is carried out subject to a number of conditions:
№1. The diameter of the pipes of the device must correspond to the diameter of the riser; narrowing from the installed fittings is unacceptable.
№2. A jumper must be provided between the drying outlets. The bypass performs a number of tasks:
- maintaining the speed of water circulation throughout the riser;
- separation of coolant flows allows you to save heat for subsequent water intake points;
A significant advantage of turning on the closing sections, bypasses, is the ability to turn off the heated towel rail for repairs without stopping the operation of the system as a whole.
№3. It is prohibited to install shut-off valves on the pipeline section up to the bypass and directly on the jumper.
Failure to comply with the requirement entails:
- slowdown of water circulation through the riser and drop in coolant temperature;
- deterioration of pressure in apartments located in the direction of water supply.
The closing sections can be equipped with the usual ball valves on the bypass and supply line or with more functional three-way valves that allow the coolant to be directed either to the bypass or to the radiator.
№4. The recommended height for placing towel dryers according to SNiP is 120 cm from the floor.
№5. Maximum distances between the heating device and wall cladding:
- 3.5-4 cm – if the coil diameter is 2.5 cm or less;
- 5-7 cm – for pipe cross-sections larger than 2.5 cm.
If a bypass is provided in the installation diagram, then it is permissible to install shut-off ball valves at the outlet and inlet of the device.
Using a bypass in a heating circuit allows you to divide the total coolant flow into two parts. One of the parts goes into the battery, the other is supplied to the following devices, due to which all radiators receive coolant at almost the same temperature as the first (+)
Additional information for self-installation
When installing a heated towel rail yourself, you must follow the rules and requirements for the system to work properly. It is not recommended to install parts made of different metals, otherwise there is a high risk of developing electrolytic corrosion processes that can deform the structure.
The heated towel rail must perform its functions all year round, so it must be connected to the hot water supply system, and not to the heating. If this is not possible, use a combined option. Thus, when the heating is turned off, the dryer will operate from the electrical network.
You should also pay attention to the following recommendations:
- installation is carried out both to the upper and lower nozzles, with the lower location the power is 10 percent lower;
- if the diameter does not match, adapters are used;
- It is preferable to use a bypass; it will allow you to make repairs without shutting off the entire riser.
It is advisable that the heated towel rail be equipped with a special valve for releasing air, this will ensure uninterrupted operation of the entire structure.
Recommended and unacceptable insertion schemes
The operation of the coil is based on the principle of a “gravity pump”. Proper insertion ensures natural circulation and functionality of the radiator. The development of a do-it-yourself installation diagram for a water heated towel rail is carried out in accordance with the design of a specific model and the location of the riser in the bathroom.
Lateral and diagonal connection
For most devices, the optimal option is a connection with coolant supply through the top outlet and outlet from the bottom. This is achieved with universal connections, the diagrams of which are given below.
Lateral and diagonal connections without narrowing or shifting the bypass are equivalent options. The circuits function well with coils of different shapes (+)
Advantages of a universal insert:
- performance does not depend on the direction and speed of water supply in the riser;
- after turning off the circulation, bleeding of air is not required;
The universal insertion option allows you to place the heated towel rail at any convenient installation distance from the riser.
Conditions for the operation of the scheme:
- The lower insertion point is located below the connection pipe to the radiator, and the upper insertion, accordingly, is above the upper outlet. The slope of the supply pipes is 2-3 cm per meter. A horizontal connection is permissible for pipes with a cross-section of 32 mm, and also if the distance to the riser is less than 2 m.
- Supply pipes - without bends or humps. Otherwise, the system becomes airy and natural circulation stops.
- Optimal diameter of supply pipes: ¾ inch steel, 25 mm – reinforced polypropylene.
- It is advisable to insulate the pipes. This requirement is especially relevant for hidden installation of a plastic pipeline.
A completely workable side/diagonal insertion scheme with a narrowed bypass. Plumbers resort to this design on a previously installed heated towel rail if there is no need to completely change the design of the riser.
Between the leads to the device, the jumper is narrowed by one diameter size. The insertion option is only suitable for water circulation in the direction from top to bottom
Shifting the bypass is justified if you want to preserve the old connections to the riser. With this connection method, it is not recommended to use a narrowed jumper. The main requirement is the top supply of coolant.
Tolerances and installation requirements for tapping with an offset bypass are the same as for lateral or diagonal connection with a flat jumper (+)
Some dryer models are designed for bottom connection. The insertion is carried out according to three main schemes.
The circuits are operational in any direction of coolant flow. When the water is turned off, the system is aired out, so a drain valve must be located on the vertical manifold. As a rule, it is included with the device (+)
Requirements for implementing the bottom connection:
- The lower outlet must be located below the heated towel rail.
- It is advisable to insulate the supply pipes.
- The upper outlet of the riser when using an offset or narrowed bypass is located below the point of connection to the device.
The optimal slope is about 2 cm per meter of pipe. Fulfillment of this condition ensures that the circuit is independent of the direction of water flow.
Possible forced insertion options
When connecting laterally, some deviations from typical recommended circuits are allowed.
Pipe routing if a non-standard location of the liner is required. The operation of the device is equally effective in different directions of the coolant (+)
The basic conditions of the tie-in remain unchanged. The difference is in the connection points between the heated towel rail and the riser, as well as in the presence of vertical sections at the inlet and outlet of the device.
An alternative sidebar option is shown below. The top of the heated towel rail is located above the top outlet. After turning off the water, you will need to bleed the air from the coil.
The connection diagram requires the installation of an air vent on the device. Due to the design “step”, when the water supply is stopped, an air lock is formed in the system (+)
The lower inset may also be somewhat modified. The need to place pipes from the riser at a minimum distance to the floor forces us to increase both ascending connections. If all requirements for the lower connection are met, the system operates without failure.
The requirements for installation work when inserting with extended vertical sections of the lower line do not change. Different directions of water circulation are allowed (+)
Incorrect connection diagrams
Inexperienced craftsmen sometimes do not adhere to the recommended schemes. As a result, the dryer remains cold with an uninterrupted supply of hot water. Examples of possible omissions are displayed below.
Incorrect execution of the side and bottom inserts leads to a stop in the water circulation in the heated towel rail (+)
In both options, the device is located below the lower outlet from the riser. The coolant that sinks down cools and becomes trapped. The water is not pushed back, since there is pressure from the coolant flow from above.
Side cut with a loop at the top. The scheme is implemented by craftsmen in order to hide communications behind the suspended ceiling
Air accumulates in the resulting “hump.” Over time, the air lock blocks the circulation in the radiator and the heated towel rail cools down.
The option presented below combines two errors at the same time. The scheme is obviously not working.
The combination of the lower and upper threshold impedes natural circulation. This design is typical when craftsmen try to hide the upper supply behind the ceiling, and the lower one in the floor screed
Dismantling
Serial Soviet coils are connected to the main line by means of a threaded coupling or by welding. The first method allows for disassembly: loosen, screw the locknut all the way, and twist the coupling with a gas wrench.
Paint on the threads that interferes with the operation is removed with a metal brush (brushing) or burned with a torch. The thermal method is suitable for major renovations of a bathroom, otherwise the lining is protected with an asbestos sheet.
The welded elbow is cut off with a grinder. Do the same with brackets attached to pipes. To avoid damaging the finish with flying abrasives, place plywood or cardboard between the knee and the wall. The latter is convenient to attach to the tile with tape.
Replacing an unusable heated towel rail without updating the bathroom line is irrational. The chrome ladder will serve properly, and fistulas will appear on the steel riser and inlets, so think about plastic.
Cutting the steel route near the ceiling and floor is a bad idea: pipes tend to leak in the ceiling. It is better to agree with your neighbors to jointly replace rusting pipes with fiberglass-reinforced polypropylene pipes. If the answer is negative, leave nozzles protruding 100 mm above the plate so that the thread-cutting tool can fit. Sometimes you have to dismantle the tiles to free up space.
If the riser is not touched, as a rule, they try to choose a towel that is identical in its center-to-center dimensions. For bent modifications of other dimensions, the insert will need to be moved. Sometimes they redo the plastic wiring, then they make do with plastic scissors. When cutting off the existing one, take into account the need to install taps and lintels.
Step-by-step installation of a water heated towel rail
The technology for installing a water heated towel rail with your own hands is the same for different connection schemes. The step-by-step progress of work includes dismantling the worn-out device, supplying pipes from the riser, installing taps and fastening the coil.
Preparation of tools and materials
The set of tools required to install and replace a heated towel rail depends on the type of water pipes in the room. For installation through polypropylene pipes you will need: ball valves; mounting brackets; polypropylene pipes; soldering iron and knife for cutting PP pipes.
The standard equipment of the heated towel rail includes:
- transition corners;
- silicone gaskets;
- locking units;
- telescopic brackets;
- Mayevsky crane.
It is advisable to use components from the same metal in the system to avoid electrolytic corrosion.
All connections are sealed with gaskets, threaded detachable units are sealed with plumbing tape (+)
Dismantling of old equipment
Before dismantling the outdated coil, it is necessary to coordinate the actions with the house management organization. Disconnecting the riser from the water requires special permission.
Following actions:
- If the towel dryer is not integral with the hot main, then the threaded connections must simply be unscrewed.
- If the device is welded to the riser, then it should be cut off with a grinder. The remaining portion of the pipe connection should be sufficient for threading.
- Remove the used device from the brackets.
The height of the cutout in the riser must exceed the distance between the pipes of the new device by the length of the couplings and bends required for inserting the bypass jumper
The size of the dismantled area must be determined with maximum accuracy. It’s better not to cut a little, and after “trying on” the device to the installation site, adjust it according to the fact
Installation of bypass and ball valves
The coil can be mounted without installing a bypass, but experts recommend providing a jumper in advance. Ball valves are installed at the ends of the heated towel rail. If necessary, the coolant supply to the device can be shut off, while water will circulate freely through the riser.
The bypass is inserted into a riser made of PP pipe using tees and couplings (+)
To install valves on pipe sections, cut a new thread using a die of the required diameter. If after dismantling the old device the thread has survived, then it is enough to “drive” it with a die to improve the connection. Install shut-off valves on the prepared pipes.
Installation of the jumper in the steel pipeline is carried out by welding. The bypass diameter is equal to the cross-section of the riser pipe
Attaching the heated towel rail coil
The procedure for “hanging” and connecting the device is as follows:
- Apply markings on the wall for the brackets - it is necessary to ensure that the placement of the coil is horizontal.
- Prepare the holes and insert dowels into them.
- Screw the brackets to the heated towel rail, place the device against the wall and secure with screws. It is important to adhere to the recommended distance between the radiator and the wall cladding.
- Connect the unit to the valves on the jumper using fittings, seal the connections with linen wrap.
Depending on the type of connection, straight or angled threaded fittings are used.
At the end of installation, inspect the tightness of the joints and smoothly open the taps to check the functionality of the device. There should be no leaks or drops
What not to do
All the above schemes work stably. As you noticed, all bends go straight, without bends in the form of an arc or rings. This is not accidental - air accumulates in all irregularities, which interferes with, and sometimes completely blocks, circulation.
This scheme doesn't work
The installation of the heated towel rail in the photo is incorrect. At least two mistakes were made:
- the bends are made narrower than the center distance of the heated towel rail;
- They are made with a metal-plastic pipe with loops.
This connection simply cannot work. Metal-plastic pipes are an excellent material, but not for connecting heated towel rails. Their fittings have a very narrow lumen, which has a bad effect on circulation. Plus, air accumulates in the loops, and the flow along the upper loop, even when supplied from above, will not flow - too much hydraulic resistance to the water must be overcome.
Unstable circuits
The following two schemes may work, but not always. At the bottom of the heated towel rail, the water stagnates and, given any difference in height, cannot rise. No one can say specifically when it will work and when it won’t. Depends on the pressure in the riser, the diameter of the pipes and the design of the dryer itself.
Unstable connection schemes
With such a connection, even a working connection may suddenly (usually after stopping) stop working. Everything is simple: the pressure has changed, the pipes are clogged, the water from below is not “pressed”, the heated towel rail does not heat.
Another option for an unstable circuit is with a loop on top. Again, it will work under certain conditions. But sooner or later the highest point will become airy and block the circulation. The problem can be helped by installing an automatic air vent at the highest point, but if the pressure drops, it will not save you.
With loop on top
Not true at all
The photo below shows examples of what not to do. Schemes without a tap on the bypass are inoperative. What this threatens is known. In addition, after several years of use, they will stop functioning altogether. Most likely this will happen after the next shutdown - the system will become clogged with dirt. This is because the entire flow of hot water is directed through the heated towel rail. After repairs, the water carries a huge amount of dirt, which safely settles in the bends (in the lowest areas first). Within a few years everything becomes completely clogged. Fortunately, everything needs to be redone and connected correctly, but only flushing can help the fire.
Very bad idea
It is necessary to wash both the heated towel rail and the connections to it. To do this, remove the dryer and wash it in the bathroom, and wash the outlets one by one by connecting a hose to the free outlets, the other end of which is taken to the sewer. By manipulating the taps, pass a flow of hot water through one outlet, then through the other. After washing everything is put back in place. It may be possible to start the system after this.
Features of installation of electric models
Unlike water models, electric dryers can be installed anywhere, since they do not depend on the location of heating pipes and hot water supply. In this case, special attention should be paid to the quality of the electrical wiring.
Requirements for installation of electric heated towel rails:
- The installation location is selected taking into account the level of protection of the device from moisture. The distance to the bathroom or washbasin is at least 60 cm.
- The minimum distance to the floor is 20 cm, to the wall – 30 cm, to the surface of furniture – 75 cm.
- The heating device must not be placed directly under the outlet.
Connection to the electrical network is carried out in accordance with the international standard NFC-15-100.
The optimal location is zone No. 3. When installed in zone No. 2, protection of the device from splashes is required (+)
Electrical wiring under the heated towel rail is carried out in compliance with electrical safety standards in rooms with high humidity:
- connection via a three-wire cable with grounding;
- Only hidden electrical wiring is allowed;
- the socket must have a rubber seal and a cover covering the contact holes;
- Copper wires of the VVGng and VVGng-LS brands are used for the electrical network.
A prerequisite for the installation and operation of electrical devices is the use of an RCD that turns off the device when the current operating characteristics are exceeded.
Oil heated towel rails require rigid fixation, while cable radiators can be installed in any position
Decorating the installed device
The pipes to the hot water supply can be decorated. You can use different options for this. One of which is the installation of a plasterboard or plastic box where the water supply and the riser itself will be hidden. The installation of the box is carried out taking into account the following features:
- small channels are made at the junction of the box and the floor, which will help to detect a possible leak in time;
- It is better to equip the box with a door, which will be located opposite the locking system.
the presence of a door will allow access to the taps. This is necessary in order to carry out repair work on time. Pipes can also be walled up in the wall; to do this, you need to make indentations using a hammer drill. The grooves are subsequently filled with gypsum mortar, and tiles are laid on top.