Instructions for installing a toilet, a complete guide to action
Toilet installation instructions
Having decided to install a toilet, you cannot do without a manual, preferably a visual one. Detailed toilet installation instructions will help you complete this procedure.
Before you begin installing a new toilet, you must dismantle the old one.
The rules for dismantling a toilet are simple:
turn off the water; unscrew the cold water supply; unscrew or break off the fixings of the toilet to the floor; tilt the toilet further back so that the remaining water pours out; unfasten the toilet from the socket.
Choosing a new plumbing item is not a problem; with today’s variety of toilets, you can find toilets of any type and price. In the average price range, for example, a good manufacturer is the Spanish company Roca, which produces sanitary ware under the jika and roca brands.
DIY toilet installation
Published: 12 Nov 2011, 22:02
The installation of a toilet needs to be approached responsibly. As a rule, installing a toilet with your own hands takes a little longer than if it was done by specialists. So, the required toilet model has been purchased. Turn off the water and remove the old toilet
A new one will be installed in place of the old toilet, so it is important to make the adjustment correctly, namely, to make sure that the toilet flush is connected to the waste pipe. If there is no connection, you can build up the floor under the toilet, and the problem will be solved
There are several ways to fix the toilet to the floor: fastening the toilet with screws, fastening it to a wooden board previously recessed into the floor, or fastening it using cement-sand filling. After fixing, we connect the place of the toilet bushing with the entrance to the drain pipe. Don’t forget about fixing the cistern; this is no less important work than installing a toilet. A properly installed tank should not leak, so if a defect occurs, it will be immediately detected. At the end, you need to connect the hose to the inlet and check the functionality of the toilet.
Keep your new toilet clean and clogs won't cause you any trouble, but if this happens, you need to know how to unclog the drain. What can you say about installing a toilet? Maybe there are some other nuances that need to be taken into account?
DIY toilet installation.jpg
Required materials and tools
For assembly, installation and connection, you should prepare tools and materials in advance so as not to be distracted by searching for them during the work process. Regardless of how the toilet is installed, you will definitely need:
- pencil;
- level;
- Screwdriver Set;
- spanners;
- drill with a set of drills;
- perforator;
- sealant;
- fum tape.
Additionally, you will need a flexible hose, a cuff or corrugated pipe, and a mounting system for the body and tank. In most cases, all this is included with the product, but sometimes you have to buy the missing elements separately. For this reason, it is recommended to check that the equipment is complete before installation.
Features of installing a toilet on a heated floor
Typically, experts recommend installing the toilet with bolts. This is quite logical, because given the small area of the pedestal, the task simply leaves no other option. But sometimes doing without bolts is not only possible, but also necessary.
It is necessary to use the installation option without bolts if the bathroom has a heated floor. Without knowing exactly how the heating elements are located, if you drill a hole for the bolts, you can end up with very expensive repairs.
The use of glue for fixation in this case will prevent harm to the heating system.
Before you start fixing the toilet without using bolts, you need to thoroughly clean the bottom plane of the pedestal, as well as the floor. Dust and dirt must be removed from surfaces and degreased. The adhesive solution adheres better to a degreased surface, and the fixation becomes stronger.
The adhesive should be applied exclusively around the perimeter of the lower part of the toilet base. The area of the floor that will be hidden by the plumbing fixture is completely covered with glue.
To avoid wasting adhesive solution, before applying it, you need to draw the boundaries of the toilet bowl on the floor. Having installed the plumbing fixtures with glue, you will need to press them well, and remove excess glue from the floor. After which it will be necessary to install pipes and fittings.
Let's take a closer look at installing a toilet on a heated floor. First of all, you need to install the toilet in the place where you plan to fix it:
- Its boundaries are outlined on the surface of the tile.
- Using a grinder, the enamel is removed from the tiles. You need to remove about two millimeters of the layer. It is necessary to remove the enamel so that the glue will better fix the toilet.
- After preparing the surface, you need to remove dust and degrease it. To do this, it is better to use a special composition for plastic and ceramics. It can be purchased at almost any hardware store. Such degreasers come in different volumes and packaging, but it is best to buy them in spray form. They are convenient to use, and their weathering speed is much higher.
- After this, you need to treat the underside of the toilet. Usually there is no enamel coating on it, but if you get caught by a diligent manufacturer and apply it, you should get rid of it.
- Once the degreaser has worn off, liquid nails should be applied to the floor and underside of the toilet. After which the toilet is put in place and pressed down.
- Excess glue should be removed using a rubber spatula.
This completes the work. All you have to do is wait until the glue hardens. As a rule, complete drying occurs within a day. But this time depends on how thick the layer is. And since the thickness of the adhesive layer is quite large, it is better not to use the device for about a week so that the fixation becomes strong.
Liquid nails should be chosen specifically for use in the bathroom. They are sold under the marking No. 915.
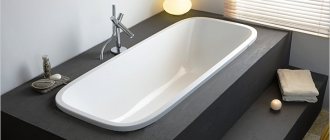
What is what
Toilets are divided into two types depending on their design: wall-hung and floor-mounted (also called traditional). The first type is usually installed in sanitary rooms located in public places. The tank of such an element is installed directly into the water pipe itself. Also suitable for rooms with small space. The range of the second type – floor-standing toilets – is quite wide. Such products are made from a variety of materials (such as ceramics, porcelain, steel, cast iron, plastic, earthenware and others), and the choice of their shapes is varied. Ceramic products are considered the most durable and can last up to fifty years. The shape and size of the toilet is influenced by the type of drain, which comes in three types: vertical, horizontal and oblique. The prices of such structures in average stores in our country vary from two to several tens of thousands of rubles. It all depends on the material, design and other individual factors.
Main types of toilets
How to install a toilet without bolts
To attach a toilet to the floor without bolts, you need to thoroughly clean both the bottom plane of the pedestal and the floor itself. Cleaning includes degreasing - this will ensure maximum adhesion of the glue to the surface.
As for applying the adhesive composition, it is applied to the pedestal only along the perimeter of the lower plane. The area of the floor that the toilet will cover must be completely covered with glue.
To prevent the glue from protruding beyond the boundaries of the toilet, before applying the glue, you can outline the perimeter of the pedestal on the floor. Having glued the toilet to the chosen place, you need to press it and wipe off excess glue on the floor, as well as connect sewer pipes and fittings.
The adhesive composition provides protection against moisture, and therefore there is no need to treat the junction of the pedestal and the floor with silicone.
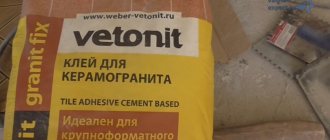
Types of adhesives
Gluing a plumbing fixture is easy. This method is much simpler than drilling holes and installing fasteners. To bond the surface of a toilet bowl with tiles, a variety of adhesive compositions are used, which are suitable in their characteristics for this purpose. Let's look at the most popular of them:
- epoxy adhesive;
- silicone sealant;
- liquid Nails.
There is another non-standard option that takes into account the use of cement mortar. We will also look at it in this article. Some of these options are more suitable for DIY, while others are not recommended for beginners.
How to install a toilet on tiles
As we said earlier, there are two main installation methods used. Let's look at each of them in more detail. Installation on anchor bolts has both its pros and cons. Of course, this method will allow the owner to achieve better stability of the plumbing fixtures, but there is a risk of damaging the tiles. Therefore, basic operations must be done very carefully.
- First of all, you need to install the toilet in the place where it will always be. Then you need to take a pencil and mark the points where special holes should be drilled.
- Once the marking procedure is completed, you can remove the plumbing and take a drill or hammer drill. Install a special drill and make holes in the designated locations. Do not use the impact function under any circumstances, as the tiles may simply crack. It should only be turned on after the holes in the tiles have been drilled.
- Insert the dowels you saved earlier and reinstall the toilet. Screw the bolts into the dowels, first attaching rubber washers to them. Once the plumbing is securely fastened, connect it and check for functionality.
If you don't want to risk the integrity of the tiles, you can use epoxy adhesive. To do this, you need to carry out the following operations:
- Clean the surface as much as possible from any contamination.
- Degrease it with some solvent. To do this, you can use either white spirit, or acetone, or any other similar liquid.
- Roughen the tile or cement base somewhat and re-clean and degrease it.
- Install the plumbing fixtures in the designated location and apply epoxy glue to the contact area. Press the toilet down with something heavy and leave it to dry for 12 hours.
- Connect the toilet and check its functionality.
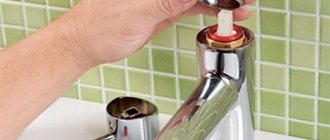
Once you have completed the installation, there is one last thing left - installing the cistern.
Usually, upon purchase, detailed instructions for its assembly are included, but often they are simply not needed, because the tanks are immediately completed and regulated by the manufacturer. In fact, of all the fasteners, there are only a couple of bolts that secure the tank to the toilet. You just need to remove the cover, install the tank, carefully tighten the bolts and connect the drain. The procedure is quite simple. If you don't understand anything, watch the video of installing a toilet on tiles with your own hands. In any case, the actual installation takes a minimum of time. You will have to wait much longer for the screed or glue to dry, but even if you entrust the procedure to a professional, it will not dry faster. By doing everything yourself, you will significantly save your family budget, and your family will be proud of your talents!
Epoxy adhesive
The easiest way is to purchase this substance in a store or order it online. You can also make epoxy glue at home, but to do this you need to maintain the proportions of the ingredients. To make it, the following components are mixed:
- epoxy resin (10 parts);
- cement (20 parts);
- solvent (2 parts);
- hardener (3.5 parts).
Epoxy glue
After preparing all the necessary components, you need to heat the epoxy resin to a temperature of 50 degrees. Next, a solvent is mixed into it. The next step is to add a hardener. Cement is added last.
Important! The resulting composition must be mixed very thoroughly. You can use the finished glue within 2 hours.
Epoxy glue has many benefits. But the most important thing is that it ensures high strength of the finished connection. Such a seam will last reliably for many years. The ability to prepare this composition with your own hands is also a big plus.
Interesting: 6 ways to disguise pipes in the bathroom
Let's get started
Each new toilet, when purchased in official stores and construction markets, must be accompanied by appropriate detailed instructions for its installation. It must be carefully studied and followed with precision for each point. Before you begin installing a new toilet on tiles, you need to buy a part such as flexible corrugation at any plumbing store, and with it individual rubber seals. It will help to extend the toilet to a fairly significant distance in the depth of your bathroom.
Flexible corrugation allows you to control the installation depth of the toilet
At the place where you plan to create the foundation of the product, inside the future outline of its base, make a mark on the tile using a chisel or file. This will help the cement to work properly on all uneven surfaces. Then, in order to begin installing the toilet itself, you need to prepare the cement mortar itself, which will act as glue.
Marking the position of the toilet on a tiled floor
Wet the mark on the tiles and bottom of the toilet. Apply the cement mixture over the entire surface of the bottom of the structure. Immediately after this, carefully place the toilet in the designated place. Leave the structure for 24 hours as the cement needs time to harden. After that, install the tank and connect the water
Pay special attention to the bolts: if they are metal, you should be extremely careful, as there is a risk of damage to the ceramics. In general, the product is ready for use
At this stage, it is recommended to stop for those for whom it would be preferable to install the toilet on a tiled floor without drilling, in order to keep the tilework intact.
Treating the joint with sealant
For everyone else, for greater reliability, we recommend securing the toilet using special fastening bolts
It is very important to remember that tiles for the toilet room must be drilled exclusively with a tile drill. Drills for wood or other materials should not be used, as there is a very high risk of damaging the tiles
The advantage of this method is that this particular installation of a toilet on a tiled floor will be absolutely “painless”, in other words, after some time it can be dismantled, and then easily installed again. For example, if you suddenly decide to carry out a major overhaul of your sanitary unit, at the same time, do not replace the toilet with a new one. The final stage will be the installation of a toilet seat (a seat, which is mainly made of plastic).
Drilling tile floor
Common Mistakes
The most common mistake is poor surface leveling. As a result, equipment breakdown and leakage may occur. To do this, you need to have a building level on hand.
Poor sealing can lead to unpleasant odors and unwanted leaks. You need to use only high-quality components with good rubberized gaskets.
There is no need to skip the point of cleaning all pipes from contamination so that the service life of the equipment is longer. If a leak in the drain barrel is detected, it is necessary to check the serviceability of the valves.
Installing a toilet is not a complicated process; you can do it yourself. The main rule is to follow all instructions and recommendations for its installation.
Toilet installation methods
There are at least three options for installing a plumbing fixture on the floor:
- using fasteners supplied as standard;
- fixation with adhesive;
- using cement mortar.
The standard delivery with the toilet comes with fasteners in the form of dowel screws. Installation in this manner is recommended only on a flat surface.
This technique is quite acceptable in terms of its reliability and stability. True, it is not always applicable. This type of mount is most often chosen for small-sized, light-weight devices.
Another installation option is fixation with glue. This method gives good strength. But if you need to carry out urgent dismantling, it won’t be possible to do it quickly and at minimal cost. This mounting option is used if there are no plans to replace the structure in the near future.
In addition, you can install plumbing fixtures using cement mortar. This is a unique alternative to standard screw mounting and adhesive fixation. This method is not much different from installation with glue, because the cement composition also includes an adhesive component. But in terms of the quality of fixation, the cement solution is less reliable than special glue.
Painless dismantling
For this procedure we need a simple set of four tools: 1) Crowbar (or nail puller); 2) Hammer; 3) Chisel or chisel; 4) Pliers. Before you begin, wash and disinfect the old toilet. Over the years of service, dirt, germs and limescale could have accumulated here. Prepare a rag and a bucket of water. Wear rubber gloves and, if possible, safety glasses. This will protect you from the unwanted effects of antiseptics, as well as from fragments and ceramic chips. Not everyone can remove a toilet that has served its useful life while keeping it intact. If during installation it was screwed with metal screws into a wooden board, which was subsequently concreted, then you will have to use physical force, practically uprooting it from the sewer pipe. The remaining fragments are removed with a chisel and pliers.
Removing an old toilet can sometimes be a real challenge
If the toilet was installed using plastic screws screwed directly to the floor, then you will have to be very careful and careful, otherwise you can injure yourself or damage the floor. Next, remove the toilet from the sewer pipe tee. You don’t have to put in much effort here. It is also recommended to clean the sewer pipe connection in the area where the toilet will be located. This is usually done using sandpaper or special cards.
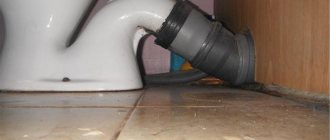
Connecting the toilet to the sewer
Preliminary work
The water supply and sewer pipes must be ready for the “new user” to connect. Install the ball valve on the cold water pipeline and connect the flexible connection. Clean the drain pipe from dirt.
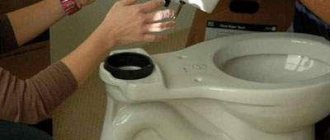
Lay out the toilet components on cardboard or cloth to avoid scratching the tiles. Check that the base of the sink is level, otherwise clean it with sandpaper, a knife or a grinder.
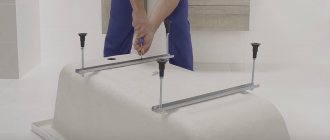
Assemble the tank according to the instructions and secure it to the toilet bowl with plastic or galvanized bolts.
Water floors.
Professional toilet installation with a guarantee.
The home in which we live must be warm, comfortable and cozy. The heating system in most homes is represented by radiators, although today warm water floors are increasingly used to heat rooms.
Hydronic floors are characterized by a system of pipes containing warm water placed between the floor covering and the floor. The water temperature is about forty degrees.
This temperature is quite enough to heat the room.
To create water floors. you will need: a mini electric boiler, a mini floor up to twelve square meters, automation, manifolds and underfloor heating pipes.
It is quite possible to install a water floor yourself. You just need to have some engineering skills.
First of all, you should make a project. If you are not entirely sure of your own competence, consult with specialists, they will help you make a project and choose the right set of pipes for water floors.
However, you can do everything yourself by choosing a set of equipment suitable for self-assembly, which is indicated on them: “For self-assembly.” After this, you can safely begin installing the water floor.
If the floors and the house are wooden, then installation is carried out using a flooring system. Such systems are suitable for all types of buildings and are divided into two types: wooden and polystyrene. Floor systems differ from concrete systems in the absence of a wet process, which makes installation of equipment much faster.
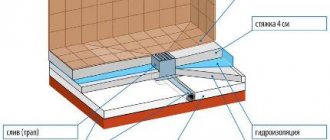
Most often, a concrete scheme is used, that is, the installed pipeline is filled with concrete. This scheme is very convenient because the concrete protects the pipes from damage and holds them firmly. Before installing the pipes, you need to put thermal insulation material on the base of the floor.
After laying the water floor, it is necessary to carry out pressure testing of the system, that is, fill the pipes with water and carry out some kind of tests. If everything is done correctly, the pipes are filled with concrete.
After the concrete has completely hardened, the flooring begins to be laid. In this case, ceramic tiles, linoleum and laminate are most suitable.
Did you like the site? Is the article Do-it-yourself warm water floors of interest? Then subscribe to new ones
Preparatory procedures
Of course, in order to properly install plumbing fixtures on tiles, it is necessary to carry out some preparatory procedures. First of all, of course, you will have to dismantle the old toilet, after which you should look at the basis on which it stood. If the taffeta installation method was previously used, then you need to cement the resulting hole. The answer to the question “How long will it take to install a toilet?” depends on the method you are going to use. At the moment there are two main methods:
- on bolts;
- with epoxy glue.
Using the first method, you will have to wait a lot, because if the cement does not dry, the dowels into which the bolts will be screwed will simply come out and will not be able to hold on. In such cases, it is recommended to let the solution dry for at least 5 days.