For a modern person, a shower stall is an opportunity to quickly freshen up between tasks, cheer up in the early morning, or, on the contrary, relax before bed. During the construction of a private house or the refurbishment of a city apartment, you can independently install a comfortable shower without sides, which is coming back into fashion thanks to its convenient design.
The main thing is not to forget about a very important element - a shower drain in the floor under the tiles, which serves to collect and drain used water. Let's consider the conditions and nuances of installing a ladder on your own.
Classification of drain devices and their differences
Floor drains differ in appearance, in features inside the model, and in its height. The only element of the device that remains visible is the decorative grille. It comes in the form of a square, circle, oval, triangular, and elongated tray.
The grille is also selected according to the material: glass, chrome, brass. More often, a drain model with a stainless steel grating is installed. Its main advantage is its long service life. Plastic grilles remain in second place in demand. It will last less, but its price is affordable.
A room equipped with an open shower without a tray visually looks larger and more spacious. It is recommended to install the cabin in a corner of the room.
The decorative grille is chosen based on personal preference. Comfortable bathing in a shower without a tray largely depends on the type of water intake structure. It varies in shape, capacity, and installation location:
- A small water intake funnel is a version of a point drain. It is closed at the top with a grille and can be mounted both in the center of the shower floor and in its corners. They are also mounted in groups.
- The shape of the tray with a grid on top is a linear drain. The size is adjusted by the length of the model. It is installed in the center of the shower, along any wall, at the exit. There is a misconception that linear structures have low traffic capacity. The bottom of the model in cross-section is not inferior in area to the diameter of the drain pipe.
- It is poorly visible at a quick glance, it is installed on the line of contact between the wall and the floor - this is a wall-mounted model.
The second option accepts a larger volume of waste liquid. The ability of the structure to pass water is calculated based on its consumption. Showers are equipped with a linear drain for simultaneous bathing of several people if a “tropical rain” watering can is installed.
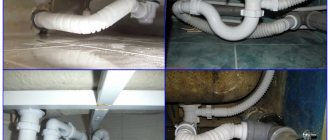
When studying the structure of the ladder, the components are called:
- housing made of plastic, steel, cast iron;
- model's face – decorative grille, removable structure, upper part of the ladder;
- hair and debris are caught by a special part - a sieve, located at the top of the body;
- a funnel with waterproofing and a clamping flange for fixation receives waste water;
- siphon;
- the pipe that discharges liquid into the sewer system is located at the bottom of the structure.
Floor shower drains installed in enterprises, in public swimming pools, and in “city” bathhouses are made of cast iron. Installation of a shower drain made of this material is difficult due to its heavy weight. Cast iron gives the model strength and increases its throughput.
Step-by-step instructions for installing a ladder
A drain for draining water is installed at the very first stage, during the laying of pipes, installation of screed and waterproofing layer. Together with communications, a floor is prepared, the cut of which resembles a layer cake. There are several options for the pie; the diagram shows one of them.
The sewer pipe passes through the thermal insulation layer of polystyrene foam, therefore, the drain “captures” two layers of screed and waterproofing, and its upper decorative flange is located on ceramic tiles
Stage #1: Preparation of material and tools
We must not forget that the installation of the ladder takes place in parallel with the construction work on the construction of a complex waterproofed floor covering, so the tools are selected based on the need to install a particular layer.
For example, to lay the screed you will need containers for preparing the solution, hand tools for applying and leveling it (trowels, levels, graters). At any stage, marking material will be useful - tape measure, marker, laser level, construction knife.
At the final stage - laying ceramic tiles - you will need a bucket and a drill with an attachment for preparing an adhesive solution, a set of spatulas, a leveling rule, a tile cutter and nippers
You will also need various materials, the amount of which directly depends on the floor area (as a rule, it is small):
- sheet expanded polystyrene for thermal insulation (5 cm thick);
- dry cement-sand mixture for screeding (per 1 m² - 5 kg);
- waterproofing membrane, mastic (per 1 m² - 3 kg), tape (10 cm);
- a set of plastic pipes, a ladder with fasteners and couplings;
- tile adhesive (per 1 m² – 5 kg);
- ceramic tiles with anti-slip coating;
- grout, sealant.
Pay special attention to the choice of drainage ladder: standard models can easily withstand a weight of more than a ton and function smoothly at temperatures up to +80ºС
Stage #2: Assembling the ladder structure
Repair work is necessary in old buildings, the bathrooms of which are already tiled. If you decide to install a shower stall with a drain in the bathroom, you should remove the old covering and re-arrange a new one, but with built-in drainage communications. For dismantling you will need a hammer drill, a chisel, and a hammer.
After removing the debris, there should be a concrete base and a sewer pipe to collect drains from the bathtub, sinks and toilet. If it is an old-style cast iron product, it is better to immediately replace it with a new plastic pipe into which you can insert a pipe coming from the drain.
For internal construction work, gray plumbing pipes with a diameter of 40 mm to 50 mm are provided with the possibility of inserting additional pipes
The joints of the walls and the floor and all corners must be carefully treated with waterproofing mastic, then it is advisable to carry out this procedure after each successive layer. This will prevent water from penetrating into the lower layers and causing the unpleasant consequences of high humidity in the room - pockets of fungus and mold.
Manufacturers of plumbing equipment have already paid attention to the problem of collecting used water in the shower and are producing ready-made products for installing drain structures.
In ready-made shower drain systems, the slats have different thicknesses, which gradually decrease as they approach the drain hole, providing a surface slope
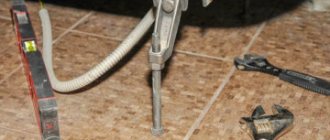
Stage #3: Installation of the drain hole
To correctly position the ladder, calculations will be required. We find the place where the pipe is inserted into the sewer pipe and from there we draw a straight line to the installation point of the drainage device. It will be unprofessional if its hole is on the edge or in the middle of the tile.
Some decorative elements correspond to the size of small ceramic elements - in this case we install a flange instead of one tile. If the ceramic squares or rectangles are large, we install the drain at the junction of two to four elements.
Narrow long decorative grilles are called trays. They are most often mounted along a wall or along a plastic fence, in contrast to their square counterparts, which are also placed in the middle of the booth
We cut the drain outlet into the sewer pipe, treating the joints with silicone sealant. If you need to connect a drain pipe from the kitchen, bath or washing machine, we use a pass-through device with two outlets instead of the usual model.
At the same stage, for additional thermal insulation, we lay granulated or extruded polystyrene foam on the floor, carefully cutting out the contours for all sewer elements.
If a layer of thermal insulation is not needed, we make a sand-cement screed, and then the plastic elements of communications will be walled up in the cement layer
Stage #4: Installation of screed with a slope
We mix the sand-cement mortar and begin to spread it on sheets of polystyrene foam in a dense layer 35-40 mm thick. You can put plastic borders along the walls, which later, when the screed matures, will play the role of expansion joints. But the best material along the wall would be damper tape, available in two versions: self-adhesive and simple.
For single-layer and double-layer screeds, a 100 mm wide tape is suitable. And for prefabricated structures you need to use a tape 150 mm wide
Damper tapes are distinguished by low thermal conductivity, an increased level of water resistance, resistance to sudden temperature changes and durability. After solving the issue with the junction of the floor and the wall, concrete work with a slope towards the drain hole comes to the fore.
One of the main conditions for floor covering is the slope in the direction of the drain hole. If it is in the center, all edges of the screed must be raised by approximately 5 mm
We lay the cement so that it completely hides the drainage device, except for the flange circle. To make the surface more even, we use a rule - a device that resembles a large ruler.
Above the screed, only the upper part of the drain should be visible - the head of the siphon and the decorative grille, which will be flush with the ceramic tiles
Recommendations for tilting: 1 cm per 1 m of floor area. If the drain is located along the wall, the slope goes in one direction - towards the location of the drain.
Step #5: Waterproofing the Floor
We wait 3-4 days until the screed dries, then we lay the waterproofing layer. First, we cut out a large piece of membrane (isoplast) with a hole in the middle, place it under the flange that goes out and fix it with screws around the circumference.
Additionally, we waterproof corners, joints and the entire area of the shower stall. We fuse the material by heating, resulting in a dense, reliable membrane layer in critical areas.
Instead of adhesive waterproofing material, you can use bitumen-polymer or bitumen-rubber coating mastic - “Elastomix”, “Elastopaz”, “Tekhnoprok”. It is applied after treatment with a primer (“Ceresit”), applying a 2-3-centimeter layer to the floor and walls around the perimeter
We attach the upper part to the drain body - a siphon with a decorative grille, not forgetting to put a rubber O-ring between them. The grate can later be removed to gain access to the inside of the ladder.
The result should be a thick waterproof layer, onto which another layer of screed must be poured. If the drain hole is in the center, we place guides diagonally from the corners so that the lower corner meets at the drain, and fill the finished triangle with sand-cement mixture.
Cover the grate temporarily with a piece of waterproofing to prevent cement from getting inside the siphon. We level the laid mixture with a slight tilt towards the center.
We moisten the hardening cement from time to time and level it with a grater. We take out the wooden guides, seal the grooves with cement, and plastic or polypropylene ones can be left in the screed so that in the future they play the role of expansion joints
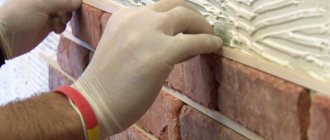
Stage #6: Laying ceramic tiles
The floor surface will look more attractive if we start laying ceramic tiles in the direction from the ladder to the walls. If necessary, parts of the elements surrounding the drain hole must be carefully trimmed. It is especially difficult to frame a ladder if its outer part is round in shape. If the calculations are correct, there will be no need to trim the tiles near the wall.
In city apartments, when installing a shower stall, you need to focus on the height of the sewer pipes. If they are laid high, the floor will have to be raised to install the ladder, resulting in a kind of podium
The ceramics are installed in the usual way: a layer of glue is applied to the cement surface, leveled with a spatula and the tiles are laid one by one. After a day, when the glue has dried, you can grout, but only waterproof grout materials must be used.
The width of the grout joints is no more than 3 mm. If the installation technique is not broken, the drain grate will be flush with the laid tiles.
There are many types of ceramic floor tiles in different sizes, but sometimes it makes sense to choose a mosaic that is grouted using an epoxy-based mixture
Video instructions for laying mosaics will help you complete the work quickly and correctly:
Siphon functions
The siphon stops the “odors” of the sewer system. To accomplish this, there is a water seal inside the siphon. When the shower cabin has not been used for a long time, the water seal dries out, which allows sewer odors to enter the room. You need to install a shower drain with a “dry” type valve. The model is equipped with more than one damper. They block the drain with their weight. The flow of waste liquid causes the dampers to open, the flow stops and the dampers close.
In a room with temporary heating for the cold season, it is recommended to drain the shower with a mechanical shutter, which does not freeze from sub-zero temperatures and is equipped with a drainage ring. When the waterproofing breaks, the water flows back into the drain through the ring.
Correctly installing a shower drain under the floor means you can say “sink” it. When the height of the screed does not allow this, a special podium for the shower is built.
Features of a shower cabin with a drain
This option for a shower area is becoming increasingly popular. It can be placed anywhere in the bathroom - built into a corner or separated from the end of a narrow room. The design has undeniable advantages over traditional devices, since it:
- does not clutter up the bathroom, which already has little space - glass sheets transmit light perfectly, look light, airy and do not visually eat up space;
- supports the concept of a “barrier-free environment”, is convenient for use by the elderly and disabled - the absence of a side eliminates the problem of getting into the shower;
- looks stylish and modern;
- has a tiled floor, which is much easier to clean and disinfect;
- does not allow the space under the pallet to become cluttered, due to the absence of such;
- provides unlimited possibilities for choosing the design, location, dimensions and configuration of the shower area;
- allows you to avoid purchasing an expensive device;
- easily dismantled if necessary.
Installation of such a cabin will require specific preparatory work at the floor installation stage. The main issue that needs to be resolved is the effective disposal of waste water. This requires a sewer slope of 0.03%. Therefore, per meter of pipe you need to provide a rise of 3 cm. If you want to completely abandon pallets, you will either have to raise the level of the entire floor or equip the drainage system with a drainage pump.
Description of the outlet pipe
The shower drain under the tiles has an outlet pipe. It can be vertical or horizontal. They differ in their diameters. The pipe is selected in accordance with the diameter of the sewer pipe. A drain with a vertical pipe will have a diameter of 11.0 cm. It is installed in dachas, in houses outside the city, where the sewer pipe runs below.
The horizontal outlet of the pipe is recognized as universal. Apartment owners make only this connection to the sewer system. In everyday life, it is better to install a device with a pipe with a diameter of 4.0 to 5.0 cm.
What is a ladder and what is it for?
A drain is a special device that is installed in the bathroom if the water in the shower is drained not using a tray, but directly to the floor. It is used for arranging open-type showers. Drains can be made of metal, plastic or a combination of these materials; they are a flattened siphon mounted directly into the floor. This useful device performs the following functions:
- Collects and directs “waste” water through the sewer system. If the bathroom drain is located directly on the floor, then a drain is needed to collect the water that comes out of the shower.
Ladder
- Protects the drain from clogging. The protective and decorative grille, which is placed on top of the drain, prevents small debris from entering the drain hole, so it does not clog longer, and the water goes into the sewer faster.
- Protects against foreign odors. Inside the drain there is a water seal or even a dry lock, which, acting on the principle of a valve, prevents unpleasant odors from the sewer from penetrating into the bathroom.
- Allows you to clean the drain yourself. If a blockage appears inside the drain hole due to the accumulation of small debris, hair and household chemicals, the drain can be easily disassembled and cleaned with your own hands.
Please note that drains are used not only for arranging bathrooms in private apartments, but also in public showers, for example, swimming pools, gyms or baths. In addition to its main purpose, this device can serve as an additional drain hole.
Steps for selecting a ladder
To understand the variety of tile drain models and which drain to choose, a list of their selection criteria will tell you. Moreover, there is consistency in the selection of models.
- Before making a drain in the floor, the direction of the outlet pipe is selected. The location of the sewer system pipe and its entrance is specified. With a horizontal pipe, a large height of the drain screed is not necessary, since the drain itself is not high. When the sewer pipe in the bathroom is located low, it is recommended to install a shower with a floor drain with a vertical pipe.
- The throughput of the drain structure depends on the diameter of the outlet hole of the pipe leading to the sewer. The larger the diameter, the faster the flow of waste water enters the sewer system. The indicator ranges from 0.4 l/sec. up to 2.0 l/sec. The common diameter of the drain pipe is 5.0 cm. The design can also be mounted with other values. You may need adapters to connect the pipe to the sewer hole. The water plug forms a water seal and stops the leakage of “aromas” into the room. The fluid is located in the lower bend of the knee.
- The next step is to choose between a dry type seal or a water seal. The choice will be influenced by the frequency of use of a shower with a drain in the floor. If the cabin is frequently used, the water seal will work at full capacity. During interruptions in use, it is recommended to choose a drain with a dry seal. If the bathroom is equipped with a “warm floor” system and a shower with a drain in the floor, then without a “dry” seal it will be difficult to cope with sewer odors. If there is liquid, the shutters rise; if there is no liquid, the shutters lower and stop the “aromas”.
- After all the steps taken, the decorative grating of the drain is selected, taking into account the size and color of the tiles.
- Choosing a height-adjustable ladder model means ensuring accurate installation of the model and accuracy of installation in terms of the level of alignment of the top of the structure with the floor.
Advantages of a shower with built-in drain
The variety of trays and drains for drainage water is explained by the fact that there is a need for shower stalls - not purchased ones, which are a single prefabricated structure, but stationary ones, without a tray and complex electronic “stuffing”.
The design of the cabin is simple and convenient: a bar with a shower, smoothly opening plastic compartment doors, a non-slip floor covered with ceramic tiles. You can organize such a place for taking water procedures yourself by laying the floor and walls with tiles and correctly connecting communications.
Even without restrictive edges and borders, water does not flow out of the cabin if the floor covering is properly equipped - with a slight slope, ensuring the outflow of water into the drainage device
Why do owners of spacious bathrooms and cramped bathrooms choose this shower option? It has a lot of advantages:
- variety of sizes and configurations;
- possibility of placement in non-standard premises;
- creation of a unique design;
- ease of care and regular cleaning;
- comfortable use of the shower by older people.
One of the technical advantages is the presence of an emergency drain. During force majeure circumstances (water supply failure in your apartment or neighbors upstairs), water will drain through a drain built into the ceramic floor tiles.
Materials
Once you have decided on the choice of equipment and location, we proceed to installation. All work can be done with your own hands without the help of specialists. To work you need to prepare:
- sifted sand;
- cement;
- material for thermal and sound insulation (foam is most often chosen);
- waterproofing membrane;
- adhesive composition or mastic;
- anti-slip tiles or mosaics from which the floor will be made.