Sanitary equipment is an integral part of any residential building or apartment; it is usually installed by specialists, although this procedure is easy for any owner to carry out independently. For example, you can save some money if you connect the bathtub to the sewer yourself.
In order to avoid making mistakes and perform all the work efficiently, you should know how to properly connect plumbing fixtures to the sewer line. It is worth noting that to carry out work with internal sewerage, no special and expensive tools are required - this significantly simplifies all installation operations.
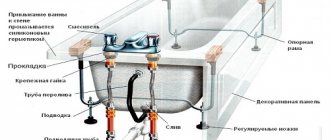
Rice. 1 Examples of connecting siphons to sewerage through corrugated pipes
Sewer design
At the initial stage of creating a sewer system, marking work is carried out. A diagram of the location of all the plumbing that is connected to the sewer is drawn on paper. The location of the pipes is determined and the need for material is calculated.
When performing measurements and calculations, the following features must be taken into account:
- The pipes are connected using tees with different outlets or funnel-shaped adapters.
- Laying pipes under the bathroom will be especially difficult. In order not to waste time removing the bathtub, the pipes are connected from several elements.
- If you plan to simultaneously connect a sink and a bathtub, then the sewer wiring is performed using a tee. The third outlet can be tilted 45º or 90º from the axis of the pipes.
- To connect the siphon to the sewer pipe, a branch pipe with a rotation angle of 90º is used.
If the installation of some kind of plumbing that requires drainage is planned in the future, then a drain for it must be created. It is easier to close the pipe with a temporary plug (although this is not attractive) than to re-install the sewer system.
Types of utility wiring
Before designing the wiring, you should become familiar with what types of such structures exist. There are only three of them. Moreover, one, with pass-through sockets, is practically not used. Therefore, we will not consider it.
Type #1. Serial type wiring
To implement this, taps are made from the cold and hot water supply risers leading to the first consumer. Pipes are laid from it to the second and further. Each water collection point is equipped with a tee, to one of the outlets of which the consumer is connected.
Overall this is a very simple scheme. It can only be used where the number of water consumers is small.
This is due to the fact that if several water collection points are activated simultaneously, the pressure in them will weaken and may be insufficient for the correct operation of the equipment. This is the main disadvantage of series wiring.
Image gallery
Photo from
Assembling the system using tees
Simple and inexpensive type of construction
Combination of tee and collector circuits
Minimum set of fittings
However, for apartments with one bathroom and a small amount of plumbing used, this may be the best option. A significant drawback of the system is the inability to turn off one of the plumbing fixtures for replacement or repair.
Serial wiring is extremely simple to implement, but not very convenient to use. However, for small bathrooms this solution may be quite acceptable.
There are many more advantages to sequential wiring. First of all, it is simplicity in design and installation. There will be no complex schemes here, everything is done very simply.
In addition, such wiring is considered the most economical option. The consumption of pipes and other elements will be significantly lower than in other systems, and installation costs are also minimal.
Even a novice plumber can handle the design and subsequent installation of sequential, otherwise tee, wiring
Type #2. Collector type of wiring
The collector type scheme involves connecting each of the consumers to the main line. For this, a special element is used, which is called a collector - a device that distributes water flows.
In a more complex version, and this is best, each collector outlet is equipped with a shut-off valve. Collector-type wiring can be considered the most convenient option to use. There are several reasons for this.
Image gallery
Photo from
Parallel connection of devices
High consumption of pipes and fittings
Mostly hidden gasket
Collector water supply outlets
Firstly , the absence of pressure drops in the system. All consumers receive equally good water pressure, even if all water points operate simultaneously.
If the pressure in the system of an apartment or private house is too low for some reason, you can temporarily limit the water supply to one of the consumers, for example, to the toilet, thereby increasing the pressure for others.
The collector type of wiring is more convenient to use than the serial type. In this case, a separate line goes to each consumer, which guarantees no problems with pressure. However, such a system turns out to be more complex in design and installation.
Secondly , the ability to disconnect plumbing fixtures from the water supply if they need replacement or repair.
Thirdly , reliability. In fact, a single pipe goes to each consumer, without any connections or other elements. A leak can only appear in the collector area or near the device itself. Here it will be very easy to find. For this reason, pipes with manifold wiring can be safely installed using a hidden method.
Fourthly , ease of use. If there is a problem with a plumbing fixture and a leak appears, for example, at a faucet, you do not need to crawl under the sink. It is enough to close the shut-off valve on the manifold leading to the faulty device and wait for the specialists to arrive.
Even a woman or child unfamiliar with plumbing can do this. At the same time, all other equipment will work properly.
Professionals recommend using manifolds with shut-off valves for installation in water supply systems. With their help, if necessary, you can easily stop the water supply to a branch or plumbing fixture in need of repair.
However, collector wiring also has some disadvantages. First of all, it will cost the owner more than a sequential circuit. This is due to the fact that it will be necessary to lay a branch to each consumer. This will take a lot more material.
In addition, the installation of manifolds and shut-off valves will be required if the distributors are not equipped with them. And the circuit itself will be much more complicated than a sequential one.
Bath connection technology
The procedure for connecting the bathtub to the sewer system
The connection procedure is as follows:
Assemble the siphon in accordance with the instructions attached to it, paying special attention to all the necessary sealing gaskets. The plastic fasteners are tightened by hand, acting very carefully. Tools are not used, as using them can break the part. After the device has been installed, one end of the pipe is connected to it, and its other end is brought to the sewer drain hole and a connection is made. Connecting the bathtub drain must be accompanied by careful control over the density of the assembled joints to ensure a high degree of their tightness.
Pro tip:
Pro tip:
If the slightest malfunction is detected, it is necessary to eliminate them immediately, otherwise during operation it will be necessary to replace defective elements of the system.
- If the sides of the bathtub are tightly adjacent to the walls, the joints must be carefully sealed so that water does not have the opportunity to penetrate under the bathtub.
Connecting the bathtub to the water supply
Just like connecting a bathtub to the sewer with your own hands, it is also possible to connect to the water supply and install a mixer yourself. You don't have to call a plumber to do this.
Let's consider this technology:
- A shut-off valve is installed on the pipe in front of the fittings, the presence of which is necessary to shut off the water when replacing the mixer or in case of repair.
- Eccentrics are attached to the fittings located on the mixer (first by hand, and then tightened with a key). In this case, FUM tape or a specialized thread is used, intended for connecting elements of the plumbing system.
- Decorative attachments are put on the eccentrics.
- On the mixer, rubber or silicone gaskets are inserted inside the threads, and then the mixer is screwed to the eccentrics (in this case there is no need to use FUM tape or thread).
Pro tip:
The bathtub connection diagram must necessarily include a check of the quality of the work performed - if leaks are detected in the mixer, the gasket is replaced - it is possible that the leak occurred due to a defective gasket.
- The mixer is screwed on both sides at the same time. In this case, the gaskets are evenly sealed.
- If the bathtub comes with a mixer when purchasing:
- then the permissible level of pipe height is below the level of the bathroom, since in this case the connection is made using reinforced hoses;
- it is not necessary to align the ends of the pipes - such hoses are very flexible;
- The basic rule in such a situation is to ensure that the length of the reinforced hose is slightly longer than the distance from the bathroom to the end of the pipe.
After completing all operations to connect the bath to the water supply and sewerage, turn on the water and observe for leaks. If there are leaks, then you need to make sure how well the gaskets are secured, and also make sure the quality of the gaskets themselves (if they are of poor quality, you will have to replace them).
Following these simple rules will allow you to efficiently connect the bathroom to the sewer and correctly install the mixer. With this approach, the bathtub will last for many years!
Installation standards
According to SNiP 3.05.01, developed back in 1985, the standard height of a bathroom sink is 85 centimeters, while during installation a deviation of 20 mm up or down is allowed.
This value is a compromise between a washbasin level that is comfortable for use by men and women, who are traditionally slightly shorter. That is why most Russian and foreign manufacturers produce sinks on a pedestal and cabinets with built-in sinks with a height of 83-87 centimeters.
The correct choice of distance from the floor to the top edge of the sink has a significant impact on the comfort of using the plumbing fixture:
- How convenient it will be for a person to use them depends on whether the plumbing fixtures are installed correctly. If the sink is installed too low, you will have to bend over when washing, which can cause spinal pain. If the washbasin, on the contrary, is too high, then children will not be able to use it.
- The distance between the floor and the sink affects their connection to the water supply and sewerage system. As a rule, under the washbasin there is also a water meter, sometimes filters for cleaning and other devices, the installation of which takes up a lot of space. The need to install additional equipment must also be taken into account when choosing the washbasin level.
Please note! Recently, scientists have noted an increase in average human height, and therefore generally accepted installation standards and GOSTs are becoming outdated and losing their relevance. In addition, if all household members are tall, then it would be advisable to increase the height of the plumbing equipment to 95-100 cm, then when using them you will not need to bend over much. Therefore, to resolve this issue, a purely individual approach is needed.
Pipe selection criteria
The main technical characteristic of plastic pipes is their diameter. It’s worth mentioning right away that in most cases, manufacturers mark pipes based on the size of the outer diameter.
For sewage drains, the main parameter is the internal diameter. The purchase of pipes of a certain diameter is carried out depending on the type of plumbing. In particular, the minimum pipe diameter is:
- for washing machine and dishwasher – 25 mm;
- for bidet and sink – 32 mm;
- for a shower stall or bath – 50 mm;
- for several devices connected to one outlet - 70 mm;
- for the toilet and the main riser in the apartment - 100 mm.
The second parameter that is taken into account when purchasing sewer pipes for the bathroom is the length of the products. Pipes with lengths from 1 to 6 m are available for sale. It is most convenient to work with material that is 2 or 3 m long.
When calculating the required footage of plastic pipes, you also need to take into account that they are equipped with sockets with sealing rubber bands, which are designed to tightly connect adjacent elements.
Requirements for installing plumbing equipment in the bathroom
Until recently, the only plumbing fixture placed in a bathroom was a small cast-iron bathtub. Now shower cabins and hydroboxes are installed in the bathroom, automatic washing machines are connected to the bathroom communications, and winding heated towel rails are placed on the bathroom walls. However, the SNiP standards adopted in the last century have not changed:
- The free space in front of the bathtub or shower stall is at least 70 cm (SNiP 2.08.01−89 “Residential buildings”);
- The distance between the sink and the bath or shower must be at least 30 cm;
- The space in front of the washbasin must be 70 cm wide and 110 cm long;
- Shower faucets are mounted at a height of 120 cm;
- The shower head is most convenient at a height of 210−225 cm;
- The height of the installed bath is 60 cm to the top of the side;
- The height of the sink or sink is 85 cm to the top of the side.
The figure shows the optimal dimensions for installing a washbasin in the bathroom.
Checking the tightness of the system
After installation is completed, the drainage system in the bathroom and toilet must be tested for leaks. First, close the drain hole and fill the bathtub with water to about 2/3 of its volume. For 15 minutes we observe the lower drain hole of the siphon to detect a leak. If there are no leaks, then fill the bathtub full to check the tightness of the overflow hole. At this stage, the bathroom drainage system is checked for leaks with a small volume of liquid.
At the final stage, open the lower hole of the siphon and check the operation of the sewer with a large amount of liquid under pressure. The diameter of the bathroom sewer pipe must be no less than the diameter of the drain hole.
Before installing sewerage in the bathroom, it is necessary to check the quality of the plastic from which the siphon is made for tolerance to high temperatures. Sometimes there are low-quality products on the market that, when hot liquid passes through them, begin to deform and in this case the drain pipe in the bathroom needs to be replaced with a new one. You can check the quality of the pipes by pouring hot water from a kettle into the siphon.
Comments:
Assembling the siphon structure
The work will be done faster if you can turn the bowl over. Before starting work, inspect the drain in the bathroom. All internal irregularities are removed with sandpaper.
It is not recommended to install a siphon with a grid on the drain hole in the form of cross-shaped sticks. Such a grill will not be able to filter debris. All garbage will go into the siphon. A grill with long slots is also not recommended. It will be difficult to clean through them. The ideal option is a grill with round holes across the entire surface.
Connecting the bathtub to the sewer yourself
Many of us believe that the most difficult process is installing a purchased bathtub. But in fact, the main difficulties are caused by connecting the bathtub to the sewer, since the safety of the room from leaks depends on the quality of the work.
Indeed, a dripping faucet will not cause as much harm as a leaking siphon under the bathtub or a fistula on the sewer riser. And the situation that causes particular trouble for residents is when the bathroom smells like sewage. Let's deal with these and other problems together.
Features of entering communications into the apartment
Having decided on the type of pipe layout in the toilet and bathroom, we finish drawing up the project. For the system to work flawlessly, it is important that the entry of communications into the apartment is done correctly. Let's figure out how to do it right.
First of all, there should be a shut-off valve at the inlet, which will make it possible to shut off the water supply if necessary. If the shut-off valves are already in place, it is necessary to check their quality.
In new buildings, good quality components are usually installed; in old houses, outdated devices may be installed. It is advisable to install a good quality ball valve at the inlet.
Important point. If you need to close/open the device, this must be done smoothly. A sharp turn of the handle can provoke a water hammer, which can damage plumbing equipment.
Mandatory elements at the entrance of the water supply system to the apartment are shut-off ball valves, coarse filters and meters. Pressure control equipment, fine filters and other devices can be installed upon request
Immediately after the ball valve, it is recommended to install a special leakage protection system equipped with a controlled shut-off valve. After this, a self-cleaning main filter is installed. It will remove coarse impurities from the water, which significantly extends the service life of the devices.
Water meters should be installed behind it, if needed.
Next you can install the water flow regulator. This is not a mandatory element - it is only needed where there are problems with water pressure. Next, serial or collector wiring of open or hidden installation type is performed.
Bath connection process
Most often, new bathtubs are purchased with a set consisting of:
- Siphon and connecting pipes;
- Drain-overflow systems.
In most cases, this is a single unit, which has its own installation features:
- On acrylic bathtubs, thanks to the preliminary assembly of the load-bearing frame, the siphon is installed immediately (on an inverted bathtub);
- The siphon is connected to cast iron and steel bathtubs after installation.
For reference: Installing steel bathtubs on a brick base narrows the work space. Therefore, experienced plumbers pre-install individual components on the bathtub.
Tip: Your main task is to make all connections airtight. When installing a bottle siphon, the kit always includes special gaskets that are required to be used.
We arm ourselves with the assembly diagram and get started:
- First, we install a drain and overflow on the bathtub, because... after installing it close to the wall, this will be problematic;
- After installing the bathtub in place and fixing it, we assemble the receiving unit (socket with pipe and protective mesh). We put a gasket on the edge of the socket, insert it into the drain hole of the bathtub and from below, also with a gasket and a nut, we connect the parts into a single unit. Depending on the design, the mesh can either be screwed on or be removable;
- The time has come to assemble the siphon. We assemble the glass according to the attached diagram and attach it to the protruding pipe of the receiving unit. We fix it with a plastic nut, tightening it by hand;
- Don’t forget to connect the drain hose of the overflow drainage system - we put its end on a special branch;
- We insert a corrugated or plastic pipe from the siphon into the sewer tee using rubber adapters.
Tip: adapters play the role of a seal, allowing you to reliably seal the entire structure.
Conclusions: we are sure that now you know almost everything about sewerage and how to connect a bathtub. All that remains is to put the acquired knowledge into practice, and spend the money saved on work on purchasing stylish accessories for the bathroom.
Arrangement of a bathroom implies the obligatory connection of the bath to the sewerage system and water supply. These plumbing jobs can be easily done with your own hands, even without prior experience.
Operating principle
First, let's look at how the sewage system works in the bathroom:
- A bathtub filled to the brim discharges part of the water through the drain-overflow system;
- When the drain hole is opened, water from the bath enters the siphon;
- Bypassing the water seal, wastewater passes through a sewer pipe (hose) connected to a tee;
- Through the sewer tee, wastewater enters the riser.
Materials from previous years
A couple of decades ago, when there was no heyday for PVC products, all sewage systems were assembled from cast iron. In particular:
- Siphons and receiving pipes;
- Washbasin elbow;
- Apartment sewer pipe tee;
- Inspection window on the riser;
- The riser itself is in the apartment.
And to seal the connection, in addition to traditional tow, the following were used:
- Cement mortar;
- Liquid glass
- Epoxy adhesive
- Rubber, etc.
Modern materials
But with the advent of the era of plastic, everything has changed. Today, almost any adult man can assemble and connect a sewer siphon.
Should I follow the standard?
Most builders, finishers and plumbers are well aware that the standard, optimal height of a bathroom sink is 85 cm.
These standards were developed and tested back in Soviet times, but are still observed, especially when arranging bathrooms in administrative and commercial buildings. When renovating a private apartment, if necessary, you can deviate from the generally accepted installation standard.
In conclusion, I would like to say that inside your apartment, and even more so in a private house, you have the right to install a sink inside the bathroom at any height convenient in specific conditions.
Whether or not to follow installation standards is up to you to decide. However, years of practice and scientific research confirm that, after all, a height of 85 cm is the most optimal option for the convenience of all family members, proven over the years.
Connection to sewerage
Any bathroom already has a sewer outlet, but in private self-buildings this may not be the case. If this is your case, then before installing the bathtub you need to drill three holes in the floor - for sewerage, hot and cold water. Next, the corresponding pipes are connected to them. Only after this should the plumbing fixture be installed.
Step-by-step instructions on how to connect a bathtub to the sewer:
To connect the sewer outlet and the bathtub, a corrugation and a siphon are used
Before installing them, it is important to check the level of the bath, the location of the drain pipe and its diameter. Only after this the necessary plumbing parts are selected; Overflows are installed first
There are two of them - a pass-through (through, central) and a locking one. The through one is mounted in the bathtub drain, and the shut-off one is installed in the side end. Before installing a through overflow, you need to assemble a siphon;
Assembling a siphon with your own hands is very simple. A black rubber gasket is inserted into the structure itself. A nut is installed in the central overflow; it must be pushed into the hole 3–4 mm. Then you need to press the gasket in the siphon. To do this, an overflow is screwed into it. Please note that the plastic thread does not need sealing, so FUM tape is not used. Next, the outlet is installed on the corrugation. It is mounted in the upper part of the siphon, above the water lock; a cone gasket must be installed on this pipe. It is pressed with a plastic nut;
There are two corrugations in the bath: drain and sewer. The drain has a small diameter and is installed on the side overflow. This corrugation is also connected to the siphon using a gasket and a nut. The sewer corrugation is also connected in a threaded manner using a nut, and the overflow is attached in the same way;
Each siphon has a hole for cleaning, which is closed with a solid nut. The connection must be sealed with a rubber gasket (white or yellowish). This is necessary for urgent repairs when the drain is clogged; If you have a plastic pipe for drainage, then most likely it already has a gasket. If it is not there, you need to additionally seal the mount. To connect a plastic sewer corrugation from a bathtub to a cast iron or other pipe, you will need a special adapter;
After completing the assembly of the siphon constructor, you need to check how it will be installed. Overflows are installed in the designated places. To do this, place a double elastic band in the central hole of the bathtub, and a single thin one in the side hole. Next, a siphon is installed and tins are attached to the holes. Using a bolt, the mesh is attached. A transition overflow is also attached;
To connect the sewer and corrugation, the side surfaces are lubricated with silicone sealant or soap. This will make it easier to connect the pipes. Afterwards they are additionally treated with sealant. It is advisable to stretch the corrugations without kinks, otherwise water will have difficulty passing through them.
This completes the process of connecting the bathtub to the sewer. Check the connection points of the siphon and overflows - water should not drip from them. The described method is the simplest and most accessible. Connecting brass structures is done in a similar way, but such siphons are 3 times more expensive than plastic ones.
Video: How to connect a bathtub to the sewer
Plastic siphon device
Siphon device
There are several types of siphons, which differ in the material from which they are made. Plastic siphons are more popular. To install them correctly, it is important to understand their structure. The siphon kit looks like this:
- Drain plug. In some cases, its production is made of rubber or plastic. The top of the plug is covered with stainless steel. Some siphon kits may have a chain that attaches to the overflow and plug. Thanks to it, you can lift the cork without putting your hands in dirty water.
- Metal overflow and drain grate. Thanks to this element, no object will fall into the drain. In expensive siphon models, this element is made of stainless steel, and in cheap siphon models, it is made of plastic.
- Rubber gasket. The color of the gasket that is installed on the reverse side does not matter. It prevents water from entering between the outlet pipe and the bathtub drain.
- Exhaust pipe. Used to drain water.
- Exhaust pipe nut. It is made of both plastic and metal.
- Removable knee. It is necessary to clean the siphon from possible blockages. Thanks to the removable elbow, cleaning can be carried out without complete dismantling.
- Cone gaskets.
- Coupling nuts.
- Sewer outlet.
- Overflow outlet.
Mechanical system
Some siphons are equipped with automatic systems for opening the drain hole. You can find three types of siphons:
- Mechanical system. A simple rubber or plastic stopper is used here. Water is drained manually. The system is simple and at the same time reliable.
- Semi-automatic system. The drain mechanism is controlled by a special cable/lever element. This mechanism is installed above the level of water that is usually drawn into the bath.
- Automatic system. In this case, the siphon is combined with the filling equipment into one structure. Control is carried out thanks to a built-in/remote microprocessor.
Automatic system
Problems with the installation of a sewer system
Old pipes
During sewer installation work, you may encounter a number of problems. For example, at the stage of dismantling work, you may encounter old pipes “tightly” fixed to the wall. This is especially true for residents of old apartment buildings. In this case, you need to carefully remove the old finish so as not to damage the elements of the general sewer system.
Correct slope
When laying new pipes, the slope that we have already mentioned must be observed. But the fact is that during installation work, the created structure is subject to slight displacement. To prevent this process, you should use hanger clamps with latches.
Leaks
Another problem is the presence of continuous leakage as a result of testing and reconnecting the pipe to the fitting. In this case, an adhesive-based sealant is used. It is applied to the joints. The pipe with the rubber band is inserted into the fitting. After drying, the sewer system is tested again.
Smell
A fairly common problem in the bathroom is an unpleasant odor. It can be caused by various reasons:
- lack of water in the water seal;
- damage to the sewer pipe;
- deterioration of the tightness of pipe and drain connections;
- accumulation of debris at the bottom of the siphon.
Lack of water in the water seal
The first reason for the lack of water in the water seal may be a poorly installed pipe in the siphon. The pipe simply does not reach the water, and the smell passes by it. This problem is solved by lowering the pipe 2-3 cm into the water.
Sagging corrugated pipe.
This defect could occur if the pipe is not secured with spacers or tape.
Prolonged non-use of the bathroom is also one of the factors causing unpleasant odors. The water in the siphon simply evaporated. To remove the unpleasant odor, turn on the water and ventilate the room.
Damage, deterioration of tightness and blockage.
When a crack forms in a pipe, dirty water flows onto the floor and wall. This results in stains and mold, which lead to an unpleasant odor. The crack is sealed with sealant, and the pipe is wrapped with tape. The sealant is also used to restore the tightness of drain and pipe connections.
Cleaning the siphon from debris accumulated at the bottom is done by unscrewing the bottom of the siphon and washing it. For preventive purposes, chemicals designed to clean sewers are periodically used.
Errors made during the installation process that can cause pipes to become clogged
- Pipes from sinks, sinks and other plumbing fixtures must be mounted on a connection at a right angle of 90 degrees. If two devices are installed and the drains are drained towards each other, a blockage may occur in the tee of the pipe, which goes directly into the drain pipe. In this case, it makes no sense to clean the pipes from the side of the sink or washbasin using a spiral or hydrodynamically using a hose. If it concerns two sinks connected next to each other, then it is clear that from one sink the hose will pass to the second sink, but it will not be able to turn in the direction of the main drain pipe. One way or another, it will be quite difficult to clean the sewer.
- Another important mistake is that the drain pipe coming from the washbasin or sink is too high in the bathroom. As a result, the process of draining wastewater into the sewer pipe becomes difficult. Many people decide to move pipes and plumbing fixtures, which include bathtubs, sinks and sinks, to another location that is not provided for in the project. If pipes are changed, the main problem may be that the outlet to the device will be rigidly tied to the outlet of the pipe in the riser, and the situation is very difficult to change. When connecting sinks and sinks, everything should be fine, since there is a certain height reserve, taking into account the fact that plumbing fixtures are suspended at a height of approximately 90 cm. But despite this, many inexperienced installers may not take into account or think through such a detail. It is easier to make a mistake with the height when connecting a bathtub and shower. Often the drain is located above the floor surface. It is quite difficult to lift a heavy bathtub yourself, so a simple solution is to install the drain pipe above the siphon outlet. Thus, the pipe is often laid without the required slope, which can also cause clogging of the sewer.
- You can often encounter a problem in which pipes that are supposed to be attached to the wall from the outside are not fixed correctly. Products may sag, and counterslopes and other practically irreparable cases often form. Of course, this does not in any way affect the proper functioning of the sewer system, but this feature can cause blockages, which will require frequent cleaning of the pipes.
What dimensions should sewer outlets have to install different plumbing fixtures? Dimensions of sewer pipe outlets for plumbing connections
In previous articles, the rules that must be followed when installing plumbing were discussed. Now let’s figure out what sizes of sewer pipe outlets
.
The shower cabin and bathtub are connected to the sewer using specially designed corrugations and pipes or tees with a diameter of 50 mm (see photo below). The level of the outlet from the wall of a pipe with a diameter of 50 mm should be 60 mm (from the level of the floor tiles to the axis of this pipe):
If this distance is higher, then you will have to build a podium for the bath.
For a washbasin (sink), the height of the sewerage system from the floor (pipe outlet from the wall) should be 530...550 mm from the level of the clean floor to the axis of the pipe:
For an attached toilet – 180…190 mm (depending on the model):
For a wall-mounted toilet – 220…240 mm.
For a kitchen sink without a chopper – 300…450 mm.
For a kitchen sink with a chopper – 300…400 mm.
For washing machine and dishwasher – 600…700 mm.
(all distances are given from the level of the clean floor to the axis of the pipe)
Let me clarify: the above values are common, standard, but with today’s variety of companies and models, it is necessary to approach each case personally.
If you want to install some new, exclusive plumbing equipment, then you should first look at the technical map of installation and connection dimensions specifically for this equipment. This must be done earlier than supplying water and laying a drainage ditch - so as not to have to redo it, therefore it is better to purchase the desired plumbing fixtures in advance (if there is space for storage).
By the way, the sequence of all repair measures depends on the type of bathtub. If the bathtub is ordinary, then first it is installed itself, and then the room is tiled. If the bathtub has a hydromassage device, then everything is done the opposite: the bathtub is installed last.
How many bathrooms are needed? If we are talking about an apartment with an open plan, then first you need to impartially assess the dimensions of the place, as well as the locations of the risers to which all plumbing equipment will be connected. As a standard, it is better to equip two separate bathrooms - a guest and a master (again, if space allows). The guest room will only have a toilet and sink.
Naturally, residents living in houses with a standard layout do not have the ability to make several bathrooms, so you just need to decide the question: is it really necessary to bother with remodeling the bathroom or should you just limit yourself to replacing plumbing equipment and cosmetic repairs?
In the following article there is still little information about installing plumbing fixtures with your own hands.
in the light of water supply and sewerage design. Namely, about electronic sockets in the bathroom.
Plumbing measures in the home can be divided into three types:
- Maintenance work, for example, fixing a leaking faucet or clearing a clogged shower drain;
- Work to replace pipes or broken equipment;
- Installation of new plumbing and pipeline communications.
Routine plumbing repairs are not regulated by any regulations or standards. However, measures to replace pipes or install new plumbing equipment will necessarily entail the need for coordination with the relevant organizations, which will require strict compliance with the rules for installing plumbing fixtures in accordance with current standards.
The motivation of bureaucrats is simple and clear:
- The transfer of utility networks and the installation of plumbing fixtures in a new location is called redevelopment, which may entail changes in the configuration and size of the room, requiring changes to the apartment’s registration certificate;
- Relocating plumbing fixtures is also a remodel.
Naturally, it is easier to do everything according to the letter of the law, then the preparation of technical documentation for housing will not cause problems.
- SNiP 2.08.01−89* “Residential buildings”;
- SNiP 2.04.05−91* “Heating, ventilation and air conditioning”;
- SNiP 3.05.01−85 “Internal sanitary systems”;
- SNiP 2.04.01−85* Internal water supply and sewerage of buildings.
The modern market of plumbing equipment is represented by a wide range of bathtubs, showers, sinks and sinks, toilets and bidets, valves and mixers. Despite all the variety of devices in terms of functionality and methods of controlling their operation, the methods of connecting household sanitary equipment with residential pipeline communications are completely unified and “submit” to the requirements of GOSTs and SNiPs.
It is recommended to install household plumbing after installation of utilities before finishing the room. Water connections for installing appliances must end with water sockets, which are a mandatory attribute of a home’s water supply system. Water outlets are specially rigidly fixed to protect the water supply system from vibration effects that occur during the operation of connected household plumbing fixtures.
The distance between the axes of the outlet fittings provided for hot and cold water must be strictly 15 cm.
Instead of sockets, it is allowed to use elbows, tees, couplings or manifolds for connecting mixers or other types of taps.
Another general requirement for the installation of plumbing fixtures is to ensure free access to the equipment, for which SNiP stipulates the size of the free space around each type of fixture (bathtub, washbasin, etc.).
The height of placement of plumbing fixtures is regulated in clause 3.11 and clause 3.15 of SNiP 3.05.01−85 “Internal sanitary systems”, and pipeline fittings to the devices are installed in accordance with clause 10.5 of SNiP 2.04.01−85* “Internal plumbing and sewerage of buildings."
The nuances of laying plastic pipes
The connection of two adjacent pipes occurs using a fitting. More precisely, the pipe is hermetically sealed in the elastic band of the fitting. The pipe must be inserted all the way
It is very important that the fitting and pipes are clean. Otherwise, over time, the sealing of the connection will be broken.
To improve the tightness of the connections, the ends of the pipes are treated with a soap solution.
The most difficult process is installing the riser. Therefore, it is from this site that the installation of the sewer system begins. First, the tee is installed. To do this, a rubber cuff, which is pre-lubricated with sealant, is placed in the lower socket and connected to the tee. Clamps are used to secure the pipes and riser to the wall.
After assembling the riser, the pipes are led to the places where the plumbing fixtures will be located. Immediately you need to provide for the presence of a slope towards the riser. It should be within 2 cm per 1 m of pipe. If sewer pipes are laid in wall grooves, then clamps are used to securely fasten them.
After installation work, all connections are carefully checked. The plumbing drain elements are connected to the pipes. This procedure is not complicated. The only problem that can arise is connecting the bathtub to the sewer.
Requirements for installing plumbing equipment in a bathroom
By analogy with the bathroom, there must be at least 60 cm of free space in front of the toilet and bidet and 25 cm on each side. The standard distance between the toilet and the bidet is at least 25 cm.
The height of the toilet without a lid is 38−41 cm from the floor with a length dimension of 60−65 cm.
The variety of sanitary products offered, produced by manufacturers according to their own internal standards, makes compliance with the given dimensions irrelevant. However, no one has canceled the requirements of the standards, so the approval of the redevelopment will be guided exclusively by the current standards.
Name
When did toilet paper appear in Russia?We think that you will be interested in learning the history of toilet paper production in our country. Here's what information was published as part of TheQuestion project: “The production of toilet paper in the USSR began only in 1968, when two English paper-making machines were installed at the Syassky pulp and paper mill (Leningrad region). The launch took place on November 3, 1969, but the first batch of hygiene products encountered zero interest from consumers: Soviet citizens simply did not know what it was intended for. Only after a large-scale advertising campaign (videos about toilet paper from the Syassky plant were shown before screenings in cinemas) did a real boom begin. The personal hygiene product, so familiar all over the world, immediately became in short supply in the USSR and until the 80s it could only be obtained by standing in a huge line.” So, the need for a toilet paper holder arose relatively recently. |
Connecting the bath to the sewer
To connect the bathtub to the pipes, it is better to use a siphon with an overflow. Its installation requires compliance with two requirements:
- Creating an optimal difference in height between the outlet and drain pipe. The specific size of the drop depends on the height of the siphon outlet.
- Providing access to the siphon, which is necessary for periodic cleaning of the drainage unit.
As for the pipe that will connect the bathtub to the sewer, the best option is hard plastic products. They should have two elbows that will ensure optimal rotation of the elements. If it is not possible to connect the drainage units using rigid pipes, then corrugated pipes are used. When joining pipes of different diameters, adapters are used.
Connecting a bathtub to the sewer consists of the following sequential steps:
- all rubber gaskets are put in place;
- the siphon is assembled and the overflow pipe is connected to the bathtub;
- fastening elements are screwed in;
- using a pipe and a pipe, the siphon is connected to the drain hole;
- The joints are sealed where the bathtub comes into contact with the wall.
All plastic elements are connected without the use of open-end or gas wrenches. The work is done manually. Otherwise, there is a risk of damage to the plastic thread.
After completion of installation work, preliminary testing of the sewer system is carried out. It is necessary to turn on all plumbing fixtures and stock up on 2-3 buckets of water. When the plumbing begins to drain waste water into the system, buckets of water are poured into the sink, bathtub and toilet. If there are leaks, you will have to redo the fastening of the sewerage elements in such places.
Special norms
Of course, the standard level of installation is not always suitable, especially inside institutions where children are present. A child is much smaller than an adult, which is why he cannot use a sink of a standard height of 85 cm without a special step or stand.
Since the use of stands for access to the washbasin is not always safe, other standards for installing plumbing equipment apply in children's institutions:
- In the territory of nursery groups of kindergartens, washbasins are installed at a distance of 400 mm from the floor surface.
- In the territory of preschool groups of kindergartens, washbasins are installed at a distance of 500 mm from the floor surface.
- For primary schools, schools recommend installing sinks at a level of 550-600 mm from the floor surface.
- For middle and high schools, schools recommend installing sinks at a height of 650-850 mm from the floor surface.
Note! The bathroom area in typical apartments does not allow for the installation of a separate sink for children, so you have to make a compromise when choosing the installation height of the main washbasin. To enable the child to use the sink independently, various retractable steps and stands are used. To avoid falling, use them on a non-slip floor and under adult supervision.
Preparing to connect
Before laying a sewer system in the bathroom, you need to prepare all the structural elements in advance, following the expert advice described below. The main element for ensuring drainage is a siphon, which makes it possible to clean the system if the drain in the bathroom is clogged. In order not to get confused in the terms when purchasing this product, you need to remember that this device has two more names, “piping” or “drain-overflow system” for the bathroom.
How to choose a siphon
The bathroom drain pipe can be made of materials such as:
- copper;
- brass;
- cast iron;
- plastic;
- textolite
When installing sewerage in the bathroom yourself, it is recommended to buy plastic products that do not have corrugated pipes and the structure is rigid. Plastic is chosen because this type of material is easy to work with and does not require special tools, while installing sewerage in a bathroom made of metal or copper requires certain work experience.
When buying a siphon model for your bathroom, you need to consider a number of features:
Installation of drain pipes in the bathroom can be carried out using siphons of two types. The universal type is suitable for all bathtubs where the distance between the drain and the overflow does not exceed 57 cm
In bathrooms with other designs, it is necessary to purchase special siphons or they can come complete with the bathtub itself from the manufacturer; Before making a sewer system in the bathroom and buying a siphon, pay attention to the thickness of the bathroom itself. There are products on sale that are designed for different bathroom wall thicknesses, but there are also universal models; installation of sewerage in a bathroom almost always involves the presence of additional consumers in the form of a washing machine
For these purposes, there are special siphons with several outlets for connecting drains of third-party household appliances.
It is worth remembering that a siphon of any model and design needs regular maintenance, so before hiding the sewer in the bathroom or when covering the bathroom with decorative panels, you need to provide an inspection hole of sufficient size so that the sewer line in the bathroom is provided with free access. Typically, in such cases, a removable panel or opening door is provided in the place where the bathtub is connected to the sewer.
When installing a new bathroom, the required height should be maintained to ensure free drainage. The sewerage system in the bathroom provides for a difference between the lowest point of the sewer pipe and the siphon connection point. This difference should be 10-20 cm for normal functioning of the system. In the absence of such a difference, the sewerage wiring in the bathroom will fill with water or the liquid will drain very slowly.
Connecting the bathroom to the sewer
Before assembling the sewer system in the bathroom yourself, for ease of understanding, we break down the entire process into main points in the form of step-by-step instructions. The installation procedure is as follows:
- laying sewer pipes in the bathroom begins with checking the configuration of all the elements involved;
- then all the elements of the siphon are assembled into one structure and a liquid sealant is used to ensure better sealing of the connections. Typically, a diagram for connecting the bathroom to the sewer and detailed assembly instructions are contained in the attached documents for the bathroom and siphon, so that you can carry out the installation yourself;
after the siphon is completely assembled, a sewer system is installed in the bathroom, where one end of the siphon pipe is connected to the drain hole of the bathroom, and the other to the inlet pipe of the waste system; at the last stage the overflow pipe is connected
In this case, it is important to monitor the tight fit of all rubber gaskets at the joints. The sewer pipe in the bathroom should not have stressed areas, this will lead to deformation and cracking of the plastic.
You can watch the video accompanying this article to learn how to properly assemble and connect the siphon.
How to calculate the optimal sink height
According to building codes, sinks in residential areas must be installed at a height of 80-85 cm, but studies have shown that this is not the most convenient location. In this case, most people have to bend over a lot to wash their hands, so it is better to be guided by the anthropometric parameters of men and women.
Optimal washbasin installation height (from floor to side) for men, women and children
| Men | 94-102 cm |
| Women | 81-93 cm |
| Teenagers | 65-80 cm |
| Children | 40-60 cm |
If the sink will be used by several people of different ages and genders, it is better to choose an average height - 86-93 cm from the floor, and for children, install a special stand or a second washbasin. True, such an arrangement is only possible for models with the ability to adjust the height - for “tulip” type washbasins or those that cut into cabinets, SNiP parameters are usually used (80-85 cm).
In addition, there are certain technical standards that regulate the location of the sink in relation to other interior items.
| Interior element | Distance to sink, cm |
| 25 | |
| 30 | |
| 25 | |
| 30 | |
| 20 | |
| 60 | |
| 60 |
The distance from the side wall to the edge of the washbasin should be at least 20 cm, and the free zone should be about 70 cm (if the sink is installed in a niche, this figure increases to 90 cm).
Before installing a sink in the bathroom, you need to carefully measure the room, consider the optimal placement of plumbing fixtures and furniture, and then draw a detailed diagram of the interior indicating all measurements. When purchasing a model, it is important to pay attention to the fact that the model’s fastenings correspond to the water supply system. Another important aspect is the choice of a faucet, which is best purchased together with a sink, since they may have a hole for the faucet or be blind.
Tulip-type sinks are equipped with a base of standard length, but it is possible to change the height of the sink at your discretion (though only if its design and configuration are quite simple). To do this, you need to cut the base of the sink or install it on any stand - the main thing is that so that it is reliable and stable. When installing plumbing, it is necessary to take into account the distance between the drain and the siphon: if the siphon is located below the level of the drain, the use of the washbasin can lead to serious problems.
If you plan to place a washing machine under the sink, its height should not exceed 70 cm, since there must be a fairly large gap between the appliance and the washbasin
When spinning laundry, the machine may vibrate, and if its edge touches the edge of the washbasin, the plastic coating of the appliance or the sink itself may be damaged.
Installation of the sink must be done using a level, and it is best to use a laser level, as it allows you to carry out work more accurately.
The easiest option for installing a washbasin for beginners is the overhead model, as it does not require special skills and knowledge. If the dimensions of the room allow, you can install two washbasins side by side. The distance between them should be 94-109 cm, and between the taps - 90 cm.
The correct choice and installation of a sink is the guarantee that the plumbing fixtures will serve its owner faithfully for many years.
Preparation for connection, selection of materials and installation of the bathtub
Before connecting the bathtub to the water supply and sewerage pipes, you need to prepare the materials and choose a place to fix the bowl. The main problem is to determine the correct installation height in order to correctly connect the siphon, and to guess the location of the mixer if you choose a model with wall mounting above the side of the bathtub.
Installation and connection diagram of plumbing in the bathroom
Simultaneously with the connection to the sewer, installation of mixers is carried out
Bathtub installation: important points
Basic conditions that should be met during installation to properly connect the bathtub:
- Correctly determine the height from the bottom to the floor.
- Level and fix the bowl using a level.
- Properly install the decorative screen.
Selecting a location and adjusting the mounting height
Determining the distance from the floor to the lowest point of the bottom must be carried out taking into account the height of the sewer pipe outlet. The second criterion is the type and depth of the siphon tank, the distance from the outlet pipe to the floor. The higher the bathtub is installed, the fewer problems there will be during installation.
Installation height is the most important condition for successful connection
The height distance between the pipe and the sewer drain should be at least 4 - 6 cm. The slope of the pipe from the outlet of the siphon to the insertion into the riser will ensure rapid drainage of water, and a sufficient depth of the siphon will ensure the absence of an unpleasant odor from the drain. Under standard conditions, it is enough to leave 15–25 cm in height from the bottom point of the bowl to the sewer outlet.
Leveling the bathtub with a laser level
After installation, you need to level the bathtub, determining the level of deviation along the horizontal upper edge. The angle lowered below the level must be raised.
Types of siphons: which one is better to choose
The choice of model and material of manufacture depends on the initial data: when installing on a new bathtub, you can choose almost any siphon, if it is possible to adjust the mounting height of the bowl. When replacing an old siphon, you will have to focus on the type and height of the bowl and select the product based on measurements.
Even inexpensive models are equipped with corrugation for connection
The main materials for the manufacture of budget siphons are polypropylene and PVC. Completely identical in appearance, the materials differ radically in performance characteristics.
Part sizes and pipe diameters
A polypropylene kit is more expensive, but will last a couple of years longer than a PVC siphon. The structure of the material is smooth, without roughness and pores: plaque is not deposited on the smooth walls, narrowing the internal lumen of the pipes. Propylene threaded connection parts are stronger than PVC threads: there is less risk of breaking fragile parts when screwing.
Classification by functionality:
- Classic siphons. They are equipped with a plastic or flexible tube connecting the outlet from the overflow to the drain. The simple design has the advantage of durability and the absence of mechanisms that often fail. The disadvantage is the need to close the drain with a lid before adding water.
- Semi-automatic products. In addition to the tube from the overflow to the bottom of the siphon, siphons are equipped with a mechanism with a cable. The lever is located on the inside of the overflow. When you turn the handle, the drain closes - there is no need to use the lid on a chain and bend over to install the plug.
Automatic models - convenient, but expensive and unreliable
- Click-clack or automatic. To fill or drain water, just press a button or turn the lever - the bottom drain will automatically close.
What you will need for assembly: pipes and adapters
In addition to the siphon, to connect the bathtub to the sewer you will need:
Sewer pipe and, if necessary, turn. It is better to buy plastic rigid pipes. If there is no space to install rigid wiring, you will have to install a corrugated flexible pipe. The diameter of pipes for local sewerage is standard - 40 mm.
Flexible adapter for plastic
If the diameter of the sewer pipe differs from the diameter of the bathtub drain pipe, you need to prepare adapters. For plastic pipe connections - rubber corrugated coupling 50 mm x 40 mm. In an apartment with an old cast iron riser, you will need to install an adapter 73 mm (standard diameter of cast iron pipes) x 40 mm.
- FUM tape, silicone for lubricating rubber seals (gaskets), moisture-resistant sealant for processing joints and bathtub edges, gasket repair kit.
- A knife for cutting plastic, if you need to cut off a corrugated hose or pipe.
What determines the standard distance from the floor to the sink?
A sink is a bowl-shaped plumbing fixture that is used inside a bathroom to provide human sanitary and hygienic needs. It can be hung directly on the wall using brackets, embedded and mounted on a bedside table, or placed on a stand .
Regardless of the method of installing the washbasin, the standard height of the sink from the floor should be taken into account when installing it. This value determines the most comfortable location of the device, convenient for human use.
During the Soviet Union, entire institutes worked in the field of standardization in order to develop uniform standards for installing plumbing fixtures in the bathroom.
Attention to detail and years of research have led to the determination of the optimal height for a bathroom sink. This value was determined in accordance with the height of the average person:
- According to the average height of a Russian woman, it has been experimentally established that the most comfortable washbasin height for her is 80-92 cm.
- Considering the average height of a Russian man, we can say that it will be more convenient for the male population of the country to use a sink if it is installed at a distance of 85-102 cm from the floor.
Important! The installation height of the sink is a standard that is determined by the average person. This value indicates the distance from the floor to the upper level of the sink. The correct choice of this parameter determines how convenient the use of this plumbing fixture will be.
How to connect a bathtub to the water supply
After installing the sewer connection, the mixer is installed. With its help, the bath will be connected to the water supply. Water outlets are holes in the wall to which outlets from the central riser are connected.
The best way to check is to turn on the water and run half a bath. With such pressure, all weak connections will immediately show themselves. Detected leaky fasteners are tightened and treated with sealants.
After completing the main stage of renovation work in the bathroom and purchasing plumbing fixtures, all that remains is to connect the bathroom to the sewer and connect to the water supply.
Choosing a location, installing a bowl.
Siphon assembly.
Connection to the sewer pipe outlet.
Connection to water supply.
Checking correct installation and tightness.
What are the dangers of incorrect installation and connection?
The bathroom smells like sewage - why is this happening? Residents of apartments in which the bathtub or washbasin has recently been replaced often turn to plumbers with this question. And the answer is simple - errors when installing the siphon.
If the bathroom stinks, it only means one thing:
- Either the hydraulic valve does not cope with its duties;
- Or there is a leaky connection between the siphon and the receiving tee, through which sewer odors penetrate into the room.
According to experienced plumbers, the bathroom often stinks due to the reduced radius of the drain pipe made from the corrugated hose from which the siphon is formed.
For reference: The volume of water contained in it is not enough to withstand the atmospheric pressure of the public sewer system. And it “presses through” the water plug, and unpleasant odors penetrate the room.
Causes of incorrect height ratio
The main reasons for the discrepancy between the levels of the tee and drain holes should be considered:
- errors made during installation or reconstruction of the system;
- the use of modern types of plumbing that require a different system configuration;
- re-equipment of kitchen or other premises, requiring installation of sewerage under the floor covering.
Owners of cafes or bars that open in unprepared premises often face similar problems. They constantly have to solve plumbing installation issues. For example, how to install a toilet if the sewerage system is higher than the drainage elements. In addition, many modern appliances are equipped with a floor outlet, which requires the assembly of a separate line.
Also read: Do-it-yourself homemade sewer pump - vacuum pump