People make their lives as comfortable as possible by constantly inventing something. Thus, bathtubs made of steel and cast iron are replaced with acrylic ones. To the positive qualities, you can add one negative point - the tendency of the coating to damage. However, they are easy to eliminate at home if you know what and how to seal an acrylic shower bathtub.
What damage can occur to acrylic bathtubs?
Before you begin repairing an acrylic sanitary ware for water procedures, you need to familiarize yourself with the nature of any damage. Despite the fact that there are not so many of them, you need to understand what the difference between them is. The method of repair directly depends on the causes of the defect. In this case, specialists consider damage of a chemical and mechanical nature:
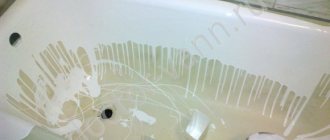
- Chemical damage is the so-called burn on the body of the bathtub tray, caused by the use of inappropriate cleaning products to care for acrylic sanitary ware. Most often, this problem occurs during the soaking process, when a reaction occurs between the acrylic surface of the tray and the components included in low-quality powders. Such local defects, which in most cases manifest themselves in the form of cloudiness, can be easily eliminated with your own hands.
- Mechanical injuries are a more serious problem than chemical burns. First of all, these are deep scratches, cracks, and in particularly difficult cases, through holes. Moreover, even a hull hole measuring 10 by 10 cm can be repaired at home. This property of an acrylic bathtub is its main advantage. All cracks, chips and holes can be easily repaired even by a non-professional in plumbing.
When deciding on the issue of independently repairing cracks and chips in an acrylic bathtub, after familiarizing yourself with the nature of the damage, you need to figure out how to eliminate it . The choice of a kit for repairing an acrylic bathtub with your own hands will directly depend on this.
How to use acrylic bathtubs correctly?
Several models of polyacrylic products are produced. The main difference between them is the quality of the top layer. It should not be destroyed under the influence of mechanical loads and chemicals. If the product is covered with acrylic 5 mm thick, then its service life is 25 years. Thickness below this limit results in reduced durability. Such bathtubs will last no more than 10 years, subject to operating rules.
The basic rules are to protect the surface from excessive mechanical stress, and not to treat it with chemicals and reagents. It is necessary to wash the bathtub using special detergents that are made from non-aggressive substances and oxidizing agents. The acrylic bathtub should be wiped with a sponge that does not contain any hard elements. It is not recommended to place heavy bulky objects near acrylic products, or to place metal containers in it.
Acrylic bathtubs are not intended for bathing pets. For many of them, this process causes fear, so extended claws can cause damage to the surface. Compliance with these simple operating rules will help maintain the durability of the polyacrylic product. During this time, no repair work will need to be performed. However, troubles do happen and damage of varying degrees occurs on the surface:
- minor damage and scratches;
- areas with chips;
- cracks;
- holes;
- destruction of plastic elements.
To perform repair work at home, you must have a special tool. In addition, you need to listen to the advice of experienced craftsmen.
Means for sealing cracks, potholes and chips
If to eliminate minor scratches it is enough to perform high-quality grinding and polishing with felt, then repairing cracks and potholes is a process that requires a lot of effort. To eliminate such defects with your own hands, you will need a special repair kit for working with acrylic bathtubs, which consists of the following components:
- Liquid acrylic, which comes in a variety of shades. Therefore, choosing the appropriate material for a particular bathtub is quite difficult, especially if there are no documents for the sanitary product.
- A hardener, without which it is impossible for liquid acrylic to harden.
- Sandpaper to create a rough effect on the damaged area.
- Polishing paper used to finish the restored acrylic section of the bathtub.
- A special solvent used to degrease the damaged area of the pallet.
- Epoxy adhesive composition, which eliminates minor scratches up to 1 mm deep.
Naturally, the repair kit may also have a minimum set of the most necessary things - liquid acrylic and hardener. In turn, related materials can be purchased separately at a hardware store.
Adhesive options for plexiglass
- Professional adhesive for extruded acrylic (aka plexiglass, plexiglass) “Acrifix 117”, “Acrifix 116”
- Dichloroethane
- Vinegar essence
- Cosmofen
adhesive available in different manufacturing options. - Glue "Colakril-20"
and
"Colakril-30" - Second glue “Moment”
Select from the table of contents what you have and immediately look at it so as not to read too much.
Also be sure (!) to look -. They exist and it is very useful to know them. Otherwise, you will still recognize them, but it will be too late.
Glue "Acrifix 117"
Very good glue. I would say the best I've ever used. Acrifix 117
good to use in mass production.
Its features:
- high strength adhesive joint
- seam transparency
- durability
- setting speed
In addition, it has a number of advantages. It has less toxicity compared to the most readily available dichloroethane. High capillary properties - it easily penetrates deep into narrow crevices and cracks in plexiglass. By gravity, without pressure.
But the glue has Acrifix 117
There is one major drawback for home gluing products: it is expensive, packaged in large 1-liter jars and rarely sold anywhere. The price for January 2020 reached 6,000 rubles. per liter And now I don’t know.
In Acrifix 117 it is useful to add a little Acrifix 116, approximately 1:10. Then the mixture better fills the smallest surface irregularities of the parts being glued.
Glue "Acrifix 116"
It is also intended for gluing plexiglass, but it is sold in tubes of 100 grams, because it is thicker (similar in thickness to fresh honey, but only transparent in color). It is more convenient for them to glue surfaces that are not perfectly smooth, rough, or jagged. In this case, it better fills uneven surfaces of the material.
Dichloroethane
A good replacement for expensive glues is dichloroethane
.
It can be purchased, for example, in a store that sells radio components, very cheaply. When gluing perfectly smooth surfaces pressed against each other, no additives to dichloroethane are needed. You can use a syringe when gluing. Just put it in a syringe and run it into the joint between the surfaces to be glued. It glues parts together perfectly. The joint will be perfectly transparent, you can achieve it without bubbles.
Or you can dilute plexiglass shavings or sawdust in it and then it will become thicker. You can not only pour it, but also spread it on the surfaces to be glued.
Dichloroethane is very poisonous!
Keep away from children! Gluing should be carried out in a well-ventilated area, away from sources of fire. Store at room temperature.
I really don’t recommend spilling a bottle of this liquid in the room!
Vinegar essence
I'm surprised, but the first experiments showed excellent results. In some properties this “glue” is superior to industrial Acrifix. Previously I wrote:
But you still need to check it for the durability of the adhesive seam and other parameters. Therefore, the results will come later.
Now I can say that you can glue them, but be careful. Acetic acid can glue. There are many nuances in the gluing results. The main problems are on the bends of parts, where there is strong internal stress in the glass after drying, cracks appear.
Today I’m posting a video about the first results of testing the strength of plexiglass bonding using vinegar essence.
Test for gluing 3 mm plexiglass:
Video of gluing 3 mm plates and 6 mm strips of plexiglass with vinegar essence:
Glue "COLACRIL-20" and "COLACRIL-30"
They replaced Acrifix 116 and Acrifix 117,
because they became too expensive with the rise in exchange rates in 2015. For gluing, it is better to separate them from each other. Because
- COLACRIL-20 liquid
- COLACRIL-30 thick
This ensures good gluing quality and a transparent seam. Transparent, like glass and without bubbles!
Unlike acryfixes, they have a peculiarity: when glue gets into the place where the plexiglass is under tension (and it appears even 15-20 mm from the place where the plexiglass is bent), small cracks appear at the place of the bend. The strength and presentation of the product is lost.
Secondary glue “Moment” and Cosmofen
These adhesives come in a variety of packaging, from tubes to plastic bottles with spouts. It's hard to say which is better. They are very similar in their properties, because... they contain cyanoacrylate.
Their peculiarity is that they do not dissolve plexiglass
and therefore I do not recommend them for applications where high strength is required. But they can “grab” small products to be glued together. For example, if a small element of a decorative toy falls off. Not load bearing.
In addition, often the gluing area turns white and becomes opaque.
But they stick to the skin very well, especially on the fingers! Therefore, twist the tubes through plastic film after use, otherwise at least one drop will definitely end up on your hands.
Attention!
After using different adhesives for a year, our production returned to Acrifixes. They are the best adhesives for plexiglass, but also the most expensive.
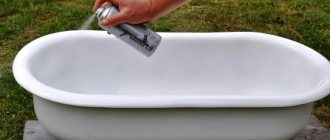
Repairing shallow scratches and minor burns
If the bathtub is not handled carefully during its intended use, then minor damage may appear on its surface in the form of shallow scratches or burns from household chemicals. Moreover, if the defect is superficial, then repairing it yourself will take place without any problems if you follow the following rules:
- Surface damage is cleaned with sandpaper using coarse-grained material in the first stage and a finer equivalent in the finishing stage.
- Due to the fact that acrylic has a homogeneous structure, due to such grinding there will be no changes in the shade of the surface. After completing the sanding procedure, acrylic polish is applied to the surface of the bathtub.
In the case of a deep burn, simple grinding is not enough to eliminate it. In such a situation, the formed depression is filled with liquid acrylic, after which it hardens, sanding is carried out using sandpaper.
Preparing for gluing acrylic
Acrylic gluing is carried out after completion of all machining operations, heat treatment and thorough cleaning of the areas to be joined. The areas adjacent to the gluing area are covered with adhesive tape or a special coating to protect against the ingress of glue. Surfaces that need to be glued are treated with a degreasing compound.
— Surface cleaning
carried out using ionized air or a mixture of warm water and dish soap. After drying, the acrylic is wiped with an absorbent material that does not leave lint.
— Protection of adjacent areas
This is done using polyethylene film, special adhesive tapes or liquid films, which can be easily removed after hardening.
— Preparation of the adhesive composition
necessarily includes a thorough mixing operation. For larger containers, an electric or pneumatic stirrer is used. After mixing is completed, there should be no streaks or bubbles in the adhesive structure.
— Adding pigment
into an adhesive composition is performed when colored acrylic sheets are glued together. Thanks to pigmentation, when gluing colored sheets, the joint is completely invisible.
What to do if acrylic peels off?
Often, the acrylic layer on the sides of deep cracks moves away from the base of the bathtub body and in such a situation, regular sanding is not enough. Typically, this problem occurs when the pallet is installed incorrectly and basic installation rules are not followed. And if the pallet was skewed during operation, this could lead to the peeling of the acrylic coating after a deep crack appeared.
But even such a defect, which at first glance seems difficult to repair, can be eliminated independently. To do this, you need to purchase a special adhesive composition for acrylic coating, which is available on the shelves of most construction supermarkets. In the area where the bathtub body is damaged, the peeling coating is drilled and an adhesive composition is poured into the resulting hole. After the glue has hardened and the layers have been properly fixed, they move on to directly repairing the crack in the acrylic bathtub with their own hands.
Repair
So, your acrylic bathtub is cracked, what should you do?
A small digression. Literally in a nutshell. First you need to choose the right material for repair. What are we talking about?
Acrylic bathtubs are made in different ways. And they react differently to deformations during water procedures. For example, different plasticity. It is important to seal it with a composition that will be like native on an acrylic bathtub.
There are two ways to make acrylic bathtubs.
Vacuum forming is the first method. There is a thicker layer of acrylic. And such baths are usually sold in film. For repairs, liquid acrylic is used, which is based on polymethyl methacrylate.
Casting or spraying is the second method. A thinner layer of acrylic. If you look at the slice, its thickness will be no more than 1 millimeter. Usually, to repair such bowls, the manufacturer sells a repair kit as a kit.
This is a small digression. Let's now get back to repairing cracks in an acrylic bathtub. So, the bathtub is cracked, what should you do? You can repair the bowl using a repair kit or repair tape.
It is important to eliminate cracks as soon as they appear, and not collect them, hoping to fix them in one fell swoop. Will not work.
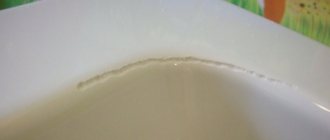
Repairing a crack on an acrylic surface
If defects in the form of various cracks form on an acrylic bathtub, more thorough and complex repairs are required. For high-quality restoration of damaged acrylic, as mentioned earlier, you will need an appropriate repair kit or a special repair tape. In most cases, the formation of cracks is accompanied by prolonged wear of the bathtub or a fall of a heavy object onto the body.
It is important to eliminate any cracks immediately after they are discovered , before they grow into a global problem. First of all, this is due to the fact that restoration of a bathroom with deep damage requires much more financial and physical costs. A simple and practical way to repair minor cracks in acrylic bathtubs with your own hands is done using epoxy putty and involves the following procedure:
- To begin with, the surface of the bathroom at the site of damage is cleaned using coarse sandpaper. Along the length of the entire damage, a surface approximately a centimeter wide is processed on both sides. First of all, this is necessary to increase the adhesive properties of the epoxy putty and acrylic.
- Using an electric drill, you need to drill 1 mm diameter holes at both ends of the crack. This unusual action is necessary in order to prevent further cracking of the material.
- At the next stage, the damaged area is cleaned of dust and other dirt using water and ordinary soap. To speed up the drying process of the damaged area, you can use a regular hairdryer.
- To repair any acrylic bathtub with your own hands, special two-component compositions are used. Therefore, the hardener is mixed with the main component before directly applying it to the crack. Since the substances included in such mixtures are toxic, you need to worry about quality ventilation in the bathroom. To protect your lungs, it is better to wear a respirator.
- The prepared epoxy putty composition is applied to the cracks and holes drilled with a drill. The putty is applied with a special applicator, which is included in the repair kit.
- It will take at least 12 hours for the composition to harden. After the epoxy putty has dried well, the damaged area is sanded with fine-grained sandpaper until a perfectly smooth surface is obtained.
Minor cracks can also be repaired using a special repair tape . In this case, the initial stage of restoration work is completely similar to the option discussed above. That is, the damaged area is cleaned, drilled at both ends and thoroughly degreased. After the area to be repaired has dried, perform the steps in the following order:
- The repair tape is cut along a length that exceeds the damage site by 2 cm so that on each side of the crack the material extends beyond its edges.
- The repair tape has a protective film that must be removed before use.
- The tape is glued to the crack and air bubbles are carefully removed from under it using a plastic spatula or rag.
While the repaired area is drying, which can take from 3 to 5 hours , water must not come into contact with it. Therefore, you should avoid using the bathroom during this time.
What to buy - review of acrylic glue
Acrylic glue comes in various forms. It can be one- or two-component, liquid or thick, colorless or colored. There are modified polyacrylate-based adhesives that harden when exposed to UV light.
Each brand of adhesive is designed to perform a specific set of tasks. In terms of price-quality ratio, the following types of acrylic-based glue
.
VGT acrylic contact adhesive of permanent tack based on an aqueous dispersion of acrylic copolymer. Designed for gluing all smooth, non-absorbent surfaces (polyethylene, polypropylene, etc.).
It does not have an unpleasant odor; after drying, the contact adhesive becomes transparent, but remains sticky. Available in plastic buckets, packaging options: 0.9, 10, 25 kg. A 0.9 kg package costs about 500 rubles.
Decart acrylic adhesive based on high-quality acrylic dispersion is an improved analogue of PVA. Has increased strength and water resistance. Universal, suitable for working with many materials (except polyethylene and soft plastics).
In its liquid state, the glue is white, but when dry it becomes transparent. Available in plastic bottles of 65 and 260 grams. A large package costs about 200 rubles.
Titan Wild Acrylic repair and installation adhesive based on styrene-acrylic dispersion. Designed for quick and reliable gluing of various building materials: metal, glass, wood, plastic, gypsum, polystyrene foam, ceramics, etc.
When liquid, the glue is milky white in color and becomes transparent when dry. The drying time of the glue at room temperature is one day. A 250 ml tube of glue costs about 150 rubles.
Litokol is a ready-to-use one-component composition with good elasticity and high adhesion. Can be used at temperatures from -30 to +90 degrees.
It is used for various finishing works, for example, for tiling walls and floors in rooms with high humidity, gluing glass wool and polyurethane foam panels.
DALI is a universal adhesive based on acrylic. Gives a strong, elastic and waterproof seam. Does not crack, fills defects and unevenness well.
Krass is another indispensable composition for laying floor coverings. Its properties allow you to reliably fix linoleum, carpets, PVC, wood, fiberboard and chipboard. It is characterized by high initial adhesion and excellent adhesion. Does not shrink. Can be used with “warm” floors.
Mastertex Pro Superfix “liquid nails” is a modern assembly adhesive based on modified acrylic copolymers. Designed for reliable fixation of widely used building and finishing materials - wood, glass, gypsum fiber board, gypsum plasterboard, ceramics, natural and artificial stone, MDF, polystyrene, plastic, etc.
Modified polymers provide high adhesion and guarantee bonding strength. Suitable for indoor and outdoor use, it allows you to glue even loosely adjacent surfaces. Environmentally friendly. When dry, it forms a high-strength elastic seam. A cartridge for a 280 ml pistol costs about 200 rubles.
How to glue with acrylic-based mounting adhesive - instructions
To work with acrylic-based “liquid nails” mounting adhesive, you will need the following equipment:
- sealant gun;
- acrylic primer;
- notched spatula;
- a sponge and a container of warm water to quickly remove glue stains.
Instructions for covering walls with MDF panels using acrylic-based mounting adhesive:
- Preparing the base. The wall surface must be smooth, strong, clean and dry. For better adhesion, it is recommended to pre-impregnate the base with a concentrated acrylic primer. This event allows you to reduce glue consumption.
- Applying glue. The glue tube is installed in the gun. By pressing the handle, the glue is applied in a continuous wavy line to the surface and leveled with a metal notched trowel. The thinner the layer of “liquid nails”, the faster the setting occurs, and the less the panel slides along the wall. The ideal temperature for working with acrylic-based glue is 18-24 degrees.
- Gluing. The panel is pressed tightly against the wall, its position is adjusted and held for 2-3 minutes. Complete drying of the glue occurs within a day; only after this is mechanical impact on the lined surface allowed.
VIDEO INSTRUCTION
Acrylic products
The physical and chemical properties of acrylic make it possible to obtain very strong and durable adhesive joints. Gluing acrylic is carried out by various special means; the choice of one or another composition depends on the brand of acrylic, the shape of the surfaces to be glued, and the design features of the acrylic product. Strength, durability, weather resistance and other performance properties of acrylic structures in places of gluing do not differ from the properties of monolithic material.
Features of repairing chips and holes
If chips have formed on the acrylic layer of the bathtub from the fall of heavy objects or a hole has appeared in the body, then even such complex defects can be eliminated with your own hands. For very deep problems, repair work consists of several stages and involves the following manipulations:
- As always, the first stage involves high-quality cleaning and degreasing of the damaged area.
- At the next stage, coarse putty is used, forming a uniform layer that is not subject to shedding.
- After the first layer has dried, it is thoroughly sanded using sandpaper.
- The following actions involve finishing treatment using a finely dispersed repair compound.
- After the composition has completely dried, the surface is sanded with fine-grained sandpaper.
- At the final stage of repair work, the acrylic bathtub is polished.
As you can see, every homeowner can do the repair of an acrylic bathtub with their own hands. The main thing is to have a suitable repair kit, read its instructions and, of course, not be afraid of physical labor.
The best posts
- How to make a plasterboard ceiling in the kitchen with your own hands
- How to paint drywall: little tricks
- Socket boxes for drywall: correct selection and installation
- Grouting drywall joints: materials and techniques for performing the work
- Epoxy resin, application
- How to cover a radiator with plasterboard without losing heat in the room
- Repair of plasterboard ceilings: we fix the problem ourselves
- Machine for the production of profiles for plasterboard: production of frame elements
Related article: Laminate flooring from JOSS BEAUMONT
Features of gluing planes
The main difficulty in gluing acrylic along a plane is the risk of bubble formation, so in this case a special degassed adhesive composition is used. The glue is poured onto the bottom acrylic plate in such a way as to minimize the number of drips. Next, the top plate is carefully placed on top. Since glue leaks are unlikely to be avoided, all edges of the acrylic sheets must be reliably insulated. This is how blocks with a horizontal working surface are glued together.
If you need to connect two blocks along a vertical plane, then a special elastic band is used, which forms a cavity for the glue. The rope holds the adhesive and does not allow it to flow down. In this case, you can use glue with bubbles - they will gradually rise up. The main disadvantage of this technique is the impossibility of gluing the workpieces over the entire surface, since the edges remain unprocessed.
So, we took a short excursion into the technology of acrylic gluing. But this is only a tiny part of all the information that is used when carrying out the important gluing operation. The quality of gluing is influenced by a huge number of important nuances - the shape and size of surfaces, the type, composition and quality of the glue, the presence of special equipment, and the professionalism of the craftsmen.
We don’t just glue acrylic blanks together - in fact, we chemically splice the material. A special technology developed by our company’s specialists allows us to obtain the most durable and completely invisible seam. Bonded acrylic structures can easily operate under static or dynamic loads. The strength and aesthetic characteristics of the seams do not change over time. We are confident in our capabilities, so we can confidently guarantee the highest quality of gluing acrylic blanks of any shape.
Date of creation: 2015-04-29 Author "Akrilshik"
Hello, friends! With this entry I will begin a series of articles about making money not only on the Internet, but also, as they say, in real life or offline. Everyone knows that it is much easier to make money here, which is what most people do. But the results will improve with the use of the Internet, without which no business can operate now. We will combine.
Since I worked a lot with plexiglass, I’ll start with offline. I will write later how to use it and where to get it for special cases, but now let’s look at a very popular question - how to glue plexiglass
.
Things to consider
To avoid having to wonder what to do, try to worry about prevention in advance. Do not pour boiling water into the sink, for example, do not drain water from freshly boiled potatoes. And, of course, don’t turn on the cold one afterwards. Even strong material cannot withstand such temperature changes.
Naturally, be careful when handling heavy jars, pans or pots. Do not drop them, otherwise you are almost 100% likely to get cracks.
People often view sinks as minor additions to their home. But if you give it at least a little attention and try to treat it more carefully, it will serve you for a long time and will not require any repairs.
Classification of adhesives for acrylic
Adhesives intended for gluing plexiglass are divided into two groups:
1. Chemically set
(hardening two-component adhesives for plexiglass). Hardening of the components of adhesives of this group occurs as a result of a chemical reaction between them. The reaction itself can be activated under the influence of one of the conditions:
- mixing glue components;
- introducing additional activators or hardeners into the mixture;
- heating;
- blowing with humidified air.
2. Grasping by physical type
(adhesive varnishes, tapes with an applied adhesive layer, adhesive compositions in the form of a solution). They contain solvents, as they evaporate and the adhesive mass hardens.
Safety precautions for working with glue
Adhesives and their components (in particular, solvents) are hazardous substances that can lead to both loss of health of the worker and the occurrence of a fire (sometimes an explosion).
Basic rules for handling adhesives
- exclude the presence of open flame sources or electric heaters with an open spiral in the workplace (or in the place where adhesives are stored);
- do not eat or smoke in the workplace;
- work in clean, well-ventilated areas free of drafts;
- install aspiration means above the floor level (solvent vapors are heavier than air);
- When working with adhesives, use personal protective equipment (respirators, gloves, safety glasses).
Organic glass is an amazing material that allows you to realize your wildest design fantasies. But all of them ultimately end up in the hands of the performer, on whose skill the quality and strength of the product depends.
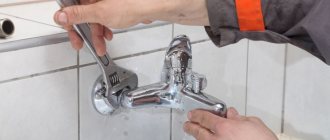
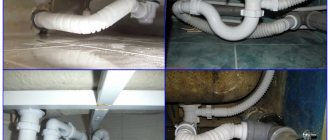
Tools and materials for bath restoration
The standard set of materials for restoring polymer plumbing includes:
- respirator and rubber gloves;
- a set of sandpaper;
- liquid acrylic;
- adhesive for polymer coatings;
- polish.
Tip: Glue is necessary when there are through holes in the coating. Therefore, in order to be able to seal an acrylic bathtub, you need to have a special composition on hand. The method of restoring plumbing directly depends not only on the types of damage, but also on their scale.
How to drill a hole?
Very often, ceramic sinks are made without a special hole for the tap. This happens because most modern faucets are installed on the wall near the sink.
But there are situations when the faucet needs to be built into the side of a ceramic sink, and then it is advisable to watch a video on how to drill a sink.
But when it is not possible to see the whole process on the screen, we suggest that you read the written version of how to drill a hole in a ceramic sink yourself.
The first step is to decide how to drill a ceramic sink; the answer is simple - a drill. This is done not with an ordinary drill, but with a special attachment for ceramic products.
A crown attachment with a diamond core is suitable for this purpose, which will allow you to drill without adding water and cooling the drill itself.
Sales consultants in the store will help you choose the right crown. If everything is done correctly, the problem will be solved. than to drill or seal a hole.
Nowadays it is important not to radically change everything during renovation, but to breathe new life into old objects that have an attractive appearance. Therefore, the question may arise of how to seal a ceramic sink for restoration.
There are such adhesive materials for ceramics:
- waterproof glue;
- silicone sealant;
- cold welding.
Use a hair dryer first to get rid of unnecessary moisture. Now you can seal the crack (for example, with waterproof glue) and leave it to dry for at least four hours.
Then you should apply epoxy putty at the joints and sand the repair area with fine-grained sandpaper.
Also watch a video with an example of restoration of a marble sink.