Acrylic bathtubs are popular among residents of Russia and beyond. They are lightweight, durable and inexpensive.
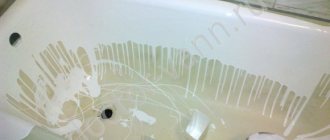
However, even with the most careful handling, scratches and chips may form on them, since acrylic has low resistance to mechanical and chemical influences.
Such damage spoils the appearance of the bathtub, leading to corrosion and deformation. Read the article on how to remove a scratch on an acrylic bathtub without ruining it.
Causes of defects
Despite its many advantages, the polymer has one serious drawback - a low level of resistance to mechanical and chemical stress. For example, if you wash the surfaces of an acrylic bathtub with an acid-alkaline agent for a long time, the surface will become deformed.
Another negative factor is contact with abrasives. Long-term use of a hard brush when cleaning an acrylic bathtub is enough to cause defects of varying severity.
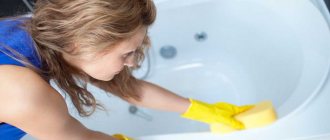
How to remove a scratch on an acrylic bathtub is the most frequently asked question. Of course, if irreparable damage has been caused to the acrylic bathtub, it is better to seek the help of specialists. Minor damage can be easily removed with your own hands at home.
We polish the bathtub ourselves
Before you start, think about what you expect from your plumbing. Each bowl is made from a different material. The polishing method depends on this. So, why do they update plumbing?
- Replacement of plumbing. These are the most extreme measures if you have all the necessary finances;
- Re-polishing. This option is much cheaper, but it is better to hire professionals for these procedures. They will polish the surface a little;
- Inserts. The price is cheaper than refinishing or replacing all the utensils. It is recommended to install them on a new product, so that if something happens, only the liner can be replaced, and the outer part will remain intact;
- Self-finishing. It is recommended that you polish the item unassisted only if you are willing to take the risk. Sometimes the procedure can give not entirely desired results.
Subtleties of manual polishing
To polish a product yourself, you need to follow several steps.
All recommendations apply to the following products:
- Cast iron;
- Enameled;
- Fiberglass.
To carry out the procedure we will need:
- detergents for cleaning enamel;
- palm sanding machine;
- sandpaper;
- insulating tape;
- paper (plastic) to protect walls from spray paint;
- in the case of an enamel bowl, you need to buy a binding material;
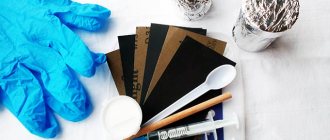
- personal protective equipment (mask, respirator, goggles, chemical protection suit, rubber gloves);
- spray;
- paint (primer or epoxy);
- acrylic solution or varnish.
Minor scratches
Before removing scratches, you must properly prepare the product. Repair actions are carried out only after thorough cleaning and drying of the surface using mild agents.
The porous structure of the material dries completely no less than 6 – 7 hours after wet processing.
- A scratch on an acrylic bathtub is rubbed with fine-grained sandpaper. For acrylic surfaces, it is recommended to use ultra-fine sandpaper marked according to GOST M5N 00 and a grain size of P2500 units.
- After grouting, run your hand over the treated area to identify any remaining roughness. If the surface is smooth, apply a special abrasive polish.
- Using a felt cloth, rub the polish over the entire area and leave for 2 – 3 hours.
- After the composition has been absorbed, acrylic bath wax is applied without abrasive.
- After an hour, rinse the surface with a liquid product.
Cracks
A crack is much more dangerous than a scratch, since it is a through defect. Firstly, the consequences are much more serious - leaks on the bathroom floor, flooding of the lower apartment. Secondly, they tend to spread further under the influence of loads from the user’s weight and water. Therefore, the restoration technology is somewhat different from repairing scratched areas:
- after sanding the surface, it is necessary to create zones of uniform pressure along the edges of the crack;
- To do this, two holes are drilled with the center of each of them at opposite edges of the crack;
Drilling holes along the edges of the crack. - The holes should not be through, they should not be deeper than the crack itself;
Making a through hole. - the crack is expanded, again only to the depth of the crack itself;
- degreased;
- the repair compound is applied and sanded.
Chips
Of course, it will not be possible to remove the chip with sandpaper. More serious measures are needed here.
Before you begin the process, you need to purchase an acrylic bathtub repair kit. The kit includes everything you need to remove a scratch:
- instructions,
- sandpaper,
- polishes,
- reducing agent,
- disposable napkins,
- gloves,
- applicator.
Inside the chip, the wet grinding method is considered more effective. For this purpose, the paper should be slightly moistened.
The process itself is simple, but requires strict adherence to the instructions:
- A deep chip is sequentially processed on all sides by three types of sandpaper - from the coarsest (No. 600) to fine-grained.
- Next, the cleaned part is rinsed, dried with a construction or household hairdryer and degreased with alcohol.
- Puttying stage. Apply the reducing agent evenly using the applicator. Level the layer to the level of the factory coating.
- After the polymerization process is complete, sand the repaired area.
The hardening time of liquid acrylic is at least 4 - 5 hours.
What cannot be used for restoration?
To remove scratches in the bathroom , do not use sandpaper with a grit rating below P2500 .
Even the P2000 is no longer suitable for repair work. Such paper will not sand, but scratch the surface.
Pumice stone and metal brushes are not suitable for removing scratches. Abrasive powders should not be used . They won't help solve the problem.
It will not be possible to correct the defect using ordinary putty. You need a professional composition based on acrylic.
Through holes
Actions in this case depend on the nature and location of the gap. A hole with a diameter of more than 5 cm cannot be repaired. Smaller holes can be repaired yourself.
Before removing scratches from an acrylic bathtub, both the inside and the corresponding area on the outside are cleaned and degreased.
- Fiberglass is attached to the back of the bathtub with epoxy glue. In this case, the size of the patch is 5–6 cm larger than the diameter of the hole.
- An overlay is cut 5 cm larger than the first. After 1.5 hours, another patch is glued with a second layer.
- The third imposed section of reinforcement should exceed the second by 5 cm.
- Degrease and sand the inside.
- The hole is filled with putty and leveled.
- After drying, carefully sand again.
The pattern of the reinforced mesh is carried out in advance according to the markings applied from the inside.
How is the preparation going?
- Using chemicals, it is necessary to remove all dirt and scale from the surface. To do this, apply any cleaning agent to the sponge and wash the entire area;
- Once all the dirt has been removed, use plain water and a clean sponge to wash away any remaining soap solutions;
- Dry it thoroughly using towels or a hair dryer;
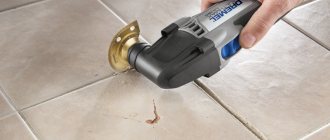
- To make the bowl soft and rough, use a palm sander. Work with the tool carefully so as not to damage the utensils;
- The tiles and walls must be covered with a special film (or paper) so that the paint does not get on them;
- Place adhesive material into a spray bottle (sold at any hardware store, ask the seller which one is better);
- Spray layers should be applied evenly. After completing the procedure, you need to wait 5 - 10 minutes until the layer dries.
Special means
Before carrying out repairs, you should select a repair kit. The choice of resuscitative agents is based on the nature and extent of the injury. As a rule, the kit includes everything necessary for further actions. The only thing that remains is to make sure that the components declared by the manufacturer are present.
Experience shows that Stakryl, an innovative product designed specifically for the restoration of old bathtubs, completely restores the color and texture. The technology is based on the full-fill method.
BEP 52-97 is no less effective. A Russian-made two-component epoxy suspension is also successfully used for restoration activities.
Damaged areas can be restored by applying touch correctors. According to user reviews, correctional drugs from Cramer from Germany are the leaders in this category. The manufacturer's product line includes 20 items of restorers and kits for partial or complete repair of plumbing fixtures.
Direct polishing process
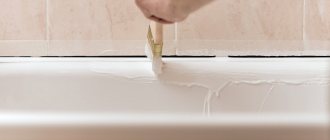
- Buy a primer. There should be instructions on the jar in what proportions to dilute it. After the paint is filled into the “gun”, it is necessary to spray it on each area, moving back and forth;
- After the first coat, wait until the paint dries (about 30 minutes), then go over again;
- Polishing after painting requires special care. Open a can of acrylic varnish and apply exactly 3 coats to the outside. As with paint, at least 30 minutes should pass after each layer;
- Once the final coat of acrylic has been applied, do not use the product for 48 hours.
It will be interesting: We create a water leakage control system using improvised means
Small tips
Five tips for productive polishing:
- To prevent drops from the spray bottle from being sprayed beyond the limits, it is recommended to stop every time the direction changes;
- every six months it is recommended to wipe the product with urethane shine (sold in automobile stores and service stations);
- if you are using a spray gun for the first time, it is recommended to get used to the mechanism by practicing on a piece of plywood;
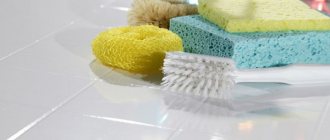
- rough and caustic detergents are contraindicated for any plumbing fixtures;
- It is better to use soft cleaning gels or a soft scrub.
Use personal protective equipment before polishing the product. Open all windows and doors. Use hoods and fans to remove toxic fumes. Pets and all family members must be removed from the premises during this period.
How to Polish a Hot Tub
The hot tub requires special attention. It takes more effort to polish it. To do this, you need to prepare it in the following way:
- Fill the hot tub bowl with warm water and mix it with any non-aggressive product. Turn on the hydromassage and wait 5 minutes. Then turn off the hydromassage and wait 10 minutes again. Drain the water;
- Fill the bowl again with clean water and turn on the hydromassage for 5 minutes. We drain the water, then clean the surface using the method that is best suited.
As a result, the preparatory stage is simplified. And the procedure lasts only 3 – 4 hours. This will not affect the strength of the plumbing unit, because the thickness of the material is about 7 mm.
Polishing a bathroom is a very labor-intensive process that can take a whole day. But it's much better than buying new plumbing. Different polishing methods are suitable for different types of bathtubs. This is affected by the material from which they are made. To ensure that your bathtub lasts a long time, treat it with care. Keep sharp objects away from the bowl, do not use harsh detergents, and wash it after each use. Then you won't have to polish it often.
Currently reading
- How to choose and install a Tulip sink yourself
- Properly grounding the bathroom yourself
- How to fix a leak in a toilet tank yourself
- We seal the water meter ourselves
Typical solution to the problem
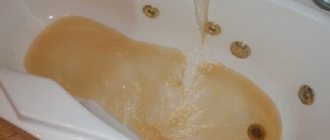
Usually, after an incident, they either use the bathroom until it turns into a rusty trough - and this happens very quickly, or they don’t wait and take action right away.
In fact, there are few actions: the most radical solution associated with dismantling tiles, bathroom furniture, and sometimes doors is replacing a cast-iron bathtub . Another option is renovation. Today this is an acrylic liner , a self-leveling bathtub or enameling with epoxy-based enamels.
As noted, the first option is radical. In my case, after almost a major overhaul that had just completed, it was unacceptable.
Preventive measures
Following the rules for caring for an acrylic bathtub will extend its service life:
- care products should not contain abrasives, formaldehydes, or acid-containing solvents.
- Cleaning is carried out once every 7 days with a soap solution.
- The bathtub should be rinsed with running water after each use.
- It is recommended to dry the walls with a soft cloth.
- apply the product to the bathtub walls only with a soft sponge.
- Special products for acrylic are used.
- the bottom or walls should not come into contact with hard rugs or basins.
- Washing shoes, especially during the period when roads are sprinkled with special reagents, harms acrylic.
- Do not pour boiled water on the surface of the bathtub.
- Do not pour chemical reagents or liquids with aggressive solutions into the bathtub bowl.
- Soaking laundry in a bathtub with bleach is not recommended.
- arrange the drain from the washing machine into the drain hole, and not into the bathtub.
- Do not allow water to leak from the faucet, which will lead to the formation of a trace of rust or water stone.
- If animals are bathed in the bathtub, then place a rubber mat on the bottom.