Have you decided on a cast iron bathtub? Great, all that remains is to install it in the right place. But before that, you need to screw and adjust the legs and choose a material that can be placed under the supports so as not to damage the floor covering. We will tell you in detail how to do this in our article.
Choosing a location
This issue must be approached very thoroughly, guided by the following recommendations:
- The bathtub should be located at the optimal distance from the water supply and drainage. This will avoid laying additional pipelines.
- Installing a cast iron bathtub on legs next to one of the walls saves room space, makes it more stable, reduces possible vibration and the risk of water splashing throughout the room.
Cast iron clawfoot bathtub against the wall
Ways to design an installed bowl
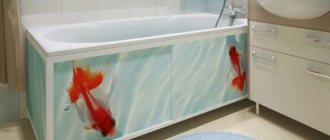
If the bathtub is a budget model and does not have a special frame with a screen, you will need to make the decorative panel yourself. Various materials are used for its manufacture: ceramic tiles, mosaics, plastic, processed wood, plywood, drywall, etc.
Ready-made plastic models with sliding doors are popular. You can build a frame to fix the position of the bathtub with your own hands; the article we recommend will familiarize you with the options and implementation schemes.
Image gallery
Photo from
Plastic screen with storage sections
Protective screen made of RPG plates
Decorative ceramic tile coating
Lattice or blank screen made of boards
In small bathrooms, installing a screen can visually make the room feel even more cramped. To prevent this from happening, you can use light-colored tiles or glossy materials. An excellent solution for limited space would be a mirror screen, the stages of its construction will be described in our recommended article.
Sliding doors provide access to the space under the bath where you can store useful items. Instead of doors, you can make a convenient hatch.
Preparing the premises
Before installing a cast iron bathtub, you need to carry out a number of measures that will ensure the safety and comfort of using the product:
- Leveling the floor leveling compound or cement screed. This will avoid additional adjustment of the bath level.
Leveling the floor before installing the bath - Laying pipelines for water supply and drainage.
- Laying floor tiles with a high rigidity index. To gain strength, it is recommended that subsequent work be carried out after some time.
- Laying tiles on walls premises. The tiles are allowed to be laid completely or partially along the height of the bathtub if it is adjacent to the wall.
Laying tiles before installing a bathEach method has advantages and disadvantages. In the first case, in the future there will be no problems with replacing the bathtub with a new one. In the second, the occurrence of leakage between the vessel and the wall will be minimized.
Tips for further care
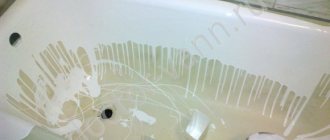
The new bathtub is installed and pleases with its whiteness. Now it is important to provide proper care in order to maintain its original appearance longer.
- Each time after hygienic procedures, the surface should be washed with a soft sponge with the addition of gel detergent. Abrasive cleaning powders and aggressive chemicals will have to be put aside.
- Wash off foam and dirt with running water from a watering can.
- All that remains is to wipe the enamel with a cotton or microfiber cloth, otherwise the water drops will leave unsightly traces of chlorine and calcium after drying. In the future, they will lead to the destruction of the enamel.
Simple rules of care will help avoid stains and scratches. The surface will no longer turn matte and porous, prone to the accumulation of dirt.
Tools and materials
During the installation process, you will need safety glasses, clothing and shoes, a hat, and gloves. For the preparatory stage - a hammer drill, a hammer, pliers, keys, screwdrivers. Directly for installation you will need bolts, nuts, drain fittings, a corner for masking the joint between the wall and the product, and legs.
Usually the bathtub already comes with supporting elements. However, if they do not fit or you need to replace the legs in an old product, you can purchase them separately.
Set of legs for cast iron bathtubs
The choice of supports is quite large - from standard Soviet ones to decorative ones. When choosing, everyone is guided by their own taste and price category. If the supports do not carry a decorative load, then it is better to choose universal legs for cast iron bathtubs. They fit almost all types of vessels and are designed to bear significant weight.
Selection rules
To be able to use the bathtub without worrying about its stability, you need to choose the right supports for the bowl. When buying a steel bathtub, immediately consult the seller about all the components for installing the legs, the method of attaching them, and select decorative elements in advance to decorate the bathtub supports.
Their selection is made taking into account the following criteria:
- All bath legs are marked and indicate the maximum permissible load for them. The choice of supports is carried out taking into account the weight of the model.
- The strength and rigidity of the legs must correspond to the pressure exerted on them. Therefore, the volume of the bath is the second criterion when choosing them.
- The design of the support and its method of fastening should not interfere with the drainage system. Its location also has a significant impact on the selection of supports.
- It is important that the legs fit tightly to the bottom of the bowl, so the shape of the bottom is of great importance. A person's weight is not taken into account as a criterion when choosing legs. The weight of the water and the bowl itself puts more pressure on the supports.
Installation
Conventionally, the installation process can be divided into several stages:
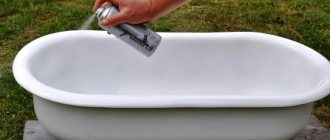
- Transporting the bath . After the place has been prepared, the bath itself needs to be moved into the room. This process is highlighted as a separate stage, because It has a pretty decent weight. It is recommended to carry it very carefully so as not to damage the doors, floor tiles and the product itself.
- Attaching the adjustment screws . Before installing the legs on the bathtub itself, it is recommended to first attach special adjusting screws with fixing nuts to them. They must be placed below the support. It is better to do this at this stage, because... attaching them while lying under the bathtub is quite problematic.
- Turning the bathtub.
Turning the bathtub over to attach the legsBasically, all cast iron bathtubs are installed on special legs, which are included in the kit. But first they need to be screwed. Solving the question of how to install legs on a cast iron bathtub is not particularly difficult. It is enough to turn the product on its side and carefully place it on the floor. In this position, screwing the legs to the bathtub is quite simple.
- Attaching legs to the bathtub. Now directly installing the legs on the bathtub.
The process of attaching legs to the bathtubTo begin with, two supports are firmly fixed. Here there are several options - mounting on wedges and on coupling bolts. In the first case, the installation process is carried out in several stages. The wedges are driven in with periodic tapping from the middle of the bath and then to its edges. In the second case, everything is even simpler. The manufacturer provides special lugs at the bottom of the bathtub, to which the legs are attached and secured with a bolt and nut. Sometimes you can see small deposits of metal on the supports in the seats. This is a manufacturing defect that can be easily corrected by processing with a grinding machine. The reliability and safety of fastening depends on the tightness of the connection between the surface of the product and the support.
Legs for bathtubThe wedge-shaped parts to be joined may move apart when the bolts are tightened. This leads to gaps at the support points, which is extremely undesirable. Therefore, if you decide to screw on the legs for a cast iron bathtub with your own hands, pay special attention to the strength of the connection.
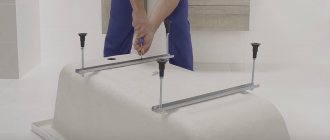
- Turning the bath over to its original position . Next, the bathtub is turned over and placed on its legs. Because Since there are only two supports attached at the moment, some kind of support must be provided to ensure stability. Its length should be at least 60 cm. Moreover, if the installation is carried out by a person without work experience, then it is better to add something else for insurance.
- Alignment by level. The next step is to install the remaining two legs and level the surface of the bathtub along a horizontal level 50 cm long.
The bathtub needs to be leveledDue to the high rigidity of the cast iron bathtub, it is enough to manipulate from the end that is most noticeable due to its connection to the wall. The level is placed in the center of this side.
The manufacturer can equip the product with adjustable legs. In this case, the alignment process consists of screwing in and out the screws to the required length. At the end of the adjustment, the product must be exactly in place, the gap from the wall is allowed to be 1 mm. Then you just need to tighten the fixing nuts.
Adjustable legs for cast iron bathtub
A more difficult question is how to level a cast-iron bathtub with non-adjustable legs that are rigidly fixed to the bottom.
In this case, several methods are proposed - sawing or sharpening the legs, or placing special metal plates under them. The last method is easy to implement. However, the first two are more reliable and will not create additional inconvenience when cleaning under the bathroom.
You can file or sharpen the legs with a grinder, after first lifting the bathtub and placing it on a brick support. Then the level is checked and so on until the bathtub is perfectly positioned.
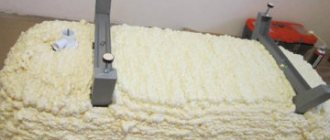
However, in some houses or apartments, the bathtub is installed on a floor with low or medium hardness, for example, wood. In this case, it may be pressed under the weight of the product. Therefore, the question arises of what to put under the legs of a cast iron bathtub.
Leveling a bathtub with non-adjustable legs
These can be metal inserts with a thickness of at least 5 mm and a diameter of about 50 mm. However, aluminum is not suitable in this case, because... it is quite soft.
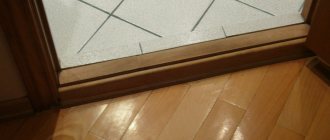
After installing the bathtub, you need to waterproof it at the junction with the wall. If the tiles were laid completely over the entire wall, then you can put a plastic corner on an adhesive base, border tape, fillet or ceramic plinth. If the bathtub was installed against a concrete wall, then the tiles can be laid slightly overlapping on the side of the product.
Is it worth making the supports yourself?
Instead of purchasing legs, you can make a brick base under the font; this will not help save much, but it will give the structure a monolithic quality. Such a pedestal will be justified for very massive baths.
It is done quite simply, the bricks are fastened together using mortar, and a larger layer of 5-6 cm is placed at the junction of the mortar bath so that adjustment can be made. Then a font is placed on top and while the solution is fresh, the level is adjusted.
Some people try to make legs using metal pipes that are welded to the bottom of the hot tub. This is not the best option, because... The reliability of this installation method remains in question, but it allows you to save only 100 - 200 rubles.
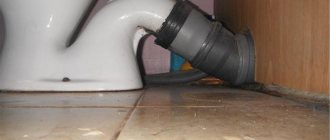
Connecting drain fittings
After completing the installation work, you need to connect the drain fittings. Experts recommend purchasing a siphon with a metal grid rather than a plastic one. This is due to the fact that the latter are softer and can bend when tightening the screw. As a result, the sealing ring will not be pressed sufficiently, and water will leak in this place.
The standard bathtub is equipped with a drain at the bottom and an overflow to protect against excessive water accumulation. First of all, the lower part of the siphon is secured using rubber gaskets for sealing. The product is fixed by screwing the screw into the nut at the inlet of the plastic pipe.
Bath drain connection
The same manipulations are carried out to connect the overflow.
Then the outlet of the drain fittings is inserted into the sewer system and fixed. It is recommended to lubricate all joints with silicone sealant.
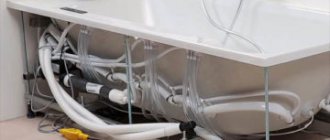
Installation on a profile frame
Required materials and tools:
- guide and rack profile for drywall;
- drywall;
- roulette;
- level;
- pencil;
- polyurethane foam;
- metal screws;
- dowels;
- sealant;
- tool for cutting the profile - it is recommended to use metal scissors or a jigsaw.
The order of work on assembling the frame:
- The legs are pre-attached to the bowl.
- Perform markings for installing the profile on the floor. Since the screen should be flush with the edge of the bathtub, the markings are shifted closer to the wall, taking into account the thickness of the drywall and cladding. If the drywall will be tiled, then the thickness of the tile adhesive is also taken into account - 3 mm.
- To install the frame, a guide and rack profile are used. The first is fixed to the floor using dowels. First, it is more convenient to glue the profile with a sealant, and then attach it to the wall and fix it together with metal screws.
- Rack frame elements are made from the rack profile.
- The strip under the side is made from a guide profile. In this case, it is more convenient to secure the rack elements - they will be inserted into the cavity of the upper and lower profiles. But the frame will be more flimsy. A bar made from a rack profile will secure the bathtub more reliably.
- The gaps under the side between the bathtub and the profile are filled with polyurethane foam.
- Further. The structure is sheathed with plasterboard.
To strengthen the frame, the racks and support for the sides are assembled from two profiles, inserting them so as to form a profile pipe. Metal screws are screwed into the ends, thus fastening the elements to each other. Moreover, they need to be screwed closer to the edge of the end of the profile, which is located inside, otherwise the sides will bend, as a result it will not sew through the profile.
Final diagnostics and testing
If all of the above installation and connection manipulations have been carried out, then before final fixation of the product it is recommended to carry out a small diagnostic. To begin with, stand in the bathtub and walk around it. If it wobbles, creaks, legs move apart, the floor is pressed, etc., then something was done incorrectly. The supports must be able to withstand the load of the bathtub and the person in it. Therefore, you need to double-check everything again and fix the legs more firmly.
Bathtub with legs
It is also mandatory to check the drain by collecting a small amount of liquid into the vessel. If nothing is leaking, the drain opens and water drains. There should be no drops or leaks at the joints. If such malfunctions are detected, you need to check the correct assembly of the siphon elements and additionally treat the joints with silicone sealant.
In principle, installing a cast iron bathtub does not require special knowledge, skills and abilities, the main thing is to follow the instructions exactly.
Cast iron clawfoot bathtub against the wall Leveling the floor before installing the bathtub Laying tiles before installing the bathtub Set of legs for cast iron bathtubs Turning the bathtub over to attach the legs The process of attaching the legs to the bathtub The bathtub must be leveled Adjustable legs for a cast iron bathtub Leveling a bathtub with non-adjustable legs Connecting the bathtub drain Bathtub with legs
Red clawfoot bathtub
Pink clawfoot bathtub in the bathroom interior
Bath siphon
Features of cast iron baths
Many owners of “Stalin” and “Khrushchev” buildings are happy owners of Soviet-style washing containers. Even after 50 years of use, bowls made of this unsightly but reliable metal have not lost their strength. The weak point of cast iron bathtubs is the enamel coating, on which chips or cracks form over time. Modern models made of cast iron are equipped with a stronger and more durable polymer coating, thanks to which they are practically “immortal”.
Cast iron bath
This type of sanitary bowls has the following features:
- Heavy weight. Each cast iron bathtub, despite its modest size, weighs 100-150 kg without taking into account the mass of the poured liquid and the bathing person, which makes installing and transporting such models with your own hands much more complicated.
- Slow cooling. Hot water poured into a cast iron bathing container heats its surface evenly and quickly, but cools slowly.
- Narrow size range. Containers for washing made of this metal are produced in a limited range of sizes and models. Typically, manufacturers produce rectangular or oval bowls with a depth of up to 60 cm, a width of up to 90 cm and a length of up to 170 cm.
- Easy to install. The heavy weight of the bowl allows you to install this type of plumbing equipment yourself, using only 4 supports.
Note! A narrow range of sizes and a limited number of models of cast iron bathtubs make it easier to select legs for installation. However, it must be taken into account that the fragility of cast iron bowls, combined with their large weight, requires the use of supports of sufficient strength that can withstand such an intense load.
FEEDBACK FROM OVERSEAS BUYERS ABOUT OUR LEGS DELIVERY SERVICE
This is our second small thematic group on VKontakte, where we ask our customers from other cities to leave their feedback on delivery times and the quality of our service. Due to the increased number of scammers on the Internet, it is reasonable to think that unknown people who want to receive full advance payment for goods and services will most likely turn out to be scammers. We understand your concerns. And maybe the responses of other, more risky people will help dispel doubts and believe that not everyone on the Internet works and lives by deception.
Popular models
To make a win-win choice when purchasing, it is worth determining which models are the most attractive and popular. Among them there is sure to be an ideal combination that suits you.
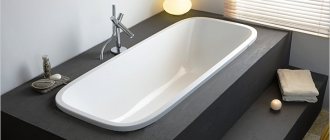
It is bathtubs that stand alone, unlike built-in ones, that erase all the boundaries of imagination, because manufacturers have taken care of a large selection of different shapes, colors, and dimensions of this design. The buyer is presented with oval, round, rectangular, and even bathtubs like in the old days, figured, each of which has the size you need, for example, from the Roca brand.
Cast iron bathtubs increasingly have classic shapes, but acrylic bathtubs have a colossally large range of colors and shapes. Bathtubs made from unusual materials such as wood, artificial marble, and exclusive glass are also very original. This is a pilot of all consumer desires. Of course, it is very difficult to give your preference and make a choice. But after the bathtub model has been selected and installed, you can apply some more tricks to the interior of your bathroom. For example, you can install a canopy with a white or transparent, weightless tulle curtain.
It looks very original and elegant. Designers explain the need for such eye-catching products with the modern desires of consumers to purchase something unusual and add chic to an ordinary interior. It is with the help of catchy and irresistible baths that you can express your good taste. You can decorate the interior with a beautiful fountain or a small aquarium, and then the bathroom will take on the appearance of a garden of Eden.