Today, according to the law, dismantling partitions in a house is a redevelopment of the premises. Thus, in order to demolish the wall between the bathroom and the toilet, you must obtain the appropriate permission. Each region has its own bodies, for example, housing inspection, urban architecture or BTI. In any case, it is necessary to determine whether this wall is considered load-bearing, since the possibility of further work depends on this.
To change the layout of the shower room, e.g. To combine a bathroom and toilet into a single space, it is necessary to prepare technical solutions and approvals for the general project or sketches. The simplified scheme and project for obtaining a permit is divided into the following options:
- The usual dismantling of the partition without increasing the area of the shower at the expense of the remaining space.
- Transferring plumbing fixtures from the previous location to the new one.
- Increasing the size of the bathroom and toilet at the expense of other premises.
- Installation of additional equipment, such as a bidet or shower.
In addition, you need to understand that the number of approvals directly depends on the region of work. Thus, in order to avoid various misunderstandings, you should take care in advance of the necessary documents, as well as the requirements for the project. It is necessary to break the partition between the bathroom and the toilet correctly, so you need to take into account some features. For example, it is prohibited to modify or reduce ventilation ducts.
What tools will you need?
Removing the bathtub
Required tools:
- adjustable wrench and regular open-end wrenches;
- screwdrivers;
- chisel;
- hacksaw for metal;
- scrap;
- Bulgarian;
- pliers;
- personal protective equipment: apron, goggles, respirator;
- rags;
- rubberized mat - so that the dismantled container does not slip on the floor covering.
The list of necessary items is adjusted depending on the chosen method of dismantling the structure.
Bathtub dismantling
How to install a cast iron bathtub on bricks
There is another way to install a bathtub - on a brick base. Some experts claim that this installation method is the most reliable and durable. But compared to the previous one, this method is more labor-intensive and time-consuming. To do it, you don’t have to be a professional builder; this work can be done by anyone who has an idea of what the end result should be.
Necessary materials:
- bricks – up to 20 pieces;
- cement mortar;
- waterproof tile adhesive;
- trowel, spatula, hydraulic (or liquid) level;
- solution container.
- Calculate the number of bricks needed for your future supports. The masonry should be several bricks high, with a distance between supports of about 50 cm. If you are installing a standard bathtub (150 cm), then 2 supports will be enough for it. The width of the support is determined by the width of the bottom of your bathtub. Calculate the height of the supports so that after installing the bathtub, its upper edge is no higher than 70 cm. One support located towards the drain hole should be at a level of 17 cm, and the second at a level of 19 cm (calculations are given for a standard bathtub). If you plan to install a decorative screen in the future and have already purchased it, take into account its height to determine the level of the masonry.
- Now take the prepared container and mix in it a solution consisting of cement and sand in proportions 1:4.
- Proceed to laying the supports. For reliable support of the bathtub, lay half a brick along the edges of each masonry. This way you will form a recess according to the shape of the bottom of the bathtub.
- Let the solution dry, and after two days you can begin installing the bathtub itself.
- Place the bathtub on prepared brick supports. Use a level to check that it is installed correctly.
- Attach the siphon and overflow to the drain holes as described above.
- Using tile adhesive, seal the joint between the wall and the bathtub so that water does not flow there during operation.
- Apply the solution to the joints of the bathtub and supports to enhance the strength of your structure.
Grounding and finishing are carried out in the same way as in the previous installation method.
To give your design an aesthetic and finished look, you can install a decorative screen, through which you can close the free space under the bathtub.
As you can see, installing a cast iron bathtub is a rather labor-intensive process. But the results of your labors will serve you for decades.
Technological process
First you need to disconnect the old bathtub from the fastening elements with which the bathtub was attached and dismantle the drain. If the drain cannot be disconnected, it is cut with a grinder. You should also remove all objects that may interfere with dismantling the bathtub (both under and above the bathtub) and remove the faucet. To dismantle a bathtub, the edge of which is embedded in the wall, you need to dismantle the legs of the bathtub (starting with the farthest ones) and, after that, pressing on it from above, “drop” it onto the floor. Before dismantling an old cast-iron bathtub in this way, you need to place a thick layer of some soft material under it to soften the impact of the bathtub on the floor.
Breaking a cast iron bathtub will not be easy. This job requires a strong man and a sledgehammer. Before you begin demolition, you need to clear the space around the bathtub, lay a soft cloth on the floor (to protect the floor), and lay the bathtub itself on its side so that it can be easily accessed from both sides. Breaking a cast iron bathtub is quite a dangerous job: there is a high risk of injury from flying bathtub fragments. To protect yourself from these fragments, you should wear thick clothing, shoes, a hat, construction gloves and a protective mask. To protect your ears from fairly loud noise, you can wear sound-isolating headphones.
To minimize the risk of injury from bathtub fragments, remove household members from the premises
How to break a cast iron bathtub without using extra effort? The weakest point of the bathtub is near the drain hole. To break it, you should apply a series of blows from the inside to the bottom near the drain hole.
Lay the bathtub on its side, this will make it easier to break.
Once the bottom has been broken, the bathtub should be covered with burlap and struck with a sledgehammer, widening the gap along the entire bottom. Do not forget that the bathtub should lie on its side during the entire process of breaking through the bottom, because the vibrations of the bathroom, which, when the bottom is broken, lies upside down, can contribute to the fall of the plaster in the apartment located below you. All blows must be struck from the side.
Once you have managed to break the bottom, turn the bathtub upside down and continue to strike the walls from the side, trying to break it into pieces. If necessary, large pieces can be broken into smaller pieces: the smaller the fragments, the easier it is to remove them from the apartment. At the end of the work, collect the fragments in bags: they can be taken to a scrap metal collection point.
Albert Yasaulov
How to split a cast iron bathtub into pieces? Why break it? Make cuts with a grinder and a sledgehammer. Autogenome. Is it not destiny to cut? With a sledgehammer, punch a hole in one place and it will fall apart like there’s nothing to do, just hit it with sharp blows, and take a sledgehammer with a short handle - God forbid you’ll break loose and smash everything in the apartment. One of my friends did just that, beat and beat with a sledgehammer and broke it, then took it out into the trash, piece by piece. True, he lives on the first floor, and if you are higher up, I don’t think the neighbors below will be very happy.
Lyubov Opalikhina
Is it possible to cut an old bathtub with a grinder? It’s just not realistic to take it out. Make cuts and break it with a sledgehammer. It should turn out better than mine - I just smashed it with a sledgehammer, but it’s a bit heavy and very noisy. Is it worth the hassle - two hits with a sledgehammer (but in certain places) and it fell into three pieces. Cut it with a grinder and hit the cut with a sledgehammer. It will only break down on the way. If you find a problem, call a couple of homeless people - they will take it out. And they will take you to the metal collection point. I had something like that, the bathtub was immediately dragged away from the trash heap
Victor Samokhvalov
How to break a cast iron bathtub They are taken whole. They will come straight to your home and pick it up. At least this is the practice in our city. There are even advertisements. Cast iron is not difficult to break. Take him outside and beat him. Cast iron is cracking. Cut with a grinder. With a sledgehammer.
Valentina Lisina
How to remove a cast-iron bathtub from an apartment (5th floor, no elevator)? Two homeless people and a bottle of vodka You can break it into a window or from a balcony with a sledgehammer. The two of us took it out. Also cast iron (more than 100 kg If you don’t need a bathtub, write and I’ll tell you that you’ll give it away for free and there’s no problem. They’ll also pay you extra. Go to the construction market, find any seller from the Central Asian republics and negotiate on labor for minimal funds
Vitaly Negushin
What's better? Should I buy a new bathtub or cover the old one with a special coating? If you have money, buy a bath! We made an acrylic insert - the bathtub looks like new for more than 5 years, the pleasure cost 5,500 rubles. , the master spent 2 hours. If the old bathtub is not broken into pieces, I don’t see the point of spending money on a new one. I think it’s better to install a new cast-iron shower stall. Steel and acrylic are completely free.
Vadim Okunev
How to remove a cast iron bathtub? Can I break it? If it’s cast iron, you can break it into pieces with a hammer and turn it into scrap metal, it’s expensive now! Throw it out the window. I called the Tajiks who work as janitors, they dragged me away like ants, you won’t find it, it won’t break. And not alone. You can call industrial climbers through the window. It’s unlikely to split, saw through. It’s easier to throw it out the window, it will break on its own)
Denis Veshnyakov
How to break a cast iron bathtub? Kettlebell 32 kg. Another CAST IRON BATHROOM! ahhhhhh NIGHTMARE
Albert Gladkikh
Which bathtub do you recommend from personal experience (cast iron, steel, acrylic? Which material is more convenient to use? Thank you! There are no comrades in taste and color, but in any case, not steel about acrylic - they say, it’s not durable, it gets scratched, some special products for washing, etc. - complete nonsense. I have had an acrylic bathtub for 3 years. It’s an excellent thing. Easy installation, because it’s light.... The best one is steel, because cast iron is fragile like acrylic, and the steel was straightened with a hammer, painted and all OK.
Alexander Dryablov
The plastic sewer pipe was connected to the cast iron pipe with some kind of solution - how to fix the leak there? It happens often. Don't do it on your own. Call a mechanic from the housing office, pay him money, he will do everything. It will become cheaper. Pick out this solution and buy a special rubber cuff. Insert a 70-40 mm rubber cuff into the cast iron socket. The 50 mm plastic pipe fits into this cuff with difficulty, but it fits. This is the most reliable. If it doesn’t work, put a cuff of 70-50 mm.
Valeria Kondratyeva
Hello) Earthenware sink for the kitchen, how is that? It seems I did something stupid =(?/ + No, before there were cast iron sinks with a coating like bathtubs and steel enameled ones. Cast iron washed well and lasted for 20 years), steel ones - the enamel chipped just like enamel. pots and teapots And earthenware is the same type as a sink in a bathroom... Of course, refuse. Previously, when there were no stainless steel sinks, we had these for the first 5 years, they cleaned well, but then.
Lilia Glebovskaya
What happens if a hairdryer falls into water? Let's calculate) a hair dryer is an electrical appliance 220-240V 1200-1800 W (heater) The motor itself is 150 W. Further, if you fall in the bathroom, you can break your head and even die if the impact is strong and it is not indicated how you will slip... If the bathtub is cast iron and grounded, then an electric shock is not excluded, because there will be a phase on the hairdryer. Otherwise, a short circuit will occur through the wire located before the heater, since the electrical conductivity of water is very high.
Olesya Ozerkova
Mystery! I have a bathtub 70 cm wide, and the passage to the bathtub is 55 cm. Question: How did it get there and how to remove it from there? The bathtub cannot be 60 cm high. She has a standard height on the legs of only 56-58 cm. They brought her in sideways. I have a passage of 60. And the corner bathtub is 105 by 150. It went in calmly. The depth of most bathtubs is standard about 45 cm without legs. They are carried in sideways and jumping with a cheerful Komsomol song, behind with the exception of cast iron of course. When dragging cast iron instead of a song, indecent sounds...
Victor Lebedev
Of course, I’m not a plumber, but I feel sorry for the money on an outsider: HOW TO REPLACE A SEWER PIPE IN A BATHROOM WITHOUT PROBLEMS? Ho-ho! And don’t think without problems! I am a plumber and I can say one thing: without moving the bathtub, it is sooooo painful and difficult. I, with all the tools and experience, did this work alone for two days. But if you decide, remember: the most... The whole difficulty is throwing out the old pipe without breaking the common riser. If you succeed, then collect the plastic. A pipe is simpler than a steamed turnip Ps If you do it yourself, don’t forget about the slope of a few degrees from...
In most cases, bathroom renovation is integrally associated with replacing an old bathtub with a new one or even a new one - in both cases you will have to undergo such an operation as dismantling. In principle, it is not difficult to perform, but if you have to deal with it, then you won’t have to worry about it - you will have to work hard. In this article from the site, we will talk about how to dismantle a cast iron bathtub correctly and with the least amount of labor. Moreover, we will offer you two ways to solve this problem.
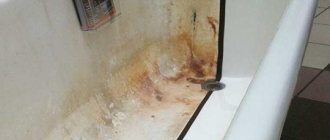
Dismantling a cast iron bathtub photo
Leak testing and preparation for work
In order for the work to be completed quickly and without undesirable consequences, you need to free the bathroom space from unnecessary objects. Everything that is possible is taken out of the bathroom. This applies to bath products, accessories, and furniture. It is especially recommended to remove the toilet and washbasin, as the plumbing fixtures are made of fragile material and are easily damaged. For the same reason, the shower stall must be disassembled and removed. There is a possibility of damage to the door frame when removing the plumbing fixtures, so they also remove it.
Dismantling a cast iron bathtub involves damage to the wall cladding. If the wall decoration will not change, then it must be protected by covering it, for example, with plywood. The same applies to other decorative coatings.
Having freed the room as much as possible from unnecessary objects, the bathtub is disconnected from the drain. First of all, remove the overflow and siphon. If the liner is made of plastic, then disassembly is easy: you just need to unscrew the fasteners. And if the pipes are made of cast iron, then disconnecting the container will be problematic, since the connection most often sours. Sometimes it’s easier to cut out a piece of sewer pipe along with the bathtub, and then replace the cast-iron drain system with PVC pipes. This is especially useful if the system has become dilapidated. When choosing a radical method, disconnection from communications is carried out using a grinder, chisel, or hacksaw.
Before starting installation, the key is to measure the dimensions of the bathtub and the dimensions of the room so that they match each other. All indicators to be measured can be seen in the figure below.
Even professionals check the reliability of all connections before completing work:
- close the bottom drain; fill the water to the brim. Check whether the waterproof seal between the edges of the vessel and the walls is maintained;
- when pouring water through the upper overflow hole, check that it is securely connected to the siphon and that there is no leakage;
- open the drain and check whether water is leaking at the junction of the exhaust system with the sewer outlet;
- Place a sheet of white paper under the siphon - even with a slight leak, stains from a few drops will remain on it.
The work can be considered complete if, after testing for waterproofing, you do not find any signs of leakage at the joints. So, having useful knowledge, you can easily cope with such a task as installing a cast-iron bathtub with your own hands. All that remains is to clean it of any contaminants that arose during installation. It’s better to do this right away before the stains get old. There are many special detergents for these purposes. Cast iron vessels with an enamel coating can be washed and cleaned with most of them, except those containing abrasives or concentrated acids. It is also not recommended to clean them with hard cutting or scratching objects - for example, a knife or a wire brush.
Working with a chisel and hammer
This pair of products will help separate cast iron in hard-to-reach places. Dismantling work begins with pipes remote from the riser in places where a grinder or hacksaw cannot be inserted. Since cast iron is a brittle material, it is easily destroyed after point dynamic loads.
A good impact tool has a rubber or polymer attachment to slightly soften the impact. This is necessary so that pieces of cast iron do not fly around, get into the riser and create a blockage.
The chisel and hammer work great with Soviet-era cast iron, that is, combined with sulfur, aluminum and cement. As you move towards the riser, there is usually more free space for work, so further cast iron can be cut with a more efficient device. As with the grinder, when working with a chisel, it is recommended to cover areas of the body into which cast iron splinters may fly off.
The productivity of work is extremely low, but sometimes you can’t do without them.
Private bathroom (no toilet)
The compact room combined maximum functions, due to the proper placement of the washing machine and wall-hung sink {amp}amp;ndash; these objects occupy the same area because they are located on top of each other.
The shade of the tiles and furniture facades is chosen in the same range, thanks to which the space is perceived as one. The glass door protects the floor surface from accidental splashes and creates comfortable living conditions in the room.
Shower stall in a small bathroom {amp}amp;ndash; An ideal option to delimit the area of the bathroom and sink. The layout of tiles on the walls and floor helps the room to be perceived as a whole.
We recommend installation in the following order:
- Bring the disassembled bathtub into the prepared room;
- Make sure in advance that the floors in the room are absolutely level, otherwise you will have difficulty adjusting the stability of your bathing vessel;
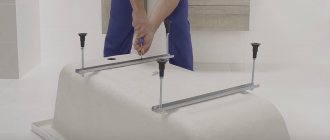
- Strengthen your legs.
It is better to do this in the room itself, since it is impossible to bring a cast iron bathtub with legs attached to it into the bathroom of a modern apartment. There are several types of bathtub legs, they can all be divided into those that can be adjusted and non-adjustable:
- if you have a set of non-adjustable legs, then in order to install the vessel at the desired height, you can simply saw them off;
- If the product is provided with a set of legs with a support-screw adjustment system, then installing it to the required height will not be difficult.
To make it easier to install a set of legs on the bathtub, turn it upside down. If it was purchased with a set of legs, there should also be brackets for mounting. First install the brackets themselves on the vessel, and then attach the legs to them using mounting bolts.
Important: when purchasing a cast iron product, pay attention to whether the legs are included with brackets and whether they are all intact. Without brackets you will not be able to secure the legs on the bathtub
Install a drain siphon and a water overflow device. A siphon with an overflow device can be included in the general kit, or purchased separately. A siphon is installed in the lower hole of the bathtub to drain the water, then from the outside it is connected to an overflow device, which is fixed in the upper drain hole of the cast iron product. Be sure to use silicone gaskets when attaching to seal the connections.
Check the horizontal installation along the upper sides using a building level. Cast iron bathtubs have a shape in which, if installed correctly, the bottom has a slight slope towards the drain hole. If the installation is not horizontal, you will have to further adjust it using the legs. In this case, the distance between the bottom of the bathtub and the floor should not be less than 14.5 cm; make sure that the side of the bathtub does not deviate from the wall by more than 0.2 cm
Preparatory stage of work
As a rule, replacing a bathroom with the installation of new equipment is associated with various kinds of problems. The sequence of actions in the event that you need to leave the old container intact will be such that you will have to remove the plumbing fixture from its installation site and, with difficulty, transport the container from the apartment to the street. This is a rather labor-intensive process. Here it would be useful to involve several assistants.
When carrying out such work, it is necessary to adhere to a certain algorithm. The dismantling sequence has some features that make the technical process as easy as possible. You can optimize the dismantling of a cast iron bathtub as follows.
First of all, you should carefully check the quality of the brackets that fix the bathtub in its original position. If one of the supports is knocked out during dismantling, there may be a risk of injury. Therefore, you should protect yourself in advance.
If you wedged the legs of the tank when installing the structure, make sure that all the elements are in place and securely hold the tank. Loose wedges can simply be knocked out with a hammer.
Previously, the bathtub was connected to the waste system through a cast iron siphon. Due to the action of a factor such as corrosion, the joints of the parts of the drainage system are compacted to such an extent that it becomes impossible to disassemble the piping while maintaining the integrity of the elements. In this case, you should separate the part by cutting it using an electric cutting machine. At the same time, do not forget to follow safety precautions and use safety glasses. To cut the flange connecting the drain trim, you will need to lie down.
Another common problem is that today, in most cases, bathroom walls are tiled. This will create certain inconveniences when you plan to dismantle the old bathtub. The tiles should be removed along with a layer of hardened adhesive building mixture around the perimeter of the product. This is necessary so that the old container can be pulled out. At the current stage, the dismantling of the bathroom can be considered completed.
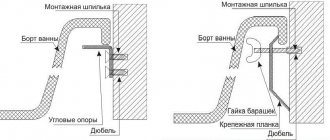
Features of installing a cast iron bathtub with legs
- Under its own weight (a cast-iron bathtub weighs from 100 to 150 kg) and from standing for a long time without moving, the legs have literally become fused with the body, the floor, the fastenings have soured and do not give in.
- To eliminate vibrations during installation, the legs of the container were filled with concrete.
In the first case, you need to apply a liquid that corrodes rust and plaque, for example, WD-40, to the fasteners and wait. The fasteners should give way.
In the second case, the supports can be cut off with a grinder, which is called “under the root,” or removed from the concrete, destroying part of the screed. The last option is more preferable.
Where should I start?
Before breaking a cast iron bathtub, it must first be disconnected from all communications. The first step is to disconnect the overflow. According to experts, cast iron pipes were installed in many old houses. Therefore, after many years, they become very rusty, covered with scale, and the master may have difficulties dismantling cast-iron plumbing fixtures. The situation is better if communications are represented by metal-plastic components. In this case, they simply unscrew. The master only needs to prepare the pliers. There are often cases when the overflow grate gets very stuck.
Before breaking a cast iron bathtub, you need to dismantle this element. Many craftsmen clamp it with pliers and turn it counterclockwise. If it is not possible to dismantle the overflow in this way, it is cut off with a grinder. Judging by the reviews, fasteners often have heavily rusted threads, which can only be dealt with after cutting them. First, several cuts are made on the grate, and then the overflow is knocked off with a chisel. Then the crosspiece under the grille is knocked out. As a result, the siphon should hang freely, connected to the rest of the sewer line. To remove it, the master needs to get rid of the coupling. Some beginners wonder if it is possible to break a cast iron bathtub with a sledgehammer. According to experts, this is quite possible to do. You just need to adhere to a clear sequence of actions.
Cast Iron Bathtub Installation Dimensions
The next point I want to talk about, I want to draw your attention to, is….
If you have a bathtub 75 cm wide, then an important size is to place the mixer in the center of the bathtub, so that the stream of the open mixer exactly falls into the drain hole of the bathtub itself. That is, we measure 75 cm in half from the wall (37.5 cm) and set up our mixer. The next size is the faucet installation height. In this case, the height of the mixer is set according to the height of the sink - this is 85-90 cm. If no additional instructions or wishes were received from the customer, then we set it to this height. The next size is the height of the bath itself. The height of the bathroom is a constantly changing issue and it depends on how high the sewer riser and sewer drain are. In this case the riser is quite high
Product embedded in the wall
Previously, when special compounds had not yet been used for sealing and the possibilities for securing the bathtub were limited, a cast-iron container was often strengthened with the help of building mixtures and concrete.
If the bathtub is built into the wall, then you need to unscrew the legs on the side where the bowl adjoins the wall. Then rags or boards are placed under this area so as not to damage the floor covering. The sides are pressed, causing the bowl to break off and fall. Then all that remains is to turn it on its side and towards the exit and take it out of the room. When carrying it from below, it is recommended to support the plumbing fixtures with a board or block.
A method for replacing a cast iron product in which the container remains intact
When starting work on removing the tank, first of all, the plumbing fixture should be pulled forward. The most convenient way to do this is with a lever, which is advisable to use a crowbar or pry bar. Provided that two people are involved in the work, it would be best to move the bathtub away from the wall by about half a meter, that is, so far that one of them could easily fit there.
Then you should lay the container on its side. To do this, it is necessary for one of the workers to be between the wall and the side of the product. Now the product needs to be taken out of the bathroom. Here it is appropriate to use the bathtub supports as handrails. By holding them, you can conveniently transport the cast iron container.
At the current stage, you should adhere to some rules. If you neglect these recommendations, you will not be able to remove the plumbing fixture. You need to move the product into the doorway on the edge and, taking into account the rotation, first remove the front legs. Next, gradually turning the container, take it outside the bathroom so that you can install the second pair of brackets.
Now all that remains is to remove the product from the home. Since the size of the front door leaf is usually at least 800 mm, this will not pose any particular difficulties. It's up to you to decide what to do with the old tank. Maybe you decide to take it to a country house, where the container can be used in at least a dozen different ways, allowing the old plumbing fixture to perform a useful function. In particular, an old cast-iron bathtub can serve as the basis for a decorative pond.
Bath characteristics
Cast iron bathtubs continue to be very popular. The advantages of such bathtubs compared to acrylic products are beyond doubt. After all, a cast iron bathtub has high strength, wear resistance, durability, and most importantly, high heat capacity. It is these baths that retain heat longer than others and are less susceptible to various damages and scratches. And the price of a cast iron bathtub is not particularly different from its competitors. The main disadvantage of such a bathtub is its heavy weight, but if installed correctly, this is not significant. You can save a lot of money by installing the bathtub yourself, without resorting to the services of professional craftsmen.
If you are doing general renovations in the bathroom, then you should begin installing the bathtub immediately after finishing the rough repair work. Finishing is carried out after installation of the bathroom. It is also better to tidy the walls after installing the bathroom, which will allow for high-quality waterproofing and minimize the distance between the wall and the bathroom.
When installing a bathtub, it is important to consider the nature of the floor covering. If you plan to lay floor tiles in the bathroom, we recommend that you install the bath directly on the screed, and then start laying the tiles
It is not advisable to place the bathtub on the tile, as its weight can push it through. If instead of tiles you use porcelain stoneware as a floor covering, then you can not be afraid to place the bath directly on the floor. If the floor covering on which the bathtub is placed is soft (for example, linoleum or wood), then under each support it is necessary to place a metal plate with a thickness of at least 5 mm and a diameter of 50 mm. This will help prevent the floor from sagging.
Dismantling a cast iron bathtub: a method to keep the bathtub intact
In fact, such dismantling of the bathtub will require you to rip it from its place, install it in a certain position and simply pull it out of the apartment, spending a huge amount of effort. You can’t cope here alone - at a minimum you will need two pairs of strong male hands. You can make your work easier only by avoiding intermediate, fruitless actions, which usually happen in cases where people don’t know what they’re doing. The “maybe it will pass” principle only leads to unnecessary labor costs and loss of strength - you can avoid this if you adhere to a certain sequence. The question of how to dismantle a cast iron bathtub is solved this way.
- First, you should make sure that the legs are securely attached to the bathtub itself - if one of them falls off during the work, then, to put it mildly, troubles may occur in the form of broken toes or hands, and possibly even more serious injuries. In most cases, the legs are secured with wedges - they should all be in place and tightly driven (adjust them if necessary).
- As a rule, almost all cast-iron bathtubs were connected to a sewer system that was the same cast-iron as the bathtub itself - after many years of use, these cast-iron siphons become so rusty to the bathtub that it is not possible to unscrew them in the normal way.
Therefore, we simply take an angle grinder, put on safety glasses, lie down on the floor next to the bathtub and cut off the siphon with an angle grinder. Removing a bathtub using an angle grinder photo - In most cases, an old cast-iron bathtub is lined around the perimeter, which also creates some problems when dismantling it - it makes it immovable. This tile, mortar (or whatever it is coated with around the edges) should be removed along the entire perimeter - only after this the bathtub will gain mobility, and it will be possible to continue dismantling the old bathtub. Then, as they say, it’s a matter of technique.
- Now the bathtub should be moved away from the wall. All methods are good here, but the most effective is a crowbar or pry bar. If you are working together, then you can try to simply pull it away from the wall so much that a person can freely walk there - 400-500mm will be enough.
- Now we place the bath standing, for this one will have to climb behind the bath. We take the bathtub by one of the sides and simply lift it to a standing position - while working, you can grab the legs. They will play their role and, serving as excellent handrails, will help you transport the bathtub through the doorway, which is the next step in solving the question of how to remove a cast-iron bathtub?
- The technique for transporting the bathtub is very important here - if you do not follow it, you will not be able to remove the bathtub. You need to bring it into the opening while standing, in an unfolded position at 45˚ - as soon as the legs pass through the doorway, simultaneously with the removal of the bathtub, it will need to be slowly rotated around the door jamb. In this way you will ensure free passage for the other two legs.
- That's it, the main work is done - the entrance door to the apartment is 900mm wide and does not present any obstacles to removing the bathtub.
The bathtub can be taken outside, loaded into a car and transported to the dacha, where you will find at least a dozen ways to use it, allowing you to extend its life in a different form. For example, you can make an artificial pond out of it. How to clean a bathtub photo
As you can see, the question of how to dismantle a bathtub made of cast iron is easily resolved, but even if you know the technique for performing this work, you still have to work hard.
DIY cast iron bathtub installation
The process of dismantling a cast iron bathtub begins by disassembling the siphon located under the bathtub. It should be noted that during the period of operation of the device this part becomes strongly stuck, and it is not possible to simply unscrew it. This is where we need a hacksaw. Carefully file away the brass drain grate
If the gap is too small and the hacksaw blade does not pass, then use a hammer and chisel: they carefully knock out the knot
It’s time to get rid of the overflow and the outlet pipe connected to the sewer. The socket is plugged with a cork or rags, only after this the grounding attached to the bottom of the device is removed. The gap between the wall and the bathtub is usually sealed using mortar or sealant. We get rid of it and proceed to dismantling the supports. We remove the bathtub from its place. All that remains is to take out the resulting garbage and the old bathtub.
Installing a siphon. Installing and securing the overflow, connecting it to the overflow pipe. Installing supports under the bathtub and securely fixing them. Attaching the outlet outlet to the siphon. Installing a cast-iron bathtub on ready-made legs. Leveling the bathtub using a level. Fixing the outlet outlet in the sewer pipe .Grounding device, if there is a need for such an operation. Device for waterproofing the gaps between the wall and the bathroom.
In any case, the work of installing a cast-iron bathtub is a very labor-intensive undertaking and requires insurance. Therefore, it is better to install it together.
How to insulate the floor in a wooden house? Instead of pleasant coolness, the floor gives off a sepulchral cold? This means only one thing – it’s time to warm up! If you live in a private house, then solving this issue is more than relevant, because... a significant part of the heat escapes through the ceilings of the first floor. As part of this review, we will give recommendations regarding the selection and installation of thermal insulation
Interior design of baths and saunas How to make a bath procedure truly cool? To do this, it is important to comply with three conditions: a successful company, a working heater and a truly cozy bathhouse interior. In this article we will not be able to help you with advice regarding the first two conditions, but we will tell you about the basic rules for designing a steam room, washing room and relaxation room
Enjoy Your Bath!
Design of a gazebo on a suburban area. Gazebos have long ceased to be exclusively a place for relaxation, rightfully being a real decoration of a suburban area. We invite you to evaluate the implemented options for such designs and gain valuable ideas for your own project. Choose something of your own among the design solutions presented in the article!
Before properly installing a cast-iron bathtub, moisture-proof the room so that water spilled on the floor does not cause trouble for the neighbors below.
Installation equipment you will need:
- bath bowl;
- set of supports and fastenings;
- adjusting bolts;
- level for measuring evenness;
- hammer;
- wrench;
- rubberized gaskets;
- siphon;
- plastic pipe;
- border tape, ceramic plinth, silicone gel - for filling the gap.
Important! Many users do not know how to drill a cast iron bathtub. Professionals advise punching the hole, and only then drilling it with a metal drill
The fact is that cast iron can have tiny air gaps and when drilling, the drill begins to “walk” from side to side. In this case, drilling a cast iron bathtub causes problems, and the hole may turn out uneven and larger than required.
There are 2 methods of dismantling:
- While maintaining integrity. Used when it is necessary to reuse the container. As a result, the bathtub is preserved along with the enamel coating or only its body. The method is labor-intensive, because Difficulties arise when removing plumbing fixtures from the apartment. The weight of the bath can reach 100 kg.
- With destruction. The method is used in a situation where the bathtub is subject to disposal. Then it is smashed with a sledgehammer or sawed with a grinder.
Destruction of the bathtub.
Removing the bathtub - we solve the problem with ease!
- Preparatory stage
- Required Tools
- Work safety
- Removing a clawfoot bathtub
- Dismantling a cast iron bathtub while maintaining integrity
- Dismantling a cast iron bathtub using sledgehammers
- How to remove an old steel bathtub?
- Removing an acrylic bathtub
People often say that repairs are worse than a fire. It's almost impossible to finish. There will always be something that needs to be greased, glued, completed, etc. However, this approach is rarely applicable to the bathroom. While you can somehow manage without renovations in living rooms or even the kitchen, you are unlikely to be able to live without a toilet and bath for long.
If you are facing a major bathroom renovation, one of your most pressing problems will be removing the bathtub. The fact is that even if you do not plan to buy a new bathtub, but are only going to make repairs in the room (lay new tiles, change plumbing, pipes, etc.), you will need to completely empty the room of any foreign objects, including and from the bath.
Preparatory stage
Find out who is obliged to handle the disposal of large cargo under an agreement with your management company. The fact is that you do not have the right to throw any bulky garbage and construction waste into a general container with household waste . To dispose of such waste, an additional container may be installed in the courtyard of the house, which is decided upon at a general meeting. Your management company can provide you with this service privately for a fee. If none of the options listed is available to you, you will have to take the garbage yourself to a place specially designated for this purpose, most likely outside the city limits.
Remove all items from the bathroom: washing machine, wall cabinets and shelves, mirrors, sink, toilet - in a word, clean everything.
Dismantle old faucets - if you are undertaking a major renovation, it makes sense to replace all the plumbing fixtures at once. Moreover, the service life of mixers is in most cases short.
Consider whether the bathtub will fit through the doors or whether they will also need to be removed from their hinges or even the entire door frame will need to be dismantled. Even if the bathtub fits into the passages in size, it is necessary to take into account that the bathtub may also have legs, which can easily damage the doors. In most cases, it is easier to remove the door from its hinges for a short time than to buy a new one later. If you absolutely do not want to do this, then try to protect the door covering from damage using some soft cloth or film.
In such conditions, paying for the service of dismantling and removing the bathroom is sometimes much easier than doing it yourself.
Required Tools
If you decide to dismantle the bathtub yourself, you will need to stock up on:
- an adjustable wrench and a set of wrenches;
- screwdrivers;
- pliers;
- chisel;
- hacksaw for metal;
- sledgehammer;
- crowbar;
- grinder;
- safety glasses and respirator;
- a large piece of fabric;
- silicone sealant;
- new rubber gaskets for plumbing;
- bags for construction waste;
- an extra pair of hands - dealing with such a serious matter alone can be not only difficult, but even traumatic.
Work safety
When dismantling a bathtub, as in any other important matter, it is important to follow safety precautions:
- Turn off the water supply. Don't forget that water is supplied not only to the sink and bathtub, but also to the toilet flush barrel. Therefore, it is best to immediately turn off the stop valve located on the way to the drain barrel.
- Seal sewer inlets. For example, cover them with some kind of waterproof film, attaching it with tape to the floor or wall.
- If, while replacing the bathroom, you also plan to replace part of the sewer pipes, put the new pipes in order in advance: they must be clean, match each other in diameter, the ends of the metal-plastic pipes must be cleaned.
- Choose suitable clothing. Since you will be working with heavy tools such as a crowbar and sledgehammer, it is best if you protect your body with thick pants and a shirt, just in case. This will soften the blow if something goes wrong.
- Use safety glasses and a respirator - when working with a sledgehammer, especially if the enamel is damaged, large and sharp pieces of construction debris can damage your eyes or get into your respiratory system.
- Make sure that the legs of the bathtub are tightly secured and will not fall off when transporting it. If this happens, you could be seriously injured and even suffer a fracture. Check to see if the wedges that secure the legs to the bathtub itself have become damaged over time.
- You should start by dismantling the siphon. Try to unscrew it with an adjustable wrench. Start at the location where the bathtub drain is located. If you cannot unscrew, you will have to resort to using a hacksaw, grinder, or hammer and chisel.
- It was customary to fix old bathtubs, especially from Soviet times, tightly to the walls using mortar and coat the entire bathtub with it and lay it out with tiles. All this solution will need to be removed using a chisel. The bathtub should move freely from the walls and floor.
If you've chosen a hot tub to replace your old bathtub, we recommend reading our article on installing a hot tub.
Removing a clawfoot bathtub
Many old bathtubs, especially Soviet-era cast iron bathtubs, were made with legs. Due to the high humidity in the bathroom, the legs turn sour over time and it becomes increasingly difficult to remove them from the bathtub. If the legs of the bathtub stubbornly refuse to unscrew, you have two options - either leave them in their original place and try to remove the bathtub with them, or saw them off with a grinder. In each individual case, you need to look at the situation to determine whether it is worth leaving them or whether it is better to cut them off.
Dismantling a cast iron bathtub while maintaining integrity
Dismantling a cast iron bathtub is the most difficult, since such a bathtub weighs a lot. In some cases, the width of the doorways will not allow you to remove the entire cast-iron bathtub from the house.
If they are wide enough, you can try to remove the entire bathtub, following the following plan of action:
- If the bathtub was built into the wall, you must first remove the legs of the bathtub from this side, place something under the bathtub so as not to damage the floor and not drop the bathtub on your feet, and then press hard on the sides of the bathtub - the bathtub should detach and fall down .
- Next, you need to move the bathtub away from the wall to such a distance that one person can easily fit there. On average, this distance is up to half a meter. The easiest way to do this is to use a pry bar or crowbar.
- After the bathtub is moved away, one person enters the resulting space and helps from below to turn the bathtub 90 degrees. Be careful! Don't let the tub fall or move. To prevent the bathtub from slipping out, wear gloves and, after turning the bathtub over, support it with something heavy from below.
- From this position, it is convenient to turn the bathtub into a horizontal position so that it can freely pass through the doorway and can be carried comfortably by two people.
Dismantling a cast iron bathtub using sledgehammers
If it is not possible to remove the cast-iron bathtub entirely, we will remove it in parts:
How to remove an old steel bathtub?
The basic principles when dismantling a steel bathtub remain the same as when dismantling a cast iron bathtub, with the only difference being that, firstly, steel bathtubs weigh less, and secondly, it will not be possible to break such a bathtub with a sledgehammer - if the bathtub does not fit through the doorway , it will have to be sawed.
Instead of a siphon, steel bathtubs typically use a special system of plastic or steel pipes, also called a bathtub piping or drain-overflow system. It is much easier to dismantle such a system than cast iron pipes. First try to spin up the system.
If this does not work, then the steel strapping should be cut down with a grinder, and the plastic strapping can be broken with an ordinary hammer or any other suitable tool.
Removing an acrylic bathtub
The main advantages of an acrylic bathtub are its lightness (the average weight of a bathtub is about thirty kilograms) and the variety of different shapes. The quirky curves of a bathtub can in some cases make it much easier to remove the bathtub through doorways, so acrylic bathtubs rarely need to be pre-cut before disposal.
Difficulties in dismantling acrylic bathtubs can only arise if any additional equipment is installed on it, for example a hydromassage system. In this case, it is better to contact specialists so as not to make the system unsuitable for further use.
Structural destruction
Destruction of products
When the bathtub does not fit through the doorway or when there are no helpers, it is wiser to resort to the second method of dismantling the old structure - breaking the product with a sledgehammer. Cast iron is a brittle material, so with enough force it will break. Before carrying out this type of work, it is necessary to protect your hands with gloves, your respiratory organs with a respirator, and put on a construction apron. These safety measures will help avoid injury from shrapnel and metal dust entering the lungs.
Communications are disconnected before the dismantling process. Then create a gap between the bowl and the wall of at least 15-20 cm. A thick cloth is moistened in water and the container is covered with this damp blanket to reduce the amount of dust generated during breaking. The side wall of the bowl is hit with a sledgehammer in several places. It cracks and breaks into pieces.
Flying debris can damage wall cladding and plumbing fixtures.
Removing a cast iron bathtub using a hammer
If you decide to scrap a cast-iron bathtub, we can recommend using such a simple method of removing an old product from the bathroom as destroying the bathtub body with a sledgehammer. This is the easiest and most rational option for dismantling. In order to reduce the likelihood of injury, it is necessary to adhere to a certain sequence of actions. Work should be carried out in this order.
First of all, it is necessary to cut off the connection of the bathtub to the sewer with a grinder and free the sides of the plumbing fixture from the layer of tile mortar and the remains of cladding along the entire perimeter. The tank should be moved from the wall approximately 10–15 cm.
To easily split the bathtub body into two parts with a sledgehammer, you should use a cutting machine to make cuts on certain areas of the surface. The cuts must be made on the rounded part of the container strictly in the middle of the product on both sides.
The sides of the bathtub must be completely cut through, since in this case they act as a load-bearing element in the structure. Now one good blow with a hammer on the bottom of the tank will be enough to divide it into two equal parts. In this case, the bathtub will fold downwards.
Fulfilling these conditions will be enough to facilitate the dismantling of the bathtub. Two workers can remove parts of the old product from the premises, although this can be done alone. To do this, it is advisable to split the parts into small fragments, collect them in strong bags and take the bath to a scrap metal collection site or a landfill. In order to break apart parts of the bathtub body, you do not need to make cuts with a sander. Cast iron is a fairly brittle material, and the remaining parts of the structure can be easily broken into small pieces with a sledgehammer.
Removing the bathtub
Dismantling and removal of the bathtub can be ordered from a special organization. A team of 4-5 people will independently perform all the necessary work. The plumbing fixtures will be packed directly in the premises, then taken out of the apartment, lowered from the floor (if necessary) and loaded onto a vehicle.
How high the cost of dismantling the bathtub will be depends on the complexity of the work performed. In the most common cases, it will be 1,500 rubles. When it is necessary to keep the cladding intact, costs can increase by 20-50%.
If you approach the dismantling of the bathtub taking into account the features described above, you can avoid mistakes that will lead to damage to the plumbing and bathroom furnishings. Accuracy and unhurriedness are the main requirements for performing work.
Getting rid of the bath
To free the room from parts of the plumbing structure, you will need the help of several strong men. In addition, this requires transport. The services of movers and cargo taxis can be quite expensive. Today there are companies that remove bathtubs. You don’t need to do anything yourself, just call a team, and specialists will quickly and efficiently dismantle it. You don’t have to pay for this - the company covers its costs and makes a profit through the sale of scrap metal. In addition, an old bathtub can serve for a long time if the damaged enamel layer is restored.
In conclusion, we can add that dismantling and removing an old bathtub is a complex and physically demanding process. You can make the task as easy as possible if you follow the recommendations of experienced specialists and also involve a special service in disposing of the product.
During a bathroom renovation, the question of updating old plumbing often arises.
The first candidate for replacement is always a bathtub, especially if it is a cast-iron model that has been there since Soviet times.
After all, the industry offers the consumer a wide selection of other, more modern materials: acrylic, quarry , wood and even marble . Products made from them are often more practical than Soviet cast iron. But, of course, it also has its advantages .
But the question arises: how to dismantle and remove such a colossus? As they say - “break, don’t build.” Let us consider in detail all the nuances of this labor-intensive process.
Cast Iron Bathtub Installation Technology
I am repeatedly faced with the fact that the installation of a cast iron or acrylic bathtub is also done incorrectly. What is the reason for improper installation of the bathtub? Why is it wrong? What's wrong?
The option when first behind the bathroom, the place where the cast-iron bathtub will be installed, is tiled from floor to ceiling, and then a bathtub is installed in this place - does not cause reliability!
Some masters do this to speed up the work. It's faster that way. They first lay tiles on all the walls, then move the bathtub against the wall. And, voila, the bath is standing. But such installation does not ensure reliability and does not ensure a good joint between the edge of the bathtub and the tiles. In addition, with this installation option, the bathtub can “play”, wobble and move during operation. Therefore, there is no need to do this. This is not the way to install a bathtub.
How to do this correctly?
Now let's show... Video 360.
Safety precautions when dismantling the bathtub
During work, hazardous situations may arise. This may be caused by inconsistency in the actions of two people, or failure to follow the rules for working with a cutting machine or hammer. Most often, injuries occur in several typical cases. Let's take a closer look at them.
The risk of injury may arise due to uncoordinated actions of workers. It is very important to accurately coordinate each action. If one of the assistants accidentally releases the bathtub, the second person will not be able to hold the product on his own and will be crushed by the cast-iron container. Most often, the hands suffer during the dismantling process. The limb can be pressed against the wall or pulled between the body of the product and the frame of the doorway. Particular vigilance should be exercised in this area, as this is one of the common causes of injury.
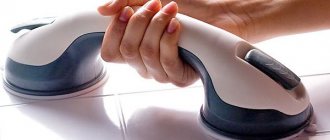
Care must be taken when lifting the edge of the tank. The bathtub may slip on the slippery surface of the tiles, and one person will not be able to hold it. In order to avoid this, it is necessary to lay an anti-slip gasket under the side of the sanitary container. This could be a rubber mat.
In the case where the edges of the product are firmly embedded in the wall, the dismantling procedure is somewhat more complicated, and additional sources of injury may arise. It is quite problematic to remove a layer of old tiles and cement mortar from the sides of a plumbing fixture so that the product can be pulled out freely. In this case, you can make the task easier by knocking out the supports of the structure one by one. After this, you need to apply force so that the container falls to the floor. Before disconnecting the structural supports, it is necessary to place a layer of shock-absorbing material under the bathtub on the floor to compensate for the force of impact when the tank falls.
When working with tools such as electric angle grinders and hammers, it is inevitable that a lot of small pieces of scale, metal shavings or splinters fly off, which can cause serious injury if they come into contact with the skin or eyes.
Particular care should be taken when breaking the body of a sanitary ware into small fragments. In this case, the enamel coating of the bathtub breaks off in large pieces, which, when flying off, can cause serious injuries. During work, not only the visual organs, but also all parts of the body should be protected from damage. To do this, you can wear work pants made of thick material and a jacket or thick long-sleeved shirt. Of course, in such clothes you can become covered in profuse sweat, but in any case this is preferable to injury.
Craving for minimalism
If you look at a photo of a bathroom without a bathtub, you will notice one interesting trend - the absence of unnecessary pieces of furniture and appliances.
It is stupid to argue that a bathtub takes up quite a lot of space, but is rarely used for its intended purpose - people prefer to use a shower. It is faster, more convenient, and water costs are significantly lower, which also plays an important role, especially in the case of a large family.
For many, minimalism has become a real revelation in everyday life, including home improvement. Following this style, people come to the conclusion that in the bathroom, not only is the bathtub itself unnecessary, but even the stall as such is no longer directly necessary. This is because it is enough to simply select a shower area and fence it off with glass - stylish, convenient, practical.
At the same time, you need to be prepared for certain difficulties. First you need to think about the drainage system of the room, which should be a little redundant and of high quality.
This is because if the shower compartment and the rest of the room are on the same level and do not have obvious overlaps, water can disperse throughout the entire area if the drainage does not cope, which is extremely undesirable.
Where to put it with benefit?
You will be surprised, but even from an old, rusty bathtub you can benefit; see how to do this below.
Removal for scrap metal
You can scrap it and get some good money. Some companies even offer free dismantling and removal services, this will save you a lot of time and effort. Read more about.
Second Life
If you apply a little imagination and “direct hands”, you can make truly amazing things from cast iron baths. Furniture, ponds and even barbecues. More useful inventions from a cast iron bathtub in our article.
Rational thinking
Previously, we have already given several reasons why you should give up a bath. This option looks especially interesting with small apartment areas.
The thing is that a small bathroom without a bath will look and feel much more spacious. You will not have problems with placing the necessary equipment, such as a washing machine or water heater. The latter mainly occurs in cases of shared bathrooms.
By completely partitioning off part of the bathroom as a shower area, you can greatly limit the couple's movement within the room, so you can experiment with design elements such as covering the walls, floors and ceilings.
About dismantling methods
There are two ways to replace an old bathtub:
- With saving. The bathtub is carefully disconnected from the rest of the communications in the house and taken out. It can be used in the future. Judging by the reviews, this method is complex and time-consuming.
- No saving. In this case, you can either break the cast iron bathtub or saw it using an angle grinder. The bath pieces are then taken out. Due to the fact that the product now weighs much less, one person can handle this work. According to experienced craftsmen, if it is necessary to dismantle the bathtub, they mainly resort to this method. The disadvantage of this method is that the procedure is accompanied by a very large roar.
Basic requirements for choosing a bath
Preference is given to cast iron bathing vessels, because they have a longer service life compared to other products. In addition, heavy cast iron bathtubs are much more stable than their lightweight counterparts made of steel and plastic, and retain heat well.
pay attention to the quality of cast iron, choose a product without “sinks” and cracks; inspect the bathtub from all sides: the outer, cast-iron surface should be smooth, and the layer of enamel coating inside the bathtub should be quite thick and glossy-smooth; the thickness of the enamel coating is characterized by an even color of the enamel and the thickness of the layer at the end of the enamel layer along the outer sides of the product; the sides and corners themselves should have a smooth, slightly rounded surface.
Important: the comfort and duration of its use will depend on the quality of the product you have chosen.
Preparing a bathroom for renovation
It is necessary to fulfill the basic conditions for preparing the room for the upcoming renovation:
- removal of all bath accessories;
- disconnection of communications;
- removal of furniture;
- dismantling the old cast iron bathtub and washbasin;
- clearing the room of debris and objects that may interfere with the work of specialists.
Dismantling of outdated plumbing fixtures
How to break a cast iron bathtub quickly and without wasting time? This question worries everyone who has ever thought about a major bathroom renovation. Old cast iron bathtubs can be removed in several ways. The first of which is free removal and removal of old cast iron bathtubs.
Advice: There are a considerable number of special services that are ready to dismantle and remove a cast-iron bathtub in a matter of hours. Moreover, they are ready to provide such a service absolutely free of charge, but on the condition that they take the old plumbing equipment with them. This is not surprising, because today the use of cast iron bathtubs for scrap metal is in great demand. Therefore, you can safely use the services of such organizations, for which you will not have to pay a penny.
However, not every locality has such initiative groups that are ready to not only dismantle, but also remove a heavy cast-iron bathtub.
And yet you shouldn’t despair, because there are still many ways that allow you to dismantle and remove an old cast-iron bathtub. For example, you can use the paid services of craftsmen who perform all the work on removing plumbing fixtures, and from any material. As a rule, such enterprises have their own standard prices for services. And after your consent to dismantle the equipment, the repair team will arrive at the appointed time and remove the plumbing; in addition, they will be able to remove the cast-iron bathtub, but also for a certain monetary reward.
But if you are going to make repairs in your bathroom without involving specialists, you will need to dismantle the cast-iron bathtub yourself. In reality, this process is not as complicated as it seems at first glance.
Do-it-yourself plumbing removal
This procedure will not cause complications if the old cast-iron bathtub was placed on supports, without any fasteners, decorative screen or brickwork, and, of course, if the dimensions of the doorway allow the plumbing to be removed without preliminary sawing or breaking.
Tip: After dismantling, you can hand over the old cast-iron bathtub to scrap metal collection points, or simply leave it near the trash cans. Believe me, the next morning there will definitely be no plumbing.
But if the product is installed in a steel frame or lined with brickwork, the dismantling process becomes somewhat more complicated. In this case you will have to:
- Turn off the water and disconnect the bathtub drain from the sewer system;
- Then you need to remove the mixer and all water distributors, because they will interfere with the process of removing the plumbing;
- When the process is not hampered by these nuances, you will need to arm yourself with a chisel and sledgehammer. Using these tools, you will need to remove the tiles and baseboards that cover the joints of the bathtub with the walls;
- The next stage involves the direct dismantling of the plumbing. Using the lever, remove the obsolete equipment. If the equipment does not yield to “provocation”, the entire structure will have to be completely cut using an angle grinder with a metal attachment. If the frame is made of brick or blocks, use a sledgehammer;
- When you are finally done with the frame, you will need to remove all construction debris from the premises. Then only the old plumbing itself should remain in the room. If you understand that due to its large size it will not be possible to remove the entire product from the bathroom, you will have to break the plumbing equipment into several parts.
How to properly destroy a cast iron bathtub
How to split a cast iron bathtub? Many videos answer the question of how to break a cast iron bathtub, so you shouldn’t have any difficulties.
Important! Please note that this procedure will be accompanied by serious noise, so you should not start repairs overnight.
- First you need to put the old equipment on its side so that it has easy access from both sides. Since pieces of cast iron will fly off the product during the process and can injure your face and hands, be sure to wear safety glasses, a hat, and thick gloves. It is advisable that there are no fans in the premises either.
- The most vulnerable spot in any bathtub is the part of the bottom next to the drain hole. It is on him that it is necessary to strike hard blows with a sledgehammer. When striking from the outside of the plumbing, cover the hole with a rag to prevent shards of cast iron from hitting you. These manipulations should be performed until a large crack appears along the entire bottom.
- Then the bathtub needs to be turned upside down and the blows should be directed at the walls of the plumbing. After cutting the equipment into pieces, invite your fans to help remove the remains of the bathtub from the room.
Getting rid of an unnecessary bath
So, where can you sell your cast iron bathtub? Cast iron products are, of course, durable, but not eternal. Therefore, sooner or later everyone asks the question: where to sell an old cast-iron bathtub? Dismantling plumbing equipment is a very difficult process, but not final, because it becomes necessary to remove the old cast-iron bathtub.
But the good news is that recycling an old cast-iron bathtub can bring not only trouble, but also a certain monetary reward. Because cast iron scrap is accepted in almost all cities. If you have your own transport and during the dismantling process you had to break the plumbing into pieces, you can organize self-pickup of cast-iron bathtubs, having previously decided on a place for scrap metal collection.
But if you do not have your own transport and handing over an old bathtub weighing 150 kg is problematic for you, you can easily negotiate with special teams who will remove the equipment themselves; they certainly know where to put the cast-iron bathtub.
You just need to find advertisements in your area of residence and contact an organization where you can rent out a cast-iron bathtub.
Children's question
Parents understand perfectly well that it is much more convenient and enjoyable to bathe children in the bathtub than in the shower. However, over time, children grow up, and at the same time the need for a bath almost completely disappears.
When children start going to school, especially if there are several of them in the house of a similar age, in the morning the bathroom becomes the most popular place in the house, and we are not talking about the ladies who can occupy the bathroom for an hour without any problems.
In this case, it would be much better to have several sinks and cabinets so that several family members can get ready for the working day at the same time.
https://www.youtube.com/watch?v=
For this case, there are large bathroom cabinets without a bathtub. Usually they are made for 2 sinks with compartments for storing cosmetics or towels - whatever you need more.
Aged people
If in the case of small children it is better if there is a bath, then with older people the opposite is true. As you get older, it becomes difficult to get into the bathtub, especially if it is used as a base for the shower area.
At the same time, part of the room that is allocated for a shower area without unnecessary plumbing items is a more interesting option.
The size of such a bench depends more on the space allocated for the shower area - it is stupid to make a bench the size of half the entire shower compartment.
Completion
At the very end, the cast iron bathtub must be completely turned over. The bottom of the sanitary ware should be directed upward. At this stage, the sides are processed with a sledgehammer. As a result, the bath is broken into several pieces, which can then be conveniently removed. In addition, the bath can be divided into smaller pieces. To do this you will have to work with an angle grinder. The gas cutting method is considered quite effective.
For those who do not know how to break a cast iron bathtub, professionals recommend following safety precautions. Mostly this work is performed by two people. Since the procedure involves a grinder and a sledgehammer, you can protect yourself from injuries if all actions are coordinated.
Due to the fact that particles of broken cast iron can get into the face from strong blows of a sledgehammer, the plumbing product should first be covered with burlap. This will also protect the bathroom itself. The speed of dismantling and safety directly depend on the proper organization of work.
Installation sequence
Do-it-yourself installation of a cast-iron bathtub is done after leveling and finishing the floor surface, but before laying ceramic tiles on the walls. By performing installation in this sequence, you can achieve a minimum gap between the washing container and the wall, so that moisture will not penetrate there.
Install a cast iron bath in the following sequence:
- To properly install a washing container in the bathroom, you need to turn off the water supply in the apartment, and then drain the remaining water from the pipes by opening the taps.
- A bathtub installed vertically in a room is carefully turned and then laid on its side with its bottom against the wall, at a distance of 70 cm from it.
- 2 pairs of legs supplied by the manufacturer are attached to the bottom of the bathtub. Fastening is done using wedges or screws. The fasteners are fastened tightly, but without excessive force, so as not to strip the threads.
- Without turning the bath over, connect the siphon with overflow. According to building codes, the siphon must be connected 2-3 cm above the sewer pipe. To avoid leaks, connections are made using rubber seals.
Experienced craftsmen claim that due to their significant weight, cast iron bathtubs can only be installed on a floor finished with hard materials. To reduce the load on the floor finishing, you can place a metal plate made of steel with a thickness of 0.5 mm or more under the knives.
How to dismantle an old bathtub: safety is paramount
So, we’ve sorted out the question of how to cut a cast-iron bathtub; now all that remains is to cover the topic of work safety. You can’t do without this - disorganized work of two people and even simply incorrect use of an angle grinder or sledgehammer can lead to serious injuries. So what do you need to watch out for when dismantling a cast iron bathtub?
- Uncoordinated work of two people. Every step or movement must be strictly verified and coordinated. Imagine what would happen if someone relaxed at the wrong time and the bathtub crushed another person? Quite often, during the process of dismantling cast iron bathtubs, hands are injured. They are either pressed against the wall or dragged between the bathroom and the door frame - the latter place is the most dangerous, so you need to be extremely careful here.
- Grinders and sledgehammers, which, as a rule, emit a lot of small particles during operation that can damage human eyes and skin. This is especially true when working with a bathtub - its enamel chips into large pieces that can cause serious injuries. When performing such work, you need to take care not only to protect your eyes, but also your entire body, for example, wear thick pants and a long-sleeved shirt. It may be a little hot, but your body will not suffer!
How to dismantle a cast iron bathtub with your own hands photo
This is how things stand with the answer to the question of how to dismantle a cast iron bathtub. It should be understood that despite the apparent ease of the entire procedure, in reality this work is complex and difficult. It largely depends on the size of the cast iron bathtub - if we talk about a small bathtub 1.5 m long, then it is easy to handle. But with large products of this type (for example, with a bathtub 1.7 m long), things are much more complicated, and this is due to their weight, which exceeds 100 kg.
A cast iron bathtub, along with its strength and reliability, has one significant drawback - its heavy weight. And when it comes to dismantling a cast iron bathtub, the owners have to face a number of difficulties - getting the product out of the apartment onto the street is not so easy, and in some cases, due to tight passages, it is completely impossible to do this. There is only one way out - break the bathtub.
Several bathrooms
This topic already applies to large apartments and private houses, which should also not be small. Having more than one floor, one way or another, people begin to think about bathrooms for each of the floors, or even several per floor.
In this case, it is quite stupid to install a bathtub in each of them, even if one of the residents of the house really likes to use it. In this case, the bathtub is usually left in the bathroom, which is most often used by the owners of the house - it often has an entrance only from the master bedroom.
In this case, take into account the floors of the house, because there are buildings in which it is better not to install a massive bathtub on the upper floors. As I already said, such houses are rare, but you shouldn’t forget about safety.
Progress
Once the most vulnerable point in the product has been found, the following steps must be performed:
- The first step is to move the bathtub a little away from the wall. To complete this task, you will need a chisel and a hammer, with the help of which the plumbing product is removed from the cement mortar around the perimeter. The optimal distance of the bathtub to the wall will be from 100 to 150 mm.
- Using an angle grinder equipped with cutting wheels, make several cuts on the bathtub. The master’s task is to deprive the product of its strength. The cutting areas on the bathtub should be its curved edges on both sides. They are used as stiffeners. If the work is done correctly, then strong blows to the bottom of the cast iron product will cause it to collapse.
- Break through the drain hole. There is no need to turn the bath over at this stage. The master only applies very strong blows with a sledgehammer to the drain from the inside of the bathtub. Judging by the reviews, after these steps the bath is divided into two separate halves. If this does not happen, then you will have to deal with its sides.
- Turn the bathtub on its side and cover it with old rags. Burlap also works well. The blows are applied to the outer part of the cast iron product. As a result, the previously broken drain hole in the bathroom should become even wider. After several blows in the bathtub, a long strip forms along its entire bottom.