Pouring concrete screed
Even taking into account the fact that today hardware stores offer a huge variety of mixtures for pouring, it is still popular to use concrete mortar as a base or even a finishing coating (for more details: “How to make a concrete floor in a private house with your own hands - instructions”). It is durable, easy to install and low cost. Next we will talk about how to fill the floor in a private house in stages.
Filling is performed as follows:
- calculation of the area of the room and the quantity required for pouring materials;
- processing of the rough base;
- selection of tools;
- performing filling.
Correctly pouring a floor screed with your own hands allows you to create a high-quality coating that looks great in the photo and during visual inspection, which makes it possible to use the screed as a finishing coating without laying facing materials.
Preparatory stage
All of the above points, up to pouring, can be combined into a single category - the preparatory stage. Naturally, you need to start by calculating the floor area in order to understand how much and approximately how much time will be spent on pouring.
If we are talking about how to properly fill a floor in a private house, then the calculation of purchased materials is made according to the following scheme (using the example of a room measuring 5x5 meters):
- The floor area is calculated using the standard formula: length multiplied by width (5x5=25 square meters);
- the volume of the solution to be poured is calculated by multiplying the floor area by the estimated thickness of the screed. Based on a layer of 10 centimeters: 25 square meters multiplied by 10 centimeters - 2.5 cubic meters of screed.
Taking into account the calculations made, materials should also be purchased.
For a high-quality screed you will need the following components:
- ordinary quarry sand;
- cement grade of at least M150;
- medium-sized crushed stone;
- mesh for reinforcing screeds with a cell size of 5 to 10 square centimeters;
- metal profiles for display as beacons.
From all of the above, we can conclude that before properly pouring floors in a private house, it is necessary to purchase the main components for pouring the screed in accordance with the calculations made. Regarding the height of the floor, it is necessary to know the thickness of not only the screed and bulk layers, but also all the materials being laid: steam, hydro and thermal insulation.
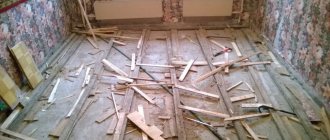
Pouring floors in a private house begins with cleaning the workspace. Naturally, it is necessary to remove dust, dirt, and debris from the subfloor using a broom, or even better, a powerful household or industrial vacuum cleaner. After cleaning, you can begin a process such as filling the floor in the house with your own hands, which is not the easiest.
It is worth considering the difficulty of creating the required amount of solution. If you knead manually, it will take a lot of time to prepare one portion. It is best to use a concrete mixer with a large capacity. Only with automatic mixing can a correct, uninterrupted supply of solution to the floor be ensured.
If we are talking about how to properly fill the floor in a house, then the worker should have the following tools with him:
- a long measuring device (a tape measure is best);
- building level, long wooden strip (rule);
- shovel and trowel;
- circular electric saw (grinder);
- large volume concrete mixer.
Features and benefits of industrial coating
Concrete flooring has become widespread in industrial and public buildings and premises. Experts highlight the following advantages:
- cheapness;
- durability;
- reliability;
- strength;
- evenness;
- moisture resistance;
- ease of care;
- thermal insulation properties;
Concreting is the basis of floors, so the technology of their laying and processing depends on the purpose and intensity of use.
Regardless of the type and purpose of the industrial premises, it is concrete that acts as the basis for the floors and ensures the performance of subsequent coating options. Without special surface treatment, it is used only in rooms with low requirements for flooring strength and cleanliness. If the base is subject to intense mechanical loads or exposure to an aggressive environment, it is subjected to additional processing.
The main advantage of industrial flooring is its surface layer, which meets all standards and technical requirements.
It is important to choose the right materials for arranging the outer layer of the coating in accordance with the purpose and requirements for the room being equipped. Industrial concrete floors are symbolically grouped according to the following characteristics:
- According to the number of layers there are: multilayer;
- single-layer.
- reinforced;
- liquid;
Main stages of work
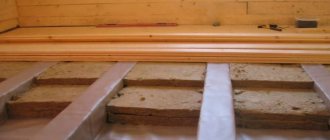
At the beginning, as mentioned above, a sand or expanded clay cushion is poured. With a sufficient headroom in the room, you can make a layer of up to 15 centimeters. Naturally, the maximum thickness allows for increased thermal insulation from the ground.
In some cases, a layer of thick polyethylene is placed under the bulk materials, which acts as a waterproofing layer. It is also laid on top of a bulk cushion under a concrete screed.
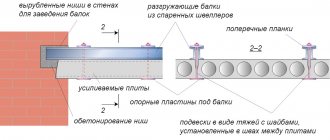
To pour the floor in a house onto the ground, it is necessary to install beacons after creating the cushion and waterproofing. You can use special aluminum profiles, ordinary reinforcement pieces or pipes for this. It is very important to use beacons with a perfectly flat surface and increased rigidity.
They are leveled using a building level so that the surfaces are located in the same plane. You can check the level using a wooden rod (rule). The interval between the slats should be about 1.5 meters, and the rule for checking the level is 10-15 centimeters longer.
The beacons are fixed to gypsum mortar. The advantage of this mixture is that it hardens quickly, but you can also remove the beacon without difficulty if its level was set incorrectly. The beacons are installed on top of the reinforcing mesh, which is first laid on the last layer of the bulk cushion or waterproofing polyethylene.
Also, if we are talking about how to fill a heated floor in a private house, it is necessary to lay a heating circuit on top of the reinforcing mesh between the beacons, if we are talking about water heating. Before pouring a warm water floor, study all the nuances of these works.
The solution is mixed at the rate of: 1 part cement to 4 parts sand and 4 parts crushed stone. The concrete solution should have the consistency of “liquid sour cream” so that it can be poured between the beacons without any problems. After pouring, the solution is leveled using a rule so that the height of the screed matches the height of the installed beacons.
Polished floor
Copes perfectly with shock and vibration loads, temperature changes. It is resistant to aggressive environments, easy to use, environmentally friendly and, best of all, can last for decades without requiring special care. If the surface is damaged, it is enough to repolish it. This coating can be called the most durable, functional, inexpensive and aesthetic.
The secret of a polished floor is that it is a monolithic concrete slab, polished to a mirror finish. Externally, this floor resembles stone, and the special “Superfloor” technology provides it with high aesthetic appeal. Experts recommend using stone fractions and dyes of various compositions and colors as concrete mix fillers, which makes it possible to create almost artistic compositions that allow you to decorate a building and adapt to any interior.
Final stage
Once pouring is complete, the floor is left for about a week. At the same time, it is regularly moistened and covered with a thick layer of polyethylene on top so that cracks do not appear in the coating. After a week, the beacons are removed from the screed.
You can use a regular hammer: you need to lightly hit the insert and it will fall out of the concrete. The voids are filled with an identical solution, and the floor is put into operation after complete drying.
Bottom line
The article describes in detail the procedure for installing a concrete screed for the further installation of any floor covering. There is also an option to process the screed using a grinding machine, which allows you to use it as a finishing coating that looks no worse in photos and visual inspection than conventional facing materials.
If difficulties arise, you can always turn to specialists who will take responsibility for all stages - from purchasing the necessary materials to pouring the screed and putting the floor into operation.
Concrete floor technology
- Find the lowest point. Before starting work with concrete floors, it is first necessary to carry out geodetic work, find and mark the zero (horizon).
- Prepare the base . On the ground . Before installing a concrete screed, it is necessary to prepare the base for the concrete floor; to do this, you need to compact the soil and make a cushion in the form of a sand bedding.
On a monolithic base. Concrete floors are installed after the foundation has been repaired, if required. Cracks and potholes are filled with a mixture of cement and sand, i.e. brand 50.
Installation of waterproofing . Concrete takes a long time to gain strength; while the mixture is hardening, it should not be allowed to dry out. Therefore, waterproofing is used; it prevents liquid from escaping from the concrete.
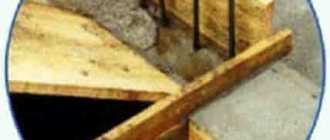
- Installation of formwork . Formwork is wooden, metal, plastic panels, with the help of which you need to give the necessary shape to the future layer.
- Formation reinforcement. If technology requires it, the base is reinforced before pouring concrete floors. This is done to increase the strength of the concrete base.
- Installation of concrete floors. Before carrying out work with concrete, you need to objectively evaluate the entire scope of work. The fact is that concrete should be poured in one layer; pouring floors in 2-3 stages with large intervals of several hours or more is a gross violation of the technological process. Therefore, situations often arise when it makes sense to order ready-made concrete from a concrete mixer. If the object is located at a height or in a place that is difficult for a concrete mixer to reach, there is a concrete pump.
Interesting: Apartment renovation: how to find a craftsman, workers, construction crew
- Actions during concrete work . To perform the job efficiently, the mixture must be leveled and compacted. For this, various tools are used, such as a vibrating screed and a vibrator. Using a vibrator, air is expelled from the concrete mixture, and using a vibrating screed, the concrete mixture is evenly distributed over the surface.
Vibrating screed.
Concrete vibrator.
- Grouting concrete floors . After 6-8 hours after completion of work, the concrete base should be cleaned with a special trowel (if the area is not large, you can rub the screed manually using a polyurethane float). It is recommended to repeat the procedure every few hours.
- Hardening of the concrete floor. After cleaning the surface, you need to let the base get stronger for several days. All this time, the concrete floor must be irrigated with water.
- Expansion joint . No later than 72 hours after finishing work, it is necessary to cut the expansion joint with an angle grinder. This must be done if a large load on the floors is expected, for large areas. Any base makes a movement invisible to the human eye. This happens due to the acting load from the mass of the structure itself, the equipment on it, thermal expansion during heating or contraction during cooling, and seismic movements. An expansion joint will avoid destruction of the concrete floor. The depth of the expansion joint is usually 1/3 of the total layer thickness.
- Treatment of expansion joints. After the seams have been cut, they must be treated with any sealing material. This will prevent water and debris from getting into the seams.
Source