Such building structures have a number of positive qualities compared to their concrete counterparts.
Not only do they not overload the walls and foundation, but they also do not require the use of lifting equipment for installation.
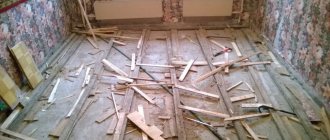
In addition, they have fairly high strength, wear resistance and at the same time have an optimal cost. Installing a wooden floor is not difficult. For this reason, many home builders are quite capable of carrying out the entire installation process themselves.
What tools and supplies will be needed?
In order for such a floor to be strong and durable, the developer will need to purchase only high-quality basic and consumable materials. Their list will depend on what type of floors will be installed in housing construction: interfloor, basement and attic, as well as types of protective materials. providing heat and sound protection.
List of basic and auxiliary materials for assembling wooden floors in a household:
Bearing beams 6 m long, cross-section: 150*150, mounting beams - 40*40 or 50*50 mm.- Unedged board, 25 mm and above.
- Waterproofing material.
- Vapor-tight membrane.
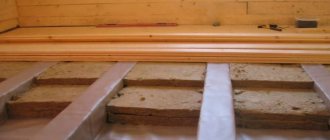
- A heat insulator with acoustic capabilities, preferably from the group of mineral wool insulation with a layer of at least 100 mm, to provide protection against airborne noise of at least 52 dB and impact noise of 60 dB.
- Fasteners: nails and screws, for assembling wooden structures.
- Adhesive tape for gluing seams of films and membranes.
- Polyurethane foam for sealing joints.
- Plasterboard and chipboards 20 mm and higher, for leveling ceilings and floors.
- Metal profile for fixing the sheathing.
- Board for subfloor.
- Antiseptic and fire-resistant impregnation.
- Metal fasteners: nails, staples, steel plates.
Installation and assembly activities are carried out using the following equipment , hand and electric tools:
- Stairs and decking for construction work at heights.
- Reciprocating and circular saws.
- Electric jigsaw for cutting slabs.
- Screwdriver and electric drill.
- Knife for cutting thermal insulation and film.
- Carpenter's kit.
- Measuring tools: angle, level, tape measure and plumb line.
- Overalls and personal protective equipment.
How to properly install on wooden load-bearing beams?
Such floors in a building differ from a conventional ceiling in a number of parameters, in the method of their installation and in the use of thicker beams. In addition, unlike the construction of ceilings, wooden load-bearing beams need to be cut into the walls of the box, and not simply laid on a reinforced belt.
Accordingly, beam floors have a greater margin of safety, and since they are made multilayer, they have high vapor, water, sound and heat protection .
Beams, logs, planed on 3 sides and boards pressed together can be used as load-bearing structures. In some cases, when it is necessary to create a more powerful structure with increased strength characteristics, load-bearing beams can be made of steel I-beams and even used rails.
All materials for floor slabs must be of high quality, and wooden products are pre-treated with a special antiseptic and fire-resistant impregnation.
Before installing timber, the developer must check that:
the wood had no biological damage, cracks or chips;- the percentage of humidity does not exceed 14% so that the material does not lose strength and does not sag under loads;
- the ratio of thickness to length was at least 1:24, otherwise, it is allowed to connect a number of narrow beams into one structure;
- beams must withstand a total load of 400 kg/m2 with a safety factor of 1.3; the maximum deflection should not exceed the length ratio: 1/300.
Before installing load-bearing logs, calculate the minimum section with an installation step between them from 0.5 to 1 m. For example, with a room length of 6 m and the number of beams - 10 pieces, the installation step is: 6/10 = 0.6 m, then the section of the beam is established using the reference table, so for the above parameters, the minimum cross-section will be 100x200 mm.
It is not recommended to make load-bearing beams from deciduous trees, since they will not be able to provide strength conditions and permissible deflection.
Tsokolnoe
Such ceilings are most susceptible to the influence of cold air and moisture, so they are installed with a high level of thermal protection and waterproofing . The beam should be installed along the shortest wall, for example, for a room 5x6 m, the supporting beams should be 5 m plus the distance for support.
Openings are provided in advance in the wall for the installation of beams with a depth of support socket of at least 18 cm, so that they rest along the length by 15 cm and a free gap of 3 cm for the expansion of the wood.
The main stages of installing a basement floor:
- The beam is cut at an angle of 60 degrees at the end before laying it in the wall, while the bottom of the beam should be adjacent to the brickwork.
- The timber is waterproofed in the support area on the walls; to do this, its ends are wrapped in several layers of roofing felt, attaching them with nails.
- Mount 2 limiting beams, checking the level horizontally and vertically, level them by substituting scraps of wood treated with resin.
- A thread is stretched between the beams, the intermediate load-bearing beams need to be aligned and aligned along it, the ends are insulated with mineral wool and secured with an iron corner. For this purpose, the 1st shelf is attached with self-tapping screws to the beam, and the 2nd to the wall.
- After this, cranial bars 4x4 cm or 5x5 cm are screwed to the beam on both sides to install the roll.
- The installed flooring is treated with antiseptic and fireproof impregnations.
- After the wood has dried, install a vapor barrier with an overlap of at least 100 mm. The seams are sealed with special adhesive tape.
- A layer of thermal insulation is installed, according to thermal engineering calculations, usually 15 to 20 cm, depending on the climatic region of the building. In the case where the cross-section of the beams does not allow the insulation to be completely built in, logs are laid on top of the timber.
- Install a vapor barrier with an overlap of at least 100 mm, which is sealed with special tape.
- To remove impact noise, before installing the logs, soundproofing tape 5 mm thick is installed on the beams.
- Install a ventilation gap.
- Waterproofing is carried out so that water from the first floor, for example, when washing the floor, does not get inside the ceiling.
- The final stage of installing the basement floor is assembling the subfloor from boards or slabs using self-tapping screws.
- The finished floor is made, for example, from laminate.
- The final finishing of the ceiling is carried out.
Attic
Such an overlap should be installed according to a different principle than the basement, since the temperature pressure from the hot source in the room to the cold source in the attic goes in the opposite direction than that of the basement. This must be taken into account when laying the internal layers of the floor and their thickness: for cold attics at least 150 mm, and for warm attics at least 100 mm.
In addition, if the attic space is not constantly used and is not heated,
lower-grade lumber can be installed . In this case, the cross-section of the beam is chosen in a ratio of 1:24 of the length, often equal to 150x200 mm. For the production of beams, coniferous lumber is used, which is more resistant to a humid environment and rotting.
Before starting installation work on installing the attic floor, preparatory work is carried out: the supporting beam is cut to the required length and treated with antiseptic impregnation. The edges of the beam are protected with roofing felt, then the treated beam is lifted upward for installation.
The main stages of installing a warm attic floor:
- For this type of floor, the maximum opening length is set from 4 to 6 m, the beam is laid at the ends of the wall structures. More often they use a Mauerlat mounted on an armored belt along the perimeter of load-bearing walls.
- Roofing material is placed under each beam to waterproof the wood,
- the pitch of wooden beams is selected based on the size of the thermal insulation material.
- Install the bottom roll from boards or slabs. 50x50 mm bars, boards or sheets are stuffed onto the bottom of the beams and secured to the bars with self-tapping screws.
- A vapor barrier is installed inside the runway with an overlap of at least 100 mm, and the seams are tightly sealed with construction tape.
- Install mineral wool or basalt wool slabs tightly, with a layer according to thermal engineering calculations.
- Install waterproofing on the insulation layer to prevent possible moisture ingress due to a faulty roofing system.
- Install the subfloor on similar bars, only on top.
- Installing a finished floor for a warm attic.
Interfloor
The ceiling, which is located between heated floors, is in the best conditions, since it does not experience temperature pressure between its surfaces, for example, like the basement and attic floors. This determines the fact that the thermal protection of such structures should have a smaller layer of insulation.
Nevertheless, it will not be possible to abandon it altogether , since for such devices there are increased requirements for soundproof characteristics. In terms of airborne noise, such overlaps should provide 52 dB, and in terms of impact noise - 60 dB. This level of protection can be guaranteed by acoustic mineral wool with a layer of at least 100 mm.
The main stages of installation of floors between floors:
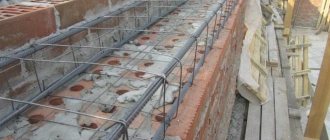
- During the construction of the walls, specialized openings for the beams are created at the top. Before installation and assembly work, these openings are thoroughly cleaned of various contaminants and the surface is covered with waterproofing. For foam blocks, roofing material is suitable, and for brick walls, nests are treated with bitumen mastic.
- The ends of the beams are coated with similar mastic and then they are placed in the openings or on the reinforced belt.
- For wooden walls, they are cut into the crown from above using the dovetail method.
- The beams are fastened with iron brackets.
- The beam in the nest must have a gap to the wall of at least 3 cm; it is filled with tow or pieces of mineral wool.
- Install the bottom flooring from 15-20 mm boards or slabs on pre-installed 5x5 cm cranial bars.
- A vapor barrier membrane is laid on top of the installed flooring so that wet vapors from the lower floor do not damage the thermal insulation and acoustic material; the seams are made with an overlap of at least 100 mm, which is sealed with special tape.
- Install mineral slabs very tightly to each other, but without jamming the material.
- A waterproof film with an overlap of 100 mm is installed on top so that an accidental spill of water from the upper floor does not damage the insulation.
- The ventilation gap is filled with a lathing made of 3 cm thick planks, which secures the waterproof film.
- The top flooring of boards and slabs is made along timber on pre-installed 5x5 cm cranial bars.
Floor installation
In order for a building to last for a long time, beam floors must meet a high level of strength. Have good sound and heat insulation, as well as good ventilation.
When installing wooden beams, the lighthouse installation method is most often used. First, the outer beams are installed, and then the intermediate ones. To avoid mistakes during work, use a level. In case of height differences, the beams can be leveled by placing cuttings soaked in bitumen primer under the end ends.
Before installation, the beams are spliced or cut to the required size. Splicing of timber beams along their length is usually carried out using the “key groove” method. To do this, the ends of the beams are cut down to 1/2 thickness and one end is buried into the thickness of the other. Then the joints are fixed.
Splicing two beams
The distance between wooden beams should not be less than 60 cm and exceed 1 meter. In a structure made of logs or laminated veneer lumber, the step is taken longer than in plank floors. When installing an attic floor, the distance between the chimney and the beams must be at least 40 centimeters.
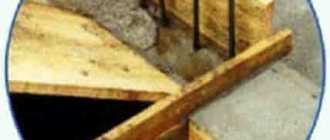
To ensure the strength of the frame, the ends of the beams are recessed into the load-bearing wall by at least 15 cm. For I-beams, this value can be reduced to 7 cm. The recesses are sealed with mortar or foam. It is possible to secure the ends to the walls using steel ties. Waterproofing is done in the support areas on the beams.
Waterproofing of beams at support points is required
Possible difficulties and errors in the process
The most significant mistakes are made by developers if they carry out work on building a house and erecting partitions without a design . After all, it is in the process of developing this document that the structures are linked together so that they work in the overall scheme of the house for many decades.
Therefore, in order to avoid mistakes during the construction of a house, the developer must carry out all design decisions exactly.
When producing floors, mistakes are most often made when performing the following mandatory procedures:
Special openings in the wall or armored belts for laying load-bearing beams were not made.- The logs were not waterproofed before installation in the walls.
- A layer of steam and water protection has not been laid.
- Violation of the technology for laying membranes, an overlap of 100 mm was not made and the seams were not sealed with construction tape.
- The heat insulator is incorrectly selected according to the brand and thickness of more than 100 mm. It is not allowed to install dense foam plastic in the interfloor ceiling due to its complete vapor permeability. Since wood breathes, such a layer will lead to its rotting.
- For interfloor ceilings, insulation without acoustic characteristics was chosen.
- The flooring and ceiling were made without 5x5 cm cranial bars.
Price
The cost of installation of wooden floors depends on the source materials, the location of the structure, the height of the house, the type of walls, as well as on transport communications to the construction site, that is, the availability of railways and highways for transporting building materials.
Average prices for the construction of wooden floors for individual installation operations and types of building materials are summarized in the table:
| List of works | Units | Price RUR/m2 |
| Chemical protection treatment of wooden floor beams | m2 | 40 |
| Installation of load-bearing beams | m2 | 310 |
| Rough cladding of beams with boards | m2 | 160 |
| Installation of logs | m2 | 415 |
| Rolling flooring | m2 | 126 |
| Finished flooring | m2 | 390 |
| Sub flooring | m2 | 170 |
| Installation of bars on beams 50x50 mm | M2 | 150 |
| Installation of lathing/counter-lattice | m2 | 120 |
| Insulation of floors in 1 layer, mineral wool | m2 | 250 |
| Vapor barrier of floors | m2 | 50 |
| Waterproofing | m2 | 90 |
| Sealing seams | m2 | 100 |
| Total cost of 1 m2 of wooden floors | m2 | 2371 |
Advantages and disadvantages of wooden beams
The use of wooden beams in the construction of buildings, unlike other types, is characterized by the following advantages:
- affordable price;
- ease of delivery to the construction site;
- possibility of installation without the use of special equipment;
- environmental Safety;
- maintainability.
However, despite many advantages, such floors are less durable than metal and reinforced concrete. They require treatment with fire retardants, as well as agents against rot and mold. Installation of wooden beams is possible only after careful calculations.
In conclusion of the article, it should be added that the use of wood in construction significantly reduces costs. In order not to disturb the structure of the entire building and install durable floors, it is better to entrust their design and installation to professional builders.