How to measure frequency with a multimeter
Many people leave all complex manipulations related to electricity and home wiring to professionals. Sometimes you need to check the resistance strength, direct or alternating voltage, as well as the number of complete cycles of current change, but it is not possible to call an electrician. In this case, a useful device will come to the rescue - a multimeter. Despite the fact that this function is not the main one, many are interested in how to measure frequency with a multimeter.
Often, a multimeter-frequency meter is needed for measurements in individual devices, such as a switching power supply generator. Measuring the network value will only confirm the presence of an indicator of 50 Hz.
A multimeter, the frequency of which in most models has a range of up to 30 Hz, is used only in everyday life; for production purposes, more complex devices are used, such as a high-frequency spark tester.
It is necessary to familiarize yourself in detail not only with the design of the measuring apparatus, but also with the features of the device being measured in order to understand how to measure the frequency of the current with a multimeter.
Multimeter design
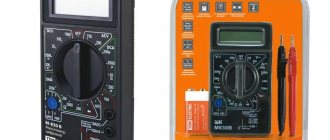
A tester with a built-in frequency meter is an excellent device for measurements, but there are a number of alternative methods that can be studied by familiarizing yourself with the structure of the device. The main composition of this device includes the functions of an ammeter, ohmmeter and voltmeter. This device is used when measuring direct and alternating voltage, as well as resistance.
The most common model of this device is digital, since, unlike analogue, it allows for more accurate measurements. Classic design includes:
- Indicator. It is located at the top of the device and serves as a screen on which test data is displayed.
- Switch. Allows you to select indicator limits and values. There is a scale around the switch, which in most modern devices has five ranges. The first value indicates 200 ohms. If you set the switch to this scale, then it will not be possible to measure resistance greater than this indicator. The scale also includes indicators for switching between direct and alternating current, and a continuity icon.
- Probe sockets. Allows you to connect the device being measured to the tester. Most models have three connectors at the bottom. For those who are interested in how to measure frequency with a multimeter, you need to pay attention to models with special functions. In addition to this indicator, the tester can measure inductance, temperature, and electrical capacitance. The presence of additional functions significantly affects the cost, so not everyone can afford to purchase such a device for everyday use. A multimeter attachment can be an excellent solution. It allows you to measure the desired indicator using a device with a standard set of functions.
Frequency measurement
It is worth recalling that if you are interested in how to measure the frequency with a multimeter, it is first important to familiarize yourself with the features of the device that is to be checked. This is the only way to achieve the desired result with the most accurate indicators. Measuring frequency with a multimeter with a special function is the most convenient, since in this case there is no need to use special attachments.
Such measurements occur in several stages:
- First of all, you need to check the meter for accuracy. It is known that the network frequency is 50 Hz. To determine the error in the tester's operation, you need to connect it to an outlet. An indicator different from 50 Hz will be the error of the measuring apparatus.
- Next, using measuring probes, you need to connect the tester to the device being measured. By first reading the instructions for using the tester, you can find out the voltage required for accurate testing. Having set the voltage indicator to the desired value, you can proceed directly to determining complete cycles of current change.
- After this, the frequency measurement by the tester will depend only on how the period of the alternating current changes.
Many are also interested in how to check the frequency with a multimeter using special attachments. Frequency meter - an attachment to a multimeter is an excellent alternative to expensive meters with many functions. Many testers with the function of determining current cycles have low sensitivity and therefore give inaccurate readings. The attachment is a complementary tool to the meter. It allows you to convert the received data into voltage.
In order for the current frequency measurement with a multimeter to have a minimum error, the frequency meter must be connected correctly. The type of operation switch in the measuring device must be adjusted so that the switch indicates constant voltage. In this case, there is no need to rebuild the set-top box when connecting to a device with an input impedance exceeding 1 mOhm.
Measuring frequency with a tester can give different results, depending primarily on the accuracy of the device. Therefore, when choosing a verification method, it is necessary to decide how seriously the error of the device and/or attachment affects the performance.
Previous news Next news
What devices can be used
Classification of frequency meters
All these devices are divided into two main groups according to their area of application:
- Electrical measuring. They are used for household or industrial frequency measurement in alternating current circuits. They are used for frequency regulation of the speed of asynchronous motors, since the type of frequency measurement of revolutions, in this case, is the most effective and widespread.
- Radio measuring. They are used exclusively in radio engineering and can measure a wide range of high-frequency voltages.
By design, frequency meters are divided into panel-mounted, stationary and portable. Naturally, portable devices are more compact, versatile and mobile, which are widely used by radio amateurs.
For any type of frequency meter, the most important characteristics that, in principle, a person should pay attention to when purchasing are:
- The range of frequencies that the device can measure. When planning to work with the standard industrial value of 50 Hz, you need to carefully read the instructions, since not all devices will be able to see it.
- Operating voltage in the circuits in which the measuring work will take place.
- Sensitivity, this value is more important for radio frequency devices.
- The error with which he can make measurements.
AC Frequency Multimeter
The most common device with which you can find out the magnitude of frequency fluctuations and which is freely and widely available is a multimeter. You need to pay attention to its functionality, since not every such device will be able to measure the frequency of alternating current in an outlet or other electrical circuit.
Such a tester is most often made very compact so that it fits easily in a bag and is as functional as possible, measuring, in addition to frequency, also voltage, current, resistance, and sometimes even air temperature, capacitance and inductance. The modern type of multimeter and its circuit are based purely on digital electronic elements for more accurate measurements. This multimeter consists of:
- Liquid crystal informative indicator for displaying measurement results, located, most often, in the upper part of the structure.
- The switch is basically made in the form of a mechanical element that allows you to quickly move from measuring one quantity to another. You need to be very careful, because, for example, if you measure voltage and the switch is set to o, that is, the current strength, then the consequence of this will inevitably be a short circuit, which will not only lead to failure of the device, but can also cause a thermal burn the arc of a person's arms and face.
- Probe socket. With their help, there is a direct electrical connection between the device and the measured conductive object. The wires should not have cracks or breaks in the insulation, especially their tips, which will be in the hands of the person measuring.
I would also like to mention special attachments for the multimeter, which exist and are designed specifically to increase the number of functions of a conventional device with a standard set.
Electrical Machine Testing - Frequency and Resistance Measuring Instruments
Details Category: Electrical Machines
In EM testing practice, it is necessary to measure frequencies in a fairly wide range from approximately 1 Hz to 60 kHz. For these purposes, both analog electromechanical frequency meters and digital electronic frequency counters are used.
The possibilities of using frequency meters can be expanded by using various measuring transducers - for measuring temperature, pressure, deformation, speed, slip and other quantities. To measure frequency in AC networks with a frequency of 50 Hz, a D126 type frequency meter is used, and in networks with a frequency of 400 or 500 Hz, a D126/1 frequency meter of a ferrodynamic system, accuracy class 1.5, is used.
More advanced are electronic frequency meters of the F5048 type with a magnetoelectric system device as a reading device. The frequency range of the device is divided into 21 narrow measurement ranges with average frequencies from 35 to 5000 Hz. In addition, it has the following wide measurement ranges: 0-200; 0—400; 0—1000; 0—2000; 0—4000; 0—10000; 0—20000 Hz.
The permissible error does not exceed ± 0.5% of the difference between the final and initial values of the measurement range for narrow measurement ranges and the final value of the measurement range for wide measurement ranges. The input voltage range is 1–500 V. The input resistance of the device is at least 20 MOhm.
The use of electronic frequency counters (ECFs) with digital display when testing EM allows, with the highest possible degree of accuracy, to measure the frequency and period of electrical oscillations, pulse duration, time interval, frequency ratio of two signals, number of electrical pulses, and frequency deviation from the nominal value. ESCs operate in the frequency range from 0.1 Hz to 50 MHz.
The operating principle of the ESC is to count the number of periods of measured oscillations over a certain period of time. The main elements of the ESC are an electronic pulse counter (ESI) with a storage device and a digital display system; time selector; forming devices (FU), producing signals normalized by value and time parameters; a counting time generation device (UFVS), which includes a block of decade frequency dividers (DFD), a control device that ensures the necessary synchronization of the operation of all ESC elements in various operating modes.
Rice. 1.17. Electronic frequency meter operating in frequency measurement mode
Rice. 1.18. Electronic frequency meter operating in period measurement mode
In the frequency measurement mode (Fig. 1.17), pulses generated from the measured signal arrive through the selector, open for the time generated by the reference frequency signal, to the ESI, on the digital display of which the average value of the measured frequency is displayed in frequency units. The counting (averaging) time tsc = 1, 10, 100 ms, 1 or 10 s is determined by the number of the DFC.
In the period measurement mode (Fig. 1.18), the UVS generates a pulse with a duration of 1 or 10th (n is a positive integer) periods of the input signal, which opens the selector. Through an open selector, pulses generated from a signal of a reference frequency are received from the signal conditioning device (SUD) to the ESI.
The digital display of the ESP displays the value of a single or average period in time units (microseconds, milliseconds). The averaging coefficient 10″ is determined by the number n of dividers included in the calculation time generation path.
The error of the frequency meter does not exceed the instability value of the reference frequency of the internal generator, summed with one unit of the least significant digit of the reading device.
All ESCs have a digital output and can be successfully used in automated measuring systems. Technical data of the ESC are given in [1.7,1.8].
Instruments for measuring resistance.
DC bridges are widely used to measure the active resistance of electrical machines.
Single DC bridges.
Single DC bridges are commonly called four-arm bridges powered by a DC source. A number of designs of these devices with different characteristics are known. The bridge error depends on the measurement limits.
When measuring small resistances, the measurement result is significantly influenced by the resistance of the contacts and connecting wires, summed with the measured resistance. To reduce this influence, a special four-clamp connection is used.
Currently, a single bridge of type P369 (MO-4) is produced, providing resistance measurement from 10+4 to 1.11111 10+10 Ohms at direct current with a four-clamp connection, with accuracy classes from 1.0 to 0.005 depending on the selected measurement range and operating temperature range 10-35 °C. The bridge has an autonomous verification.
Double bridges for measuring low resistances.
In order to expand the measurement limits in industrial devices, double bridges are combined with single bridges, providing wide measurement limits. The industrially produced single-double bridge type P3009 is designed for measuring electrical resistance in the range from 10-8 to 1.11111 10+10 Ohms at direct current, with an accuracy class for a single bridge of 0.02, and for a double bridge from 0.01 up to 2.0 depending on the measurement scheme and operating temperature range 10-35 °C.
Table 1.5
AC bridges are used to measure the inductance of EM windings. In most cases, AC bridges are made universal, i.e., they allow, in addition to inductance, to measure capacitance, quality factor of inductors, dielectric loss tangent and resistance.
Such devices, for example, include an AC bridge type P571, which has an accuracy class of 0.1. The main technical characteristics of the bridge when measuring inductance are given in table. 1.5. Other characteristics when measuring other parameters, as well as technical data of similar devices are given in reference literature.
Frequency measurement
It is worth recalling that if you are interested in how to measure the frequency with a multimeter, it is first important to familiarize yourself with the features of the device that is to be tested. This is the only way to achieve the desired result with the most accurate indicators.
Measuring frequency with a multimeter with a special function is the most convenient, since in this case there is no need to use special attachments.
Such measurements occur in several stages:
Many are also interested in how to check the frequency with a multimeter using special attachments. Frequency meter - an attachment to a multimeter is an excellent alternative to expensive meters with many functions.
Many testers with the function of determining current cycles have low sensitivity and therefore give inaccurate readings. The attachment is a complementary tool to the meter. It allows you to convert the received data into voltage.
In order for the current frequency measurement with a multimeter to have a minimum error, the frequency meter must be connected correctly. The type of operation switch in the measuring device must be adjusted so that the switch indicates constant voltage. In this case, there is no need to rebuild the set-top box when connecting to a device with an input impedance exceeding 1 mOhm.
Measuring frequency with a tester can give different results, depending primarily on the accuracy of the device.
Therefore, when choosing a verification method, it is necessary to decide how seriously the error of the device and/or attachment affects the performance.
Source
How to correctly measure voltage, resistance, current with a multimeter
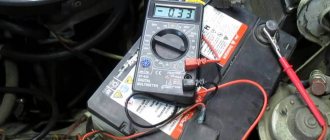
Almost every person at home is faced with the problem of measuring voltage, resistance, as well as other parameters of wiring and electrical appliances. There are a lot of everyday situations: wires sticking out of the wall, finding out the current strength of the charger, checking a light bulb, etc. All this work can be done with a special measuring device - a multimeter. There is no great difficulty in working with a tester; the main thing is to know how and what to measure.
Rules for measuring resistance
Before measuring the resistance of any part, you need to familiarize yourself with its passport data. You must have an accurate idea of the value of this indicator for a working part, otherwise the resulting resistance measurement result will not provide any benefit. All windings of a transformer or electric motor have a certain resistance. In order for the multimeter test to be carried out correctly, it is necessary to compare the reference indicator with the result obtained.
When installing an electrical circuit, an additional resistor is often installed to limit the current. To obtain the required output voltage, you need to know its resistance accurately. It is usually written on the case in numbers. However, there are markings in the form of colored stripes, which are deciphered according to the reference book. If you don’t have such a book at hand, you will have to measure the resistance of the resistor with a multimeter.
You can perform the measurement in the following order:
- On the tester, the switch is set to resistance measurement mode. The device has several ranges, so you need to choose the smallest one. For most multimeter models it is 200 ohms.
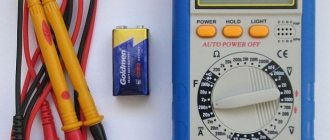
- First you need to check the device itself. The multimeter probes are connected to each other. The screen should display a value of no more than 0.7. Otherwise, the probe wires will have to be replaced.
- If everything is in order with the multimeter, start measuring. For ease of work, especially if you have to measure small parts, toothed clamps - alligator clips - are put on the probes. The probes touch the two outgoing ends of the part and look at the result on the multimeter display. If the tester display shows a unit on the left side of the scale, it means that the range is incorrectly selected. The switch must be moved one step forward and a new measurement must be performed.
In order for a resistance test with a multimeter to show an accurate result, the part must be placed on a dry dielectric surface. The terminals must be cleaned to a metallic shine. Plaques of paint, varnish, or simply an oxidized film have their own high resistance, which prevents you from obtaining the correct result.
If you have to measure with a multimeter in the range of 20 kOhm, you should not touch the metal ends of the probes and the terminals of the resistor being measured with your hands. The human body has a lot of resistance, which will affect the correct result.
How to understand the multimeter scale?
When picking up a tester for the first time to measure the resistance of a resistor, a person may get confused in switching ranges. The standard scale of most household multimeters has 5 ranges with values from 200 Ohms to 2000 kOhms. Checking the resistor in Ohms, the display will show the same value.
By setting the switch to the 200 Ohm range, you will be able to measure the resistance of the resistor no more than this value. The switch installed in the 2000 Ohm position allows you to measure resistors with a resistance of up to 2 kOhm. You need to know that each resistor has a tolerance of ±10%.
For example, a part marked on the 1K5 housing when measured can show a value from 1350 to 1650 Ohms.
As for the following ranges, expressed in kOhms, everything is the same here, only larger values. For example, the 2000 kOhm position allows you to measure the resistance of a resistor up to 2 mOhm, and the result on the display will naturally appear in kOhms. Taking into account the same tolerance of ±10%, measuring a resistor marked 1 mOhm will give a result on the tester display from 995 to 1000 Ohms.
But what happens if you check the resistor marked 5K6 at the 2000 kOhm position? Here the display will only show the value of 5 kOhm, and the fractional number after the decimal point will not be displayed. You can find out a more accurate result by turning the multimeter switch to a lower position. So, in the range of 20 kOhm, the resistance of the 5K6 resistor will appear on the display as the exact number 5.61.
There is one rule when measuring resistance with a multimeter. When measuring current, for example, in a socket, the tester is set to a larger range so that the device does not burn out, and gradually move down until the result is obtained. Resistance is measured in the reverse order from a smaller range towards a larger position. This is due to the fact that there is no current in the resistor and the multimeter cannot burn out, but such steps allow you to get an accurate result with fractional numbers.
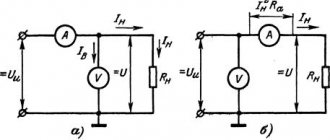
We measure the resistance of home grounding with a multimeter
According to safety regulations, all electrical appliances should not be used without grounding. New apartment buildings are equipped with a circuit, but for private buildings, laying the bus falls on the shoulders of the owner. But in any case, whether it is a finished or manufactured circuit, it is necessary to periodically check the grounding resistance.