An armored belt for floor slabs is created with the aim of strengthening the structure of the structure, increasing the strength characteristics of load-bearing walls, distributing the total pressure of the roof on the walls and foundation, eliminating the negative consequences of soil subsidence, the influence of external deforming loads (wind, soil shifts, daily and seasonal temperature fluctuations, precipitation and etc.).
The strength level of the entire building and the actual resistance are influenced by: the thickness and height of the reinforced belt, the grade of concrete and the properties of metal elements, the design features of the frame, the correctness of the work and compliance with all norms and standards.
Armored belt design
A monolithic belt under the floor slabs is created to smooth out the loads from the weight of the roof, interfloor panels on the main walls (their end plane). In this way, it is possible to distribute the load from the floor slabs in the most optimal way, achieving the strength of the entire structure.
Design planning includes:
- Definition of construction type
- Selection of the optimal reinforcement diameter, mesh pitch, number of layers - the power should be greater, the less durable materials are used in the masonry of walls (for example, for lightweight floor slabs, you can use a not very powerful belt)
- Calculation of dimensions in accordance with area, design features
- The thickness of the armored belt is determined - usually equal to the thickness of the walls
Depending on the place of use, the armored belt can be:
1. Grillage – is a support for the foundation, is made in a special trench at a depth selected in accordance with the weight, number of floors, dimensions and other characteristics of the building.
2. Basement - created under all load-bearing walls to distribute the load on the foundation, the height is 20-40 centimeters, the width is equal to the thickness of the walls, it is made with 12 millimeter reinforcement, and is laid with waterproofing.
3. Interfloor reinforced belt for floor slabs - installed after each floor, strengthening the walls and increasing rigidity, preventing movement and deformation, distributing the load evenly.
4. Unloading - under the roof, simplifies the creation of a rafter system, secures the mauerlat to the wall, levels them horizontally, distributes the weight of the roof over the entire perimeter, preventing point loads.
When is it needed?
This armored belt is made in the form of a not very large strip of continuous masonry, which is reinforced with longitudinal steel rods or mesh. This is explained by the fact that, according to their production characteristics, aerated concrete blocks, even with good compressive strength, are completely unable to withstand bending, which causes premature cracking of the walls “in real life.”
Of course, in terms of strength, such a structure cannot be equal to a concrete monolithic belt , but for many low-rise construction projects, its characteristics are quite sufficient to create strong load-bearing aerated concrete walls.
The reinforced belt takes on the main loads, preventing the load-bearing walls from moving relative to each other at the moment of exposure to forces of different directions or sizes.
An additional function that the armor belt is capable of performing is to serve as a mounting location for important reinforced elements of an object on anchors when the wall itself is not able to bear them. Therefore, the developer must first make a kind of dividing brick belt in accordance with the technology specified in the house design.
Reference . There are several types of reinforcement: longitudinal, vertical and transverse. The first two methods are used in seismic construction areas, and the latter ensures the stability of the structure through the use of a specialized masonry mesh and is used everywhere when foam concrete blocks are used as wall material.
The device of a double armored belt installed under the foundation base and its upper section when using a column-type foundation has shown very good results in practice. Seasonal soil movement with this option of strengthening the object will not be able to “play” with the supports, since they become a common truss, rigidly fixed by 2 ligaments.
What is the armored belt made of?
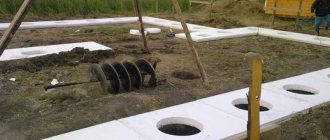
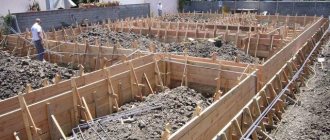
When considering this issue, it is necessary to take into account the preparatory work and the design itself. At the preparation stage you will need formwork. To construct collapsible formwork, planed wood in the form of special panels is used, while the stationary structure is usually created from polystyrene. In this case, it is important to ensure the tightness and rigidity of the formwork structure, so materials must be selected carefully.
Reinforcement with reinforcement is carried out using the following materials:
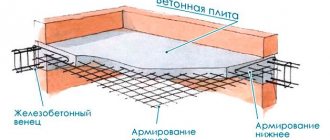
1) Concrete mortar mixed with cement grade M400 and higher. The solution is poured into the formwork frame, which contains the reinforcing mesh. When concrete hardens, it creates a power circuit along the perimeter of the main walls that can withstand various types of loads.
The solution is prepared according to a standard recipe from sand, crushed stone, and cement. Concreting is carried out in one go, with obligatory compaction with a vibrator to eliminate air cavities inside the slab.
2) Steel rods with a diameter of 8-10 millimeters with a corrugated surface. The rods are cut to the required sizes and tied with a special knitting wire into a rigid frame. Typically, the structure is made up of four rods arranged longitudinally and connected by transverse pieces of wire of the required size with a diameter of 6 millimeters. The mesh is made with square cells, the size of which depends on the diameter of the reinforcement used and calculations.
How to make an armored belt with your own hands
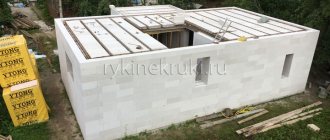
Now that we’ve figured out what an armored belt is, let’s find out how to make it with your own hands. With a brick armored belt, everything is simple. Typically, masonry is made of solid red brick of minimum grade M100 in several rows with reinforcement with masonry mesh. You can also reinforce the masonry with reinforcement with a diameter of 6-8 mm. With a concrete, monolithic armored belt, the situation is more complicated.
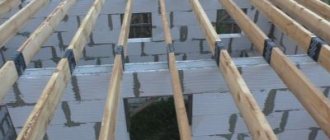
First you need to set up the formwork. This can be either wooden formwork or “tray” or permanent formwork, if we are talking about an armored belt on aerated concrete or foam concrete blocks. You can use factory U-blocks or make your own trays. To do this, it is not necessary to cut a U-block from a regular gas block. It is enough to make masonry from a thin gas block on the outside and inside. The space between these blocks can be insulated with extruded polystyrene.
After you have made the formwork, a reinforcement frame is placed inside the tray.
Sufficient reinforcement for an armored belt measuring 200 by 200 mm is a frame of 4 threads of reinforcement with a diameter of 12 mm (two on top and bottom), fastened with transverse clamps with a diameter of 6-8 mm every 30-50 cm.
The standard overlap of reinforcement should be 30-40 diameters. That is, if you are laying 12 mm reinforcement, then when building it up, you need to make an overlap of about 40 cm.
In corners, the reinforcement must be bent so that the corner is connected by solid reinforcement.
It is advisable to place the frame made of reinforcement on plastic clamps of the thickness of the protective layer of concrete. And put the clamps on the vertical clamps. If there are no factory fixings for the protective layer, you can use pieces of stone, brick, etc.
Pins under the Mauerlat or pieces of reinforcement are attached to the reinforcement frame for subsequent fixation of the floor slabs.
Now you can proceed directly to pouring the reinforced belt with concrete.
If you will be pouring purchased concrete, choose the M200-M250 brand. This grade of strength is absolutely enough for private construction.
If you plan to prepare concrete for pouring the armored belt yourself, then use the universal recipe for the proportions of concrete for the armored belt: 1 part 500 grade cement, 2 parts sand, 4 parts crushed stone.
You can also use one of our construction calculators to calculate the composition of concrete. Don't forget to add concrete plasticizer to the mix. This will make the filling more convenient for you, and the resulting armored belt more durable.
After pouring, cover the armored belt with film to prevent sudden drying. For the same purpose, wet the concrete for the first 2-3 days.
The armored belt will be ready for loading in a week. Full maturation of concrete will be completed 28 days after pouring.
Height and thickness of armored belt
When creating a reinforced belt with a square section, its height is usually equal to its thickness. Rectangular designs assume that the height exceeds the width by 1.6 times.
The grillage should be 30-50 centimeters high, for soft unstable soil it is increased to 80 centimeters, sometimes up to 100. The height of the reinforced belt for basement-type floor slabs should be 20-40 centimeters, for interfloor ones - about 40 centimeters.
The thickness of the reinforcing contour must be equal to the width of the load-bearing walls of the structure. Although, in some cases, technology makes it possible to reduce the thickness of the belt, taking 0.7-0.8 of the thickness of the walls (if thick, lightweight blocks are used in the construction of buildings).
When it is necessary to strengthen building structures with a reinforced belt
An armored belt may be needed to implement the following tasks: increasing the strength of load-bearing walls, creating a level base for installing interfloor panels, uniformly distributing different types of loads, preventing wall deformation, reducing the negative impact of external factors on the building, ensuring maximum structural stability, increasing the safety margin.
When it is necessary to create an armored belt:
- In multi-storey construction, where this is prescribed by building codes
- When constructing walls made of porous materials (aerated concrete, cinder block), which can wrinkle and collapse
- If construction is carried out on soft soils and there is a possibility of settlement, the monolithic belt will act as a screed and will not allow cracks to appear
- When the foundation is shallow or made of prefabricated blocks
- The house is being built in a seismically active zone
The need to install a reinforced concrete belt can be avoided in cases where the main walls are built from brick or block with good strength characteristics, and the foundation is poured below the freezing point of the soil. In other cases, the question of whether an armored belt is needed for a monolithic ceiling is not raised at all: the reinforcement contour becomes a mandatory element of the structure.
Is an armored belt needed for wooden floors?
As mentioned above, an armored belt is needed to properly distribute the load from heavy floors onto the walls of the building. But what if the flooring in the house is not reinforced concrete slabs or monolithic concrete, but ordinary wooden beams, the weight of which is several times less than concrete?
When building houses from aerated concrete, you can often find this approach when walls are erected without the use of a reinforcing structure. In this case, wooden floor beams are mounted directly on aerated concrete blocks, and the ends of the beams, as a rule, go outside.
Without exposure to large loads, this approach may be justified, but in most cases, the absence of an armored belt in such houses is a sign of the absence of a construction project. Such a structure can stand for decades without damage, but if standard loads are exceeded, the local pressure of the timber on the aerated concrete can lead to the formation of cracks and its destruction.
Reinforced belt under prefabricated and monolithic reinforced concrete floors
In this case, the contour significantly increases the load-bearing capacity of walls built from blocks with a cellular structure, eliminating problems caused by the porosity of concrete and its instability to deformation. The reinforced belt allows you to evenly distribute the loads from the roof and interfloor ceilings, eliminating local forces, which often cause cracks.
In addition, this type of structural strengthening protects the building frame from cracking, smoothes out the effects of sudden temperature changes, and significantly increases the service life of the masonry. Reinforcement from reinforcement and concrete connects the entire frame of the structure and the floor slab into a single power circuit, which is very important.
Insulation
The most important feature of aerated concrete is that it has low thermal conductivity, which will ensure that the built structure does not freeze even at the lowest ambient temperatures. For this reason, when constructing a reinforcing structure, it is important that they do not in any way violate the thermal insulation properties of the house. In winter, as well as during periods when constant sharp changes in temperature are not uncommon, condensation may appear on the brick armored belt. To avoid this, we recommend carrying out insulation work.
Expanded polystyrene, polystyrene foam and mineral wool (mats) can be used as elements to create thermal insulation. In some cases, you can use aerated concrete blocks that have partitions. When using mineral wool, small ventilation gaps should be left between the facing surface and the insulation.
Getting ready to make a reinforced belt for floor slabs: building materials and tools
To pour a monolithic reinforcing belt, it is necessary to calculate the consumption and purchase the following materials: plywood and planed boards (or polystyrene in sheets) for formwork, all components for concrete mortar (gravel or crushed stone, cement, sand), steel reinforcement for the structure itself and binding wire for its assemblies, polyethylene film (seals the formwork), fasteners (nails, screws, self-tapping screws) for assembling the formwork structure.
Tools that may be needed for work:
- Concrete mixer for preparing concrete mixture
- Hand hook for tying reinforcement
- Grinder + metal circle for cutting steel rods
- Plumb + building level for measurements
- A device for bending reinforcement - if rods of increased diameter are used
Materials and tools for making a seismic belt
Having an idea of how to make a seismic belt, it is easy to determine the list of materials and prepare the necessary tools to complete the work.
You will need:
- concrete solution based on sand-crushed stone mixture and cement;
- steel reinforcement of various diameters for frame assembly;
- concrete mixer for mixing;
- grinder with cutting wheel for cutting workpieces;
- steel wire for tying frame elements.
To knit the frame, it is advisable to purchase a special crochet hook. When using rods of increased diameter, it is advisable to use special equipment for bending rods.
https://www.youtube.com/watch?v=0DuugUzjCfs
Technology for constructing a reinforced belt (main stages)
- Preparing the base, cutting blanks for the formwork structure
- Assembling formwork from the selected material
- Cutting rods in accordance with specified sizes and in the required quantity
- Assembling the frame - knitting rods with wire
- Preparation of concrete solution
- Filling the formwork with mortar - preferably in one go, tamping with a vibrator or manually to remove air cavities
- Spraying concrete with water to avoid microcracks
- Dismantling the formwork after the concrete has hardened
For houses built of brick, it is possible to create a belt from this material. The contour is constructed during the process of laying the walls, the design corresponds to the features of the building. For a brick belt, there is no need to form formwork, since the reinforcement is placed directly on the brick. When using mesh, you need to choose sheets with a rod thickness of at least 5 millimeters.
What formwork materials can be used
The first stage, which involves reinforcing the reinforced belt under the floor slabs, is the creation of formwork. The width is equal to the size of the wall, the thickness is about 30 centimeters. Most often, planed wood 2 centimeters thick is used, fastening the boards with screws 5 centimeters to the top of the wall, additionally strengthening every 100 centimeters or more often.
The side edging is fixed with strips or threaded rods. The boards must be fixed horizontally, level, airtight, and securely.
They also use moisture-resistant plywood, impregnated with pre-used oil, which will facilitate installation. Extruded polystyrene slabs are most often chosen for arranging thermally insulated formwork.
Installation of fittings
Reinforced concrete tape is performed with a certain sequence of work: first, the rods are cut, then they are laid on clamps or pads along the formwork, tied with wire (this is the bottom layer), transverse rods are installed on them and the top layer is attached. Afterwards, the elements are fastened with wire or threaded rods.
Usually, ribbed rods with a diameter of 12 millimeters are used, and they are used to assemble a parallelepiped or ladder. But it is better to take 12 millimeters for the first layer, 6 millimeters for the second, and 10 for transverse fastening. The transverse frame can be welded in the center and along the edges, and the entire volume of rods can be tied together.
The frame must be recessed in the concrete solution by several centimeters, the distance from the edges is 5 centimeters. The knitting wire can be of a minimum diameter, since its thickness does not affect the strength of load-bearing external or internal structures, but significantly increases the time and money required to complete the work.
When both layers of mesh are ready, they are laid, welded together at the edges and in the center, creating a frame with a square or rectangular cross-section. It is better to carry out this stage of work in formwork, so that later you do not have to transport the part, the large weight of which is noticeable.
In the process of assembling parts into a single mesh, welding is not used - it is enough to overlap 20-30 centimeters between the parts. The entire structure must be evenly located inside the formwork; a building level is used for measurements.
If the reinforcement is laid in polystyrene concrete or other blocks, then grooves are first made with a wall chaser, they are cleaned of dust, moistened, and filled with softly mixed concrete mortar or glue. Then they lay corrugated metal rods with a diameter of 8 millimeters in the grooves, remove excess adhesive, and continue the construction process.
Step-by-step creation technology
Such an armored belt is raised from 4 to 7 rows high and with the width of an aerated concrete wall using an iron mesh matrix of 30 or 40 mm or reinforcement D = 5 mm.
The masonry technology corresponds to conventional brick walls with the seams offset by one third of the length and the 3rd row bonded.
If the reinforcing protective belt for gas-block walls becomes a supporting structure for the Mauerlat, vertical pin reinforcement with thread D 12/16 mm is walled into it, every 1.5 m and with a depth equal to the size of the beam and 2 times longer than the freed end for fastening the Mauerlat.
The reinforcement contour under the roof performs a unloading function and becomes a strong support for the mauerlat beam. In the case where the project provides for the installation of lightweight slabs, it will be necessary to install a brick armored belt on both the internal and load-bearing wall structures, since they will be the ones that will experience the loads.
Important ! The belt in this version is designed to create a special buffer that will evenly distribute the pressure created by the slab over the total wall area, while preventing sagging of the supporting structure.
Basic stages of laying a brick armored belt on aerated concrete:
- The first row is laid using a solution directly on the aerated concrete layer. With a standard wall of 300 mm, the masonry is made in 2 bricks, while filling the gaps with additional pieces.
- Install the reinforced mesh along the entire contour of the belt.
- The 2nd row is laid in a similar pattern with further strengthening.
- Row 3 is a splice row, it is performed oriented towards the inner surface of the wall. The remaining external gap is filled either with quarters or pieces of insulation, for example, basalt wool, in cases where a heat-protective ventilated facade is installed in parallel.
- Under the top row of blocks, when the belt under the floors is installed, reinforcing bars are laid in grooves, which will strengthen the rigidity of the wall structure and protect them from deformation cracks. The reinforced mesh for anti-corrosion protection is covered with a layer of laying solution, and if it is made of ferrous metal, then it is also pre-painted.
- After the process of setting the solution is completed, roofing material or roofing felt is placed in 2 layers. This must be done to ensure waterproofing of important elements and to protect the timber and brick of the reinforced belt from the accumulation of condensation.
- Next, points for attaching the Mauerlat are designated, studs are installed and it is secured to the reinforced belt with nuts and wide washers.
- The armored belt must be insulated, since brick has higher thermal conductivity than aerated concrete; in this combination, it turns into stable “cold bridges” in the wall structure of the house, which increases heat removal from its interior.
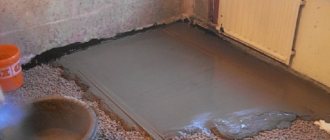
How to pour concrete
To fill a monolithic frame, use a concrete solution, following the recipe: 5 parts gravel, 3 parts sand, 1 part cement, completely mix the dry components, gradually add water until a thick solution is obtained.
The stage is performed in one go, having prepared the required volume of the mixture in advance. In the process of filling the formwork, it is necessary to remove voids with a vibrator or bayonet, check the horizontal level, eliminating differences. Then you need to carefully plan the surface and cover it with plastic film.
During the hardening process, be sure to periodically moisten by spraying. The concrete hardens within 3-5 days, and it will be possible to lay slabs on it, extending 12 centimeters onto the walls for reliability. When the layer has completely hardened, you can dismantle the formwork (but not break it) with a nail puller or crowbar.
Creation using formwork
The formwork for the armored belt is a frame made of wooden components. It is made from scraps of boards that are fastened together along the outside. When the formwork is completely assembled, the lower part is secured with self-tapping screws to the wall, and the upper part with transverse board ties at intervals of 1.8 to 2 meters. The screed is required in order to give reliability to the structure, otherwise it may be crushed or deformed when pouring concrete.
Tools and materials
Before starting the construction of the structure, try to take care of purchasing all the required building materials:
- Edged boards, minimum permissible thickness 3 cm and wooden beam 40*40 in order to make formwork.
- Nails to attach the plank structure to the wall.
- Flexible wire to make the structure rigid.
- Reinforcement rods, the diameter of which should be 1.2 cm.
- Use polystyrene foam as insulation material.
Before starting work on making an armored belt from brick onto aerated concrete, we advise you to draw a diagram of the future structure and indicate the planned dimensions. Based on the drawing, you can calculate the amount of building materials that may be required. In this case, you will need a hacksaw and a drill for construction tools.
Construction technology
The process involves performing work in several steps:
- Prepare wooden shields.
- Lay a layer of polystyrene between the wooden board and the wall of the house for insulation.
- Attach the structure to the wall using long nails or self-tapping screws.
- Perform additional fastening of the wooden structure using wire and self-tapping screws.
- Assemble the reinforcement cage. First you need to lay the reinforcing pins inside the wooden panel. To connect the reinforcement into the frame, use flexible wire. We do not recommend fastening the reinforcement by welding, as the material may begin to rust inside the concrete.
- Filling with cement mortar.
As you can see, just 6 steps and the armored belt is ready.
Reinforcement
Reinforcement is made from reinforcing bars with a diameter of 0.8 to 1.2 cm. The process is as follows:
Horizontal laying of rods.- Fastening the rods with an overlap using flexible knitting wire along the entire perimeter of the walls.
- Tying the joints with rings of wire, the diameter of which should be 0.6 cm.
The binding of reinforcing bars must be done on the formwork itself. The finished frame made of reinforcement is quite heavy. When assembling the structure separately, it will be difficult to lift it, much less place it. We recommend laying a layer of brick or stone between the frame and the aerated concrete blocks of the reinforced belt.
Pouring concrete
When purchasing dry concrete mix, pay attention to the marking, as it should be no lower than M200.
If the store does not have such products, you can make it yourself at home if you buy other components and mix them in the correct proportion:
- Crushed stone - 2.4 measures.
- Cement – 0.5 measures.
- Sand – 1.4 measures.
To make the density of the composition higher, you can replace crushed stone with gravel. After the dry elements are mixed, you should start adding a little water in portions, and its amount should be 20% of the total mass of the mixture.
In concrete pouring technology, there are certain standards of work that should be performed in order to obtain the desired functional result:
- Pouring should be done in one cycle and should not be interrupted under any circumstances, and the concrete layer should not be allowed to partially dry out.
- Also try to avoid any voids or bubbles in the grouting solution, as they may reduce the strength characteristics of the structure in the future.
- After pouring, we recommend compacting the concrete using a hammer drill with a special attachment. In order to eliminate voids in the solution, they use a special vibrating machine, and if it is not there, you will have to remove all air bubbles by pinching the solution using fittings.
Insulation of armored belt
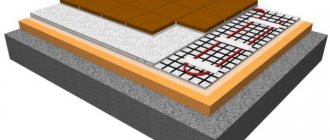
The reinforcement circuit acts as a conductor of heat, so without proper insulation, cold bridges will appear, significantly worsening the thermal insulation characteristics. Before finishing work begins, insulation is placed in the recesses remaining after dismantling the formwork.
Typically, insulation is created to the height of the belt along the entire facade. In two-story buildings, if there is a belt between the first and second floors, including after the second floor under the Mauerlat, two insulating belts are created along the facade.
Most often, polystyrene foam 8 centimeters thick, grade PSB-S 25, is used; the height of the insulating contour is calculated as follows: 15 centimeters + height of the reinforcing belt + 15 centimeters, attaching the insulation below and above the contour lines at the specified distance.
To make the thermal insulation layer durable, a drip with a drip is installed in the upper part, which will drain melt and rain water from the reinforcing circuit. The ebb is placed with a slope from the wall, made of galvanized sheet steel and coated with polyester. They are fastened by cutting above the insulation belt, the top edge is brought in, then sealed and secured in increments of 30 centimeters.