Manufacturing technology of concrete sections
There are several technologies that specialists use to make decorative concrete spans for fences. The most popular is the quick release method . It allows you to produce about 20 sections per day .
The essence of the method is as follows:
The work process can be clearly seen in the following video:
In order for the process to be continuous, you need to take care of the racks on which the finished products will dry. It is better to do this in a special room in which a certain temperature regime is created, the moisture level meets the standards, and there are no drafts.
But the situation can be improved. To do this, it is enough to paint after installing the entire structure.
To initially get colored sections, you can use another method. It is not very common, as it requires a lot of time to manufacture and harden the slabs. The technology is as follows:
- The required forms are filled with concrete mortar, leveled, and excess is removed using a spatula.
- Leave for 24 hours until completely hardened, but the mold must not be moved.
- The finished product is carefully removed from the mold.
With the advent of the rapid release method, this technology is used less and less. It is considered unprofitable and is only suitable for creating sections at home, when you have a lot of time and installation of the fence can wait.
It is better to entrust the creation of sections to professionals and purchase ready-made products. In this case, you will be confident in the quality, reliability and durability of the structure.
DIY block mold
There are various options for creating moldings in shape and size. Having decided exactly how you want the fence to look, you can start working on the shape.
Here are some possible forms:
- Solid brick. Can be made from old furniture, unnecessary boards, etc. We form a rectangle from wooden blanks and place it on a specially prepared surface made of boards, previously sprinkled with sand. Fill the form with the solution, tamping it well. We remove excess. Using a rolling pin or other tool convenient for you, smooth the surface and wait for it to harden.
- Form for decorative fences. A regular rectangular shape can be made from sheet steel, the thickness of which is approximately 2 mm. To make a block with any pattern, simply make special inserts of the desired type. Place it on the stand. Pour in the manufacturing mixture and compact it well. Then roll out the surface to make it smooth and wait for it to harden.
- The battery housing is also a great option to create fence blocks. The process is as follows:
- Cut off the partitions and bottom
- Remove any sharp edges with a file
- Strengthen the resulting frame with slats, otherwise it may distort its shape under the weight of the mixture
Place the pan on a rack covered with plastic wrap. If desired, pipes with a diameter of about 10 cm can be placed inside. Fill with the resulting composition. After the filler has set, the pipes can be removed, and the block itself will be ready for use no earlier than after 3 days.
- Hole brick. This molding, just like for solid brick, is made from old furniture or unnecessary wooden boards. The difference is that here you need a metal grill with holes for tilting. When the mold is filled with the mixture, place a grate on top and press the roll through it to the bottom of the mold. After which they take it out, wait for the mass to harden, and then remove the mold itself and the lattice.
block molds
Advantages and disadvantages of a decorative fence
Among the positive qualities of sectional fencing it is worth noting:
- High strength. Concrete is one of the most reliable materials, characterized by excellent mechanical strength.
The principle of installing a decorative concrete fence
Design option for a decorative concrete fence
Finding flaws in such a fence is difficult, but still possible:
- Concrete fences are expensive compared to chain-link or wood fences.
- Another disadvantage is the likelihood of purchasing low-quality products from unscrupulous manufacturers.
A concrete fence will be truly reliable and durable if you use high-quality raw materials for its production and take a responsible approach to the production process.
Shape and Pattern for Concrete Fence Sections
Advantages and disadvantages of a fence made of decorative concrete blocks
Decorative fence
To fully characterize concrete fences, it is enough to say about their positive qualities:
- Such a fence is a capital and reliable structure;
- The use of the material in question helps to create a beautiful fence, made in any necessary style, which will harmoniously combine with the overall architecture of the house;
- This design is highly durable and durable;
- Simple installation, subject to the technology of constructing structures of this type;
- This design does not rot, does not mold, or becomes covered with moss;
- Concrete is resistant to precipitation and other aggressive environmental influences, such as gusty winds and hail;
- A concrete fence has high frost resistance;
- Concrete is fireproof;
- The construction of a block structure allows you to create a structure of any height and configuration in plan.
Among the disadvantages, it can be noted that the price of a monolithic concrete structure is quite high, in addition, you will have to build a fairly strong foundation, the calculation of which must be done by a specialist. But these disadvantages can be eliminated by choosing a combined option.
Production of decorative fences
The process of making decorative sections is simple; the main difficulty lies in preparing the necessary materials and tools.
Necessary equipment
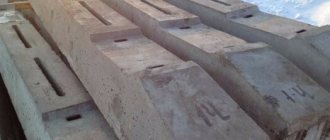
- forms for concrete sections;
- concrete mixer;
- vibrating table for forming concrete products;
- vibrating sieve for cement and sand;
- trays for drying finished sections.
This is what a vibrating table for casting concrete products looks like
Raw materials
To make decorative sections you will need the following materials:
- Portland cement grade 500;
- wire reinforcement;
- quartz sand GOST 8736-93;
- crushed stone;
- various plasticizers to speed up the setting process.
Kawabanga!
Forms for concrete stones Return to contents
Stages of making a decorative fence
Advantages of concrete fences
Such fences have already become firmly established in everyday life as “Euro fences”. Thanks to the list of advantages, concrete fences have become one of the most common ways to fence off an area, decorate it and distinguish it from the mass of similar ones. The advantages of concrete fencing over other types of fences are:
- reliable protection against intrusion into the site by strangers, including animals;
- an elegant and original element of site decoration; you can choose absolutely any design and color scheme, right down to an individual sketch of the form;
- concrete is a material that can withstand sudden changes in temperature and does not lose properties at high humidity;
- compared with other types of fencing, longer service life;
- optimal combination of quality and cost.
Return to contents
Features of exposure casting
The main difference between the technology of exposure formwork is that the concrete gains strength in the form.
Exposure casting mold
If during rapid formwork it is not recommended to introduce coloring pigments that weaken concrete, during exposure casting decorative fillers and dyes are introduced into the cement composition.
Drying of concrete products should occur at a temperature not lower than +15 degrees. After about 5 days, the panels can be considered ready for transportation and installation. Although the full maturity of concrete products will occur only after 28 days.
Advantages of type-setting pillars
Concrete stacked structures have several characteristic advantages:
- Low cost;
- Low labor intensity;
- Easy installation of blocks;
- Versatility;
- Long service life.
Prefabricated fence posts are very easy to make. This does not require particularly complex technology. All components are manufactured according to a simplified design; the blocks are mounted without any particular difficulties.
An example of a pillar made from type-setting blocks.
To make a type-setting pillar you must have:
- Cement;
- Reinforcing parts;
- Sand;
- Crushed stone;
- Forms for typesetting pillars.
Concrete is considered a particularly durable material. No mechanical influences can cope with it. If you strictly follow the technological process for making concrete blocks, the service life of the pillars and the fence itself will increase significantly.
Concrete pillars are highly durable, which is why they are often installed in fences of any type. Such supports can be installed for fences made of a variety of materials:
- Welded sections;
- Reinforcing bars;
- Metal mesh;
- Fence made of corrugated board;
- Picket fence;
- Reinforced concrete slabs.
The process of installing fence posts from blocks
Return to contents
How to make a concrete fence with your own hands
Preparatory work
First you need to select the material for mixing the solution. For this you will need:
- Cement M400 or M500.
- Crushed stone of small fractions - 19–20 mm.
- The sand is coarse-grained.
- Water.
By mixing them in a certain proportion, you get a solution that must be used immediately - otherwise it will harden. The time required to gain structural strength is four weeks.
It should be remembered that the more sand in the solution, the lower the strength of the concrete will be.
Table: recipe for preparing concrete mortar
| Proportions for preparing the solution | For concrete blocks | For foundations for pillars and fences |
| Cement | 1 part | 1 part |
| Crushed stone | 1 part | 2 parts |
| Sand | 3 parts | 2 parts |
To make concrete blocks, a little plasticizer is added to the solution - it will give greater plasticity to the raw material and allow you to create the required shape for the blocks. Water is added to the solution until it has the texture of viscous thick sour cream.
The solution can be mixed in a large trough, but having a concrete mixer will speed up the process.
When working with a concrete mixer, crushed stone is first loaded into it, filled with a small amount of water - so that the cement does not stick to the blades of the inner drum, and only then - cement and sand.
Preparing tools and molds
The mixture for the solution is already mixed in a concrete mixer, now all that remains is to prepare the tools for work:
- spatula, level;
- molds for solution;
- steel reinforcement (4 mm cross-section for the fence and 8 mm for support posts).
Calculation of the number of slabs and concrete for erecting a fence
If you have already decided on the type, then you can start making the slabs. For a regular level fence you will need removable formwork and mortar. The amount of volume for one slab can be calculated based on the formula:
V = L x H x B, m 3, where V is volume, m 3; L—length, m; H—height, m; B - width, m.
Thus, for one slab measuring 1.6x1.5x0.15 m, the volume of the solution will be 0.36 m 3. The width of one slab of a homemade fence must be at least 150 mm.
The number of slabs will depend on the perimeter of the fenced area. It should be remembered that the total length of the fence also includes the size of the support pillars, the cross-section of which is 300x300 mm.
Again, for an area of 36 m2 (6.0x6.0 m) you will need 12 slabs:
N = P/L = (2 x (a+b) - 0.3x16)/1.6, pcs., where P is the perimeter of the fenced area, m; a and b—sides, m; 0.3 - length of one column, m; L is the length of one slab, m.
The number of pillars for the entire perimeter is 16 pieces, obtained from the calculation (a-3xL)/s, where a is the side of the site = 6.0 m; s - 0.3m - pole length, m.
There are 4 posts on one side of the fence, therefore, a total of 16 pieces should be installed.
The total volume of solution on the slabs will be at least 0.36 m 3 x 12 pcs = 4.32 m 3.
The base for the slabs (although it is preferable to arrange a strip foundation) will take a little less: with dimensions of 1.6 x 0.5 x 0.3 m, the solution volume is V = 0.24 m 3. For slabs in the amount of 12 pieces, concrete will be consumed V = 0.24x12 = 2.88 m 3.
In total, the total volume of concrete solution will be 4.32 + 2.88 = 7.2 m 3
The width of the foundation for the fence should be twice the width of the slab.
If the choice fell on a concrete fence made from ready-made forms, then everything is simpler. You just need to follow the instructions for making the amount of solution for a specific form.
Kawabanga! GOST R 56687-2015 Protection of concrete and reinforced concrete structures from corrosion
Device from ready-made molds
- The concrete mixture is loaded into a concrete mixer.
First, crushed stone is loaded, then sand and cement
- A pouring mold is placed on a flat surface, lubricated with oil or a special compound that prevents the frozen solution from sticking.
- Reinforcement is placed into the mold to ensure the adhesion strength of the concrete.
Laying of reinforcement for both the form and the foundation itself follows the same pattern
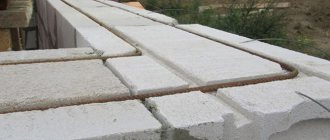
- After laying the reinforcement, you can pour the mortar. Having filled the form to the brim, the concrete should be leveled with a spatula.
When the filling dries, the surface is modified: rubbed or sanded directly in the mold
- After drying, the finished product is removed and laid to dry completely - under a canopy. After making the required number of molds, they can be installed on the foundation, fastening the sections together using support pillars.
For decorative elements of the fence, silicone molds are used - the most common and easy to use.
Video: constructing a concrete fence from ready-made forms
Construction using formwork
When constructing a fence yourself without using a form, the whole process boils down to the fact that instead of ready-made forms, you will need to install removable formwork and a foundation.
The foundation for the fence must be wider than the main structure.
This is done as follows.
First, a solid (preferably strip) foundation is built for the future fence, for which a ditch with the required width is dug, a sand cushion with a layer thickness of 20–25 cm is placed there.
The layer is then filled with concrete mortar and left until it reaches its original strength - usually for a month. It is advisable to periodically moisten the concrete structure with water for greater strengthening.
While the foundation is gaining strength, you can prepare material for removable formwork - panels, boards and supports. The formwork is installed to the width of the planned fence, secured on both outer sides.
The fence can be built either separately from a standing house or for a fence adjacent to the house
Don't forget about the reinforcement of the structure!
The height of the fence can be arbitrary - it will depend on the height of the formwork structure. The poured solution is allowed to settle for at least a day, after which the formwork is removed and transferred to another area.
This construction system is the simplest. The complexity of the work lies in the preparation of the solution and the installation of the formwork structure.
Do-it-yourself block production
The first thing you need to get acquainted with before starting work is the composition of the mixture for the blocks. It all depends on what effect you want to get: either it will be decorative fence blocks, or an ordinary cinder block. Based on this, the composition may include such materials as slag, expanded clay, crushed stone, sawdust, gypsum, sand, gravel, waste coal, brick and other components.
The most popular decorative version of the recipe:
- Mix Portland cement with clean sand in a ratio of 1:2
- Add plasticizer SP-1, which is perfect for such a structure and will make it more durable, waterproof, protect it from frost and prevent cracks.
A little advice: to reduce cement consumption, you can add fine gravel, in which case the ratio will be 1:2:3 - cement, sand, gravel, respectively.
When making decorative fences, glass or marble chips are added to the composition. Such manipulations will allow you to imitate the material like natural stone. You don't need to add a lot of water, just enough to keep the mixture slightly moist.
Well, if you want to add color to the fence, then mix white cement with the desired shade.
Fence concrete blocks with the addition of slag:
- Coal slag mixed with expanded clay sand
- Add gravel (maximum size 15 mm) and cement M 500
- There is no need to fill everything with copious amounts of water. It is necessary that the mass is viscous, not liquid
- The mixture proportions are 7:2:2:1, respectively.
Add plasticizer if necessary. It requires no more than 5 grams per block.
If you are interested in how to make a carved quartz block, then simply add a small amount of quartz stone to the composition and create shapes as for a decorative fence.
Brick fencing
Brick fences are made from clinker or facing bricks. Clinker is more expensive, but it looks strict and natural.
Kawabanga! DIY claws for climbing poles
The hedge turns out beautiful when using colored brick .
Technological process for manufacturing blocks
The production of concrete blocks for type-setting fence posts is carried out using the vibration casting method, for which the latest equipment is used. Such blocks are produced with a wide variety of front surfaces, imitating:
- Brick;
- Slate;
- A natural stone.
This is what a mold for making a typesetting block looks like.
In some cases, the surface is painted or prepared for final painting.
Molds for casting type-setting pillars consist of several parts:
- Fiberglass plates - 4 pieces;
- Frames - 2 pieces;
- Steel container;
- Inserts with special grooves.
By design, fence blocks can be:
- Without grooves;
- With grooves;
- Angular;
- Smooth;
- Textured.
It must be said that the grooves can be located opposite to each other or parallel. Each typesetting post design dictates its own conditions. The block form is formed according to the corresponding parameters of the fence block. Before starting work, it is necessary to lubricate the working surfaces with machine oil.
Return to contents
Modern fence design: current ideas
Fence made of wire and stones (pergons).
Frosted glass sheets attached to metal posts are an excellent solution for a minimalist fence.
A fence in the form of wooden or metal posts, not fastened together, provides protection against entry into the site, and on the other hand, allows you to admire the beautiful garden.
Modern picket fence.
Modern picket fence.
A modern “picket fence” made of wooden beams enlivens a very minimalist urban landscape, but does not stand out from the general style.
With your own hands
It is not necessary to spend money on purchasing expensive material for making a fence when you can make it yourself using improvised means.
If the question arises about what type of fence to make, the simplest option is from pallets. This is a pre-fabricated, original fence. The inside of the fence can be decorated with flowers.
The picket fence is easy to install and adds a rustic charm to the area. And to prevent it from looking gloomy, you can paint its pointed tops with pencils.
The original “pencil” fence.
You can make a decorative fence with your own hands from colored bottles and metal rods.
Original fence of colored bottles.
How to make a mold with your own hands?
To make a mold for the production of concrete fence parts, you need to have free time and suitable tools. At home, it is easier to make a tool from polyurethane. Purchase ready-made materials from a hardware store and make the structure of the desired shape with your own hands. If you don’t have much time, you can buy a ready-made form - the price difference is small. Before use, you need to prepare the form and follow some recommendations - this will ensure a high-quality result:
- before pouring concrete, lubricate the walls with machine oil for easy and safe removal of the finished product;
- place the forms on a vibrating surface, fill them halfway with concrete mixture;
- lay the fittings without turning off the table, add solution to the very top;
- level the surface, turn off the vibration;
- take the form to the place of drying, turn it over and leave the concrete product to dry. Fill the container with a new portion of the solution.
Making molds for concrete fences from ABS plastic
Our company produces molds from ABS plastic. The thickness of the product is only 3 mm. This material has a number of advantages, namely:
- Long service life
- Convenient transportation, light weight
- Low price
- Accurate reproduction of the geometry of the drawing
We offer a large range of products, so be sure to check it out in the catalogue. The production of Euro fences takes a day or more, it all depends on the technology used by the manufacturer.
Molds can also be used to produce fence posts , integral structural elements. To select plastic forms for a typesetting post, go to the catalog.
Fence forms
| Fence section No. 001 Versailles-top Price: check in the new catalog Dimensions: 1950x500x40 (mm) |
| Fence section No. 001 Versailles - through top Price: check in the new catalog Dimensions: 1950x500x40 (mm) |
| Fence section No. 2 Versailles-bottom Price: check in the new catalog Dimensions: 1950x500x40 (mm) |
| Fence section No. 3 Price: check in the new catalog Dimensions: 1940x530x40 (mm) |
| Fence section No. 4 Price: check in the new catalog Dimensions: 1940x480x40 (mm) |
| Fence section No. 5 Price: check in the new catalog Dimensions: 1940x490x40 (mm) |
| Fence section No. 6 Price: check in the new catalog Dimensions: 1940x490x40 (mm) |
| Fence section No. 7 Price: check in the new catalog Dimensions: 1940x485x40 (mm) |
| Fence section No. 8 Price: check in the new catalog Dimensions: 1940x560x40 (mm) |
| Fence section No. 9 Price: check in the new catalog Dimensions: 1940x530x40 (mm) |
| Fence section No. 10 Price: check in the new catalog Dimensions: 1920x560x40 (mm) |
| Fence section No. 11 Price: check in the new catalog Dimensions: 1920x480x40 (mm) |
| Fence section No. 12 Rocky Mountain Price: check in the new catalog Dimensions: 1950x500x40 (mm) |
| Fence section No. 13 Rocky Mountain Price: check in the new catalog Dimensions: 1950x470x40 (mm) |
| Fence section No. 14 Rostov stone Price: check in the new catalog Dimensions: 1940x500x40 (mm) |
| Fence section No. 15 Ancient mosaic Price: check in the new catalog Dimensions: 1975x505x40 (mm) |
| Fence section No. 16 Price: check in the new catalog Dimensions: 1970x490x40 (mm) |
| Fence section No. 17 Price: check in the new catalog Dimensions: 1970x490x40 (mm) |
| Fence section No. 19 Skol Price: check in the new catalog Dimensions: 1970x500x40 (mm) |
| Fence section No. 20 Rope Price: check in the new catalog Dimensions: 1950x490x40 (mm) |
| Fence section No. 21 Old stone Price: check in the new catalog Dimensions: 1950x300x40 (mm) |
| Fence section No. 22 Muslim, top Price: check in the new catalog Dimensions: 1960x640x40 (mm) |
| Fence section No. 23 Muslim, bottom Price: check in the new catalog Dimensions: 1960x490x40 (mm) |
| Fence section No. 24, top Price: check in the new catalog Dimensions: 1970x490x40 (mm) |
| Fence section No. 25 Price: check in the new catalog Dimensions: 1970x490x40 (mm) |
| Fence section No. 26, bottom Price: check in the new catalog Dimensions: 1970x490x40 (mm) |
| Fence section No. 27 Price: check in the new catalog Dimensions: 1900x470x40 (mm) |
| Fence section No. 28 'Board' Price: check in the new catalog Dimensions: 1830x190x45 |
| Fence section No. 29 'Grapevine', top Price: check in the new catalog Dimensions: 1970x490x40 |
| Fence section No. 30 Grapevine, bottom Price: check in the new catalog Dimensions: 1970x490x40 mm |
| Fence section No. 31 'Grace' Price: check in the new catalog Dimensions: 1920x555x40 (mm) |
| Fence section No. 32 'Natalie' Price: check in the new catalog Dimensions: 1930x540x40 (mm) |
| Fence section No. 33 'Zhiguli Mountain', top Price: check in the new catalog Dimensions: 1960x500x40 (mm) |
| Fence section No. 34 'Zhigulevskaya Mountain', bottom Price: check in the new catalog Dimensions: 1960x500x40 (mm) |
| Fence section No. 35 'Zhiguli Mountain', through top Price: check in the new catalog Dimensions: 1960x485x40 (mm) |
| Fence section No. 36 'Bristol', top Price: check in the new catalog Dimensions: 1960x480x40 (mm) |
| Fence section No. 37 Bristol, bottom Price: check in the new catalog Dimensions: 1960x490x40 (mm) |
| Fence section No. 38 Sheffield, top Price: check in the new catalog Dimensions: 1960x480x40 (mm) |
| Fence section No. 39 Sheffield, bottom Price: check in the new catalog Dimensions: 1960x490x40 (mm) |
| Fence section No. 40 Cobblestone, through top Price: check in the new catalog Dimensions: 1990x650x40 (mm) |
| Fence section No. 41 Cobblestone, blind top Price: check in the new catalog Dimensions: 1990x570x40 (mm) |
| Fence section No. 42 Cobblestone, middle section Price: check in the new catalog Dimensions: 1990x480x40 (mm) |
| Fence section No. 43 'Cobblestone', bottom Price: check in the new catalog Dimensions: 1990x460x40 (mm) |
| Fence section No. 44 Price: check in the new catalog Dimensions: 1980x490x40 (mm) |
| Fence section No. 45 Price: check in the new catalog Dimensions: 1980x490x40 (mm) |
| Fence section No. 46 Rocky Mountain No. 2 Price: check in the new catalog Dimensions: 1910x300x40 (mm) |
| Fence section No. 47 River pebbles, bottom Price: check in the new catalog Dimensions: 1985x490x40 (mm) |
| Fence section No. 48 River pebbles, top Price: check in the new catalog Dimensions: 1985x490x40 (mm) |
| Fence section No. 49 Grapes - top Price: check in the new catalog Dimensions: 1985x490x40 (mm) |
| Fence section No. 50 Grapes - bottom Price: check in the new catalog Dimensions: 1985x490x40 (mm) |
| Fence section No. 51 Mountain range - top Price: check in the new catalog Dimensions: 1985x490x40 (mm) |
| Fence section No. 52 Mountain range - bottom Price: check in the new catalog Dimensions: 1985x490x40 (mm) |
| Fence section No. 53 Flowers - top Price: check in the new catalog Dimensions: 1985x490x40 (mm) |
| Fence section No. 54 Flowers - bottom Price: check in the new catalog Dimensions: 1985x490x40 (mm) |
| Fence section No. 55 Austrian fence-top Price: check in the new catalog Dimensions: 1980x485x40 (mm) |
| Fence section No. 56 Austrian fence-bottom Price: check in the new catalog Dimensions: 1980x485x40 (mm) |
| Fence section No. 57 Renaissance-top Price: check in the new catalog Dimensions: 1980x680x40 (mm) |
| Fence section No. 58 Renaissance-bottom Price: check in the new catalog Dimensions: 1980x490x40 (mm) |
| Post with grooves 1 meter Price: check in the new catalog Dimensions: 1000x160x140 (mm) |
| Post with grooves 1.5 m Price: check in the new catalog Dimensions: 1500x160x140 (mm) |
| Post with grooves 2 m Price: check in the new catalog Dimensions: 1985x160x140 (mm) |
| Post with grooves 2.8 m Price: check in the new catalog Dimensions: 2740x175x140 (mm) |
| Pillar PEBBLES Price: check in the new catalog Dimensions: 2750x140x125 (mm) |
| ROCKY MOUNTAIN Pillar Price: check in the new catalog Dimensions: 2740x140x125 (mm) |
| Pillar cladding 'Brick' with grooves Price: check in the new catalog 1200 rub./set Dimensions: 2800x140x40 (mm) |
| Form for typesetting pillar BUT Price: check in the new catalog Dimensions: 400x400x200 (mm) |
| Form for typesetting block BUT Price: check in the new catalog Dimensions: 390x190x180 (mm) |
| Forms for prefabricated pillar Brick Price: check in the new catalog |
We bring to your attention ABS plastic forms for fences. With their help, you can make a concrete fence of a given texture. The molds do not require lubrication, complex formwork or steaming. We try to constantly update our range of forms for concrete fences and are now ready to offer you more than 20 types. The overall size of the fence sections is 2000x500x40 mm. The range also includes molds for making pillars and decorative elements. We will supply forms for concrete fences to any region of Russia and the neighboring countries.
LOBAS LLC is your reliable supplier of high-quality molds and equipment.