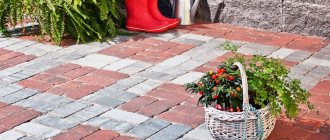
On city streets, laying paving slabs is a popular type of paving and the choice of such a covering is explained not only by its aesthetics, although this is an important factor, but also by the high practicality of the material. Such tiles in the garden, on the site of a country house or cottage are widely used both in shaping the landscape and simply for laying paths, organizing parking for a car and other purposes.
Material advantages
The photos of laying paving slabs presented on the site give a complete and clear idea of how you can improve a suburban area or cottage using different colors and shapes. But this material also has other advantages, which has allowed it to displace traditional asphalt or concrete pavements. One of the main advantages is that laying paving slabs with your own hands is a completely doable task even for a beginner in construction. The amount of work to be done is considerable, but the results obtained and the funds saved will fully compensate for this.
This product has a number of characteristics that make it competitive among coating materials:
- strength;
- frost resistance;
- environmental friendliness;
- absence of harmful fumes as a result of heating by sunlight;
- aesthetics and presentability;
- no deformation of products;
- maintainability: the damaged area is easy to replace;
- reasonable and affordable price;
- durability, the service life of products is 15 years or more.
It should be noted that laying paving slabs with your own hands is done with simple tools, and there is no need to use special equipment, with the exception of delivery and unloading - for this it is better to hire a car with a manipulator.
Types of paving material
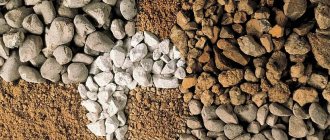
For paving garden paths and areas for various purposes with paving slabs, products are used in the production of which various materials are used.
Depending on this, several types of products are divided:
- cement-sand (concrete);
- polymer-sand (plastic);
- rubber;
- granite.
Laying paving slabs with clinker
In addition, laying paving slabs with your own hands can also be done with clinker, which is a clay product obtained as a result of a special firing regime. It is used quite often for paving, although it can be conditionally classified as a paving group. Clinker has high performance qualities, but its cost is higher.
You can pave the sidewalk with your own hands at minimal financial cost using concrete products that are distinguished not only by their affordable price, but also by their good consumer properties, including anti-slip properties, which pays off in the winter. These products are varied in color, shape and size.
Polymer sand tiles size 330x330x22
Polymer products have the highest strength characteristics and almost zero abrasion coefficient. Rubber, providing excellent grip and characteristic softness, is rational for use near swimming pools, on sports or playgrounds.
Granite paving slabs
Crumbs of natural material are added to granite paving slabs to add strength and improve the aesthetic appearance. This type is used for paving main passages, squares in cities, as well as for creating exclusive landscape ensembles around a cottage on a country site.
Production methods
When choosing a material for paving sidewalk paths with your own hands, it will be useful to learn about the method of its production, since strength characteristics, frost resistance and, as a result, durability depend on this.
Three main methods are used:
- vibration pressing;
- hydropressing;
- vibration casting.
During vibrocompression, the prepared mass is poured into molds on a vibrating machine. Additionally, pressing occurs with the participation of a punch, a special piston, which ensures maximum compaction. Products obtained in this way are distinguished by a rough surface, high wear resistance and strength, so in the vast majority of cases this material is used for laying paving slabs.
Production of paving slabs
Hydropressed products are produced in a similar way, but in this case vibration is not used. Instead, high pressure is used to seal.
Vibration casting is similar to production using the vibration-pressed method, but in this case the mixture is first placed in special molds and then transferred to a vibrating table. After compaction, the hardening process continues either in a special oven (chamber), or the products are covered with a kind of dome, under which a temperature of 35-40°C is maintained for 10-15 hours.
To give the finished material the necessary performance characteristics, special additives are widely used during production, and in order for the paving slab paths laid with your own hands to have a colorful and beautiful appearance, pigmenting colors are added to the raw materials.
How to choose the right material
Before laying paving slabs with your own hands, you need to choose the shape, size and color of the products, which are very diverse. Your own preferences, artistic and aesthetic preferences matter, but when making a choice, you should definitely take into account the size of the site, the style of the landscape, the architectural features of the building and other important factors.
Sale of paving slabs, samples
Manufacturers place in their catalogs photos of paving paths with paving slabs, giving a clear picture of what the final result will look like. But it is necessary to take into account the characteristics of your site. Before purchasing, it is recommended to draw up a layout diagram of paths, playgrounds, park areas and other objects that are to be improved.
Before laying a paving slab path, you need to decide on its type and shape. Paving a sidewalk path with your own hands can be done with products in the form of squares, rectangles, polygons, etc. It is necessary to select the appropriate size, which varies from 50x50 cm to 5x10 cm, while the thickness ranges from 3 to 10 cm, and mostly determined by the production method.
Main types of products
There is no unified register of names for products: each manufacturing company can give its own unique names to series, but it is still possible to bring everything to the same denominator.
Paving slabs old city
The range of paving tiles can be represented by English cobblestones, often referred to as the "Old Town" series. This type is characterized by the use of gray and brown (yellow) shades, which allows them to be combined when creating patterns. At the same time, it is possible to achieve the effect of masonry through the use of products of different sizes and shapes (squares and rectangles) and the use of natural stone fractions in production. Similarities with this series are the “Brick” products, as well as the so-called tumbled products, characterized by rounded edges.
When using material with a clover shape, the process of laying paving slabs may become somewhat more complicated, but due to the presence of broken edges and curves, during operation it is less susceptible to slipping, for example, as a result of soil subsidence or erosion. Similar characteristics are exhibited by the products of the “Wave” series, represented by irregular rectangles with broken lines of parallel sides. Therefore, on complex or shift-prone soils, it is recommended to lay paving slabs with your own hands using these types, which, moreover, can be used even without the presence of restrictive and stabilizing curbs.
Creating a Sketch
Before laying paving slabs with your own hands, it is advisable to make a diagram or sketch of the future path or site, taking into account the selected type and size of products. The color palette should also be taken into account when creating patterns, designs or ornaments. In the future, this will help to correctly calculate the amount of material of each type and color, as well as perform the work accurately and accurately.
The choice of material and paving scheme are closely interrelated processes, since the first determines the second, and in order to embody artistic ideas, certain and specific types of products will be required.
If we lay paving slabs ourselves, then you need to know that the greatest variability is found in paving made from products of rectangular or square shapes. At the same time, the choice of such types as “paving stones”, “diamond”, “brick” is characterized by certain technological difficulties. Therefore, their choice, before laying paving slabs on your site yourself, must be balanced.
Certain skills will be required to complete the work. But nothing is impossible: how the work is done is described in the video tutorial “Laying paving slabs with your own hands”, from which you will not only learn the basics, but also eliminate all gaps in knowledge, and also learn some professional techniques and “tricks”.
Methods of creating drawings, patterns and ornaments
Vibropressed paving slabs with patterns
If it is decided that paving slabs will be used for paving, laying it yourself can be done using traditional geometric patterns, which are not difficult to first draw on a diagram yourself and then turn into reality. Despite the laconicism, using this method, it is possible to achieve unique results due to the play of colors, shapes and sizes.
You can even create real designs from simple shapes: butterflies, leaves, coils, honeycombs, as well as simpler ones - rhombuses, squares, chessboards and others.
The process of laying paving slabs can also be carried out in the so-called chaotic or “random” way, which, despite its name, can be ordered by alternating colors and shapes. As samples, you can find photos of laying paving slabs made using 3D technology.
Options for laying paving slabs
But since laying paving slabs in this way can only be done with good artistic training, only professionals should undertake such work. Otherwise, the result may be unpredictable.
In order to select or, if necessary, supplement the option that is most suitable for the existing landscape and its execution will be feasible, it is recommended that you familiarize yourself with the photos of laying paving slabs, which show design options from simple ornaments to complex patterns.
Calculator for calculating the amount of paving stones depending on the paving area
Making a playground or garden paths from paving stones in your home is the dream of many happy owners of a country house or summer cottage. Very often, the limitation is the fairly high cost of laying paving stones, and the material itself too. If you try to do it yourself, you can bring your dream much closer to reality due to the savings on services that can be used to purchase paving stones.
Calculator for calculating the amount of paving stones depending on the paving area
Prices for paving stones
paving stones
After planning the site, drawing up a diagram, calculating the paving areas, you need to calculate how much and what kind of paving stones you need to purchase. A calculator for calculating the amount of paving stones depending on the paving area, developed specifically for readers of our portal, can be a good help. It takes into account the most popular sizes of paving stones in the form of individual elements or sets that are used most often.
Go to calculations
Readers should not have any questions when using the proposed calculator. The list of paving stones shows the sizes that are most often used for paving. We present a table where we consider the characteristics of artificial vibropressed paving stones.
| Image | Name | Standard sizes, mm | Description |
| Standard vibropressed paving stones “Brick” | 200*100, thickness 40, 60, 80, 100mm | Available in a wide range of colors (up to 10 colors), both surface and volumetric. | |
| Vibropressed paving stones “Small Square” | 100*100, thickness 40, 60, 80, 100 mm | Similar to the top | |
| Vibropressed paving stones “Old Town” of three elements | 240*160, 120*160, 160*160, thickness 40, 60, 80 mm | The Color Mix series immediately contains bars of different shades in one pallet | |
| Vibro-pressed paving stones “Old Town” of four elements | 60*120, 90*120, 120*120, 180*120, thickness 40, 60, 80mm | One pallet may contain 1 or 2 colors | |
| Vibropressed paving stones “Old Town” of three elements | 260*160, 100*160, 160*160, thickness 50, 80 mm | One pallet may contain 1 or 2 colors | |
| Vibro-pressed paving stones “European Brook” of three elements | 240*240, 240*120, 120*120, thickness 60 mm | Available in gray and sand colors |
The supply of paving stones is selected taking into account the method of its laying, the size and configuration of the areas where the paving stones will be laid.
- If the paving stones will be laid on rectangular areas and straight paths parallel to their edges, then the margin is chosen from 5 to 10%.
- If paving stones are laid diagonally on areas with smooth edges and straight paths, then the margin is 10-15%.
- If the sites have curved edges, the paths do not go in a straight line, but “twist”, then 15-20% of the supply of paving stones will be just right, since many stones will be trimmed
Sometimes clinker bricks are used as paving stones, or the stones are made independently. Dimensions may differ from standard ones, and installation may have gaps. If on the side surfaces of vibro-pressed paving stones there are special shaped protrusions that provide the required gap, then on clinker bricks and hand made stones there are none. Therefore, we invite readers to use a simple calculator that calculates the number of stones of arbitrary sizes and taking into account the selected gap.
Go to calculations
Laying paving stones yourself is quite possible! There are many good examples of this. We invite you to read the article on our portal: “Laying paving stones with your own hands,” which describes in detail the process of selection, preparation of the base and installation.
Popular and simple drawings
Using paving slabs as a paving material, laying it yourself for the first time can cause quite natural, but in most cases unfounded fears that you will not be able to cope with the upcoming work. But if you first choose simple but effective designs, you will gain more confidence in your abilities.
Braided paving slabs
For large and wide areas, you can use the “braid” scheme, characterized by paired paving: first, two products are installed, and then the next two are installed next to them, but at right angles. The result is an eye-catching woven design that can be further embellished using different colors of material.
There is another simple way to lay paving slabs with your own hands - “spoon”, in which the products are laid using the sides (spoons) and are used mainly for rectangular-shaped elements. In this way, paving slabs are most often laid, which, despite the simplicity of execution, allows you to create authentic patterns under ancient paving.
Herringbone paving slab laying scheme
You can also lay out paving slabs with a herringbone pattern, in which the layout is made at an angle of 45 or 90°, and also use circular paving options, but for this method it is preferable to use small-shaped elements and preferably with a wedge-shaped or diamond-shaped shape.
There are various ways to lay paving slabs with your own hands; photo examples are presented in large numbers on the website.
Step-by-step layout recommendation
We carry out the first marking of the entire area, including the paths for laying out, distribute the installation of stakes, use them to mark the gaps along the width of the path on both sides, and do not forget about the turning angles. Most stakes that mark the length of the trail will make it easier to recreate the height of the berm. Next, you need to carefully examine everything, deciding whether this distribution of paths will be comfortable, and whether the work area was marked correctly.
If necessary, we make adjustments. For this purpose, you should walk along the selected section of the future path, alone, with your family, moving to the sides, etc. By such actions, the required width of the garden path is selected.
There are a number of subtleties, taking them into account, it is possible to complete the entire process without much difficulty and great problems. We will analyze in detail the technology for laying paving slabs on sand with our own hands in step-by-step instructions. Using this material, it is possible to build a special covering in a parking area, on sidewalks or in the garden. It is necessary to understand in more detail what exactly the technology in question lies under. Often, sidewalk tiles are laid on dry cement-sand mixtures.
Preparing the soil
Before we begin the tile laying operation, we prepare the work area in advance. The area for future tiles must meet certain standards. When doing the work yourself, you need to take into account some subtleties:
- Deepening. Lay the tiles in recesses, while they rise above ground level by 4 cm.
- Compacted soil. The soil should be compacted especially well.
- Leveled surface. We ideally level the area for laying.
- We provide drainage. Either we cultivate a gravel-sand layer, or we provide a non-steep slope, approximately 5 degrees per meter.
Next, we remove the top layer of soil, this will help eliminate all the tubercles, we compact the soil and prepare a gravel-sand layer. For the sidewalk, a depth of 20 cm is good, and for car entrances and parking lots you should add about 10 cm more, the depth directly depends on the purpose. Then we compact the soil: we moisten it with water from a hose with a watering can and then compact it. This operation makes it possible to eliminate the possibility of subsidence of the territory in future years.
We install curbs and drains
Laying the border
Next, it is recommended to start installing limiters, namely curbs, before starting to lay out sidewalk tiles on the sand.
They should be placed along the entire perimeter of the sidewalk.
Otherwise, if you neglect this procedure, the sidewalk under the tiled covering will soon corrode to the sides.
To install the limiters yourself, you should dig a ditch along the entire landscaped area.
It should be done a little deeper. Crushed stone is laid at the bottom of the ditch for support and covered with sand on top to compact the voids. Then we set up the curbs using the means of the level.
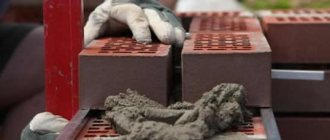
To fix the tiles, we mix a concrete solution, its base will be cement, sand and screenings. We fill the groove with borders with this prepared composition. When the composition dries, remove the spacers and fill the ditch with soil to the required level. In addition, we install water drainage systems. We install the drainage structure on the inside of the sidewalk parallel to the curbs. The slope should extend towards the drains from the general area.
Laying a sand bed
Laying the tile itself requires the use of gravel and sand as a substrate for this tile. Initially, we cover the soil with sand. Then we sprinkle crushed stone on it, approximately 20 cm thick, it will help distribute the load over the sidewalk area and create conditions for water drainage. In addition, add sand to fill any existing voids.
The top layer acts as a fixative, which is why it is necessary to know exactly what type of sand is required for the tiles. Its best variation is considered to be sand consisting of finely dispersed particles; it makes it possible to clog all the gaps, but it is only necessary to filter it from impurities. The area must be moistened with water and the materials allowed to dry.
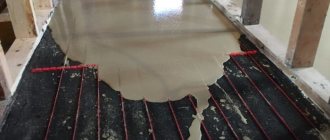
After the site is leveled, we fill in the working “cushion”. Namely, a sand-cement mixture in a dry variation. It also needs to be perfectly leveled, maintaining the slope. Now let's start laying out.
Laying out the tiles
We lay paving slabs with our own hands on sand and cement in a certain way; they must be laid out, directing “away from ourselves”, this way the evenness of the sand coating will not be disturbed. It must be laid out so that some gaps of approximately 2 mm are maintained between its elements. For fixation we will use wedges made of wood or plastic.
Leveling the sand bed
The technological procedure involves deepening the tile components into the sand mixture approximately to the middle, which means that there must be enough sand for this.
Let the height of the substrate correspond to the depth of the soil.
The next row should be controlled using the level and all identified errors should be eliminated immediately on the spot.
For these purposes, as a rule, a flat block of wood and a mallet are used.
Move along the sidewalk with caution so as not to move the tiles before they are completely set.
Tools and building materials for work
Tools for laying paving slabs
Before laying paving slabs with your own hands, you need to prepare the necessary tools for the work. There is no need to purchase a special tool, since all the necessary kit is available to any owner.
To complete the work you will need:
- shovels, rakes;
- buckets;
- Master OK;
- rubber hammer - “mallet”;
- tape measure or other measuring device;
- building level;
- cord or rope;
- wooden pegs;
- hard brushes and broom;
- a large watering can or, more conveniently, a watering hose;
- a tamping machine or a corresponding hand tool that you can make yourself.
In some cases, a tool for cutting the material will be needed, for example, an angle grinder (“grinder”), but if the paving is done with small-shaped products and with the presence of additional elements, then you can do without it.
It is recommended to prepare several boards, metal corners, rods, and channels in advance.
The process of laying paving slabs is impossible without sand, gravel (or crushed stone), and cement; the use of geotextile fabric is also justified, which, although it increases the cost, eliminates many problems during operation, especially in areas with problematic soils.
How to calculate the amount of paving material
Laying paving slabs on a summer cottage
As the photos confirm, paving slabs in a dacha or suburban area can transform the surrounding landscape beyond recognition, giving it a well-groomed and presentable appearance. But in order to achieve the desired result, you will have to make an effort, and you need to start by drawing up a diagram and calculating the required amount of materials.
Having a pre-made diagram makes it easier and faster to calculate how much paving material will be needed, especially if you plan to use products of several colors, shapes or sizes. Calculations should begin by determining the number of elements in 1m2. Knowing the total coverage area, you can easily calculate the total need for materials. Before laying paving slabs yourself, you need to take into account that you should order products 5-10% more: taking into account damage or damage, as well as to correct possible errors in calculations. It is better to purchase everything at once than to buy more later, since there may be, albeit almost imperceptible, differences between the colors of elements from different batches. If you have storage space, you can stock up on several products for subsequent restoration of the coating in the event of its destruction.
Calculation of other types of building materials
Paths and areas have their own boundaries, marked by special elements - borders, for which either a special stone or other products are used. The required quantity is calculated based on the total perimeter of the paving area and the length of one unit.
Properly laid paving slabs in the country house
To determine the volume of bulk materials, it is necessary to know the area of the site and the thickness of the layer of the “cushion” being laid. It must be taken into account that due to the characteristics of the soil and functional purpose, the objects require the construction of a “cushion” of different thicknesses.
- For paths, a layer of gravel of 10-15 cm may be optimal, but for parking a car you will need 25-35 cm.
- For sand, the average thickness varies from 5 to 15 cm.
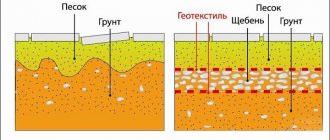
Types of laying layers of paving slabs
If you plan to lay paving slabs on a rigid base, you will need to correctly calculate the amount of concrete mixture for this. The main parameters for calculation in this case will be the total paving area and the thickness of the poured concrete layer. When using geotextiles, you need to know the area of one linear meter of material and the total area of the site or path, but you must take into account the overlap of the sheets on each other, which is at least 10 cm. Photos of laying paving slabs on geotextiles with your own hands will help you understand this issue in more detail.
Marking and preparing the site.
Since it is necessary to lay paving slabs on the base, before starting paving, preparatory work should be done on the site.
In accordance with a pre-compiled diagram, markings are made, for which pegs, a cord and a tape measure are used. After this, you can begin to remove the top layer of soil by approximately 15-45 cm, depending on the thickness of the pillow and the material itself, and do not forget about an additional 15-20 cm on each side for the border (if you plan to install it).
Installation diagram for curbs for paving slabs
The next step, before laying the paving slabs yourself, is to install the curb in prepared trenches, which can be deeper than the main site. It is also recommended to make a small sand cushion in them. Additionally, you can fix the curb stone with cement mortar by tying the individual elements together.
It is first necessary to compact the soil and only then proceed with the construction of a gravel-sand or, alternatively, crushed stone-sand or simply sand cushion.
Rigid base device
Preparing the base for laying paving slabs
At this stage, you should decide what kind of paving slabs will be on the site and how to lay them - on a gravel-sand bed or a concrete base. If preference is given to the second option, then the foundation should be made according to all the rules: install formwork, perform reinforcement (if significant static and dynamic loads are planned) and fill it with concrete, which can be produced directly on the site or by pre-ordering its delivery at the factory. Having chosen such a base, it is necessary to take into account that the width of the screed should be greater than the width of the paving by the thickness of the curb stone, and laying paving slabs directly with your own hands can begin only after the concrete has gained initial strength. Therefore, a technological break of 3-5 days may be required.
Due to the fact that this type of foundation construction is more expensive and labor-intensive, it is used only on complex or problematic soils. Also in this case, it is necessary to consider the effective organization of water drainage, since it will not have the opportunity to freely go into the ground through the seams. To do this, it is necessary to provide for the slope of the site and organize breaks in the curb.
In the future, paving slabs are laid using a mortar, the thickness of which should be from 1 to 3 cm, which ensures not only the evenness of the coating, but also the necessary slope for water drainage.
Installation of sand and gravel cushion
The question of how to lay paving slabs, or rather, on what basis, is in most cases resolved in favor of installing a sand and gravel cushion, which is a multi-layer “pie”.
First, a layer of gravel or crushed stone is laid and leveled, then a layer of sand. The next step is to moisten the pad and compact it thoroughly using a vibrating machine or hand tools.
If the groundwater level is high, it is recommended to use geotextiles as the first layer, which should also be laid between the “cushion” layers to avoid their mixing. This guarantees better static structure and virtually eliminates subsidence processes during operation. If large areas are being formed, then in order to guarantee an identical top layer of sand, long channels should be laid, which are leveled in height with each other, and the sand layer is leveled at this mark. To achieve greater strength, it is allowed to backfill the top layer with a dry cement-sand mixture.
Paving
Paving paving slabs
Basically, laying paving slabs with your own hands is done using the so-called “dry” method, that is, on a “cushion” of bulk materials. In this case, the only wet process left is to spill the base with water in order to achieve better compaction, which will further protect the paving from creeping, subsidence and other deformation processes. After all the preparatory work has been completed, you can immediately begin paving. For work you will need to use a rubber hammer, a broom and a stiff brush.
When laying paving slabs with your own hands, you must follow several rules, one of which is that installation starts from the lowest point and is carried out exclusively by the “pull” method.
It is important to ensure a tight fit with the border, which not only performs a decorative function, giving a complete look to the structure, but also ensures the stability of the entire structure and protection from spreading. Since paving slabs can be laid without a curb, for this method there is a material equipped with special interlocking connections that will “pull together” the path or area into a single whole.
Filling joints with sand
Upon completion of work on a certain area, it is necessary to backfill the masonry with fine sand. To fill the seams more tightly, you can use a brush and remove the excess with a broom.
Filling joints with sand
For greater stability and strength, it is recommended to grout the joints in two steps, using a special cement-based mixture for the top layer. The finished coating must be spilled with water until puddles form and left for several days.
Grouting joints for paving slabs
Preparing the base for laying paving stones
Before installation, it is necessary to prepare the base for this. To do this you will need a number of gardening tools:
If it is necessary to carry out repair work (for example, laying underground communications), paving slabs can be easily removed, the necessary work carried out and laid again.
- Rake.
- Bayonet shovel.
- Tamping.
- Shovel
- Construction trowel.
To mark boundaries and directions, you will need pegs and a rope (respectively, a hammer and a tape measure).
A drainage layer of fine crushed stone or sand is poured into the prepared sidewalk bed. The thickness of this layer can be up to 150 mm. To level the surface of the sand cushion layer, you can use two or more PVC pipes that have a diameter of one inch. They must be laid at a distance of several centimeters or meters from each other (depending on the width of the sidewalk). These pipes will act as rails along which the leveling mop will slide. Using these pipes you can also set the drainage slope. The length of the board at the end of the mop should be slightly longer than the distance between the “rails”. Next, sand or crushed stone is added to level with the elevation of the “rails” and the resulting layer is leveled.
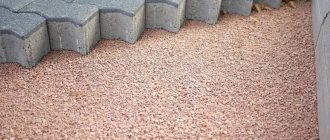
No puddles form on the surface of such a coating, since water flows freely through the gaps between the tiles.
In general, it should be noted that the basis for laying paving stones and the method of laying it directly depend on the operating conditions and purpose of the coating. Based on these indicators, three main options are distinguished;
- Pedestrian paths and blind areas - a sublayer of crushed stone and sand is sufficient for them.
- Entrances to the garage and parking for passenger vehicles - the base is a sandwich made of a layer of crushed stone and a cement-sand mixture.
- For cargo transport, it is better to lay paving stones or tiles on a concrete base (preferably reinforced).
How to calculate how many tiles are in a square meter
When buying paving stones, many people ask sellers the question: how to find out how many tiles are in a square meter. Theoretically, it is not difficult to calculate the exact number of paving stones for a particular object. This information is often indicated by manufacturers, and you can find it on the company’s portal or in a hypermarket. Also on the Internet today you can easily find online calculators that instantly calculate, according to their developers, the correct consumption of paving stones.
Experienced people recommend throwing calculators aside altogether to look at how to calculate the number of tiles per square meter in a much broader way. Why? And that’s all, because it’s definitely not possible to take into account absolutely all the details. For example, it is always necessary to purchase a little more paving stones per cut. But this should only be done if all the paving stones in the package are completely intact. To make sure of this, you will first have to open the packaging and carefully inspect each paving stone individually.
Paving slabs
Paving slab factory . We produce heavy-duty paving slabs, paving stones, wall blocks and side stones. The tile plant manufactures products in accordance with the requirements of the Construction Committee of the city of St. Petersburg. (STO 58357155-001-2016, STO 5746-020-03984296-2014, STO 5741-023-03984296-2016, STO 5746-018-03984296-2014). The production of tiles is carried out using the vibration pressing method on machines of the German company HESS. There is a separate area for uninterrupted supply of technological pallets. The drying chamber allows you to improve the quality of paving slabs. All products are oil and petrol resistant. Each batch of paving slabs is tested in its own certification testing laboratory and is accompanied by a quality certificate. If necessary, we produce paving tiles with a textured front layer of granite chips, quartzite, gabbro-norite and other wear-resistant materials.
All necessary documentation, certificates, quality certificates, cost of tiles can be requested from our managers in the sales department.
Where is the production and sale of paving slabs located?
The paving slab production plant is located in the Parnassus industrial zone. You can view finished products and buy paving slabs at the finished products warehouse or in the sales department. More detailed information can be obtained from the manager by phone: +7 or send a message via the feedback form.
Where are paving slabs laid?
Paving slabs are divided into three main purposes - tiles for pedestrians, tiles for vehicles and tiles for heavy vehicles, and paving slabs are also selected according to the thickness, size and type of protective layer applied. 60 mm tiles are laid in places with little traffic. These could be sidewalks, pedestrian zones, streets, bicycle paths, i.e. stowage areas not intended for vehicular access. 80 mm tiles are installed in areas with average traffic intensity. These can be parking lots, parking lots, squares, transport passages, highways, highways, entrances and exits from the territory, garage driveways, i.e. places intended for vehicular traffic. The 100 mm thick tiles are designed for paving areas with high traffic load. These could be warehouses, truck parking lots, gas stations, port areas, container terminal areas.
Please ask our managers in the sales department for all necessary documentation, certificates, quality certificates, and cost of tiles. Our official website of the plant on the Internet can be found by asking how many paving stones are in 1 square meter .