Preliminary floor preparation
An experienced tiler doesn't need to be told how to lay tiles on a kitchen, hallway or bathroom floor. For a novice craftsman taking on floor covering for the first time, valuable information regarding the upcoming process will clearly not seem superfluous. Where does finishing begin, including tiling? With the right preparation.
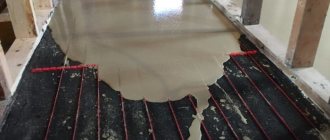
Concrete screed
A classic of the genre - a concrete floor base. Simply - a screed. It may not be concrete, but made with any cement-based mortar. The point is not in the composition of the material used to fill the floor, but in the final result that we have before laying the cladding. What requirements must the screed and its surface meet so that laying the tiles is hassle-free and the durability of the ceramic coating can be guaranteed? Here are the evaluation criteria (SNIP):
- the surface of the screed is without delaminations and large cracks; no movement is felt when there is a mechanical impact on the base of the floor (you can jump);
- screed in a horizontal plane (checked by the building level);
- the curvature of the surface does not exceed 3 mm per 2 linear meters in different directions (you will need a rule to check);
- The concrete base moderately absorbs moisture, is cleaned of dust and all kinds of deposits (putty, plaster, various types of glue and oils).
If problems are found, the floor is prepared for laying tiles, namely:
- we expand the cracks in the base of the floor and fill them with ordinary tile adhesive, we clean the areas of delamination from loose screed elements, we carry out repairs with a polymer cement mortar, and to be sure, we reinforce the area with a dense fiberglass mesh;
- unevenness exceeding the permissible values is leveled with a self-leveling mixture or cement-based adhesive mass (the second option is cheaper);
- After cleaning the base from debris, dust and deposits, we impregnate the screed with a primer, for which we pour the liquid onto the floor and “stretch” it over the surface with a wide paint brush (mack brush).
The repaired, leveled and primed screed is ready for high-quality ceramic tile flooring. All that remains is to wait for the primer mixture to dry completely and proceed to the main part of the program.
DSP panels
Sometimes, to construct a floor base for ceramic cladding, cement-bonded particle boards (CBPB panels) are used. Using this material, you can quickly create a surface that meets the requirements, ready for facing with porcelain stoneware or floor tiles, leveling a rough screed, a dilapidated concrete base and even a wooden floor. If this is the case, the cement-bonded particle base only needs to be treated with a primer before laying the tiles.
DSP panels are heavier than their closest analogue - OSB boards, and they are more difficult to work with. But the affinity of tile adhesive with a cement-bonded particle board, and therefore the strength of installation on such a surface, is much higher.
Calculation of material quantity
It is difficult to accurately calculate the consumption of tile adhesive - it all depends on the curvature of the base and the installation technique used by the master. On average, one package of dry polymer-cement mixture (25 kg) is used to cover 3-4 m2 of prepared floor surface. The same applies to primer solutions, the consumption of which depends on the absorbency of the screed and its porosity. Usually 0.5 liters of primer is enough to fully impregnate a completely dry screed. If the concrete base has not completely given up moisture, the consumption of the primer mixture will be reduced.
It is easier to calculate the number of tiles, although there are also nuances here that depend on the type of cladding and the method of laying it out. If porcelain tiles (tiles) do not have a laying direction (there is no arrow on the back of the tile), the cost of trimming will be minimal. Such facing material can be purchased at the rate of: floor area + 5% of the available square footage. When the manufacturer has provided for compliance with a certain direction of laying, especially when laying out diagonally, up to 10% of the calculated area of the floor base is taken into reserve.
Technology for laying ceramic tiles on the bathroom floor
Required tools and materials
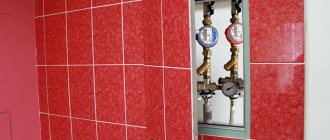
If a tiled floor is being installed in a bathroom, toilet, or kitchen, an additional waterproofing membrane is installed or standard polyethylene is used. Often the tiles are combined with a heated floor, then you will need an electric heating system and material for dry or wet screed. To treat the surface, soil is prepared, the tiles are set on glue, which comes in the form of a dry mixture.
Required tools:
- construction or laser level;
- tile cutter, pliers, rubber hammer, emery stone;
- tape measure, pencil, cord;
- scraper, notched and rubber spatula;
- bucket, drill with whisk, grinder with diamond wheel;
- rags, foam sponge, protective gloves.
For a traditional layout, take tiles by count, since it is easy to calculate the number of elements. Other layout methods require the use of a coefficient of 1. - 1.2, depending on the arrangement of parts in the diagram and the number of trimming places. Packs of the same batch are taken from the warehouse to eliminate discrepancies in color shade. To treat joints, buy grout of a similar or contrasting color.
Floor marking
Before gluing the tiles to the floor, the working surface is marked and symmetry calculations are carried out. It is important to arrange the cladding elements so that the waste of material resulting from edge trimming is minimal, and the fragments of tiles cut against the wall are wider than half of the whole tile, while being approximately equal in size on opposite sides of the floor. This is calculated for two reasons. Firstly, it is easier to lay wide fragments than narrow strips of tiles. Secondly, narrowly cut strips of tiles laid near the walls look less attractive and catch the eye.
Laying tiles begins in various ways. You can start tiling from the far corner in relation to the entrance to the room and move towards the doorway. It’s easier to work this way, but you can deviate from the course, especially if the floor geometry is not perfectly rectangular. It is more convenient to start from the far corner in a small room (a bathroom in an apartment, or a toilet).
Some craftsmen prefer to start laying porcelain tiles or floor tiles from the center of the floor, evenly filling the floor surface with ceramic finishing in all directions. Using this method of laying, it is much easier to guess the symmetry, but this technique is better and more convenient if floors with an area of more than 8-10 m2 are tiled. In a small room, laying tiles this way is extremely inconvenient and takes a long time - after laying a small area, you need to take a daily break, waiting for the mounting adhesive to set.
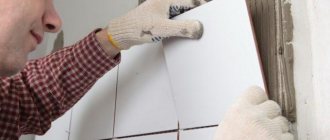
To make it easier to imagine how to lay tiles on the floor in a kitchen, bathroom or other room, you need to pre-lay out the tiles or porcelain tiles. To do this, a whole tile is laid directly on the screed in the order and relative position as it is intended to be laid. The tiles are laid end to end, without gaps. This simple trick helps:
- visually evaluate one or another method of arrangement of facing elements;
- guess the correct direction of masonry;
- Approximately calculate the dimensions of the edge cutting elements.
Having made estimates and calculations, presented the sequence and order of laying the facing elements, the tiles are removed from the working surface, and the necessary preparations begin before laying the ceramic floor cladding.
Floor preparation in video
Viewed times: 4,535
Great article 0
Author's rating
Author of the article
Oleg Grishin
Flooring specialist with 10 years of experience. Oleg has something to share with our readers
Articles written
105
- Even more interesting:
- How to lay carpet tiles with your own hands
- Correctly installing a tongue and groove floor
- How to lay solid boards on screed, plywood and other surfaces
Laying ceramic tiles on the floor
Before moving on to the description of how to lay tiles on the floor, it is worth briefly dwelling on the immediate preparatory activities that precede the main work. First, you need to prepare the tools necessary for floor covering. Secondly, correctly prepare tile adhesive from a dry polymer-cement mixture.
Ready-made diluted tile adhesive solutions are available for sale, packaged in plastic buckets. But the use of such material is much more expensive than the use of dry polymer-cement mixtures.
The tools you will need are:
- a drill or hammer drill with a mixer attachment for preparing a working solution of tile adhesive;
- a manual tile cutter for cutting tiles, or a grinder with a diamond-coated disk attachment;
- bubble building level;
- usually 1.5-2 m long;
- three spatulas (notched, narrow (80-100 mm) and wide (250-300 mm));
- container for mixing polymer-cement tile adhesive;
- a sponge or rag to remove excess glue from tile joints;
- spacer plastic crosses and wedges.
The technology for preparing tile adhesive can always be found on the packaging (paper bag) for the dry composition. However, craftsmen rarely follow the strict proportions of water and dry matter as indicated in the instructions, preferring to mix the solution of the required consistency by eye. How to do this so as not to measure out the required number of milliliters and kilograms, and get the required volume of glue of the correct consistency?
Technology for laying mosaic tiles on the floor
- pour cold water into a bucket to fill approximately 1/6 of the full volume of the tank (a standard water-based paint container, usually used for this purpose, holds 12 liters, which means you need to pour in about 2 liters);
- gradually pour the dry mixture into the bucket (use a scoop or wide plaster trowel) until a slide forms above the surface of the water;
- mix the components thoroughly, achieving homogeneity of the solution;
- if the glue turns out to be liquid (does not stick to the spatula), add the dry component and mix again;
- when the mixer rotates with a heavy load, and it is noticeable that part of the dry cement mixture is not wetted, add a little water and mix.
After the normal consistency is achieved, the solution should be allowed to stand for about 5 minutes, then mixed again.
Keep in mind that proper preparation of the adhesive solution affects not only the ease of working with it, but also the strength of the material, which is the binder between the tiles and the subfloor.
Having prepared the “correct” tile adhesive, you can begin laying the tiles. The main thing in this matter is to slowly, under level control and observing the desired direction, lay the first cladding elements. The speed and quality of subsequent finishing of the floor surface depends on the starting row of tiles and the correctness of their installation.
As for the rules for laying each individual tile, there are no uniform standards. If you observe the work of professional tilers, it is easy to notice that each master has his own nuances in the technology of laying tiles (porcelain stoneware) on the floor. Some apply glue to the back surface of the tile, others to the surface of the screed. Some people find it more convenient to lay tiles by applying glue to both joining surfaces. And each of these specialists will be right in their own way. The essence of high-quality gluing is not in the surface on which the solution is applied, but in the area of contact of the tile to the adhesive mixture. Durable installation of floor finishing involves gluing the tiles to 60-70% of its total back surface. For technical rooms with high mechanical load on the floor, this figure should not be less than 95%.
You need to glue the tiles according to the following algorithm:
- Apply a layer of glue to the surface of the screed (the underside of the tile) with a narrow spatula;
- Holding a notched trowel vertically, we move over the applied solution so that the tool touches the solid base;
- We lay the tile on the resulting leveled layer of glue and gradually press it down, “crushing” the adhesive solution;
- as the tile is pressed onto the base, we control its location in the horizontal plane and its relationship with adjacent finishing elements;
- you need to achieve this result - the tiled surface is located horizontally in all directions, the edges of adjacent elements coincide as much as possible in terms of their relative position.
We separate adjacent laid and leveled floor tiles or porcelain tiles with crosses of a certain size or wedges if the facing material is poorly calibrated (the difference in the sizes of individual elements is 1.5 mm or more). Using wedges and crosses, longitudinal and transverse seams (distances between adjacent tiles) are formed, which must be filled with a special colored solution (grout). This is done when, after finishing covering the entire surface of the floor, the installation adhesive has set so much that you can walk on the floor finishing without the risk of displacing the ceramic elements. How to determine how long it takes for floor tiles to dry after installation? You will learn more about this later.
Mix the solution
Let's start preparing the solution. If you are using ceramic tiles, you will need a dry mix. It needs to be diluted in a certain amount of water. Usually a ten-liter bucket is enough. To prepare the solution you need only 3 liters of water, the rest is a mixture. Using an electric drill or a mixing whisk, the mass of water and powder is brought to readiness. You need to mix the solution for several minutes, adding liquid or glue if necessary. Of course, it is best to study the instructions on the package, which describe in detail the process of preparing the mixture. How to lay tiles on the floor with your own hands so that they last as long as possible? You need to add a little cement to the solution, then the mixture will become more viscous, and the tiles will fall into place quickly and more firmly. Over time, the solution thickens, so you need to periodically add water to the bucket and stir constantly.
How long does it take for floor tiles to dry and when can they be grouted?
The period of complete hardening of the adhesive polymer-cement mass, regardless of the manufacturer of the material, lasts on average about a day, and this is stated in the product information written on the packaging. But it must be taken into account that the daily setting period of the adhesive solution is typical at room temperature, normal humidity and the thickness of the installation layer is up to 10 mm. Any changes to these parameters will affect the curing time of the tile adhesive. If the temperature is below +5 degrees and the mortar layer is 1.5-2 cm (this is quite possible if leveling the screed is neglected), the mortar will completely set in about 36-40 hours. When the tiles are glued to a minimum layer (3-5 mm), especially at a base temperature of 30-40 degrees (in the summer, or with heated floors working), already 8-10 hours after installation you can safely walk on the tiles and grout the intertiles. gaps (seams). It is clear that it is necessary to determine how long the tiles on the floor take to dry based on specific conditions.
If the flooring is done at a normal temperature for a living space (20 degrees and above) on a small layer of glue, grouting is done the next day after installation is completed. Before filling the gaps with grout, do the following:
- remove crosses and wedges from the seams;
- additionally clean the seams from dried tile adhesive (if necessary);
- do light wet cleaning of the surface.
Gaps between tiles should be filled only with specialized color mixtures. To save money, it is not recommended to do this with ordinary mounting adhesive. The reason is not aesthetics (the adhesive mass after drying is gray and nondescript). Grout is not only needed for beauty. This specialized mixture, even after drying, has residual elasticity, that is, the ability to compensate for the linear expansion of ceramics with temperature changes. Another function of the grouting material is to prevent moisture from penetrating under the tiles, which is important for bathrooms, bathhouses, and swimming pools. To grout joints in such rooms (structures), it is recommended to use a moisture-repellent mixture containing silicone.
How to prepare the floor for laying tiles in the toilet. Installing a tile floor in a toilet
The materials for finishing the toilet should be beautiful, durable, practical and have good water resistance. Ceramic is often used as a floor covering in toilet rooms, so you need to know how to lay tiles on the floor in a toilet.
Before laying tiles in the toilet, you can install a heated floor
Ceramics is considered one of the most popular materials for cladding. It gained high popularity due to its properties and technical characteristics:
Ceramic tiles in flooring fully comply with the above requirements. It should also be noted that the installation of ceramics is quite simple, so you can easily install it yourself. This material is easy to work with and anyone who is at least somewhat familiar with construction work can lay tiles themselves.
First of all, you need to select the necessary materials and stock up on the necessary tools. You should also determine the pattern according to which the tiles will need to be laid. By choosing the right tiles and laying them correctly, you can correct certain shortcomings in the toilet room.
Of course, the work of laying and cladding, like any other, causes some difficulties, but with desire, accuracy and patience, it is quite possible to cope with it yourself. As a rule, when laying the floor in a toilet, tiles are traditionally used, which differ in texture, coating, pattern and color from the tiles laid on the walls, however, the technology for laying it is almost the same. For a tiled floor you will need to purchase tools and materials: