Tiling is a practical and beautiful solution for any interior. But what to do if the ceramic element breaks off, and because of this the surface has an unattractive appearance. Every craftsman should know how to glue fallen tiles to a wall, or restore the coating.
How to choose bathroom tiles
Before starting work, a tile layout plan is drawn up. The choice of design is important. Medium-sized tiles with a square shape are easy to install. It is more difficult to correctly lay a mosaic that includes many small elements of two or more colors and shapes.
Size and type
Tiles are now available in different sizes. There are mosaics on sale, the individual elements of which reach 3x3 and 5x5 cm. There are also larger versions of mosaic tiles. Such small tiles require careful preparation of the walls and floor. Its installation is complicated and takes more time.
Mosaic tiles are quite complex and require more time to install.
Large-sized tiles are also made, but not every beginner can cope with laying them. Large elements are more easily damaged. They are also more difficult to cut. It is best to use such tiles in large bathrooms, so that as many intact elements as possible fit on the walls and floor.
It is convenient to lay rectangular tiles measuring 40x60 cm on the walls. Such tiles are laid vertically. It can be combined with thin elements that are used to form dividing lines. It is easier to place elements measuring 60x60 cm on the bathroom floor.
Shiny or rough
Rough porcelain tiles can go well with a glossy finish.
There are both glossy and rough options on sale. Smooth, shiny tiles are easier to clean, but even small deposits of water stone and other contaminants are visible on them, so this coating requires careful care. When wet it becomes slippery. In addition, this coating reflects light, which is not always appropriate.
It is better to put rough tiles in the bathroom. Thanks to the features of its top layer, it gets dirty less and does not become slippery. Rough porcelain tiles are recommended to be laid on the floor. It is possible to combine glossy and rough coatings.
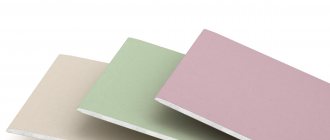
Texture, color and pattern
Nowadays tiles are produced in different shades and textures. There are many types of tiles that have both a textured and smooth surface. There are models with patterns in the form of floral patterns or abstractions. Decor imitating natural materials is also on sale, including:
- skin;
- concrete;
- slate;
- granite.
In the bathroom, the tiles can be embossed.
Often, tiles of several colors are installed in the bathroom, separated by a line of tiles of other sizes and styles. Dark brown elements are laid up to the middle of the wall. For the dividing line, you can use elongated beige elements with brown ornaments. The wall is covered with beige material from the middle to the ceiling. A combination of samples of other colors is possible. Both in the photo and in life, this design looks neat.
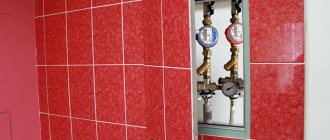
Grout
The decorative coating in the bathroom is exposed to moisture. Water getting under the tiles will lead to the formation of fungus and elements coming off. To prevent this, it is important to seal the seams correctly. It is not recommended to use cheap cement-based grout in the bathroom. It quickly cracks with frequent contact with water.
To prevent water from getting under the tiles, it is necessary to seal the seams correctly.
The best are two-component compositions based on epoxy resin, which repel water and do not change color. They are not affected by chemicals and fungus. The color of the composition is selected according to the darkest shade. You need to immediately purchase the required amount of grout for the joints (the calculator will help you calculate how much material will be needed in your work).
For ceramics
Sometimes the old tiles are not removed before renovation, since dismantling usually takes a huge amount of time and effort. Installation on ceramics is possible. The main thing is to check that the previous surface is holding really firmly. An equally important indicator is adhesion. Glossy tiles without cracks will adhere rather weakly to the adhesive material.
In any case, mounting on ceramics can only be done with a really good glue. In this case, it is not advisable to save on compounds, because this threatens to redo the entire repair.
Layout methods
Decorative coating elements can be placed in several ways on the floor and walls of the bathroom. There are simple installation methods that allow you to quickly lay tiles in geometrically correct rooms. If you have experience, you can use complex installation patterns. It is advisable to lay out the tiles in advance, taking into account the space for the joints.
The direct installation method is the simplest. It involves laying elements in even rows parallel to the floor. In this way, you can lay both rectangular and square tiles. This installation order is recommended for beginners.
Methods for laying tiles in the bathroom.
It is relatively simple to tile walls and floors using a brickwork pattern. In this case, every second row is mounted with an offset of ½ element. This method is more suitable for rectangular elements. The main disadvantage of the scheme is the need to cut tiles. This increases material consumption.
The option of laying tiles diagonally is more difficult to implement. It involves installing elements at an angle of 45° relative to the line of contact between the floor and walls. Most often this scheme is used for arranging floor coverings, but can also be used for walls. Square tiles are installed in this way. This scheme is better suited for large bathrooms, where a panorama of the intersection of lines will be visible. The installation method requires cutting elements. Due to increased waste, the final price increases.
To obtain an unusual coating, modular masonry is often performed. Square tiles are used in 2 sizes of different colors. Thus, a complex geometric pattern is laid out. The difficulty lies in the need to take into account the size of the seams.
Causes of destruction of masonry
If several elements of ceramic tiles have fallen off the wall, then first of all it is worth determining why this happened. The main reasons why tiles fall off are:
- emptiness. Improper installation leads to the appearance of voids under the tiles. After the tile adhesive dries, voids remain between the main surface and the tile. If 10% of the total surface is voids, then the tile will most likely fall off;
- To ensure maximum adhesion of the tiles and the base coating, the adhesive manufacturer specifies specific temperature and humidity conditions under which wall cladding work can be carried out. If such conditions were not met during installation, then there is a high probability that the tile will soon fall off;
- insufficient adhesion between the tile and the base. This happens mainly due to poor preparation of the base before cladding or, if ceramic elements are laid on surfaces made of a specific material, for example, wood or chipboard;
- uneven base surface. This is especially true for tiles that were laid on the floor, but this also applies to the surface of the walls. If there are serious differences in height on the surface, then the tile elements become loose and fall off during operation;
- poor quality glue. If you use low-quality glue during installation or do not follow the proportions specified in the instructions during the preparation process, then a high degree of adhesion will not be achieved;
- insufficient and excessive amount of glue. In the first case, the ceramic element simply will not be able to securely attach to the main surface. In the second case, the excess amount of adhesive after drying delaminates, crumbles and cannot hold the tile on the wall;
- moisture ingress. Bathroom tiles often fall off the wall for this very reason. Especially if the tile adhesive was chosen incorrectly or a low-quality solution was used. Moisture getting under the ceramic elements softens the adhesive composition and reduces adhesion to the surface;
- mechanical impacts, after which the solution loosens and breaks. This happens if, for example, renovations are carried out in an adjacent room, on the opposite side of the tiled surface;
- regular temperature changes have a detrimental effect on the adhesive solution, which causes cracking and chipping of the tiles;
- shrinkage of the building. This reason is typical for new buildings, when the structure has not yet taken its final position.
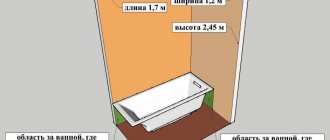
How to correctly calculate the number of tiles
First you need to choose a tile design. You need to write down its dimensions. After this, you can start calculating. Measurements are taken of each wall, and the location of the bathtub, toilet and sink is determined. A detailed plan of the room is made. Each wall is drawn on a separate sheet. In this case, you need to respect the scale. This will allow you to determine the number of elements needed to decorate each wall, taking into account the seams.
The plan will help you accurately determine the number of trimmed elements. They need to be positioned so that they are least visible. The detailed plan helps determine the exact number of tiles. You need to add 10% to the resulting number. A reserve is needed, because when cutting, the tiles may split incorrectly.
Grout the joints
No earlier than a day later, after the glue has completely hardened, you can begin the final stage - grouting, or jointing the seams. This is done like this:
- Remove the crosses and remove any remaining glue from the seams.
- Prepare a small amount of fugue according to the recipe on the package and mix thoroughly with a mixer.
- Let sit for 5-10 minutes and stir again.
- Use a soft rubber spatula to fill the joints with grout.
- Hold the tool at a 45° angle to the surface and apply the mixture perpendicular to the seam, filling it completely.
- After half an hour, remove the remaining fugue with a damp sponge. Wipe off any remaining stains after a few minutes with a dry cloth.
How to lay tiles in the bathroom with your own hands
By following simple rules, you can complete all stages of the work yourself. First you need to prepare the bathroom and buy tools and materials. The old coating must be dismantled. Before laying tiles, it is necessary to level the walls and floor. It is advisable to install additional waterproofing. After this, you can begin laying the coating.
Preparing the premises
The bathroom needs to be prepared for future tiling. Furniture and decor are removed from the premises. The hot and cold water supply should be turned off. It is advisable to carefully remove the heated towel rail, sink and toilet. It is not necessary to lay material under the bathtub, so it can be left untouched. After this, they begin to dismantle the old covering and prepare the walls and floor.
Before you begin laying tiles in the bathroom, you must turn off the hot and cold water.
Tools and materials
In addition to tiles, you need to purchase a number of building materials. First of all, compositions for leveling walls and floors are selected. You also need to buy mixtures for installing tiles. You should carefully study the manual that comes with them. There is a special adhesive for ceramic, porcelain stoneware and other types of tiles. You need to purchase a primer and waterproofing. Necessary tools and consumables include:
- building level;
- notched spatula;
- containers for preparing solutions;
- mixer;
- tile cutter;
- Bulgarian;
- corundum block;
- starting metal profiles;
- rags;
- crosses;
- putty knife;
- aluminum rule;
- square;
- rubber hammer;
- laser level;
- rubber spatula for grouting joints;
- brush;
- roller
You will also need a vacuum cleaner and bags for construction waste. You need to prepare gloves, a protective mask and work clothes.
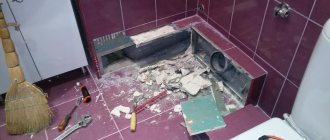
Dismantling the old coating
Before you start laying new tiles, the old ones must be removed using a hammer drill.
Laying tiles is not carried out on old flooring. If there are tiles on the walls, they need to be removed with a hammer drill. The device is used in shock mode. The tool is inserted under the lower edge of one of the elements.
Tiles, adhesive and poorly attached plaster are removed. Shards of tiles may fly to the sides, so you need to take precautions: wear gloves and safety glasses.
If the walls are covered with paint, it should be removed. A grinder with a special attachment is suitable for this. In places where the old coating is firmly attached to the wall, you can use a chisel and a hammer.
The walls and floor are thoroughly cleaned of dust and dirt with a stiff brush, as well as with a vacuum cleaner. After this, all trash is removed from the bathroom.
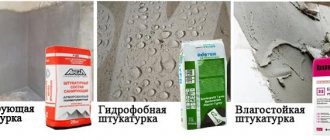
Leveling surfaces
The surfaces need to be leveled with a plaster mixture. Drywall should not be used in the bathroom, because it does not tolerate high humidity. First, level the ceiling and walls. The surfaces are pre-treated with a primer. Using a plumb line, determine the deviation from the vertical. Using a building level, guide beacons are fixed.
Application of guiding beacons.
After this, the plaster solution is prepared. First, it is thrown onto the wall with short, sharp movements using a ladle. The layer of plaster should be no more than 2-3 cm. After this, the surface is leveled using the beacon rule. In this case, you should not put too much pressure on the guides. You need to remove excess composition. Particular attention is paid to the formation of corners. They must be straight (90°). The remaining irregularities are rubbed with a trowel.
When the walls are leveled, using a laser level you need to make marks on the bottom of the walls along which the floor will be leveled. It is better to use a self-leveling compound. After this, the floor screed is poured. When the plaster and screed are dry, you can begin waterproofing.
Proper waterproofing
To waterproof bathroom floors and walls, it is better to use a penetrating mixture. Such compositions include:
- "Lakhta";
- "Penetron";
- "Isopron";
- "Hydrosmile."
Penetron.
Hydrosmile.
Lakhta.
Isopron.
It is necessary to prepare a waterproofing solution. Using a brush, they should work on all corners. The walls and floor are covered with the composition using a roller. It is advisable to apply several layers of penetrating waterproofing.
Where is the best place to start?
Using a laser level to determine the bottom line of the first row of tiles.
The laser level is used to determine the bottom line of the first row of tiles. Starting metal profiles are installed along it. They will support the first row until the glue hardens.
There are no rules regarding the choice of where to start installation. Most craftsmen begin laying tiles at the level of the bathtub. However, if it is not adjacent to the wall, then you can start laying from the floor. The greatest difficulty is the installation of the first row of tiles. After this, you need to let the glue harden. This series will become the basis for subsequent ones. The covering is laid on the floor starting from the far corner.
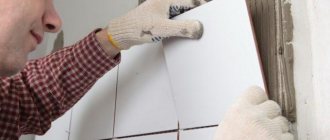
We put the material
The tiles are attached with special glue. First you need to prepare a solution. Water is poured into the container, into which the dry mixture is added in small portions. The glue should have the consistency of thick sour cream. After this, you can begin laying the material. A thin layer of glue is applied to the wall. Use a notched trowel to spread it over the tiles. It should be pressed against the wall so that the glue under pressure is evenly distributed.
The bottom edge of the element should be located on the starting rail. Correct installation is checked using a building level. After this, the next element is placed. Crosses are used to control the size of the gap. When the first row of tiles is installed, vertical strips are installed on both sides. A cord is pulled over them - a horizontal guide for laying the second row. It is better to lay the cut elements in the corners.
After laying the walls, you can proceed to the floor.
After covering the walls, you can start decorating the floor. You need to start from the far wall. To control the location of the elements, a nylon thread is pulled, along which the first row will be installed in the future. A thin layer of glue is applied to the floor. The composition is distributed over the tiles with a notched trowel.
Floor tiles are being laid. Evenness must be controlled using a building level. If necessary, you can straighten the tile by lightly tapping it with a rubber hammer. If the tile is deeply embedded in the mortar, it should be removed and reinstalled. Using the level, all elements of the first row are controlled. Subsequently, the remaining elements are laid out on it until the entire floor is covered. Do not step on it until the glue has completely hardened.
Are crosses necessary for installation?
When installing tiles, crosses should be used. They help make the seams uniform. Crosses come in different sizes, resulting in the desired gaps being created. Without the use of these devices, there is a high probability of the formation of uneven seams. This will cause the rows to shift and the coating to look sloppy.
Crosses will be required when installing tiles.
How and when to rub seams
Both ready-to-use grouting compounds and dry mixtures that need to be diluted with water before application are available on the market. The highest quality grouts include:
- Kesto Kiilto.
- Kerakoll Fugalite Eco.
- Litokol Litochrom Luxury.
- Litokol Litochrom.
- Litokol Starlike.
- Mapei Kerapoxy Design.
- Mapei Ultracolor Plus.
Litokol Starlike.
Litokol Litochrom Luxury.
Kesto Kiilto.
Kerakoll Fugalite Eco.
Mapei Kerapoxy Design.
Mapei Ultracolor Plus.
The grout should be applied with a flexible rubber spatula or sponge. Some masters distribute this mixture with their fingers. The work must be done quickly until the composition dries. Before hardening, it is necessary to remove the remaining grout with a damp sponge. The cleaned tiles are wiped dry with microfiber.
Join the corners
When laying tiles in the inner corners, make sure that the tile with a cut edge is covered with a plate with a smooth factory edge on the other wall.
To form external corners, use special corner profiles made of plastic or aluminum. Install the corner and align the first tile with it, and insert the second into the profile coated with glue.
Laying errors and how to correct defects
Defects must be identified and eliminated in a timely manner, because after the glue hardens, it will be necessary to break the tiles, and sometimes even dismantle the entire coating.
The tiles lay in steps and not in one plane
This defect occurs when the plane of the wall is disrupted. If the horizontal is shifted, then when laying, the vertical seams will also have a flaw. It can only be corrected before the glue hardens. To properly align the horizontal line, trimming the first row of tiles is often required.
If the violation was discovered too late, when the wall is almost covered, you should find the row where it started and then wedge the seams. The bottom row is straightened with wedges or matches, and the rest - with crosses of different sizes. The flooring may move. This happens when the angle of the walls is not straight. To fix the problem, you need to trim the tiles when laying the first row.
Tile fell out of row
Displacement of the element may occur if a cross was not inserted into the joint when laying the tiles. Less often, the problem lies in a manufacturing defect, in which the corner of the tile is beveled. In this case, the element must be replaced. If the problem is not a manufacturing defect, a cross should be inserted into the seam. The tiles are fixed in the desired position with tape. After the glue dries, the element will take the right place.
Tiles sink deep
The reason the tiles are too deep may lie in poor-quality application of the mortar. Most often this happens when elements are glued pointwise or the composition is applied only to the corners. In this case, individual elements may fail. To eliminate the defect, remove the element that is too recessed, apply glue evenly and install it again.
Dips in seams
This defect often occurs when using low-quality or too liquid grout. To eliminate the flaw, the seams should be cleaned. After this, fresh grout must be reapplied.
Prepare the glue
- Pour water into the container and add the required amount of adhesive in strict accordance with the instructions on the package.
- Stir well until smooth using a hammer drill or drill at low speed.
- After 10 minutes, stir the solution again for a more uniform consistency and complete saturation of the settled mixture.
- Do not prepare a large amount of solution at once. If you don’t have time to use it, it will dry out and lose its properties.
- You cannot add water to already prepared glue: this will impair the strength.
So that the seams do not match
It is necessary to glue the tiles so that the seams between the elements of the new cladding do not coincide with the seams of the old one. To do this, before starting work and marking, it is worth “trying on” the new tile, making a preliminary layout.
Preliminary drawing of a floor plan, taking into account all elements of furniture or equipment that cannot be dismantled (plumbing, built-in furniture, etc.) will help speed up the process. In this case, you can immediately select the places where the trimmed tiles will be laid in order to disguise these places as much as possible.
It is advisable to choose larger tiles for secondary cladding than in the primary one. It is also important to pay attention to the thickness of the new finish - thin, fragile tiles are not suitable for it; you must choose products with a thickness of at least 8 mm.
Cladding process
The process itself is simple, although it requires some skill.
- Surface primer. This must be done even if the glaze or notch was cleaned. In this case, it is not necessary to use a “concrete-contact” primer; you can limit yourself to cheaper options specifically designed for laying tiles.
- Surface marking. It is convenient to use a thick thread or thin cord moistened with a dye (for example, a strong solution of manganese or blue). By pulling such a thread between the markings near the walls and pressing it to the floor, we get a perfectly straight line for the future tile seam.
- Dry layout (if this has not been done previously) to calculate the number of rows, the number and cutting line of the outermost elements of the masonry.
- Applying tile adhesive to the selected area of the surface. First, the glue is applied with a smooth spatula and leveled with a serrated one.
- Laying tiles. It is pressed tightly to the base surface and evenly “settled” by tapping it with a rubber hammer. The correct level is constantly checked.
- Fixing the correct width of seams using special inserts.
- Grouting joints after the tile adhesive has dried (cured).
- Cleaning the lined surface from residual glue, grout and other contaminants.
For a better understanding of the process, we recommend watching the video.