When it comes to renovating a kitchen, the practicality of the materials with which it is planned to decorate the room comes to the fore. Today, the building materials market is ready to offer a lot of options that meet both the visual and utilitarian wishes of the buyer. True, many of these solutions come at a considerable price, which not everyone is willing to pay, so today’s article we will devote to oilcloth - an inexpensive, practical and very aesthetic material. How to glue oilcloth to the wall, what tools you will need for this and how to ultimately glue it to the wall - read below.
What kind of glue to glue the oilcloth on?
The base of the oilcloth consists of synthetics, so not every glue is suitable for it.
To glue the film to the wall, as a rule, the following types of glue are used:
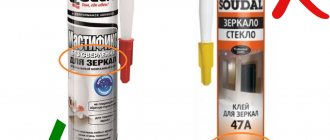
- Bustilat. Designed for repair and finishing work, gluing materials to floors and walls: wallpaper, oilcloth, carpets, linoleum, ceramic and polymer tiles to wood, concrete and oil paint. Made from synthetic materials. It is a creamy white mixture. Prevents the growth of fungi and mold due to the presence of biocidal additives. Environmentally friendly, fireproof, non-toxic, when dried it gives a durable and transparent seam, and has high adhesive properties. The cost of a package weighing 1.3 kg: 174 rubles.
- PVA White House. Construction and household adhesive solution intended for gluing decorative oilcloth, cardboard, leather and wood. It is used in laying linoleum, film and various types of wallpaper. When dry, it becomes transparent, so the seams remain invisible. It is a homogeneous mass of white or light yellow color, without lumps. Non-flammable, elastic, does not contain harmful components. The cost of a package weighing 2.4 kg: 105 rubles.
PVA glue recipe
It is not necessary to buy glue in the store to glue oilcloth to the wall .
You can prepare an analogue of PVA glue at home. For this you will need flour and water.
What should be done:
- Pour a glass of water into a deep plate;
- Add 2 teaspoons of flour;
- Stir with a whisk until no lumps remain;
- Place the container on medium heat;
- Stir the mixture until thick;
- Stir the paste constantly to prevent the formation of lumps.
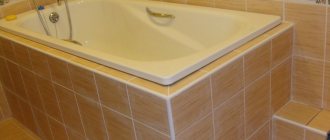
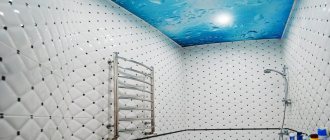
Step by step gluing the oilcloth in the bathroom
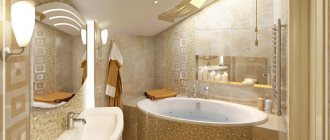
The bathroom is characterized by high air humidity. Therefore, so that the oilcloth does not lose its original appearance, does not fall off, and the paint on it does not rub off, you need to properly prepare the surface for gluing and follow the procedure for applying the oilcloth strictly according to the instructions.
To do this you will need:
After that, get to work:
- Remove old trim;
- Get rid of uneven surfaces on the wall with a spatula;
- Wash the wall from dirt and dust with a solution, adding 3 tablespoons of soda to 1 liter of water;
- Dry the wall well with a hairdryer;
- Treat it with a primer;
- According to the instructions, prepare Bustilat glue and leave it for some time until it swells;
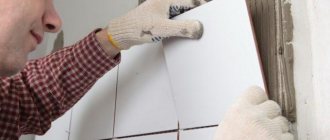
- As soon as the glue is infused, proceed to cladding the walls;
- Mark the stripes on the film with a pencil and cut them with a cutter;
- Apply glue to the strip using a roller or brush, leaving no gaps, otherwise bubbles will form;
- Apply glue to the desired area of the wall (start work from the corner of the room towards the window);
- Let it dry, then spread another layer;
- Paste the strip of film on the wall in the same way as wallpaper: pressing the canvas from top to bottom, from the center to the edges;
- Smooth the oilcloth with a cloth to expel air from under it;
- Glue the next strip slightly on top of the previous one, matching the pattern;
- To ensure that the joints fit tightly, stick paper strips coated with an adhesive mixture on top of them;
- After the oilcloth has dried, remove the strips after moistening them;
- If the wall was previously whitewashed, work it with glue using a hand brush so that the oilcloth does not fall off after the glue dries.
In the same way, you can glue oilcloth to the wall in the kitchen, since this room is also characterized by high humidity.
How to calculate the amount of film
To calculate how many rolls of film you need:
- Determine the required number of canvases by dividing the perimeter of the room by the width of the roll;
- Calculate how many sheets are in a roll by dividing the length of the roll by the length of one sheet;
- Calculate how many rolls you need by dividing the required number of canvases by the number of canvases in the roll.
Oilcloth finishes are suitable for almost all surfaces: metal, mirrors, plaster, glass and wood. There is even a special film that is fixed on ceramic tiles.
Alternative options
When deciding how to wallpaper in the bathroom, you can use alternative options, use oilcloth for the walls, self-adhesive PVC film, liquid wallpaper or glass wallpaper. Let's consider these options in more detail.
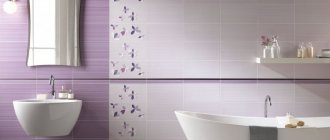
Oilcloth for walls
An inexpensive but practical solution is oilcloth for bathroom walls. This is a completely synthetic material that is not afraid of moisture:
- To glue the oilcloth, you can use PVA or Bustilat glue.
- The glue must be evenly applied to the entire oilcloth panel, since if you leave areas ungreased, an air bubble will form in this place.
- Before gluing the oilcloth, you need to treat the walls with primer or glue diluted with water.
- Start gluing the oilcloth from the corner; to smooth it you need to use a soft cloth or roller.
Self-adhesive PVC film
This is another inexpensive option for wall decoration. When using this material there is no need to use glue, the film is self-adhesive. Pasting the film is no more difficult than wallpaper; it is cut into strips of the required length, and then applied in place and the protective paper is carefully removed, while smoothing the film.
Liquid wallpaper
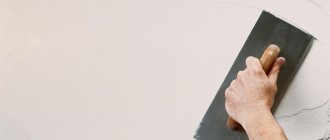
This name is given to water-based plaster, which after completion of the work becomes one hundred percent moisture-proof. Liquid wallpaper for the bathroom is applied using a sprayer or manually using a trowel and a plastic grater.
Glass wallpaper
When choosing moisture-resistant wallpaper for the bathroom, you should pay attention to glass wallpaper. The basis of this material is specially processed glass
The raw material is heated to high temperatures, then fibers are pulled out of it, from which the base of the wallpaper is then created.
That is, fiberglass is woven together like threads on a loom. The created canvas undergoes additional processing, due to which the material acquires a stable shape.
Fiberglass wallpaper is created from natural raw materials. The main raw materials for their production are quartz, clay, and dolomite. Therefore, the material is environmentally friendly. Why should you use fiberglass wallpaper in your bathroom? Their main advantages:
- Breathability. Such wallpaper in the bathroom will not interfere with natural air circulation, and this will prevent the growth of mold fungi.
- Hygiene. Walls covered with fiberglass wallpaper can be washed using detergents that do not contain abrasives.
- Durability. If the walls are decorated with fiberglass wallpaper, then the repairs will not need to be repeated for a long time. If you want to update your interior, you can simply repaint the wallpaper.
- Strength. Despite the fact that the basis of such wallpaper is glass, they are distinguished by a high level of strength.
- Moisture resistant. Like ordinary glass, wallpaper based on this material does not collapse under the influence of humid air and is not afraid of direct contact with water.
- Fire safety. This material does not support combustion and does not emit toxic substances when heated.
Waterproof glass wallpaper will allow you to create a beautiful and durable coating with minimal effort, ideal for finishing bathroom walls. This is the most durable option of waterproof wallpaper, but it also costs significantly more than vinyl-based wallpaper.
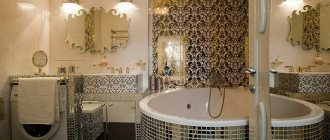
Colored oilcloth for the bathroom
In Soviet times, the choice of building materials and the shortage of furniture often led to the fact that many housewives did not allow many housewives to realize their creative ideas in their apartments. Despite this, the owners created a beautiful design and competently equipped their home.
Related article: How to drill a concrete wall in an apartment
For example, to decorate the walls of the bathroom, oilcloth for walls was used, and if you were lucky with the purchase, then self-adhesive colored films. The choice of material, of course, was small, so we were content with what we could buy. In Soviet times, the owner of an apartment often glued the material himself, and also knew how to glue the oilcloth; this knowledge was passed on by word of mouth.
In modern times, everything has changed for the better; manufacturers offer a wide variety of materials to suit every taste, color and budget. On the market you can find a huge assortment of self-adhesive oilcloth; of course, this material is inferior in quality to ceramic tiles. But if you waterproof it correctly and glue the film to the wall, then such a coating will reliably protect the bathroom from moisture.
Features of the material
Given the shortage of building materials, which was observed during the Soviet era, any design tricks when decorating a bathroom were nonsense. Tiles were used very rarely, so self-adhesive oilcloth was used.
At that time, this material did not have as many different design solutions as it does today, so many tenants were content with little. Now in construction stores and supermarkets you can find a wide range of oilcloth for the bathroom, for every taste and budget.
Of course, oilcloth cannot be described in such words as a high-quality material, because the influence of steam and moisture wears off the paint on it over time. But still, if you follow all the technologies for pasting walls, then such an oilcloth will certainly serve you for many years. In order to achieve a reliable coating, first of all you need to prepare the walls well: clean them of old finishes and apply a good primer.
Oilcloth is a canvas that has a special waterproofing coating. Its functions are not so difficult to determine, because the very name of this composition suggests that it protects the bathroom walls from moisture. There are cases when the material is specially sandwiched with foam rubber.
Oilcloth is produced without a backing, on a paper or fabric base, embossed or foamed.
How to choose sanitary doors for the toilet and bathroom?
Find out from this article what is the best way to decorate the walls in the bathroom.
Advantages of oilcloth for the bathroom
This type of bathroom wall decoration has many advantages. The main benefit of finishing with this material is that the cost of repairs is significantly lower than when finishing with other building materials.
Advantages of the material:
- a large assortment, this allows you to choose oilcloth to suit any design;
- modern materials have high water-repellent properties, which will ensure the safety of the walls from dampness and fungus;
- modern manufacturers make oilcloth that has a long service life;
- oilcloth can be used to decorate a small object to match the surrounding interior or an element in the bathroom that is inaccessible or subject to repair;
- the film is suitable for almost any type of base: brick, concrete, wood, drywall;
- the finishing speed is several times higher than when installing tiles or finishing with other materials.
Oilcloth for the bathroom is presented in a large assortment. You can find material for gluing to plywood and even glass.
General information
The oilcloth for the table is made from laminated protective transparent PVC film. Production - South Korea.
The product has a shiny laminated surface and reliably protects the table from any damage. The oilcloth structure is flexible and durable. It is tear-resistant, practically does not wrinkle and cannot be cut with a knife. Soft glass remains transparent for a long time and retains all its properties.
Thanks to the flexible tablecloth, wear and tear on the tabletop is reduced. Dust on the surface covered with a protective film is practically invisible, any dirt can be easily wiped off without scratching or staining the table material.
Flexible glass is intended for use:
- in any office;
- in the kitchen;
- in the dining room;
- in a restaurant (cafe).
Which table is it suitable for?
Protective film is suitable for all types of tables, but is especially relevant for glass and lacquered ones. The tablecloth protects the kitchen table from cuts, the desk from rubbing, and the dining table from accidental stains.
It can also be any table in shape:
- rectangular;
- square;
- round;
- oval;
- non-standard shape.
Main characteristics
Before purchasing the product, you must select the thickness:
- 1.2 mm is used to protect chests of drawers, window sills, children's and school tables;
- 1.8 mm is well suited for the kitchen (protection of tables and countertops), children's (protection of desks) and office (protection of tables and window sills);
- 2.2 mm is designed to protect large surfaces and helps emphasize the premium quality of the interior.
Liquid glass on the table has the following characteristics:
- Duration of operation - up to 5 years;
- transparency - 98%;
- hardness - 37;
- blue pigment that protects against yellowness;
- resistance to sunlight;
- food standard - the material is allowed for contact with food;
- synthetic smell - absent;
- There are no heavy metal impurities in the composition.
Advantages of flexible glass
Main advantages of the product:
- easy to trim after shrinkage;
- has a comfortable temperature range - from –20 to +80;
- merges with the surface;
- just spread out;
- does not slip, lies well under its own weight;
- greasy stains are not eaten away;
- any dirt is easily removed.
If you want, you can decorate the tablecloth. Any stickers can be easily attached to the silicone surface. You can also paint it with permanent paint, or attach fringe around the perimeter.
Preparing for work
After choosing and purchasing oilcloth for the wall, you should start preparing the tool. Also, if the oilcloth is not self-adhesive, you must choose a waterproof special glue.
To glue the oilcloth, you need the following tool:
- Cutter - with a well-sharpened cutting part;
- Pencil - for marking panels;
- Mounting tape;
- Painting sour;
- Hairdryer - can be used at home;
- A special felt spatula is used for smoothing oilcloth fabrics.
The most important tool when working with oilcloth is a hair dryer. Use a hairdryer to heat the surface to the desired temperature before applying the film. We also treat the swelling areas with warm air - after trimming, bubbles sometimes appear if we do not glue the oilcloth correctly.
Installation features
Oilcloth as a finishing material is simply ideal, as it is suitable for any base. Where should it be glued?
The list of materials is very extensive: wood, plywood, glass, metal, plaster or mirror surface and even tiles.
If you have decided on oilcloth for your bathroom as a finishing material, then you need to prepare the necessary tools before starting the renovation itself.
Here's what you need:
- hair dryer (suitable for both household and industrial use);
- a special cutter to prepare oilcloth panels;
- pencil or pen to mark;
- scissors;
- measuring tape or ruler;
- squeegee or felt spatula for smoothing the facing material.
Let's figure out why we need a hair dryer. It is used during the application of self-adhesive film to treat surfaces, corners and joints with warm air. A hairdryer will also help to heat the puncture sites of air bubbles that arise when attaching the oilcloth.
First you need to stock up on the right amount of oilcloth. Calculations are made upon completion of the measurement.
After determining the length, height and width of the walls, the result must be multiplied and the quadrature of the surface to be finished is calculated. Having obtained the desired result, you can purchase oilcloth of the correct size. If it has a pattern, then you should leave a little space. Then it is better to buy a little more oilcloth, since when pasting, it may be necessary to combine images.
Finishing begins by removing the old coating. What needs to be done is to scrape off the unnecessary paint and whitewash from the walls, and then remove the plaster. Next, the surface should be leveled using putty, and after it dries, apply a primer thoroughly.
Many people are interested in what they need to use to glue oilcloth to the wall in the bathroom. For it, it is quite possible to use the usual and well-known PVA or Bustilat glue. If you follow the instructions on the package, there should be no problems with their preparation. Then you need to give the mixture a little time to swell.
The above-mentioned adhesives are ideal for oilcloth without a base or with a fabric backing. To finish paper-based oilcloth, vinyl wallpaper adhesive is also used. It would be nice if the date of manufacture of the glue is not too distant, as this will directly affect the quality of the finish.
Film application technology
At the first stage, the area is measured, it is necessary to calculate the amount of oilcloth. It is better to take the film with a reserve, as it will require allowances of material to connect the drawings.
Pasting begins by dismantling the old finish. Remove old paint from the walls, whitewash and plaster if necessary.
Then the surface should be leveled with putty. After drying the putty layer, a primer is applied to the surface.
The oilcloth is glued to the walls in the bathroom using ordinary PVA or Bustilat glue. PVA glue is usually sold ready-made, but when gluing wallpaper and oilcloth it is mixed with water. The method of application is simple, and there are instructions on the jar. These types of glue are suitable only if the oilcloth is without a backing. How to glue? The principle of pasting is very similar to wallpapering:
- the canvases are trimmed and adjusted according to the patterns at the joints;
- a thin layer is applied to the canvas and the wall;
- The glued film is ironed with a felt roller.
When working, you must ensure that the entire canvas is completely coated with glue, otherwise bubbles will form in uncoated areas. A layer of glue is applied to the oilcloth and canvas, after which you should wait a little, then another layer is applied to the film and the canvas is pressed against the wall. They act in the same way as when pasting wallpaper: the film is pressed from the center and smoothed to the edges, expelling the air.
Gluing the film begins from the corner, so that the joining edge is well glued, glue a paper strip on top of it, well coated with wallpaper glue. After work, the strips are well moistened and removed from the wall.
Pasting with film of different materials
Self-adhesive film is suitable for finishing wooden frames and wall panels. Before gluing, it is necessary to thoroughly clean the surface, remove old coating, dirt and dust. The surface should be degreased. To do this, you can use water with any detergent. It is advisable to try to level the wall as much as possible, sand all the protrusions and recesses, otherwise all these flaws will be noticeable under the oilcloth.
Many owners stick the film directly onto the tile cladding. Today you can even find oilcloth material that is specifically designed for mounting on ceramic tiles. It is very easy to apply this coating: the oilcloth is moistened with water, and then pressed against the wall and carefully smoothed. This durable film finish lasts a long time.
When covering furniture with film, there are also usually no difficulties. The oilcloth lays flat on wooden surfaces coated with varnish. If there are unevenness or pores on the coating, it is advisable to first level such a surface with a primer.
Experienced craftsmen recommend using an acrylic-based primer. This enhances the adhesion of the material to the surface of the base.
As a rule, on the reverse side of the self-adhesive film there are already applied markings in the form of squares. You can additionally draw the cut lines with a pencil. This will allow you to get more even fragments of material. It is convenient to use a tape measure and a mounting knife. It is necessary to take into account an allowance of 2.5 cm, but at the same time ensure that the pattern on the oilcloth is aligned. When working with patterned film, it is advisable to cut the fabric from the front side.
Nuances of work and useful tips
- Before gluing, you should thoroughly clean the surface; if you are using a self-adhesive film, then the wall must be degreased. You can use warm soapy water to degrease the surface.
- When applying film to a plastered whitewashed wall, be sure to treat the surface with glue, otherwise the oilcloth may fall off along with the plaster. If you don’t have a special roller, you can use regular gauze for smoothing.
- Try to apply the glue evenly - this will help avoid the appearance of voids under the canvas. However, if bubbles appear, you can get rid of them. The swollen area is cut with a blade and smoothed until no air escapes.
- It is recommended to treat the surfaces with primer before gluing. The corners of the walls and ceiling can be trimmed with a decorative border or a edging can be made from paper or oilcloth strips.
Related article: Attaching penoplex to a brick wall
Usage
The surfaces to be glued must be prepared. They are cleaned of dust and dirt residues. The porous surface is primed using a special solution.
Important! Before starting work, you need to check how well the room is ventilated, but after work you will have to close all windows and doors.
The consumption of adhesive for carpet or linoleum will be approximately 700 g per sq.m. It is applied to the floor, and a coating is placed on top and pressed. The surfaces will take 72 hours to dry. If you need to speed up the drying process, add a cement solution to the glue. The proportion should be 1 to 1.
If you need to glue the tile, then the product is applied to its back side in a thin layer. The consumption will be about 1000 g.
For wallpaper, glue is not diluted. If it thickens, add a little water. The main thing is not to overdo it. Per sq. m. consumption of adhesive composition will be about 200 g.
Important! It is imperative to prevent air bubbles from appearing between objects. While they dry, the windows in the room should be closed, and there should be no drafts.
The composition of Bustilat glue includes chemical compounds, so you need to work with it, observing the basic rules. Be sure to wear gloves before use. When the glue dries, the room needs to be ventilated. In case of contact with mucous membranes, they should be washed thoroughly. If any unpleasant symptoms appear, be sure to visit a doctor.
To find out more watch the video:
Caring for oilcloth walls
Film, although it is considered a short-lived product, is actually a very easy-to-maintain material. It is enough to occasionally carry out wet processing so that the material retains its original appearance for a long time. As the surface becomes dirty, wash it with warm soapy water. If stains appear that need to be washed off, you can use an alcohol-containing detergent or regular vodka.
Never use hard abrasives or sandpaper to clean oilcloth or self-adhesive film. These “remedies” can simply erase the design or damage the canvas.
In addition to the cost-effectiveness and simplicity of the device, the film has also won the love of consumers due to its ease of maintenance. It is easy to change, move or replace a separate section. Using oilcloth, you can easily change a boring design by changing the glued surface.
Storage
Bustilat glue is stored in a hermetically sealed container and in a place protected from high temperatures.
For this substance, repeated freezing (up to 5 times) with further thawing at room temperature is acceptable during transportation and storage.
Before use, the substance is thoroughly mixed.
The shelf life in the original sealed packaging at an ambient temperature of + 5-20 degrees C is 12 months from the date of manufacture.
When carrying out repair work, adhesives are almost always used. In order not to spoil the surface of the material with nails, Bustilat glue is used. It has been successfully used for 50 years, which indicates its high quality. In this article we will talk about what this type of glue is.
Universal glue “Bustilat” (click to enlarge)
How to glue oilcloth to a wall efficiently and for a long time
When renovating an apartment and decorating premises, you can add zest to the design using a variety of finishing materials, including oilcloth or fabric (chintz, satin, velvet). Oilcloth can be used to cover all the walls of a room or only part of the surface. Such material can be glued with mastic, special glue, or simply pinned with nails, although it is now so rare to attach the coating to the walls. How to glue oilcloth to the wall so that it is practical and beautiful? What advice can we give to the home handyman? I invite you to the group on Subscribe.ru: APARTMENT RENOVATION, USEFUL TIPS, HOME AND FAMILY
how to glue oilcloth to a wall
Precautionary measures
Since this synthetic substance is made on the basis of chemical compounds, it is very important to take some precautions when working with it (especially in cases where glue is used regularly). You should always wear gloves made of polymer materials when performing work, and also ventilate the work area well. If the substance gets into your eyes, rinse them thoroughly with clean running water.
Information about oilcloth
Various materials are used to make oilcloth, giving it strength and good resistance to mechanical damage. The components that make up the oilcloth ensure excellent environmental friendliness of the coating.
Positive aspects of coating
Oilcloth does not absorb moisture. Therefore, it can be safely used to decorate walls in the bathroom, kitchen and many other utility rooms.
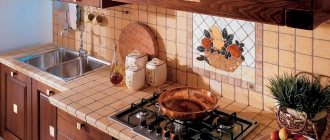
Possessing heat resistance, oilcloth can be used to cover the kitchen work area, as a so-called kitchen apron.
The material does not absorb fats and various dirt. It is easy to remove dirt using a soap solution.
The low price of oilcloth allows you to replace wall cladding with a new material.
A huge range of coatings allows you to match it to any interior style and become a real decoration of the room design.
The disadvantage of oilcloth is the risk of harmful microorganisms: mold, mildew.
Oilcloth for walls
The most popular use of the material is as a dining table cover.
More recently, oilcloths have been on sale with a paper or fabric backing, on which a layer of polyvinyl chloride (PVC) was applied to ensure strength. These types of oilcloth were not very durable, had a strong chemical smell, and over time the paint rubbed off from the design.
With the use of modern new technologies, materials using synthetic and polyester varnishes have appeared, giving oilcloth brightness, thinness, lightness, and wear resistance. Modern oilcloth has become similar to fabric, and this property allows it to be used for unusual wall decoration.
Application area
- Oilcloth with its fancy ornament or pattern and beautiful design can compete with wallpaper, especially in rooms with high humidity: bathroom, kitchen.
- The coating can be used to decorate furniture: finishing shelves, table surfaces and using unusual zippers in furniture instead of doors.
Oilcloth gluing technology
You need to know about the features of pasting with this coating even before you decide to use oilcloth for wall decoration.
oilcloth for walls
Work order
- The amount of material should be calculated. To do this, take measurements of the room or kitchen apron. Knowing the length, width, height of the room, you can easily calculate the surface area without taking into account window and door openings and can determine the length of the oilcloth. Remember that if the coating has a pattern, then you need to buy it with a reserve to adjust the pattern.
- Now you should prepare the surface of the walls well. Completely remove the old coating (paint, wallpaper, etc.), clean from dirt and dust, if necessary, wash with the prepared solution: 3 tbsp per liter of water. l. baking soda. After the procedure, the walls need to be thoroughly dried.
- Purchase the estimated amount of oilcloth and glue in the store. To glue the coating, PVA glue and Bustilat are used. They are diluted with water, so they do not leave stains after drying. Excess glue can be easily removed with a damp cloth. Be sure to check the release date - the glue must be fresh.
- Prepare glue according to instructions.
- The material is cut into the required strips, adjusted according to the ornament and design. The strips are carefully coated with glue as evenly as possible, without missing a single area, using a brush or roller, otherwise there will be bubbles. The glue is also applied to the wall, allowed to dry a little and then smeared again with the next layer. The strip is glued to the surface, proceeding in the same way as with wallpaper: press the canvas from the center to the edges, smoothing the oilcloth over the surface, expelling the air.
- The next canvas is glued with a slight overlap on the first, matching the pattern. The joints are carefully rolled so that they are not visible.
- If pasting is done on chalk whitewash, then you should first treat the wall with glue so that when the whitewash dries, it does not come away from the plaster.
- You should start gluing from the corner. To ensure that the joints stick well, paper strips coated with wallpaper glue are glued on top of them. After the oilcloth has completely dried, the strips are moistened and removed. The top of the covering is secured with a suitable border.
- If bubbles form during gluing, carefully cut them with a sharp knife, release the air and smooth them out.
Operation and care
- After drying, the surface with the oilcloth should be washed with soapy water at room temperature and wiped dry. Repeat the procedure as it becomes dirty.
- Do not use aggressive detergents containing acids and alkalis to extend the life of the material.
- To maintain the brightness and color of the coating, it is recommended to periodically wipe them with a mixture of milk and vinegar, diluted in equal proportions.
Now you can imagine how to glue oilcloth to the wall . With its help you can get an extraordinary interior for your bathroom or kitchen.
To avoid mistakes, you can read the tips on how to properly glue wallpaper.
If you find an error, please select a piece of text and press Ctrl+Enter.
DIY apron for the kitchen.
Good day, dear visitors of the site rems-info.ru.
I want to tell you about a solution to a problem that almost everyone who moved into a new apartment with finishing from the developer has encountered. As a rule, in a modern new building, a protective wall apron in the working kitchen area (which protects walls and wallpaper from splashes of water, grease, etc.) is simply not provided. And if you are not going to make a new renovation in the near future and have already spent a lot on purchasing kitchen furniture, then I will tell you a simple, and most importantly inexpensive option for decorating a kitchen apron with your own hands, which will allow you to forget about this problem for a year or two. To do this you will need:
- Kitchen oilcloth. The one that is usually used to cover the table. We choose medium thickness, any color and shade or colorless - it’s just a matter of your taste. The standard width is 140 cm. The length depends on the size of the kitchen and the width of the desired apron. Prices for this product are reasonable and vary widely.
- Furniture stapler with staples. I already had a stapler, but it is better to purchase staples with a greater depth, for example 12-14 mm. The price for boxes of 1000 pieces is around 100-200 rubles.
- Scissors, stationery knife, measuring tape and other available tools.
- A little imagination.
So, let’s move on to decorating an apron in the kitchen from oilcloth with our own hands.
These were the usual nondescript walls in our kitchen.
We went to the store to get the necessary materials. The choice of oilcloths is huge.
Prices are approximately in this range.
I opted for a bright, kitchen-themed oilcloth.
It all depends on the color of the wallpaper and kitchen furniture. You can lay the same oilcloth on the table, then you will have two bright, well-combined accents.
In the same store we buy furniture staplers and staples.
We bring all this home and move on to the main lesson. You need to carefully measure the length and width of the piece of oilcloth you need. Keep in mind that you need to run along the wall behind the worktop in order to protect our wallpaper there too. Since oilcloth is a very easy-to-work material, you can easily measure the length, cut out sockets, switches and other elements. If the work area is corner, then simply wrap the oilcloth on another wall.
After we have measured and cut out the necessary sections, we begin to attach them to the wall with a furniture stapler.
This is quite difficult, since the walls are not made of wood, but of brick or concrete. It is better to use brute male power. We apply the oilcloth evenly, if you have cabinets hanging, then directly under them, but if the wall is not loaded with anything, then simply along an even line (you can even mark it with a pencil).
We continue in the same spirit with an interval of 10 - 15 centimeters.
When you have secured the oilcloth along the entire length of the working area, secure the joints and edges of the sections in the same way. Cut holes for sockets, switches and other elements that cannot be secured from above.
If you plan to have any shelves, holders, dryers, etc. in your work area, then we attach it all to our finished apron. Again, due to the fact that this is oilcloth, there will be no problems with drilling and screwing in screws.
In this photo you can clearly see how the socket is cut out, and the holders for all sorts of kitchen little things are already attached to the apron.
I advise you to make the protective apron higher above the kitchen stove, since in this area the walls get dirty the most - droplets of fat fly from a heated frying pan, steam from a boiling kettle settles.
This is how we quickly and cheaply made a kitchen apron with our own hands, giving it a bright accent in our kitchen in soothing colors.
As you can see, nothing complicated! A little time, a little expense, a little imagination and such a small but important problem has been solved. I hope your apron will serve you until major renovations! Good luck!