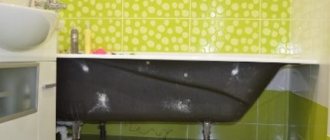
A bathtub is a mandatory attribute of any home, along with shower cabins; when placing it, the space under it is often screened to give an aesthetic appearance to the room. If a user purchases a finished product in a retail chain, he has to solve the problem of how to install a screen under the bathroom.
Installing a standard factory screen fence does not require expensive construction tools; one usually gets by with one flat wrench of the appropriate size. Some types of screen fencing have a closed rectangular frame, which will require a hammer drill to attach it to dowels and screws.
Solid fencing with tiles
We select a convenient design
Screens consist of a frame (usually aluminum) and panels. They can be blind or equipped with doors for access to communications and items stored under the bathroom.
There are also models with removable panels; they are usually installed under acrylic bathtubs.
The advantages of blind panels are high aesthetics and durability. The smooth surface can be decorated in any way or left plain.
It will look nice regardless of the presence or absence of additional decor. Due to the absence of moving parts, these bath screens last much longer.
The disadvantages of solid stationary structures include the inconvenience that arises in the event of breakdowns of the plumbing system. To access it you will have to remove the entire panel.
This takes a lot of time, which can cause problems if a leak develops and water accumulates under the bathtub.
Designs with doors are more practical than blind ones. The doors themselves can be hinged or sliding. Both options have their own advantages and disadvantages.
In most cases, bathroom owners opt for sliding models.
Hinged doors conveniently open and close, providing access to shelves with necessary small items.
However, you should not choose a screen with such doors for a small bathroom. Open, they occupy useful space and make it difficult to manipulate the elements of the plumbing system.
The doors of the sliding screens under the bathtub open, sliding along the guides
When purchasing such a system, you should pay special attention to the quality of the metal.
The stronger it is, the longer the bath screen will last. It is better to give preference to steel or aluminum.
There are models with plastic frames. They are less reliable, but are quite suitable for apartment owners who do not intend to store frequently used items such as washcloths, towels, shampoos, hygiene products, and household chemicals under the bathroom.
If doors are needed only for access to communications, then you can buy a plastic system.
How to fix it to the wall yourself so it doesn’t wobble?
The convenience of installing a bathtub to “bare” walls under the top tiled area or to walls entirely finished with ceramic tiles depends on various factors, such as: the dimensions of the bathtub, its shape and the size of the room. Let's look at the main differences in the installation.
Despite the presence or absence of tiles at the installation site, the methods of fastening to the wall are not very different. You can use both fasteners from the kit and wooden blocks and metal profiles.
Installation to tile or under tile, which is better?
When installing a bathtub against a wall, you may encounter three different situations:
- bare plastered walls;
- tiled walls up to the upper planned boundary of the bath;
- fully tiled walls.
Many people wonder: is it possible to first install a bathtub against bare walls, and only then cover it with tiles or lay mosaics? This option has the right to life; first you need to install fasteners on the wall and then “plant” an acrylic bathtub on them. The most important thing with this installation option is to ensure that during further wall cladding you do not damage the coating of the already installed bathtub. Therefore, under no circumstances should you tear off the protective film from the bathtub. It is better to do this after finishing all the work.
Pros:
- ease of bath installation;
- no need to worry about the safety of the tiles.
Minuses:
- With further wall cladding, the surface of the bowl can be damaged.
If you plan to cover the walls after installing the bathtub, be sure to cover it with several layers of mounting film and line the bottom with foam rubber.
This way you will preserve its original appearance. In the second case, you must first:
- place the bathtub against the wall;
- adjust the legs so that along the entire perimeter the distance between the sides of the bathtub and the lower edge of the tile is no more than 5 mm;
- install the mounting plates on the wall so that they tightly press the upper sides;
- check that the bathtub rests on both the legs and the mounting plates;
- using silicone sealant, carefully seal the gap between the tile and the bathtub.
Pros:
- aesthetics;
- maximum sealing of the joint.
Minuses:
- inconvenient installation, it is very difficult to cope with such a task alone;
- the need for accurate calculation and consideration of all sizes.
Third case: how to fix it to the wall if the tiles are already there? This option differs from the first one only in that when installing fasteners to the wall you need to be more careful, since the tiles are a rather fragile material. Below are detailed instructions for using wall mounts. Attention, so that the tile does not crack: first make a hole in the tile using a special drill, and only then insert a drill into the same hole to drill out the concrete.
Pros:
- the safest way for the bathtub surface.
Minuses:
- the tile may be damaged.
It is impossible to answer the question which of the above methods is better. All options have their pros and cons. Of course, it is easier to attach the bathtub to bare walls, but in this case you will have to attach the facing tiles as carefully as possible so as not to damage the acrylic bowl.
How to use wall mounts, step by step instructions?
- Move the height-adjusted bathtub close to the wall;
- Make a mark along the edge of the side;
- Move the body aside;
- When filled with water, the bathtub will sag a little, so the fasteners must be installed just below the marked line;
- Drill holes for plates or hooks in the required places;
- Attach hooks or plates to the marked area;
- Hook the side of the bathtub onto the fasteners;
- Fill the bathtub with water;
- Check that the bathtub sits tightly on the side supports.
For greater reliability, you can coat the side of the bathtub with sealant and thus firmly glue it to the wall.
After attaching the bathtub to the wall, you can safely remove the protective polyethylene, because all the dirtiest work has already been done. How to remove the film? You need to carefully pry it from one of the corners with a fingernail or a sharp object, and then smoothly pull it off the surface - everything is extremely simple.
If necessary, instead of fasteners and frames from the manufacturer, you can use metal profiles or wooden blocks.
A frame is made from suitable sized bars or profiles around the entire perimeter of the bathtub. After adjusting the height, the bathtub is attached to the wall precisely due to the frame.
For step-by-step instructions for attaching a hot tub to a wall with examples in pictures, see our articles: installation on legs, installation on a frame.
Preparatory work
A sliding screen under the bathroom, installed independently, is a multifunctional invention that provides attractiveness to the interior, additional protection to the bathroom, and comfortable storage of household chemicals for the bathroom owner. But such an element of the bathroom interior will be easy to use and durable only if its installation was carried out without errors and with high quality.
Installing a screen under a bathtub with your own hands begins with purchasing the screen itself. You can purchase a design that is designed for a standard rectangular bowl, or you can find a design for a curved bowl. It all depends on the bathtub installed in your bathroom. The characteristics of sliding screen models that are present in a wide range on the domestic plumbing market today are described in the table.
| Structure length, cm | Structure height, cm | Screen material | Number of bowl legs, pcs |
| 150 | 50 | Plastic (PVC) | 2 |
| 160 | 52 | Metal | 3 |
| 170 | 54 | Aluminum | 4 |
You can also make such a design yourself, but it will require more time and effort. Yes, and experience in such matters must be present, otherwise the result of the work may not be as good as necessary.
When all the tools and the screen itself are prepared, you can proceed to the preparatory work. Clean your bathroom of unnecessary furnishings so that they do not act as an obstacle to comfortable work.
Making and installing a screen yourself
Many of our compatriots are accustomed to doing everything in the house themselves. This can be considered a peculiar feature of the national mentality, since the desire to personally participate in home improvement is associated with masculinity.
Such craftsmen can mount the screen under the bathtub with their own hands.
The video describes in detail how you can make a blank screen with a technical niche. The panel material chosen is plasterboard, the finishing is tiles.
The range of screens for bathtubs is huge. It is very easy to get lost in such diversity. If you have difficulty selecting and installing the correct model, seek advice from an experienced professional.
This is much safer than learning from your own mistakes.
Options for sliding screens for the bathroom
When choosing materials for sliding screens, manufacturers take into account their level of reliability, moisture resistance and safety.
The simplest and most inexpensive design is made of plastic and a durable aluminum frame. It will be very durable and will serve you for many years.
Sliding screen made of plastic
Sometimes such screens are made of glass. They are not only safe and high quality, but also incredibly beautiful. Steel or aluminum are used to make their frame. You can often find sliding screens made of frosted or transparent glass, with various designs, textures, patterns and even backlighting. They will go great with a glass sink and a mirror stand. The following illustrative photo will show you the glass sliding screen for the bathroom in all its glory.
Glass screen for bathtub
Screens are also made from a moisture-resistant and reliable material such as MDF. They will look no less impressive, but will help you save a little money.
MDF sliding screen
Less commonly, mirrors are used as a material for sliding screen panels. They are less practical, but very decorative. In addition, they will help to visually expand the space of a small room.
Mirror screen
Mirror and transparent designs
Screens made of transparent and translucent glass or mirrors are quite expensive and rare. Undoubtedly, a bathtub with such a design looks extravagant and expensive, but it is very difficult to find a ready-made mirror or glass product. It can be made, but it is better to entrust this task to a professional, since cutting and fitting of thin material will be required.
This type of screen is not susceptible to moisture, but it is very fragile and requires constant care. After all, water leaks and salt accumulation are especially noticeable on glass surfaces. When installing such structures, you need to make sure that the surface is covered with a film that does not allow small fragments to fly away.
Despite the complexity of installation and operation, such designs are finding more and more buyers. After all, with the help of mirrors you can visually change the geometry of the premises; you just need to slightly change the angle of reflection.
Subtleties of screen selection
Before purchasing a bathtub screen, you need to think in advance which model is best suited. In this case, several criteria must be taken into account:
- functionality;
- price;
- durability;
- complexity of installation;
- appearance.
If the screen is needed only to cover unsightly communications, you should pay attention to simple removable models or stationary products with a hidden hatch. If you plan to actively use the free space under the bathroom, the screen must have doors
The most convenient are products with sliding doors - this is a universal option for rooms of any size. Hinged doors are convenient to use only in a spacious bathroom.
All fittings must be made of corrosion-resistant material, otherwise the screen will very soon lose all its attractiveness. It should be taken into account that plastic fittings wear out faster and are less durable, while parts made of galvanized steel retain their qualities throughout the entire period of operation. When purchasing, be sure to check the quality of fastening of all elements, the smooth movement of the doors and the tight fit to the frame.
If the repair has not yet been completed, and it is not possible to calculate the exact parameters of the screen, you should purchase a model with the ability to adjust. Such products cost a little more, but there are no problems with installation and fitting. But it is best to choose a screen after finishing work is completed, when it is possible to accurately take measurements and select the best option.
The decorative design of the screen should match the bathroom interior as closely as possible in terms of color and texture. In small rooms, mirror screens look very good: the reflective surface visually makes the room more spacious. Photo printing or drawing on the front panel must also correspond to the general style of the interior, otherwise it will not be possible to achieve a harmonious combination. For example, a floral print screen may be very beautiful on its own, but it will look out of place in a nautical themed bathroom. An image of waves, sea life or pebbles on the beach would be more suitable here. If there are a lot of bright contrasting details in the room, it is better to choose a single-color screen, and vice versa; for a bathroom in soothing colors, a model with a large colored pattern is perfect.
Choosing a model: important nuances
First, decide on a design that is suitable for your purposes. The most convenient options:
- Blind stationary model with a technical opening without a door. This design is usually preferred by craftsmen who do everything in the house themselves. It is simple, convenient for access to pipes, but does not involve arranging a mini-storage area under the bathroom.
- Removable stationary model without technical opening. If you choose a similar model, then try to choose a panel that can be easily removed if pipe repairs are necessary.
- Screen with hinged doors. If the bath is spacious, then no problems will arise at all. If the room area is small, carefully calculate the size of the doors so that they do not take up the entire bathroom.
- Model with sliding doors. This is a universal screen that will be appropriate in any bathroom.
When choosing, you need to pay attention to the type, dimensions, design of the structure, type and performance properties of the material
Before purchasing, measure the space that needs to be covered. Standard screens have a length of 1.5, 1.6 or 1.7 m, a width of 0.5, 0.55 or 0.6 m. There are also models of other sizes.
So, on sale you can find screens 1.05x0.5 or 1.9x0.5 m.
If you set a goal, you can find a model for any bathtub. The only difference is that among screens of non-standard sizes, models with unusual designs or with unique decor are less common.
If you are satisfied with a design with a smooth, monochromatic surface, then this option can be found in any size.
Sometimes doubts arise regarding the required width. This happens when the screen is selected before finishing work in the bathroom is completed.
Often the owner himself does not know the exact dimensions until the bathtub is installed and the tiles are laid on the floor.
The problem with selecting a model of the required width is also relevant in cases where the floors of the room have a slope. This can be solved using a screen on adjustable legs.
During installation, the legs are set to the desired height on each side.
Models with adjustable legs need to be selected according to length, because... The width can always be adjusted. Adjustable screens come in plain colors or with a variety of decorations
Installation of a purchased screen
When choosing a purchased sliding screen model, the following factors should be taken into account:
- functionality of the purchased product;
- its cost and service life;
- complexity of installation and design.
In cases where the screen is intended only to hide communications laid under the bathroom, you can get by with installing stationary hinged or removable panels equipped with a hidden hatch. The most versatile and easy-to-use option is a screen product with sliding doors, the installation of which will be discussed further.
Required tools and spare parts
Before installing the screen under the bathtub, you should worry about preparing the tool, which must include:
- hacksaws for wood, plastic or metal, used to fit ready-made screen blanks;
- a drill with an impact function or a hammer drill, necessary for punching mounting holes in the walls;
- a hammer and a set of screwdrivers, as well as a marking set (chalk, string, level).
In addition, special fasteners will be required to fix the frame elements (sometimes it is supplied with the purchased product). After this, you need to check the entire kit, which, in addition to the panels, should include ready-made racks and aluminum guides. In addition, it usually comes with plastic plugs, a set of hardware, handles with fasteners and instructions for installing the product. This should be used as a guide during the process of installing a purchased screen.
Assembly (fixation of parts)
According to the attached instructions, the installation of the screen structure is carried out in stages.
First, both guides are laid on a flat plane so that their grooves face inward. After this, racks are placed on top and across them, simultaneously aligning both mounting holes. Then the self-tapping screws supplied with the kit are lightly placed in these holes and tightened enough to secure the posts in the desired position.
Upon completion of fixing the frame, the sliding doors are carefully inserted into the grooves of the profiles, after which the entire structure is adjusted in height, and then the hardware on the racks is fully tightened and plugs are inserted into the ends. At the next stage of assembly, handles are screwed to the doors, and legs are inserted into the support posts and lightly screwed
After this, you should lift the entire assembled structure and place the top cut under the side of the bathtub, aligning its edges vertically
At the next stage of assembly, the handles are screwed to the doors, and the legs are inserted into the support posts and lightly screwed. After this, you should lift the entire assembled structure and place the top cut under the side of the bathtub, aligning its edges vertically.
Upon completion of this operation, all that remains is to unscrew the legs until they stop, after which the assembled fence should be securely locked in place.
When assembling a structure with end walls, all these operations are repeated for each of the sides of the bath, after which all three elements are attached to the support posts using suitable hardware.
https://youtube.com/watch?v=u0M3t4gP2GA
Materials and tools
Before starting work on installing the factory panel, you need to buy the screen itself and select a set of tools (buy, rent, borrow from friends or neighbors).
The kit should include:
- sashes - 2-3 pcs.;
- frame consisting of 2 (preferably 3) vertical posts and 2 horizontal ones;
- legs;
- pens;
- screws for fastening handles (2 per handle);
- self-tapping screws for attaching the frame to the bowl.
Attention: manufacturers increasingly began to supplement kits with screwdrivers for screws and self-tapping screws, and wrenches for legs, and therefore they will be superfluous in the tool kit.
Tools you will need:
- screwdriver with drill and bits: slotted and cross-shaped. The tool will be needed for drilling holes for handles, and also as a replacement for screwdrivers;
- roulette;
- construction pencil or marker;
- level;
- wrench, if not included;
- silicone sealant.
Installation process
So, the screen has been selected, all the necessary tools and materials for its installation have been collected - you can safely begin the installation process. In order to get a high-quality result, you must strictly follow the simple algorithm recommended by experts:
- marking fastening points using a level;
- carrying out the necessary measurements;
- manufacturing a screen frame from a metal profile
Metal profile frame
- fastening the frame elements according to the markings;
- cutting panels from suitable material;
- securing the panels to the frame;
- carrying out facing works.
Screen installation
Subtleties of installing frames
If you choose a screen made of plasterboard, then the frame in this case is made of a metal profile. It is worth remembering that the more complex the screen design, the more effort and time it requires to install. To install a screen with doors, you need to install an W-shaped profile on the frame. After this, two panels are cut out so that they slightly overlap each other. These will be the sliding doors. The last step is to insert them into the profile and screw the doors.
If the door is hinged, then its installation, accordingly, is done differently. You can make it yourself from acrylic material, plastic, plasterboard and a metal profile, and then fasten it in the right place with special hinges. To ensure that the screen has the required rigidity, use construction foam, placing it between the side of the bathtub and the top of the frame.
It’s easy to make sure that installing a screen under a bathtub is not difficult; all you need is to purchase a suitable option and acquire the appropriate tools, and then follow the instructions exactly.
Installation of a homemade structure
Tile design
You can make a screen yourself as follows:
- Mark the attachment points.
- They take all the necessary measurements.
- A frame is made of metal and its elements are secured according to the markings.
- Panels are cut from a suitable material and secured to the frame.
- They carry out the cladding.
If the installation process takes place on an acrylic bathtub, then the fasteners are mounted directly on the side, but a cast-iron bathtub cannot be drilled, as this will damage the product.
When installing a sliding screen, you can use removable suction cup handles. This is an additional safety measure that will help hide household chemicals from children.
Screen installation
The side screen of acrylic bathtubs is often sold separately. For rectangular structures, the side part can be made independently, for example, from plasterboard followed by tiling. In this case, the screen is installed at an angle for the convenience of placing your feet while doing some kind of work on the bathtub. For the same purposes, an opening with a width of 200 - 300 mm and a height of 100 - 150 mm is left in its lower part, in the middle.
Such protection would be difficult to produce for corner products. Therefore, it is advisable to purchase a standard screen along with the bathroom. It comes with grips, stops and spring-loaded legs. This kit does not provide structural rigidity.
Let's consider one of the options for strengthening the screen
Attach metal grips and stops to the bathtub and the wall so that, resting against the stops and grips, the screen is flush with the bathtub in a vertical position.
Install the feet into the side protection mounting holes. Prepare 6 pieces of timber. with a height corresponding to the height between the edges of the screen.
Photo of attaching the acrylic bathtub screen.
In the four prepared elements in the side part, make a hole with a diameter of 14 mm and a depth equal to the height of the connecting nut. Since the nut must fit tightly into the wood, the hole should not be drilled out.
Wooden products with nuts will serve as additional support legs, others serve as fittings.
Drive the connecting nuts into the beam. On the side parts of the protection, mark holes for attaching wooden elements to the screen. The beam should be positioned this way: without holes on the sides, and the other four parts should be evenly distributed over the protection, taking into account the existing legs.
In places where the board will be placed without connecting nuts, on both sides of the screen collar, make holes with a diameter of 4 mm in the middle and countersink to place the screw head flush with the product.
At the installation points of the beam with nuts in the upper part of the protection, make 4 mm holes with countersinking, and on the opposite side a hole with a diameter of 10 mm.
Place the wooden elements tightly in the screen and secure them with screws and bolts in accordance with their purpose. Place the protection in its place, spread it with the bolts installed in the additional support legs, between the floor and the side of the bathtub.
Photo of fixing a corner acrylic bathtub.
Sustainability
The installation of an acrylic bathtub does not have to be trusted to professionals. You can do this work yourself if you wish. To do this, you need to take into account that the stability of this product in different planes is not the same. Thus, in the vertical direction, the structure on legs is stable. Manufacturers create supports that can withstand the weight of a bowl of water. This is easy to feel if you stand inside the bathtub.
However, in the horizontal plane the material cannot boast of stability. Acrylic and steel bowls quickly come out of balance in this direction. If the bathtub is left to move horizontally during installation, the sewer connection may be damaged.
It is also worth noting that an acrylic bathtub 170 cm long in a bathroom with dimensions, for example, 180x200 cm, can only be adjacent to the wall on one side. In this case, its side parts remain unfixed. The tightness of the joint between the wall and the bathtub will certainly break down over time if other fastening options are not provided.
For a bowl made of acrylic, it is important to choose one of the correct installation options. This will allow you to securely fix the bowl in a horizontal plane, avoiding troubles in the future.
How to install a screen under a bathtub with your own hands, analysis of installation technology
Those who decide to make a bathtub screen with their own hands have many options for solving this problem. Such structures perform a number of functions: they mask communications, improve the design of the bathroom, create a place to store household chemicals, etc. The home craftsman has an excellent opportunity to implement creative ideas, because installing a screen under a bathtub is an exciting activity.
What screen options are popular today?
The design of the screen can be very different. You can do it:
- deaf;
- with sliding doors;
- with a swing door (or two);
- with shelves;
- with retractable block;
- removable, etc.
The bath screen looks stylish and makes the bathroom more functional
When figuring out how to install a screen under a bathtub, you need to choose the right model. The design is chosen depending on the characteristics of the room. For a spacious room, you can install a screen under the bathtub with shelves that are mounted on its front surface.
It is better to make such a design removable, since the shelves can make access to the communications located under the bathroom somewhat difficult. The most functional screen under the bathroom for a small room is a device with sliding doors.
A blank screen is a very simple, but least practical option, since if it is necessary to repair communications, it will have to be completely dismantled.
An even easier way to hide the unsightly surface of the bathtub and the space below it is with curtains. An ordinary pipe is mounted under the side, on which a non-woven fabric of suitable sizes is suspended. Unfortunately, ease of execution is the only advantage of this option. This screen is short-lived and does not look very presentable.
The screen itself can be made of different materials, for example:
- plastic;
- drywall;
- thin sheet of painted metal;
- MDF;
- acrylic, etc.
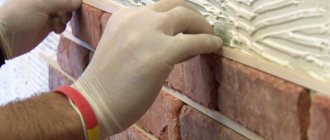
Brickwork is a more labor-intensive way to create a bathroom screen, but it is worth noting that it is one of the most reliable and durable options. Most often, after installation of the structure, it requires additional finishing. This provides excellent opportunities to improve your bathroom design.
For example, in a small room it makes sense to install a mirror screen under the bath, which will visually expand the space. A stylish tiled bath screen is a standard option for a bathroom that is all tiled.
In a small room, a mirror bath screen is more than appropriate
Mosaic is an excellent choice for finishing structures with a curved surface. A good tile adhesive will make the process easier and more creative.
Please note: When choosing the type of screen, you need to think about the possibility of coming close to the side of the bathtub. To do this, you can leave a small gap at the bottom, only 50-70 mm
Another way to solve the problem is to make a slight bevel on the vertical surface. This option is acceptable if the screen is covered with ceramic tiles.
The procedure for installing a plasterboard screen with a foot niche is clearly demonstrated in this video:
Screen installation procedure and features
A general description of how to make a screen for a bathtub may look like this: 1. Mark the mounting points using a level.2. Make the necessary measurements.3. Make a screen frame from a metal profile.4. Secure the frame elements according to the markings.5. Cut panels from suitable material.6. Attach the panels to the frame.
7. Carry out facing work.
What you will need for installation
Typical factory screens are mounted using the spacer method, resting the horizontal section of the frame under the side, and on the opposite side from below, unscrewing the support posts with some force.
Even a woman or a schoolchild can install a standard factory-made screen under a bathtub; this does not require expensive construction tools. Some manufacturers complete their products with a flat key for tightening the legs.
A flat or adjustable wrench may be needed when installing a standard or sliding screen to adjust its height using the lower supports.
The screen frame in the vast majority of cases is made of aluminum coated with polymer coating in various colors. To install a screen under a bathtub of standard length, it is cut on one side for an exact fit. To perform cutting work on aluminum guides, you will need a hacksaw. It can also be useful if the height of the screen is too high and does not allow it to be installed under the bath. In this case, the protruding sections of the vertical posts into which the supports are screwed are cut off.
Wooden fences
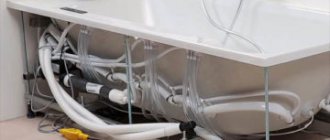
In many cases, next to the bathroom there is a sink, the pipes from which go under the bowl to the sewer pipe. In this case, you will have to cut the side panel where the pipeline passes. Depending on the type of material used to make the panels, this can be done with a fine-toothed metal hacksaw or a paint knife.
When placing a screen of complex shape under acrylic baths, it may be unevenly immersed under the side along the entire length. To level it, scraps of wooden beams or rigid extruded foam are usually glued, placing them at the same distance from the lower edge of the side. To carry out operations, in addition to fragments of supporting materials, you will need appropriate glue for polymer materials (acrylic).
In order to correctly install a sliding plastic screen under the bathtub, it is necessary to maintain the vertical position of its location under the side. To track the position, you will need a short building level, which is also necessary when installing the bowl itself.
Factory screen barriers made of MDF
How to install on corner models
For corner bathtubs, mounting is most often provided not with self-tapping screws, but with special magnets and metal plates. Such magnets are initially attached to the legs of the font.
STEP 1. Height adjustment. Just as in the case of the rectangular model, we adjust the height of the legs based on the screen parameters.
STEP 2. How to attach the plates? On the back side of the panel, in the places where the magnets will rest, we glue the metal plates from the kit with double-sided tape or silicone sealant. While drying, you can secure them with regular tape.
STEP 3. Installation. We apply the front panel and check that the magnets grab the metal plates.
This installation option is convenient because the question: how to remove the screen and then put it back on again does not arise. Everything is extremely simple, you need to apply a little force by pulling the panel towards you, and you can just as easily return it to its place. The previous method is no different from this simplicity; there you will first need to unscrew the screws.
How to quickly remove the screen without damaging it
It is almost impossible for an untrained home craftsman to remove the screen from an acrylic bathtub without damaging the panel. You need to know the type of fastening. However, not everything is so complicated in the end if you know some of the nuances.
- If there are no supports between the bottom of the screen and the floor, then the panel is secured in one of three ways: self-tapping screws, magnets or using springs.
- The supporting legs of the screen frame indicate that it is installed sideways.
- Direct fastening of the panel to the floor indicates the presence of spring clips.
With this information, you can easily remove the screen.
Fastening with self-tapping screws. The panel hanging above the floor should first be inspected for the presence of plugs. If they exist, then the problem is solved in two steps:
- decorative plugs are carefully removed using a sharp blade;
- Use a screwdriver to unscrew the screws.
Magnets. If there are no plugs, the panel quietly pulls down. If a little effort is not enough to tear the screen out of place, it means it has magnets on the bottom and latches on top. It's easy to remove - just pull the top towards you. In this case, it is advisable to perform the operation with several hands, so as not to distort the screen too much.
Springs. Pull the panel down and out from under the side. After this, disconnect the springs from the hooks.
Attention: if there are no plugs, and attempts to remove the panel by other methods were unsuccessful, it means that the screen is still on screws, and the heads of the hardware are skillfully masked with sealant by a good craftsman. In this case, a needle will help - in the supposed locations of the screws you need to carefully prick the acrylic (plastic). Acrylic (plastic) will resist, but the sealant will puncture easily. Then it’s simple: the homemade plug is removed, the hardware is unscrewed.
Installation by surprise. The presence of a frame is indicated by the legs. In such options, the screen is attached to the acrylic bathtub by surprise. To remove the panel, simply screw the legs into the frame and then pull them towards you.
Spring latches. The panel is removed from the spring clips in two steps:
- the upper edge of the panel is pulled towards itself until the clamps are released;
- the screen is raised up to release the latch tab from the clamp attached to the floor.
What types of screens are there?
Now you can buy bath screens of any design and made of any material. Manufacturers of decorative panels involve experienced designers in the design of models.
They develop original designs that can fit into even the most sophisticated interior.
For the manufacture of screens, plastic, metal, MDF, polystyrene, plasterboard, polyvinyl chloride, and acrylic are used. Patterns, subject pictures (photo printing), and decorative elements can be applied to the surface of the product.
Often there are models made from combined materials.
Glass and mirror screens look very original. They are used not only for their intended purpose, but also to model the space of bathrooms.
For such panels, they use not ordinary glass, but organic glass, because it better resists mechanical damage and shock.
When choosing a material, you should pay attention to its strength, resistance to moisture and high temperatures. A high-quality model can last for decades
Good performance characteristics imply a higher price for the structure, but this is the case when the investment is completely justified.
Decorative tiled screen on a brick base
The advantage of a decorative screen on a brick base is reliability and durability. Disadvantage - the monolithic structure consists of difficult-to-replace elements. Instead of tiles, you can glue plastic panels.
Make markings on the floor surface.
- Lay the first row of bricks. The second row is laid after 24 hours. During this time, the cement mortar will completely set and dry. Shift each subsequent row 1-2 cm to the side.
- Place a brick wall under the edge of the bathtub. Leave space for a technical opening.
- Cover the finished structure with a primer mixture.
- Apply adhesive over the primer.
- Lay the tiles on the glue and leave to dry.
- Treat the joints with sealant.
- Insert the decorative plug into the technical opening.
Types of screens by structure
Screens, as a rule, come in two standard lengths: 1.5 m and 1.7 m. The height can be 506, 550 or 560 mm. The height is adjustable using the legs.
The structure of the screens can be as follows:
- Conventional screens are plastic panels enclosed in a frame with certain dimensions;
- Universal screens - plastic panels are enclosed in an aluminum frame, which can be reduced in length. This allows you to install a screen where sewer pipes pass;
- Screens without end frames;
- End screens – cover the end part of the bathroom.
Such screens are not expensive. You can buy, or you can make a sliding screen under the bathtub with your own hands. As a frame (frame), you can use plastic guides, which are attached using liquid nails.
Plastic panels are inserted into these guides.
Advice!
To stiffen the screen, it is better to take three panels.
The screen is ready. All components can be purchased at the nearest construction supermarket or market.
Making a screen frame with your own hands
I offer another option for making a screen with your own hands:
Again, we make a frame for the screen from the ceiling profile. We attach the profile under the side of the bathtub using wooden blocks, which are installed vertically along the height of the bathtub. The bars need to be lined between the floor and the bathtub. Then we attach the profile to the wall using wooden blocks and screws. The frame is ready. Now you need to glue plastic guides into this profile. And insert the screen content into them. It can be plastic, plexiglass, gypsum panels, vinyl lining. In general, everything that is at hand. We take two panels and cut them to fit the screen. Insert into the guides.
Note!
To make opening the screen easier, you can glue handles to both panels.
Bottom reinforcement
How to strengthen the bottom of the bathtub so that it does not sag? bricks as additional support . The use of such a base will strengthen the structure, but in case of dismantling difficulties will arise.
The method of arranging the support is called combined, since bricks are used together with the factory base.
- First, install the legs and adjust them in height;
- Measures the distance from the floor to the bathtub and determines the height of the brick support;
- Carry out masonry work;
- Check the length of the legs and the height of the brickwork (they must match exactly to evenly distribute the load on the supports).
- The masonry is covered with a dense layer of polyurethane foam and a bathtub with legs is placed on it;
- The font is filled with water for better “gluing” with the brick.
Types of screens
The screen consists of a durable frame and a panel attached to it. The frame is made of aluminum or steel; in budget models, it is made of hard polymer. The range of these products is very wide, especially in terms of decorative design. There are models in plain colors, with photo printing, in various textures and shapes.
By design, screens are:
- sliding;
- removable;
- deaf stationary;
- with folding and hinged doors;
- with shelves;
- with a technological hatch.
The screen canvas can be either solid or lattice. The second option helps improve air exchange, which eliminates the appearance of mold and unpleasant odors from under the bathtub.
Most factory models are equipped with adjustable legs, and the gap created between the floor and the bottom edge of the screen allows you to comfortably stand close to the bathtub. The standard length of products is 1.5-1.7 m, height - from 50 to 60 cm, but other standard sizes are presented very widely.
For the manufacture of screens, materials with increased water resistance are used - plastic, organic glass, MDF and moisture-resistant plasterboard. Each type of screen has certain pros and cons that influence the choice of model.
| View of the screen by material of manufacture | pros | Minuses |
| Affordable price, huge variety of textures and colors, ease of installation. The plastic screen can be easily cleaned of soap scum and other contaminants, does not deform, and retains its attractive appearance for a long time. | Low mechanical strength, poor resistance to chemicals and abrasives | |
| A plexiglass screen always looks very unusual and impressive. There are options in matte and mirror finishes, with a corrugated surface, painting and other decor. The material is strong, durable, highly resistant to abrasion and detergents | Heavy weight, high cost, more complex installation compared to plastic screens | |
| Relatively low price, large selection of colors, ease of installation. Such screens are easy to clean from dirt, do not require special care, and are suitable for any interior. | Limited sizes, short service life, prone to deformation | |
| The most popular option for homemade screens. Drywall can be easily adjusted to any size and shape of plumbing fixtures, is lightweight, and has a long service life | The installation process takes longer; the screen requires mandatory finishing with decorative materials |
Installation of most screens requires the construction of a frame around the perimeter of the bathtub. The frame is usually assembled from aluminum profiles, less often from wooden blocks.
For lightweight plastic screens, such a frame is not needed, since the product is attached to the side of the bathtub. Sometimes the space under the bathroom is covered with brickwork, which is lined with tiles or mosaics. It is recommended to make an emergency hatch in the masonry in case of repairs to communications, so that you don’t have to break everything. This screen looks good and is highly reliable, but it requires more time and effort to install and eliminates the possibility of rational use of free space under the bathroom.
How to choose the right size?
Any bath panel is selected for a specific size. It is very important to check whether it fits your plumbing model. The length of acrylic panels varies from 120 to 180 cm for standard hot tubs. And the height is 55-60 cm, but it can change if there are legs.
Most often, acrylic panels come complete with plumbing fixtures and have the same tone as the bathtub, which allows the overall design to look organic. They are made of plastic coated with an acrylic layer.
The advantages of panels purchased complete with a bathtub include the fact that they fit as tightly as possible to the sides of the bathtub, eliminating unsightly gaps. Experts do not recommend purchasing such screens separately, since they do not always fit exactly in size.
If the screen is purchased separately from the bathroom, then in order not to make a mistake with the choice of size, you should carefully measure the plumbing from all sides.
Screen made of clapboard
Lining is a strong and durable material, so it is often used to install a screen under a bathtub. It will provide maximum protection of communications and at the same time make the room more attractive in appearance.
In stores you can find two types of lining suitable for installation on a bathtub:
- plastic;
- wooden.
Lining made of natural wood must be pre-treated with a special water-repellent composition. If this is not done, then the wooden screen installed under the bathtub will quickly become unusable due to the humid climate of the room - or, even worse, it may cause the spread of mold or mildew.
Plastic lining is more convenient in this regard. It is not afraid of moisture, and in all respects it is in no way inferior to wood. The method of installing any lining is practically no different from the option with plastic panels. The starting frame must also be pre-made. It is possible to use wooden guides instead of metal ones, but it is not recommended - this material is not very suitable for the humid climate of the bathroom. Self-tapping screws are used to secure the sheets.
MDF panels
You can install a screen for an acrylic bathtub without a frame, and the materials for the shield must be dense and moisture-resistant. These are MDF boards. In fact, this is a chipboard familiar to everyone, differing from chipboard in smaller fractions of wood and resistance to moisture due to modern glue.
MDF is almost twice as thin as chipboard, it cuts well, so it is great for building a screen for an acrylic or regular bathtub.
The main difference between an MDF screen and a thin plastic one is the way it is opened. Due to the thickness of the slabs, they cannot be made sliding - the storage areas under the bathroom open, like in a regular closet (via a hinged door). However, this feature gives the structure a monumental and expensive look. At the same time, installing a screen under an acrylic bathtub differs little in time from a simple device. MDF structures are sold ready-made with standard dimensions. They can be made on site using a jigsaw and door fittings - hinges, handles, trim.
MDF is not afraid of moisture, so it will work for many years without deformation or destruction. This screen is easy to clean with regular detergents. This device has only one drawback - it is much more expensive than a thin plastic screen.