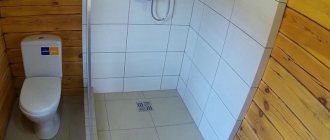
Features of installing bath skirting boards
Installation of the baseboard is carried out using a special sealant
The choice of sealant here needs to be given special attention. The fact is that if you take regular silicone, its service life may not be long enough
Now manufacturers have begun to produce formulations that, in order to save money, contain cheap and unreliable components. With regular contact with water, they are gradually washed out of the material and form pores in it, which contribute to the formation of fungus.
At the moment, the optimal sealant for a bathtub is a sealant based on MS Polymer.
The baseboard is attached to both the wall and the bathtub so that water does not have the opportunity to penetrate under it. However, if the bathtub is not fixed firmly enough and moves a little each time during use, then the baseboard is glued only to the wall. This ensures the integrity of the connection between the curb and the wall. If the baseboard glued to the tile is pressed well against the bathtub, then practically no water will leak under it, even when there is no sealant there. And a good connection to the wall is guaranteed to eliminate cases where the bathtub leaks between the walls.
Borders come in various shapes and some models allow you to not only close the outer corner from water, but also fill the gap between the bathtub and the wall.
With its help, you can achieve additional fixation of the bathtub in its place. The bottom strip, previously treated with sealant on both sides, of the baseboard is inserted between the bathtub and the wall. This solution adds stability to the structure and serves as a kind of fixation, which is very convenient if the bathtub is located a short distance from the wall.
Materials and tools
To glue ceramic corners you will need the following materials and tools:
- Ceramic borders of selected lengths plus stock.
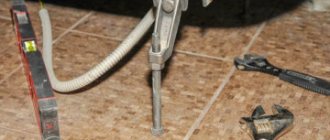
- Laser level.
- The tile adhesive is water-repellent (liquid nails will also work).
- Silicone based sealant containing antifungal elements.
- Construction gun for easy, precise application of sealant.
- Sandpaper.
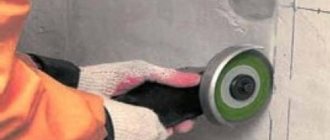
- Grinder with discs, pliers.
- Construction tape.
- Stationery knife.
- Grout mixture.
- Clean, dry rags.
How to seal the gap between the wall and the bathtub - basic options
This article will look at how and with what to seal the gap between the wall and the bathtub, as well as the main methods for sealing this gap.
Causes of the gap
Most often, a gap that appears between the bathtub and the wall is a sign of the following situations:
- The dimensions of the installed bathtub do not fit the dimensions of the bathroom;
- The geometry of the bathroom does not meet the standards, that is, the walls intersect at an angle other than 90;
- The technology for renovating a bathroom, small or large, was not followed correctly.
If the bathtub was installed after laying the tiles in the bathroom, then this gap appears quite logically, and the issue of its elimination must be somehow resolved.
If you are installing a bathtub, you should proceed in a slightly different sequence:
- The first step is to lay the bathroom floor;
- Install the bathtub;
- Only after installing the bathtub should you begin laying tiles on the walls.
In this case, the tile will rest on the edges of the bathtub, which avoids the formation of this gap and the question of how to cover the gap between the wall and the bathtub will not arise.
When considering this problem, first of all you should understand the various methods of eliminating the resulting gap - there are different ways to eliminate free space of certain sizes
In addition, you should take into account what material the bathtub is made of.
In this case, you should fasten the acrylic bathtub to the walls efficiently and reliably using ordinary hooks screwed into the walls: two hooks are screwed along the long side of the bathtub, and one at its ends. This fastening is sufficient to ensure that the sealing of cracks between the bathtub and the wall is sufficiently reliable.
Three ways to close the gap
As already mentioned, the method of connecting the bathtub and the wall depends primarily on the size of the existing gap; it is by this criterion that it is determined how to close the gap between the wall and the bathtub.
Sealed gap
- Sealing small gaps less than 10 mm in size:
- To do this, you will need an external white corner for the tiles and sanitary white silicone;
- The ends of the corner are measured strictly to the size of the bathtub and cut at an angle of 45 degrees;
- Next, tightly fill the gap between the bathtub and the wall with silicone and cover it with a plastic corner. In this case, you should pump up such an amount of silicone that pressing the corner causes it to come out both near the wall and near the bathtub. Excess silicone is then removed using a damp cotton rag.
Skirting
- Eliminating a gap of 10-30 mm:
- To eliminate such gaps, ordinary tile corners are not suitable, since their maximum width dimensions are 12 mm. In this case, a self-adhesive border or a special plastic plinth should be used;
- The installation of skirting boards is carried out similarly to the installation of a corner, the main difference is that a gap more than 1 cm wide cannot be completely filled with silicone - this is not necessary, the main thing is to reliably and efficiently glue this skirting board to the wall and bathtub;
- Before gluing the plinth, you should thoroughly degrease and dry the surfaces that will be glued;
- Closing the gap is carried out taking into account the same rule in the case of a self-adhesive border, which is sold in the form of rolls by linear meters. Gluing the border is a more complex procedure than it might seem; to make the process easier, it is recommended to glue one side first (for example, to a bathtub), and only then another.
Sealed gap
- Sealing large cracks. The first two methods are not suitable when the gap size exceeds 30 mm. In this case, you will have to use another method that requires certain concreting skills:
- A kind of formwork is installed underneath the bathtub in order to prevent the solution from getting under the bathtub;
- The resulting depression is filled with solution;
- After the solution has dried, ceramic tiles (white or matching the tiles on the bathroom walls) are laid on top of it.
When solving the issue of sealing the gap between the bathtub and the wall, other methods and materials that differ from those described in this article can be used. With imagination and the ability to use tools, you can come up with your own way to solve this problem.
At the same time, the main thing is to remember that regardless of the chosen method of eliminating the gap, tightness and aesthetics should come first.
How to avoid a gap near a wall
The bathroom is a room with high humidity, so it is necessary by all means to prevent water from getting on the surface. Installing an exhaust device helps with this. The correct connection of the bathtub to the wall is also of great importance. The outside of this plumbing fixture is covered with a screen, limiting access to the surfaces behind and under the bathtub. If there are cracks left, water will get in. It is difficult to remove, because mold often grows behind the screen.
It is impossible to avoid the formation of gaps between the bathtub and the wall. But you can choose a method of installing it in which the gaps are minimal. They can be easily eliminated using silicone moisture-resistant sealant, since the distance between the bathtub and the wall is small.
Craftsmen disagree on when to install plumbing fixtures: before or after laying the tiles. Experienced people advise doing this last, but they recommend preparing the walls in advance for installing a bathtub: making grooves in them for the sides. Thus, they (the sides) can be “embedded” directly under the first row of tiles. This method of installing plumbing equipment has its advantages:
- The sides of cast iron and steel bathtubs are rarely even. With acrylics in this regard, things are much better. By sliding the bathtub into the grooves, you get minimal gaps between it and the walls.
- To design such joints, no finishing materials are required. The method is beneficial in terms of saving money and labor costs.
Gap up to 10 mm
Otherwise, false expectations may be created, which may even end up being sued for fraudulent deception. When installing bathtubs, washbasins, toilets, etc. mistakes are still being made in the area of wall and floor connections. The remedy brings not only troubles, but, of course, expenses.
Here are two examples from practice. In the first case, artisan craftsmen installed all the porcelain objects directly onto the tile or ceramic lining without backfill and then elastically wound them. Due to the supposedly flat or planned surfaces of the ceramic wall and flooring, there was no reason to properly backfill.
To close a gap of this size, you will need to prepare a white outer corner, usually used for tiles and white silicone sealant. Operations for sealing cracks are carried out in this case in the following order:
- We cut off a corner blank, measured exactly to the length of your bathtub, and trim its ends at an angle of 45°.
- We fill the free gap between the bathtub and the wall with silicone.
- We close the seal on top with a plastic corner.
There should be so much silicone in the voids that when pressed with a corner, it appears not only against the wall, but also on the side of the bathtub. Excess silicone is then removed with a damp cloth. When using an acrylic bathtub, sealing the cracks should be done after filling it with water and maintained for 12 hours.
In the second example, installers conveniently coated the back walls or supporting surfaces of sanitary items with a permanently flexible silicone sealant and then attached them. Consequence: In the event of subsequent dismantling of the object due to renovation, significant damage in the area of glazed tile surfaces occurred due to the very intense adhesion to the silicone material. As a result, the client requested a free upgrade of the incorrectly installed sanitary facilities as part of the guarantee.
The described cases are not, as one might think, so-called “installation exoticism” - quite the opposite! The reason for such erroneous versions often occurs due to the fact that professional wall connections are, firstly, expensive and time-consuming, and on the other hand, it is surprising that there is still considerable uncertainty regarding the correct installation version consists.
How to properly glue a bathroom corner, what glue is best to use
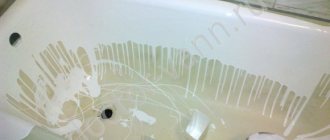
Most DIYers install bathtub baseboards using silicone sealant. Very often, the seam darkens due to the fact that mold begins to develop in it. If such a situation occurs, it is recommended to completely dismantle the product, disinfect and degrease the surface, and then reinstall it.
Depending on the quality and composition of the sealant, the period before mold appears is from 6 months to three years. Additionally, this is influenced by the quality of ventilation and the intensity of use of the bathroom. To prevent such a development of the situation, there are several ways out. For example, before gluing the border to the bathtub, you need to apply a special sealant intended for aquariums. Due to the presence of antibacterial components in the composition, this adhesive composition “does not bloom.”
Aquarium sealant can be transparent or white, is mainly sold in small jars and has a high price. But the long service life eliminates this disadvantage.
In most cases, bathtub baseboards are installed using silicone sealant
Another option is waterproof glue, which is a little more expensive than regular glue, but much more reliable. If you use the glue strictly according to the instructions, it will last a long time, and fungi and mold will not multiply and spoil the appearance of the bathroom.
Important advice! If the border is attached to the surface of an acrylic bathtub, then before applying the sealant it is imperative to fill the bowl with water as much as possible and leave it in this form until the adhesive composition has completely hardened. Otherwise, during operation, the sealant will move away, which is why a gap will form.
A good, high-quality, but expensive sealant is considered to be based on MS polymers that have a hydrophobic effect. This allows the product to repel water even a year after application, while conventional acrylic glue flows after only 4-6 months.
Among polymer sealants you can also find options with antibacterial components in the composition that prevent the appearance of fungi. Another advantage is considered to be high elasticity, even after drying, which allows the adhesive mixture to maintain its original position when heavy cast iron or metal baths move.
The border should be glued to the plane of the wall, while the lower part should be pressed as tightly as possible against the surface of the bathtub
Why the baseboard can come off and how to avoid the problem
Many users, after installing a tile border, note that after a short time the tape partially or completely peels off. This happens due to constant vibrations and small movements of bathtubs or showers that occur when filling water and when a person is inside.
No matter how carefully you use the bathtub, there will still be minimal movement of the plumbing. This is especially noticeable in the presence of lightweight acrylic bathtubs and showers, from which the curb usually falls off faster than from steel or cast iron bowls.
To avoid such a problem, you need to know how to glue the border in the bathroom correctly. If we are talking about a PVC product, then the plinth should be glued only to the plane of the wall. In this case, it will be possible to avoid leaks into the gap between the bathtub and the wall. The lower part of the side should be pressed as tightly as possible to the surface of the bath to minimize the ingress of water.
To avoid the problem of unpleasant odor coming from under the side, it is recommended to fill the gap with sealant before installing it.
With this installation option, movements of the plumbing fixtures will be compensated due to the elasticity of the curb, and the product itself will adhere tightly to the wall surface. Another reliable option is the same sealant based on MS polymers, which is more suitable for metal bathtubs than for acrylic ones.
Another common problem when using PVC skirting boards is the appearance of an unpleasant odor from under the plastic. The cause of this problem is the microscopic cracks left after installation, where a small amount of moisture penetrates. A damp and dark area is an ideal environment for pathogens to multiply. This is why it is highly recommended to fill the gap with sealant before installing any baseboard, even if the curb manufacturer does not suggest this action.
How to properly attach a tiled border to a bathtub
The edge made of ceramic tiles consists of straight, end and corner elements. The required number of straight parts depends on the parameters of the bathtub bowl or tray. Experts recommend taking one more straight piece so that there is at least a minimum margin for trimming. With a traditional bathtub installation, you will need 2 corners and ends each. If we are talking about a standard rectangular shower, it will be enough to take one element each.
Installation of a tiled border on a bathtub should start from the corner
Before purchasing, it is recommended to carefully check all components not only for damage, but also for perfect joining of the elements with each other. If there is minimal discrepancy, it is permissible to trim the edge a little using a file. The method of installing the tiled edge depends on the type of wall cladding and the size of the gap:
- If it is a glossy smooth tile, it is enough to use waterproof glue for fastening.
- When textured tiles or rough plaster are laid on the walls, it is better to use a special adhesive for ceramic tiles for installation, intended for application in rooms with high humidity. This adhesive composition is sold dry, and to prepare it you just need to add a little water.
- If there is a significant gap, it is better to seal it first and lay the tiles on a slope, especially if a shelf larger than 5 cm is formed.
- In any case, installation should begin from the corner, covering two adjacent areas in parallel.
Each bathtub curb has its own advantages and disadvantages. When choosing a product, you must take into account that the baseboard must be waterproof, practical and ideally combined with the surrounding surfaces. When purchasing, you also need to make sure that the product fits the width, completely covers the gap, and has at least a small margin. If you follow all installation rules and choose high-quality glue, you will not have to deal with leaks.
- How to connect a digital set-top box to your TV
- Stationary circular saw: an indispensable assistant for cutting material
Making an unattractive joint at the border with cladding
Many owners are interested in the question of how and with what to seal the gap between the bathtub and the wall in order to improve the overall aesthetics of the bathroom and the practicality of the further use of the room. To do this, you need to take into account some nuances.
First decide on the clearance width
You need to pay attention to the temperature of the room, the shape and material of the bathtub, as well as the finish of the wall surface. Previously, only a cement-sand mixture was used to create such a joint, but progress and technology are constantly developing
Today there are several options for solving this problem. Your choice is determined only by the distance from the wall to the side of the bathroom and personal preferences.
Preparatory stage
A large gap between the side of the bathtub and the wall occurs if a plumbing fixture of standard dimensions does not fit the size of the room. Problems can also arise if the room has uneven corners and this could not be fully compensated for in the process of finishing the walls.
It is important to properly waterproof the gaps, since water will flow down the wall and get under the bathtub, resulting in:
- there will be a danger of leakage to the lower floors;
- High indoor humidity provokes the development of mold, which is harmful to human health.
Important! Before sealing the seams, make sure that the acrylic bathtub is securely fastened to the wall using special hooks that are installed on the lower edge of the side. Otherwise, over time, the acrylic will bend and the tightness of the seams will be compromised.
Before you start sealing the gaps, fill the acrylic bath with water and do not drain it until the work is completed, until the silicone has completely dried!
For sealing wide gaps (15-30 mm), a combined method is best suited - a combination of polyurethane foam and bathtub sealant. Using polyurethane foam, a support is formed for the sealant layer, which itself also serves as a waterproofing agent and is durable.
How to seal the joint between the bathtub and the wall
Moisture constantly collects in the bathroom, and it is extremely undesirable there. In places where it is constantly humid, mold forms, which is very harmful to human health. The place where the bathtub meets the wall is especially vulnerable to water, which is why poor sealing of the bathtub will lead to constant accumulation of water and serious problems, both in your apartment and in the neighboring one, which is located under yours. Water from under your bathtub may seep into them. In order to avoid unexpected repairs in both apartments, you need a bathroom sealant to properly connect the bathroom to the wall surface.
Small gap
If the gap does not exceed ten millimeters, it would be advisable to seal the seam between the bathtub and the wall using sanitary silicone, polyurethane foam, plastic corner or grout.
Silicone
The optimal solution to the problem of how to seal the joint between the bathtub and the wall is plumbing sealant. This polymer material is intended to create a waterproofing layer. Once applied and dried, this substance forms a dense, elastic coating similar to a rubber surface.
Plumbing silicone has sufficient adhesion, so it will easily adhere even to the glossy coating of tiles and bathtub enamel. Remember that an acid-based substance will cause corrosion on metal products.
Polyurethane foam
To seal the gap between the wall and the bathtub, it would be a good idea to use waterproof construction foam. The polyurethane included in its composition helps the substance harden when exposed to air. When applied, the material fills all irregularities, therefore it contributes to good sound insulation and prevents heat loss. The low cost of polyurethane foam and high adhesive properties will be another advantage of its use.
However, a gap sealed in this way will not be completely sealed due to the porous structure of the substance. In addition, such a surface will require additional decor, as it looks extremely unattractive.
Grout and plastic corner
Both of these materials are not independent waterproof coatings. However, when, after applying silicone or polyurethane foam, the question arises of how to close the gap between the bathtub and the wall, the use of these products will be the optimal solution. As a rule, they are needed only for decoration after applying a layer of unsightly sealants. It should be remembered that the width of the corner does not exceed fifteen millimeters, so it is not practical to decorate gaps of more than one centimeter with it.
Ribbon
The self-adhesive profile allows you to cheaply and quickly close the gap yourself. To glue the border to the bathtub you will need:
- Detergent and degreasing composition: soda solution, alcohol, kitchen liquid cleaners. To avoid damage to tiles, enamel, acrylic edges, do not use abrasive powders or solvents.
- A washcloth with a rough side.
- Dry, lint-free cotton cloth.
- Sealant suitable for bathrooms, the list of materials is indicated on the tube. The sanitary composition prevents the development of mold.
- A tape measure, a soft simple pencil for marking, a marker are not suitable, as they are absorbed and cannot be washed off.
- Stationery knife, scissors.
- The smoothing applicator is sold with the tape.
- Rubber narrow spatula.
- Industrial or household hair dryer.
Important:
- The width of the gap covered by the strip plinth should not exceed 3 - 5 mm.
- Wide tapes are not designed to close large gaps; a large contact area provides better grip and water resistance.
- The adhesive layer dries out, so do not use a product that has expired.
Preparation
Rushing at the preliminary stage will easily ruin the further work. Follow the following algorithm:
- Remove dirt, fungus, old silicone, and glue from walls and edges in the work area.
Remove old silicone.
- Degrease surfaces.
Degrease.
- Wipe dry with a clean rag and dry the area with a hairdryer.
- Carefully apply the sealant along the seam (it's faster with a gun), level it with a wet rubber spatula or fingers in a medical glove moistened with water. Do not put tape on the sealant; it will serve as additional waterproofing.
We apply sealant.
- Wait until the sealant hardens to prevent splashing. It is not advisable to glue the edging right away due to the possible squeezing of silicone under the sticky part.
- Take measurements of the abutment perimeter and write down the data.
We measure the perimeter.
Gluing
Installation of corner and curved plinths differs in the sequence of actions. It is recommended to glue the first one in this way:
- Mark and cut the strip along the length of the sides with an allowance of 20 mm. They often glue without cutting into pieces, going around the corners, but the edging may come off along the fold.
Cut pieces to the required length.
- Bend the pieces along the middle.
We bend it.
- Remove the protective film from the element to be glued by 150 - 200 mm.
Remove the protective film.
- Apply to the joint, start gluing from the corner, smoothing with the applicator. Continue laying the tape, while simultaneously freeing new areas from the film. Try not to stretch the material, do not allow folds or loose fit.
Glue it
Applicator
- Corner joints along the wall are made end-to-end. An overlap is made along the side, then the shelf is cut at 45˚. If they are glued in one piece, then the vertical shelf is not cut, but the horizontal shelf is cut in the same way from the middle to the edge.
Trimming at 45 degrees.
Or only the lower part is trimmed.
- The curved plinth is equipped with corners, which are installed first. The strip is glued end-to-end to the connector identical to the previous type.
Corner for a curved plinth.
Curly ribbon.
- Dry the glued border contour with a hairdryer, press the loose areas again, if that doesn’t work, fix the areas with “liquid nails”.
- Apply a small amount of filler joint compound to the fillet joints to fill any imperfections, smoothing them flush using damp gloved fingers.
- During the day, prevent water from entering the circuit.
They produce versions without a sticky backing. Install according to the described scheme, using neoprene construction adhesive applied in a continuous path to the underside of the roll. The excess squeezed out by pressing tightly is removed with a wet cloth. The task is made easier by masking tape pre-attached around the perimeter at a distance of a couple of millimeters above the edge.
Useful videos:
How to properly seal a joint
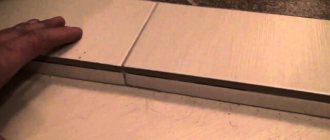
The optimal method for sealing the gap will depend on how the bathtub is installed in its place. You should also take into account the characteristics of the joint itself. If there is a distance of 1-2 cm from the bathtub to the wall, then you can use a special plastic baseboard for the bathtub. They come in a variety of shapes and designs and are wide enough to fill up to 2cm of empty corner space.
For the convenience of connecting this decorative element in the corners, the manufacturer provides various corners and tips. When choosing a border, it is recommended to purchase one with which you can purchase these components. If your budget is limited, you can take the simplest plastic baseboard for a bath. Corner joints and decorative trim at the edges of such a border are sealed with silicone sealant of the same color (usually white).
The peculiarity of installing such a border is that there must be space under it for ventilation. Often, in order to fix the bathtub in a static position, the gap between it and the wall is filled with foam. If you install a plastic plinth over such a joint, then an empty area will form under it. In this place there is a high probability of the development of all kinds of fungi and mold. Over time, they will begin to spread and ruin the appearance of the walls and surface of the bathtub.
Advantages and disadvantages
Standard plastic corners have a minimal number of weaknesses, but it is worth noting their fragility. Nothing bad will happen with a little pressure, but if the impact is stronger, the damage can spread to the tiles.
The disadvantage of all types of products is the loss of relevance, because various coatings quickly go out of fashion. This indicator is relative, but when buying a corner you should still take into account how long the product will retain its original appearance. Corners also make tile repairs more difficult. There are many more advantages and they are more significant. Corners improve design, protect against damage, form compositions, prevent the penetration of water and insects, and promote hygiene.
The strips increase the reliability of fastening the cladding itself. At the same time, products are produced for different placement options: some products are mounted on walls, others on steps or floors.
It is important to know
- Acrylic bathtubs are characterized by their ability to sag. To prevent the sealing work from going down the drain, the plumbing fixtures must be screwed on three sides with four fasteners - two fasteners at the ends and two more fasteners along the long side.
- Filling the gap between the walls and the acrylic bathtub is done by filling the body with water. Drain the water only after all adhesive materials have completely dried.
- Steel and cast iron bathtubs are installed in such a way as to eliminate possible vibrations and swaying during operation.
- All bathtubs should be installed level, adjusting the position by twisting the legs.
You should entrust the work of eliminating cracks in the bathroom to master tilers. They will quickly and efficiently seal the unnecessary gap, and the owners will only have to accept the work. But if you have free time and strictly follow the instructions, even a woman can do this work on her own. Whatever method you choose, the main condition is waterproofness and aesthetic appearance. You will learn about the pros and cons of this or that sealing method by watching the video below.
Silicone sealant
How to seal a bathtub with a wall using silicone sealant? Tools you will need for work:
- alcohol or solvent;
- scissors or sharp knife;
- tube with silicone sealant (transparent or matching the color of the bathroom walls);
- assembly (construction) gun;
- plastic or ceramic baseboard.
Sealing a bathtub with a wall with silicone involves the following procedure:
- Thoroughly clean the joint and adjacent surfaces from dirt, construction debris, etc.
- Degrease the joint with solvent or alcohol. Dry.
- Cut off the tip on the tube with sealant. It should be taken into account that the sharper the cutting angle, the thinner the line will be.
- Apply the sealant using a mounting gun in a continuous line as carefully as possible.
- Wet the applied silicone with soapy water and smooth the line with your finger.
- If desired, a plastic or ceramic border can be glued over the sealant.
Ceramic borders
The properties of ceramic, marble and granite borders are similar. But for convenience, we will consider the most common one - tiled.
Ceramic borders have two prevailing properties. The first is durability and the second is fragility. And all this at a relatively high price. Although, the price range in this segment of finishing materials is incredibly wide! Thus, borders from domestic manufacturers, measuring 6 by 30-35 cm, can be purchased for 30 rubles/piece. And the same Italian-made part will cost 24,000(!) rubles/piece. Ceramic profile Corda Platinum bead costs about 180 rubles / piece.
To install a ceramic border you will need:
- Ceramic border (can be 35x35 mm in size, if space allows).
- Glue.
- Clean rag.
- White Spirit.
- Rubber spatula.
- Laser level.
- Miter box.
- Tile cutter (or grinder with cutting disc).
There is indeed an opportunity to lay a homemade, surrogate ceramic or tiled border. You can make these yourself, from the tiles that line the walls in the bathroom. But to do this, you need to have a sufficient amount of tiles and a tile cutter (grinder with a cutting wheel), a ruler, a pencil and sandpaper.
In order to lay a bathroom border with your own hands, you need to mark the required distance on the tile, draw a line and cut off the required part. The edge of the cut needs to be sanded.
If you have everything ready, then you can start. First you need to install the laser level directly into the bath. Adjust the horizontal beam so that the edge of the curb adjacent to the wall is raised by 5 mm. With a border width of 5-6 cm , this will be an angle of 5-8°. Now we coat the border with glue and carefully place it in place. A vertical laser beam will help maintain the level. After installing the first tile, we do the same with the second and subsequent ones. Separately, it should be said about the corner tiles. If the elements you need are not on sale, but you can get around the corner in the bathroom: make a corner border element with your own hands. To do this, you need to mark the tiles and cut them at an angle of 45° with a grinder using a miter box.
After the glue has dried, you can begin grouting the joints. This should be done in the same way as grouting joints between tiles. But when buying a grout, try to choose a latex-based mixture. It has excellent water-repellent properties and excellent adhesion.
Using your imagination, you can frame the mirrors, creating a single composition in the bathroom.
Medium-sized slots up to 30 millimeters
Sealing the seams between a bathtub and a medium-sized wall is usually done using a special baseboard, tiled frieze or border tape. It is worth noting that these materials are not independent sealants, so for high-quality insulation you should take care of additional purchase of silicone or foam.
Decorative tape
Bathroom sealant tape –
This is a strip made of polyethylene. Its width will allow you to mask gaps of medium width, which are found in most cases. This material is cheap and very easy to use. High hydrophobic properties and presentable appearance allow it to be used as an independent coating, and not just as decoration. Many of these products have an antifungal additive, which will prevent the appearance of mold at the joint.
Border tape can be used as a decoration for the skylight
. Perhaps the main disadvantage of this material will be its fragility. The joint between the bathtub and the tiles designed in this way will last very little, a maximum of two years. However, subject to careful use, its service life is extended to five years.
Polymer plinth
Another solution to the problem of how to seal the joint between the wall and the bathroom is to purchase a plastic baseboard. This product has a decorative surface and is very often used only for decoration. It is better not to purchase models that have self-adhesive tape designed to secure the element. This adhesive part is not waterproof.
Plastic skirting boards will help hide gaps up to three centimeters
The best alternative to such a plinth would be a ceramic frieze. Installation using tile mortar guarantees excellent tightness and durability of the coating. In addition, a border purchased together with wall tiles will become an unusual addition to the interior design.
Matching the sealing material to the style of the bathroom
Do not think that to eliminate the gap between the wall and the bathtub, you can take any material and cover the gap. Don’t do everything hastily, everything should be combined: high-quality material + ease of use + harmony with the interior. For styles such as hi-tech or minimalism, the latest, frequently used materials are suitable; a plastic border will look good.
If the renovation is done in an eco-style or an ordinary classic, you cannot do without stone or ceramics. A marble edge will suit the classic design. This element will add elegance and splendor. Eco-style is simpler, so limit yourself to regular white ceramics or simple grout. Those who are limited in finances can use plastic skirting boards and border tape.
The material for sealing joints must be chosen so that it does not differ in color and style of the room
Polyurethane foam
Sealing the bathtub with the wall using polyurethane foam is one of the easiest ways to solve the problem. Tools you will need for work:
- alcohol or solvent;
- construction (model) knife;
- gloves;
- a can of polyurethane foam;
- finishing material.
- Thoroughly clean the joint and adjacent surfaces from dirt, construction debris, etc.
- Degrease the joint with solvent or alcohol. Dry.
- Wear gloves.
- Shake the can of polyurethane foam and apply it evenly to the joint, avoiding contact with the walls and surface of the bathtub. When applying, be sure to take into account that after drying the volume of foam increases significantly.
- Dry for an hour.
- Use a construction knife to remove excess dried foam.
- Depending on the type of decoration of the bathroom walls, you can putty the seam and then paint it with a suitable color or glue a border made of tiles, plastic, etc.
How to properly seal the gap between the bathtub and the wall
Immediately after renovating the bathroom I discovered water under the bathtub. It turned out there was a leak between the wall and the bathroom itself due to the gap between them. How to seal the gap between the bathtub and the wall so that water does not leak?
When installing bathtubs, for various reasons, gaps may appear at the points of contact with the walls.
According to statistics, the main influencing factors are considered to be: non-compliance with the dimensions or geometry of the plumbing fixtures and premises, or errors were made during installation work.
If cracks or gaps are not sealed in a timely manner, then in the future this threatens the accumulation of moisture and the development of mold or mildew between the wall and the bathtub, as well as affecting the deterioration of the decorative properties of the tiles.
This article will tell you how to properly seal the cracks formed at the junction of the walls and the bathroom.
Sealing in wooden bath rooms
For high-quality sealing with a wooden wall, you will need a product based on silicone and acrylic latexes. When using such a sealant, vapor permeability, resistance to moisture and elevated temperatures will be guaranteed. First of all, the surface must be cleaned, degreased, and foam insulation must be placed on the inside of the gap (to reduce the amount of material consumed). To make the seam even, limit its borders with masking tape and form a seam. Apply trim as desired.
Silicone or acrylic latex is suitable for sealing wood.
Sealing and sealing the seam
The side of the bathtub and the section of the wall along it must be cleaned of mechanical impurities, degreased with a suitable product and dried thoroughly.
Then apply masking tape to the edges of the bathtub and to the wall, starting from the mark where the foam layer should reach
It is important that there is a little space left for a layer of sealant, which will fill the free space flush with the side of the bathtub
Tip: When working with polyurethane foam, it is recommended to use gloves, since this material is very difficult to remove from the skin. Painting tape will help protect the walls and bathtub from foam.
Apply the foam in small fragments - it expands approximately 30 times, filling the gap. At room temperature, the foam will take about 40 minutes to harden. Excess foam is cut off with a sharp blade. The result should be a neatly sealed seam just below the edge of the bathtub.
The next step is to apply colorless or white silicone sealant. This material is packaged in cartridges or tubes and squeezed out of the container using a construction plunger gun.
Clean the side of the bathtub and the area of the wall along the gap from dirt, degrease and dry. Insert the tube of sealant into the gun, remove the cap from the spout and cut the spout at an angle using a sharp blade
It is important to note that the width of the strip when applying the material depends on the cut diameter. This parameter is selected independently - the tube spout is made in the shape of a cone, the cut is made at an angle
When applying sealant, it is important to take your time and proceed carefully. It is advisable to lay the silicone compound in a continuous strip
Then, using a spatula or spatula, the sealant is leveled - it should qualitatively fill the gap left under it. If you don’t have a suitable tool, you can level the silicone material with your finger dipped in soapy water.
While the sealant has not hardened, its excess is removed with a damp cloth. The hardened sealant can be trimmed with a sharp blade if necessary. After the material has dried, remove the masking tape. It takes about 12 hours for the silicone to harden.
At this point the work is completed.
For aesthetics and additional protection, the sealed gap is covered with a special plinth. Polymer plinth (rigid or self-adhesive tape) is suitable for acrylic bathtubs in combination with any cladding, as well as for cast-iron bathtubs in rooms with plastic panel trim or painted walls.
It is better to cover the joint between the tiles and the side of a cast-iron bathtub with a special ceramic or marble plinth if the width of the seam filled with silicone is relatively small and allows the plinth to be securely attached with cement glue to the side and the wall.
Conclusion. The combined method of sealing wide gaps is the most reliable and durable option.
Video on the topic “how to seal the seam between the bathtub and the wall”:
How to choose the right one
To choose the right edging for the bathroom, you need to follow some rules:
- This design element should be in harmony with furniture, plumbing equipment, and accessories.
- Natural stone or ceramic tiles will only go well with a cast iron or metal bathtub. Acrylic construction and plastic panels on walls with this finish do not look good.
- For bathtubs with rounded shapes, only flexible borders are suitable.
- Before purchasing a product, you need to analyze all its characteristics: water resistance, strength, resistance to mechanical and chemical influences.
Curb made of natural stone.
How to close the gap between the bathtub and the wall
Based on the width of the resulting seams, the appearance of the bathtub, its shape and material of manufacture, the best means for sealing large cracks and masking small seams is selected.
Next, we recommend watching a video that explains in detail how and what is the best way to close the gap:
How to seal the junction of the bathtub and the wall
For sealing, both time-tested products and modern sealants can be used. The choice of product depends on the width of the gap.
Cement
The most reliable, although outdated, way to solve the problem with gaps is cementation. The advantage of cement is that it is quite durable and is not afraid of moisture.
Photo: https://i.nakseron.ru/u/53/e60d8eb32611e588ae8f279c77891b/-/20151216_103833.jpg
It is necessary to mix sand and cement in a ratio of 3:1 and dilute the resulting mixture with water, not forgetting to also add PVA glue. The resulting composition must be stirred to the consistency of sour cream. Since the composition dries quickly, it should be applied and leveled as quickly as possible.
Polyurethane foam
One-component polyurethane foam has good moisture resistance, making it ideal for this type of work.
Photo: https://orcmaster.com/wp-content/uploads/2016/02/Zadelat-shhel-mezhdu-vannoj-i-stenoj-montazhnaja-pena.jpg
To protect the surface near the seams, apply masking tape to the wall and bathtub. Moreover, this must be done so that it is located as close as possible to the joint, because it will then be very difficult to clean tiles or painted walls from accidentally falling foam. After the foam has hardened, the tape is removed and the excess foam is cut off.
In accordance with sanitary standards, the foam must be closed, since it quickly becomes dirty or tends to turn yellow and crumble. Usually the foam is covered with a plastic corner, plastic tape or a decorative ceramic border. Such materials are widely available in construction stores, so choosing them to match the color of the bathroom will not be difficult.
Silicone sealant
This option for sealing the seam is suitable only if its width does not exceed 0.5 cm. In this case, it is necessary to use only waterproof sanitary sealant with an antifungal effect. The assortment of construction stores offers sealants of different colors, but it is wiser to use transparent ones.
Photo: https://vipvannaya.ru/wp-content/uploads/2016/05/Kak-pravilno-vybrat-germetik-dlja-vannoj-_foto1.jpg
After applying a layer of sealant using a special gun, it is leveled with a finger dipped in a soap solution. Run your finger along the joint, trying to press the sealant into the seam, and thus seal it securely.
The bathroom should always be kept clean and hygienic, so there should be no poorly sealed seams. In conditions of high humidity, bacteria and fungi settle in them. Therefore, to avoid their spread throughout the bathroom, all joints and gaps must be securely sealed with cement, polyurethane foam or sanitary sealant.
Plastic borders
Being a cheaper finishing material, plastic bath borders have a wider range. In particular they are:
- Internal (mounted together with tiles).
- External (installed after the tiles).
- Consisting of two parts (two-part profile).
Each of these borders can be self-adhesive. The width of the product varies, up to 30-50 mm. There is no uniform length standard for these products. The set may contain borders 1.8 m long or long, up to 3 m. The height of this element is also different, depending on the height of the bathtub. Therefore, when purchasing one, pay close attention to the total length of the slats. The situation is similar with prices. The minimum cost of such a bathroom set, which includes, in addition to the border itself, plugs and corner elements, starts from 250 rubles, with the simplest appearance. This category also includes the “swallow” profile, the convenience and beauty of which is appreciated by many craftsmen. Particularly popular are the profiles of the companies progress plast, profiles and kolpa san, makroplast.
For installation you will need:
- Plastic border for the bathroom.
- Silicone sealant.
- A hacksaw for metal (it has fine teeth).
- Miter box.
- Pencil.
- Roulette.
- Acetone (solvent).
If you look at the reviews, it turns out that gluing such borders is extremely simple. First you need to wipe the work area dry from dust and moisture and degrease the surface. Then, you need to measure the required length, set it on a plastic border and saw it off on a miter box at an angle of 45°. Regardless of whether your border is self-adhesive or not, we recommend additionally using silicone sealant. It will increase the strength of the connection and serve as an additional guarantee of water resistance. After this, you can apply silicone sealant to the bathtub curb and place it on the gap.
Components and borders can be purchased at any store that sells building materials. If you purchased a set of plastic borders with corners, then install these elements at the junction of the planks. If they are not there, then the joint between the two planks is additionally sealed with silicone sealant. In the latter case, the failed element can only be remade if the sealant has not set.