Every person, when arranging their home, and in particular their bathroom, wants to create the most comfortable environment possible. After all the necessary repair work has been completed, the question arises about decorating the bathroom.
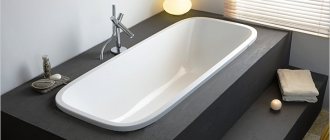
Not every homeowner can boast of an expensive bathroom with an unusual body finish. More often this is an ordinary bathtub, in which the external side is not decorated. How can you make your bath look more attractive?
For this purpose, there are special screens and curtains that are installed under the bathroom. Many people install screens, but if the bathtub is of a non-standard size or shape, a curtain comes to the rescue.
Bath curtains are usually made of the same material as regular ones and can be easily purchased at any specialty store. But if you need your bathroom to look original, you can make curtains yourself.
How to choose curtains for a bath and make them yourself - read on.
What characteristics are important
When choosing curtains, you should pay attention to the following parameters:
- Moisture resistance . The material must be waterproof, because the bathroom is a place of high humidity. PVC is excellent, since curtains made of this material repel water better, unlike textile ones.
- Durability . The curtain must withstand mechanical stress, especially if you plan to use it for a long time.
- Light fastness . If the bathroom has a window through which direct sunlight enters, you need to choose a material that is most resistant to direct sunlight. But even if there is no window, it’s worth thinking about light resistance, because any material still loses color saturation over time. Properly selected material will please the eye for a long time.
- Flexibility and plasticity . Modern bathtubs come in not only rectangular shapes, but also, for example, corner ones. As a result, the method of fastening may be specific, so care must be taken in advance to ensure that the material can easily change its configuration.
Content
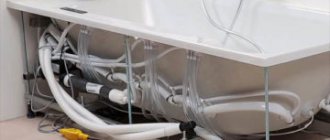
How to close the space under the bathroom if every penny counts? The cheapest and fastest way is to make a decorative curtain with your own hands. Behind it you can hide all the shortcomings of the plumbing, and, if necessary, household items and household chemicals. Making a curtain is very easy. The first step is to make a frame and string special mounting hardware onto it. And then sew a product from any non-woven material. Or you can buy a ready-made oilcloth shower curtain and shorten it to the required length. Advantages:
- cheap, practical and aesthetically pleasing;
- easily mounted on any bathtub, regardless of its configuration and dimensions;
- in the event of a water leak, there is direct access to the breakdown site.
This design solution is most suitable for country, retro or vintage style
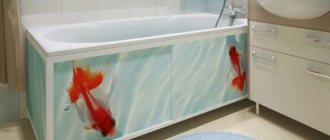
First of all, let's understand what a finished screen is. This is an inexpensive design that can be found in hardware stores. It is easy to assemble and remove when necessary. Screens for decorating the bottom of the bathtub are usually made of plastic. A large selection of shades allows you to choose a product that matches the color of any interior. Screens with doors, which, in turn, can be hinged or sliding, are convenient in everyday life. The last factor will be a big plus for a small bathroom.
If the bathroom is small, you should take a closer look at ready-made screens with sliding doors and built-in storage shelves
If you choose a design with internal shelves or drawers, you can significantly relieve wall cabinets. And in the case of a small bathroom, remove them completely. Advantages:
- one hundred percent moisture resistance;
- duplicate the most common types of ceramic tiles in color;
- easy care;
- Quickly assembled and disassembled: installation instructions are included with the product.
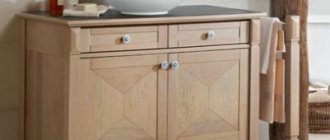
Wood-look decorative screen
Here is a list of building materials for the capital structure:
- moisture-resistant plasterboard 10-12 mm thick;
- PVC panels or tiles;
- tile.
First you need to make a frame. It can be assembled from a wooden beam, which is less preferable, or an aluminum profile. The guide elements are attached directly to the floor and walls. Then the frame is covered with plasterboard. Don't forget to make a hatch for pipe inspection.
First of all, you need to make a frame
The base for a ceramic tile screen can be laid out of brick or foam block using cement mortar. To avoid having to break a major structure in the future, make a window through which you can repair plumbing equipment.
Don't forget to make an inspection hatch
Some companies that manufacture bathtubs of non-standard shapes also specially produce frames for a specific model. They are usually made from high-density plastic or foam. After the rough work is completed, you need to cover the surfaces with finishing material.
As the latter, you can use mosaics, PVC panels, wooden slats, artificial stone and even leather.
Ceramic tiles can be used as a finishing material
- long service life;
- reliability and capital construction;
- hygiene when facing with ceramic or PVC tiles;
- easy care.
Before installing the frame structure, we level the floor.
- We lay water and drainage communications.
- We lay the pedestal out of brick and cover it with moisture-resistant plywood on top.
With a one-piece design, the bathtub is installed on a podium, but, if desired, it can also be placed in a recess. 3. We sew up the side surfaces with moisture-resistant plasterboard or expanded polystyrene boards.
Bath built into the podium
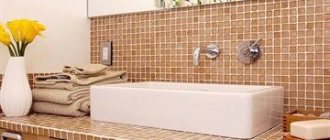
When choosing cladding for the podium, you need to take into account the color scheme of existing finishing materials and the general style of the room. Advantages: • monumental and decorative; • strength and durability.
Stylish podium for a spacious bathroom in a modern style
If you want to close the bathtub yourself, use one of the first two methods. It is better to entrust the construction of a podium and other capital structures made of brick to professionals.
Was the article useful? Tell your friends:
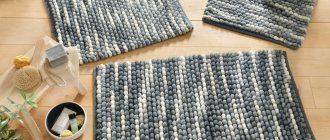
Advantages of curtains
One of the advantages of curtains is that they fit perfectly into an interior that involves the use of textile materials. In this case, the atmosphere becomes very pleasant and cozy. Curtains will be especially relevant if the bathroom interior is in a retro style.
It should also be noted that in the event of a plumbing breakdown, you will not need to dismantle the entire structure; you just need to move the curtain and install the profile.
Another advantage of curtains is that cleaning can be done every few months. Simply remove the curtain and wash it by hand or in the washing machine.
How to make a curtain in a bathroom from fabric?
Such curtains can be made in just a few hours. As a result, you will receive a product no worse than the purchased version. The most important thing here is to correctly calculate the length and width of the future curtain.
What do we need:
- Water-repellent fabric.
- Centimeter for measuring length.
- String or cornice.
- Sewing machine.
Sewing technique:
- We take the necessary measurements. First of all, we measure the width of the protective sheet (from one wall to another) and the length (from the intended location of the cornice to the floor).
- We mark the obtained measurements on the previously prepared fabric. If the fabric is a little wrinkled, then iron it with a not too hot iron.
- We bend and stitch the sides of the fabric.
- From the same fabric we sew loops onto the top of the curtain.
- We fix the weighting material at the bottom of the material, bend the fabric and make a horizontal stitch on a sewing machine. As a weight for the curtain, you can use any long wooden stick or make, for example, a fold in which you can hide sand or wood shavings. Many people do without weights, but in this case the curtain may leak splashes onto the bathroom floor.
- We hang the product on the cornice and secure the rod in the wall using special holders.
Important! If you want to hang the curtain on the fastening rings, then do not forget to process the edges of the internal holes by hand or overlock. Doing this yourself is extremely difficult and time-consuming, so for these purposes it is better to buy ready-made accessories. Such rings are easily inserted into the hole on both sides of the fabric and are securely fixed with ordinary pliers.
Why is a curtain better than a screen?
Why should you choose bath curtains instead of a screen?
- Firstly, by installing a glass screen, you lose the possibility of free access to the space under the bathroom.
- Secondly, ease of installation if the bathtub is of non-standard size. When decorating the interior, it is very difficult to choose a screen in this case.
- Thirdly, ease of installation and the possibility of making curtains yourself. A DIY bath curtain is a great opportunity to give free rein to your creative abilities. Moreover, a thing made with your own hands is doubly pleasant to use.
- Fourthly, saving money. A plastic curtain made by yourself is several times cheaper than a finished screen.
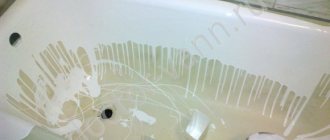
Decorating a plastic curtain for the bathroom
An ordinary plastic bathroom screen looks rather boring and unattractive. We invite you to decorate it a little using a very popular technique - decoupage. Doing this kind of work is not as difficult as it seems. And the consumables are inexpensive.
So, let's take a closer look at how to do this:
- Cover the entire surface of the curtain with acrylic paint. The color for the background is suitable for the color scheme of the room.
- We wait until the paint is completely dry.
- We take special cards purchased in advance. We cut out pictures from them, which we then moisten with water.
- Mix PVA glue with water and prime the surface of the canvas with this solution.
- While the glue is wet, apply decoupage pictures to the curtain, leveling each of them with your hands from center to edge.
- We fix the result with water-based varnish. Apply at least three layers of varnish to the plastic screen.
- After the protective coating has dried, you can try the curtain in operation.
Important! Even the most sophisticated and thoughtful bathroom interior can easily be ruined by household troubles such as limescale or blockages. Find out how to get rid of them without extra effort:
- How to remove plaque in the bathroom?
- How to remove a clog in the bathroom at home?
Materials from which they are made
There are very few types of materials from which curtains are made:
- Polyester – a frequently used additive in mixed fabrics. It is needed to ensure that the material does not wrinkle or fade during renovations in the bathroom. Curtains made of this material look like they are made of textiles, but they do not allow water to pass through. The advantage of such curtains is that they do not take up space when washed - you just need to hang them back on the fasteners.
- Polyvinyl chloride – easy-to-use material. It does not tear, does not absorb dirt and is easy to clean. At the same time, if suddenly, when cleaning the bathroom, any cleaning agent gets on curtains made of such material, nothing will happen to them, because this material is resistant to the effects of such agents.
- Textiles create comfort, but compared to products made from polyvinyl chloride, they wear out faster.
Plastic partition
There is a large selection of ready-made solutions on the market, but they do not suit everyone. The material is very practical and comfortable, but the design is often not original. But you can use your own method to decorate the finished product.
Plastic materials combine well with any molecular adhesives, so you can purchase the simplest curtain in the store. There are a lot of decoration options - these include appliqués, decoupage, frescoes and mosaics. In the case of applique, various plastic elements in the form of flowers, animals, and abstract images are tightly glued onto it.
Despite the fact that the application is very simple, this curtain looks very original and stylish.
The decoupage technique is one of the most difficult to perform, but also the most effective. To do this, purchase white acrylic.
To make a curtain for the bathroom with your own hands using the decoupage technique, you need to go through several steps:
1. Roll out the curtain on a flat surface.
2. Paint the canvas in the desired color and wait until it dries well.
3. Next, prepare pictures for decoupage and treat the painted surface with a solution of water and PVA glue.
4. The images are pasted onto the prepared surface and coated with PVA glue again on top.
5. Lastly, it is necessary to fix the result; for this, the surface is covered with moisture-resistant varnish.
How to make it yourself
Having made a choice in favor of a curtain, people wonder how to make it with their own hands? The process is absolutely simple, even a beginner can do it.
Sliding curtains for bathtubs are most often used, because they are very convenient to use. How to make a bath curtain with your own hands - read on.
List of required items:
- roulette;
- scissors;
- sewing machine;
- water-repellent material;
- Suitable fasteners (string or frame);
Algorithm of actions:
- Determining the size of curtains. It is necessary to measure the space under the bathtub (use a building level) and cut off the required amount of material. But don't forget about seam allowances. After all, in order for the edges of the curtain to look neat, they should be stitched on a sewing machine.
It is important to remember that if you plan not to pull the curtain, but to let it flow in waves, then the length of the cut should increase by 1.5 - 2 times.
- Determining the size and attaching loops. If the curtain will be attached to the cornice, then it should be taken into account that the size of the loops should be quite large. If string or wire is used, the loops can be several times smaller. The loops are attached to the top edge of the curtain.
- At the next stage, the guides are installed (mounted) on the walls. Check the bolts (or screws).
You can also try attaching the curtains with adhesive tape. In this case, one adhesive tape is sewn to the upper edge of the curtain, and the second is secured with a glue gun under the side of the bathtub, after which both Velcro strips are connected to each other.
- The final step is to hang the sliding curtains in place.
Many needlewomen, when making curtains on their own, also prefer to make a beautiful frill for the curtains. In this case, safety pins are also added to the list of necessary items. Making a frill is not difficult, here's what you need to do:
- On the finished curtain you should make a mark where the frill will be located.
- Select the width and number of frills. It must be remembered that the frills are slightly gathered, so at the initial stage they should be longer than the curtain itself.
- Cut the strips and pin them to the curtain with safety pins and stitch them using a sewing machine. Ready!
If you plan to make several frills, you need to sew them on, starting from the bottom row.
Classification of curtains for the bathroom
Let's start getting acquainted with the main bathroom accessory - the curtain. You can make any version of such a product yourself, the main thing here is to be patient and follow the manufacturing specifications.
Important! If you only thought about a curtain, and then decided to remodel the entire bathroom, our articles will help you create an original, functional and cozy bathroom interior:
- Bathroom design 5 sq. m. Interesting ideas for decoration.
- The design of a 4 sq. m bathroom is modest, but tasteful.
- Bathroom design with corner bath.
- Interesting DIY bathroom ideas.
According to the material:
- Classic.
- Fabric.
- Plastic.
- Glass.
- Wooden.
- Vinyl.
- Polystyrene.
Important! The most expensive is a DIY glass curtain for the bathroom. It will cost you a lot, and if it breaks, you will have to shell out a large sum of money to restore it. We will tell you how to install it correctly in the master class “How to install a glass curtain on a bathtub?”
By sliding method:
- Sliding.
- With three movable curtains.
- With one movable and one fixed curtain.
- With two central movable and two lateral fixed ones.
The sliding curtain can be of the following configuration:
- Rectangular (two front sliding panels).
- Corner (one opening and one fixed panel).
- Prefabricated (two movable and two fixed side panels).
- Curvilinear (panels of any type).
The sliding curtain is divided into sections:
- Single section.
- Two-section.
- Three-section.
- Four-section.
- Multi-sectional.
Important! Before installing a sliding curtain, analyze the arrangement of your bathroom. Most older apartments use one faucet for both the bathroom and the sink at the same time. It is necessary to ensure that the rigid structure will not interfere with this process.
If you still decide to install a hard barrier, first familiarize yourself with the intricacies of its creation in our publication “Do-it-yourself sliding screen for the bathroom.”
By surface type:
- Smooth.
- Corrugated.
- Film coated.
- Mirror.
- Tinted.
- With an image.
Types of fastening
There are three ways to secure the curtain:
- String mount . This is the most common fastening method. But it should be remembered that it is only suitable if the bathtub has a side, under which you can easily hide the entire structure.
- Metal frame . Very convenient fastener, as it is durable. These metal curtain rods have a special anti-corrosion coating and come in different shapes. They can be straight, oval or round.
- Baguette with nuts . Ready-made kits are sold in stores, which simplifies the process of designing a bathtub for people who do not want to create a mounting system themselves.
What properties should a bathroom linen have?
The selection of material for such an accessory must be approached with special responsibility, since surface protection and ease of use depend on this indicator. Let's look at the basic requirements that a DIY bathroom curtain should have:
- It should be completely waterproof (ideally water-repellent). This thing is a kind of barrier against splashes on the surface of finishing materials.
- It is desirable that the canvas is low maintenance. Since the material is in daily contact with water and various hygiene products, the resulting stains must be wiped off periodically. It follows from this: you need to choose a material that can withstand regular cleaning with detergents.
- A DIY bathroom curtain should be of a simple design so that you can remove or repair it yourself without special equipment or calling a professional.
Decoration
Decorating curtains is a very creative process. Here you can give free rein to your imagination and use whatever you want. Various interior elements are often used for decoration; these can be beads, stones, braid, rhinestones, lace, shells, buttons and even puzzle elements. Also, if you have certain skills, you can use cross stitch or satin stitch when decorating.
Application
Any person knows what applique is from childhood, so you can use your skills in this matter to give bath curtains an unusual look.
To create applications you will need a simple set of items - scissors, paper with the desired images, glue and waterproof varnish. The process is simple - you need to cut out the desired images, glue them to the curtain and secure it on top with waterproof varnish.
Decoupage on plastic
Decoupage is a very common type of decorative and applied art among creative people. A set of items for decoupage is also available to anyone - PVA glue, acrylic paint, waterproof varnish and decoupage cards.
Decoupage stages:
- The first step is to paint the curtain with acrylic paint of a suitable color and wait for it to dry completely.
- At the next stage, you need to prepare decoupage cards - cut out suitable images and moisten them with water.
- Next, mix the glue with water and prime the varnished surface.
- Now you need to act quickly - pictures moistened with water are placed on the surface of the curtain before the glue has time to dry, and smoothed out.
- All is ready! All that remains is to cover the decoupage with several layers of waterproof varnish. There should be at least three such layers.
From this article we can conclude that bathroom curtains are an inexpensive and practical solution when decorating a bathroom. A bathroom curtain is not only an easy-to-install and use interior detail, but also an excellent object for demonstrating your creative abilities.
Stationary
Another name is that capital screens are non-removable panels. The closed part at the bottom of the bathroom makes access to the basement difficult. It will be very difficult to install the product yourself, so it is better to trust the professionals. These models are a structure that requires additional finishing. Such screens are usually made from the following materials:
Once the material has been chosen, the panels can be finished in any style. If you wish, you can paint them yourself or use tiles instead of paint, which is very convenient. In addition, it is possible to use film, PVC panel or artificial stone as a finishing material.
In some cases, the basement space is decorated with wood, however, in this case it is better to choose waterproof species - oak or beech.
Brick options
Brick models are the most reliable foundation, they are distinguished by an affordable price, as well as ease of construction, which can be done with your own hands. The one-piece design consists of laying bricks with cement mortar, which provides the screen with reliability and strength. Facing is carried out with any material available for this purpose. The enclosed space will look attractive, and uneven masonry can be corrected with the amount of glue during finishing.
Drywall, MDF or plastic
Models made of plastic or plasterboard, like other materials, are attached to a pre-assembled structure in the form of metal profiles, as well as wooden blocks. For timber blocks, certain conditions must be met, i.e. They were treated and impregnated with protective compounds against moisture. After installation, the entire frame is sheathed with the necessary material.
see also
- Installing a siphon on a sink
- Overhead sink in the interior
- Sink siphon how to clean
- Sink 60x40 rectangular above the washing machine
- How to clean an artificial stone sink
- How to clean a sink from plaque
- At what height from the floor should a bathroom sink be installed?
- How to screw a sink to a wall
- At what height should you hang a mirror from the sink?
- Shelf under the kitchen sink
- Mount for sink to countertop