If you install a cast iron bathtub, you don’t have to worry about it moving out of place. But when installing a steel bath, some difficulties arise.
The main problem is to install the steel bath, which is a lighter and more flexible container, as stable as possible. In our selection, we will look at how to firmly fix (strengthen) a steel bathtub with your own hands.
How does a steel bath work?
Before looking at bathtub installation methods, it’s worth considering its design. Typically, such a bathtub does not have special mounts on which the legs can be attached. Because of this, there are no devices in the steel bath that can firmly fix the bowl. If, nevertheless, the bathtub has devices for fastening legs, the steel bathtub may bend under significant human weight, and in this case the fastening may cause damage to the enamel.
The manufacturer usually provides legs with the bathtub, but their quality and design do not allow the steel bathtub to be firmly fixed. In this case, you can additionally purchase self-adhesive legs, which are suitable for all types of bathtubs. This measure will add some stability to the bath.
This method is suitable if the bathtub will be secured only with the help of legs, without additional devices. Naturally, when installing such a steel bathtub on brick stands, legs are not needed.
Fastening methods
Steel bathtub mounted to the wall
It is possible to install a steel bathtub securely and stably. For this purpose the following are used:
- brick base;
- polyurethane foam;
- insert into a niche;
- metal corners;
- frame made of metal profile.
In all cases, except for the construction of a brick base, the bathtub is also installed on complete legs.
How to fix a bathtub if the walls have low load-bearing capacity
If attaching the bathtub to the walls is not an option (plasterboard or foam block, just an old crumbling wall), you can only create a reliable base on which it should be installed. One option is a pedestal, described above. Often it is supplemented with a frame that supports the front side. This is where the maximum load usually occurs, so a frame is assembled, which is attached to the floor with dowels, even if tiles are laid on the floor. When installed, one of the sides has a reliable support, which provides the necessary stability.
The retaining wall for the front side is made of timber or plasterboard profile. You can weld it from a profiled pipe, a corner with a small shelf.
If you cannot fix the bathtub to the walls, you need to make a reliable base for installation on the floor
The second option is a welded frame made of profiled pipe, which is welded to the size of the bathtub. It “sits” on the frame, and it, in turn, is rigidly attached to the floor using the same dowels. The gaps between the wall and the side can be closed in any available way, but this is not what will hold the bathtub, namely the frame.
For shock absorption and noise reduction, you can use rubber gaskets - made of hard rubber. Or boards like in the photo. They can also hold the container from the sides. This way of fastening the bathtub to the floor is reliable. She's definitely not going anywhere. Using the same principle, you can make a frame for a free-standing bathtub, and trim and decorate it to your liking.
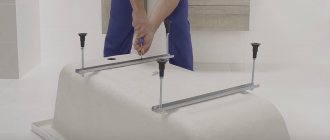
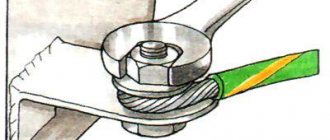
Installing legs on a bathtub
Legs come in different designs. The easiest way to install is paired ones: two supports are connected by a metal concave strip that follows the shape of the bowl. They are attached to the inverted bathtub with one screw, and spacers are installed between the legs and the bowl. The kit may include legs on a self-adhesive base, the installation of which is also easy. It is more difficult to fix metal supports, which are tightened in pairs with pins.
The installation procedure is as follows:
- Plugs are attached to those parts that will be adjacent to the bowl.
- Then, a horseshoe-shaped bracket is inserted into the grooves located on the fold of the main part with the hooks facing up. On the reverse side, press the hooks with pliers.
- There are metal loops on the parts, and protrusions on the outside of the bathtub body. The legs are installed so that the protrusion is in the loop.
- Then a pin is inserted into the special holes and secured on both sides with nuts.
All that remains is to screw the metal pin legs with rubber heels into the holes provided for this purpose.
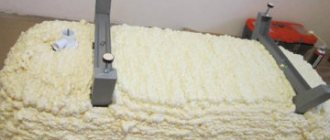
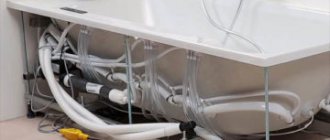
Polyurethane foam
Installation of the structure using polyurethane foam
This is the easiest way to secure a steel bathtub so that it does not swing. The only disadvantage is the high consumption of polyurethane foam:
- The bowl is first placed on its legs, leaving a gap of one centimeter against the wall.
- Connect the drain.
- Fill a bowl with water.
- Fill the space between the bottom and the floor with polyurethane foam, taking into account that the composition gradually expands upon contact with air.
Be sure to leave access to the siphon.
Preparing the premises for installation
The process of preparing the surfaces of walls and floors for the installation of a pre-selected steel bathtub can begin even before the moment of purchase, but much depends on the purpose of the repair.
If an old plumbing fixture is replaced with a new one, but with the same bowl dimensions, then the activities come down to cleaning. Another approach for major renovations is when the walls are covered with ceramic tiles or plastic.
It is reasonable to use ceramic tiles or make a poured floor under the bathtub if you do not plan to install a frame or screen. Otherwise, good waterproofing and a strong screed are sufficient.
It’s easier with plastic: the walls are finished in full, and then the bathtub is installed. There are different ways to deal with tiles.
There are three options:
- cladding-installation;
- installation - cladding;
- partial cladding – installation – cladding.
The last option is relevant when the exact height of the bath is not known or a small area is required to install the bowl on a frame attached to the wall. In this case, a free strip is left above the intended installation location of the bathtub, and after installing the bowl, it is tiled.
Installation on bricks
For laying a brick base, it is better to use fired material that is resistant to moisture, since there is high humidity in the bathroom.
You will need:
- bricks - approximately 20 pieces per two supports (depending on height);
- cement mortar (for half a bucket of M400 cement, two buckets of sand);
- trowel;
- drill with mixer attachment;
- roulette;
- pencil;
- level.
The side should not be higher than 70 cm, so that you do not have to make a podium with steps. From this calculation the height of the brick base is determined.
Instructions for implementation:
- To make the necessary markings and take measurements, install the bathtub on the legs in the place and position in which it will be after installation on the bricks. At the same time, mark with a line the place where the plumbing fixtures come into contact with the wall, and measure the distance from the bottom to the floor. It is not necessary to set a slope towards the drain, since it was already created when the bowl was cast.
- The bathtub is then removed from the room.
- Considering that the width of the standard model is 70 cm, the length of the base is determined to be 60 cm, since it should not be larger than the bath itself. The masonry will be 2.5 bricks long, based on a standard length of 24 cm.
- If the installation height is 16-17 cm, then two rows of masonry are enough, since the height of the brick is 7 cm, plus take into account the thickness of the mortar and the required gap between the base and the bottom - approximately 1 cm. More brick parts are placed along the edges of the top row, adjusting them to the shape of the bowl.
- Prepare cement mortar by mixing cement with sand and gradually adding water to it. You can replace some of the material with tile adhesive to make the solution more plastic.
- Lay a base consisting of two or three supports and allow the cement to harden for 2 days. Then lay a layer of mortar on the base, repeating the shape of the bowl, but slightly increasing the thickness of the layer in the center. The places adjacent to the wall are also treated with cement.
- Place the metal bath on the base and press it into the wall. Excess cement is immediately removed before the solution sets.
You can also lay columns of bricks around the perimeter, fixing them on edge, and from the outer edge of the bathtub it is advisable to lay out not just pillars, but a screen from bricks. This installation method is used both separately and in combination with foundation masonry.
Selection of plumbing fixtures and fittings
Initially, you need to select a model that is suitable in size and shape. If the bathroom is spacious, then there are no special requirements for the configuration, but for limited space it is better to opt for compact or corner products.
Plumbing stores offer a line of plumbing fixtures of standard dimensions from 1 m to 2 m in length and from 0.7 m to 1 m in width.
Image gallery
Photo from
Length 2m for large bathroom
Average size – from 1.5 m to 1.7 m
Minimum bath length – 1 m
Ability to install additional options
Along with the device, it is necessary to purchase fittings for connecting to the sewer network. Drainage devices differ in design, size, and material of manufacture.
Combination devices made of polypropylene with a water seal and a corrugated overflow pipe have proven themselves well. Visible parts can have different shades (white, silver, gold), usually they are chosen in accordance with the color of the faucet.
Using a metal corner
Bathtub with metal frame
If the bathroom walls are made of durable materials - brick or concrete, you can secure the bathtub with metal corners. They are fixed to the wall using dowels or anchors. The corner can be mounted either on a bare wall or on the cladding.
Required tools and materials:
- drill or hammer drill with drills (for tiles, concrete, metal);
- metal corner;
- fasteners for metal corners - dowels;
- MS polymer sealant;
- silicone sealant;
- degreaser;
- primer;
- roulette;
- pencil;
- level;
- flat spatula;
- notched spatula;
- hammer;
- screwdriver or screwdriver.
Installation procedure on the cladding:
- First, the wall is completely covered and the tile joints are rubbed.
- Then a metal corner is cut to size and holes are prepared in it for self-tapping screws.
- Degrease the base of the tiles, drill holes in the wall using a special drill for tiles and a drill for concrete.
- Treat the MS corner with polymer sealant - the side that will be adjacent to the wall.
- The composition seals the junction so that in the future water does not penetrate under the bathtub.
- Then degrease the base along the entire perimeter of the installed corner, as well as the lower edge along the perimeter of the bowl. Apply sealant to the corner, remove excess with a notched trowel and install the bath.
- After installation, load it.
- The next day, the water is drained and a seal is made along the upper edge of the bath with silicone sealant.
After installing the bathtub on the corner, all that remains is to connect it to the drain.
Why a bathtub should be stable ↑
Stability and reliable fixation of plumbing fixtures are the basis for safe daily use. Wet sanitaryware and a wet bathtub themselves can cause household injuries and require some caution when touching or supporting them. “Playing” objects can present extremely unpleasant surprises, ranging from damage to the floor or walls and ending with failure.
The bath bears the greatest load. The weight, if the product is made of cast iron, is also significant. On average, it fluctuates at 100 kg and can reach 180. Popular metal and acrylic models are much lighter - up to 30 kg. They are the ones who need the most responsible approach to fixation.
Installation on a profile frame
Required materials and tools:
- guide and rack profile for drywall;
- drywall;
- roulette;
- level;
- pencil;
- polyurethane foam;
- metal screws;
- dowels;
- sealant;
- tool for cutting the profile - it is recommended to use metal scissors or a jigsaw.
The order of work on assembling the frame:
- The legs are pre-attached to the bowl.
- Perform markings for installing the profile on the floor. Since the screen should be flush with the edge of the bathtub, the markings are shifted closer to the wall, taking into account the thickness of the drywall and cladding. If the drywall will be tiled, then the thickness of the tile adhesive is also taken into account - 3 mm.
- To install the frame, a guide and rack profile are used. The first is fixed to the floor using dowels. First, it is more convenient to glue the profile with a sealant, and then attach it to the wall and fix it together with metal screws.
- Rack frame elements are made from the rack profile.
- The strip under the side is made from a guide profile. In this case, it is more convenient to secure the rack elements - they will be inserted into the cavity of the upper and lower profiles. But the frame will be more flimsy. A bar made from a rack profile will secure the bathtub more reliably.
- The gaps under the side between the bathtub and the profile are filled with polyurethane foam.
- Further. The structure is sheathed with plasterboard.
To strengthen the frame, the racks and support for the sides are assembled from two profiles, inserting them so as to form a profile pipe. Metal screws are screwed into the ends, thus fastening the elements to each other. Moreover, they need to be screwed closer to the edge of the end of the profile, which is located inside, otherwise the sides will bend, as a result it will not sew through the profile.
What types of tile floors are found in bathrooms?
| Type of tiled floor | Description of technical characteristics |
On a concrete base | The most durable coatings that can withstand significant forces. Only on such floors is it recommended to install heavy cast iron or stone bathtubs. The tiles are laid on a leveling cement-sand screed on concrete; there is no insulating layer. If various insulation materials were used to reduce thermal conductivity, then installing heavy containers is not recommended. |
On a wooden base | Ceramic tiles are installed on sheets of plywood or OSB. Wooden beams are used as load-bearing elements. Such a base does not have high levels of physical strength; it is not recommended to install heavy bathtubs on them. The fact is that wooden structures change linear dimensions due to fluctuations in relative humidity. As a result of such movements, the degree of adhesion of tiles and adhesive significantly decreases. Loads from the legs of the bathtub speed up this process and increase the risk of tiles peeling off. |
Heated | In terms of strength they occupy an average position. The thickness and strength of the screed above the heating system cannot guarantee the integrity of the coating; sharp loads from the legs of the bathtub can cause critical damage to the coating. |
Be sure to consider the features and technical specifications of the floors before purchasing a bathtub.
Insert into a niche
Bathtub mounted in a niche
To strengthen a bathtub installed on legs, you can additionally cut it into a niche. The insertion is made only along the long side or along one short and long side. For preparatory work you will need a tape measure, a marker, and a level. The groove can be made with a wall chaser, drill, hammer drill, or grinder. They are done manually with a hammer and chisel, but cutting grooves in concrete with a hand tool will not work.
The work order is as follows:
- First, the bowl is placed on its legs. Make adjustments by choosing a convenient installation height. You can do this outside of the bathroom, so you don’t have to take out the plumbing later.
- Measure the distance from the floor to the lower edge of the side and set this distance at the installation site, from the floor, along one or two walls. Draw a line. The length of the groove along a short wall should be equal to the width of the bathtub; it can be done with a small margin for ease of installation.
- Measure the height of the side and set this distance from the first line upward. This is the minimum width of the groove. To make installation more convenient, you can expand the groove upward by 1-2 cm. The depth should be no less than the difference between the length of the bathtub and the distance between the walls if the length of the plumbing fixtures exceeds the width of the room.
- Having made a ditch, they bring in the bath.
- Install it at an angle to the installation site. They put something on one side so that the side that will not be inserted into the groove rises higher, or use the help of a second person.
- The second side is lifted and inserted into the side groove.
- They slide the bathtub into the groove along the long wall.
- Install the legs.
Using this method, you can install a bathtub if it is several centimeters larger than the opening.
How to avoid mistakes when installing plumbing ↑
You should think through all the steps of how to install a bathtub on tiles before starting work. It will not be possible to solve problems as they arise. So, initially the floor tiles must have a significant margin of safety.
First of all, this is true for heavy cast iron bathtubs. Ceramics simply may not withstand the increased load. The characteristics of the material can be clarified with the seller, but it is best to consult with professionals and resort to their help. They are the ones who will suggest the right decision, since they are directly interested in the proper quality of the work performed and are responsible for them.
A popular method of leveling a bathtub is using foot pads. Often improvised materials are used - wood, tile scraps, rubber or polyurethane. Amateur efforts in such cases are rarely crowned with success - a couple of months pass, the bathtub begins to sway and crawl on the floor. All the work goes down the drain.
Common mistakes
When installing a steel bathtub yourself, it is not always possible to avoid mistakes. They negatively affect the final result, so you need to know in advance what you can do wrong:
- The drain pipe must be below the bottom of the bowl, otherwise draining will be difficult.
- The screen under the bathtub should not be made absolutely straight. For convenience, it is necessary to make a recess at the bottom.
- Failure to comply with the horizontal installation level. This happens due to the haste of the work and inattention. It is much more difficult to level a bowl that is already secured.
- Installation of drain and overflow after installation. It is better to do this before installation.
- Loose nuts. If the nuts that secure the legs are loose, the bathtub will tilt or begin to wobble.
- Lack of sound insulation of the bowl. Not all models need to be soundproofed. But it is still wiser to cover the outside of the bowl with mounting foam or putty, since these materials also perform a heat-saving function.
Thanks to its weight, a steel bathtub can be installed even alone. But light weight is both an advantage and a disadvantage at the same time. In order to securely fasten the structure and not worry about its stability, it is necessary to use standard racks together with additional fasteners and frames.
Manufacturing for a steel podium bathtub
To more reliably strengthen a steel bathtub, you can use a specially constructed podium. For its manufacture, you can use a variety of materials: brick, foam blocks, wooden beams, metal corner, profile pipe and other similar materials.
Note! For a small bathroom, such a podium will look inappropriate and uncomfortable. In a large room, such a podium will perform several functions: reliably strengthen the steel bowl and serve as an additional decoration in the interior.
The most durable material for a podium is brick, but in houses with unreliable floors it is not always possible to use it. For the same reason, concrete is not suitable for the podium. Although wood or foam blocks are lighter than brick, these materials are easily destroyed when interacting with moisture. If you follow some recommendations, you can safely use the above materials in the manufacture of the podium.
Making a podium from foam blocks
The podium made of foam blocks must be made in such a way that the edges of the bathtub rest on the walls. The height of the podium is selected so that it is convenient to use the installed bathtub. Before use, foam blocks must be treated with special moisture-resistant impregnations, which will protect the material from destruction and protect against the appearance of fungus and mold.
Making a podium from wooden beams
Before use, the timber will need to be treated several times with a special protective impregnation. Additionally, it will be necessary to treat the places where the timber was cut. If the structure protrudes beyond the edges of the bowl, then a moisture-resistant sheet of plywood can be laid on the wooden beam.
To fasten the frame, you need to use only special stainless steel screws. Although the timber structure is quite strong, additional insurance will not be superfluous. The bathtub can be installed on additionally laid out stands or used for this purpose are the legs on which the bathtub bowl will rest.
Making a metal frame
The frame for the podium can be made from a metal corner or from a profile pipe. This frame is durable and lightweight. The main disadvantage of this design is the need to weld individual parts during assembly, since it is not always possible to use a welding machine in an apartment. And a frame welded outside the apartment, due to its size, may not fit through the doorway.
If there are no problems with such a frame, then the completely finished product should be pre-treated with anti-corrosion impregnation, primed and painted.
To prevent the structure from moving, it can be additionally secured to the wall or floor. After installing the steel bowl, you can begin covering the podium with plywood or other material.
If your podium is two-level or occupies a significant area, you can provide drawers or niches for storing toiletries.
In this article we looked at the main methods of fixing a steel bathtub. Thanks, you now know how to strengthen a steel bathtub with your own hands.