Clothes dryers, the popularity of which has noticeably increased, allow you to avoid many inconveniences: washed clothes do not have to be hung throughout the apartment, they dry faster, wrinkle less and do not get in the way. The ease of use of a dryer largely depends on the design itself, its size, functionality, and material of manufacture. How to install an electric storage water heater in the bathroom, read the link.
Clothes dryers for the bathroom
To choose the best option, you should become more familiar with the types of dryers, their pros and cons, as well as installation methods.
Features of clothes dryers
Drying clothes is a necessary task that causes significant stress for homeowners and their families. To facilitate the process, many types of dryers have been created, both compact and large sizes, so that everyone can choose an option for their bathroom.
Benefits of use
A clothes dryer for the bathroom has a number of advantages:
- Compact and functional. Sliding and folding wall-mounted dryers have small dimensions, which allows them to be placed anywhere.
- Easy installation. You don't need any special skills to install a dryer.
- Easy to use.
- Solid foundation. Durable materials are used to make dryers - plastic or metal.
Flaws
Dryers also have their disadvantages:
- Small drying area. This applies mainly to wall-mounted models.
- Low load.
- Weak fastening strength. Due to the weight of the laundry, the fastenings wear out and become unusable.
Mobile or portable dryers
The most popular option for a floor clothes dryer is a folding design that looks like an ironing board.
Also, quite often housewives choose dryers on wheels, which are easy to move from one room to another.
- Orange bathroom - 75 best photo ideas for bright color combinations
Beige bathroom: calm and stylish tones in the design + 76 photos of design ideas
- Self-leveling floor in the bathroom - installation taking into account the characteristics of the room (92 photos + video)
Both models are made of metal, and they are particularly strong and durable, since they have a simplified design without rollers, brackets and other devices.
Portable dryers include a model resembling a book with special support bars. It is necessary to place such a dryer on the bathtub itself, focusing on the edges of the container.
Types of clothes dryers
Dryers are standard and electric.
They are mainly made from the following materials:
- aluminum;
- plastic
- stainless steel.
Depending on the design, they can be installed on the side of the bathroom, attached to the wall or ceiling. In order not to make a mistake in your choice, you need to study in more detail one of its main criteria - the installation method.
Floor-standing
Floor-mounted horizontal design is the standard option. It is a frame where rods are stretched horizontally for hanging laundry. This design, when unfolded, takes up a lot of space, but is indispensable for drying a large number of things. When assembled, the model becomes narrow, so it can be hidden between the bathtub and the washing machine. On average, this model can withstand up to 20 kg of wet laundry with a maximum weight of 3.5 - 4 kg.
One of the varieties is a multi-tiered model, similar to a bookcase. Its design is foldable and has wheels for easy movement. When unfolded, this model takes up less space than a horizontal model, but is only suitable for drying small items (underwear, socks, shirts).
Advantages of floor models:
- durability in operation;
- ease of use;
- low weight of the structure;
- good capacity;
This design has only one drawback - it takes up a lot of usable space.
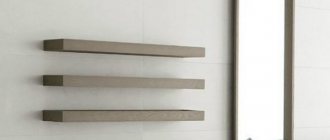
Wall mounted
Wall-mounted models are much more convenient to use than floor-mounted ones. The design consists of guides with crossbars for linen. There are folding compact models that have a spring mechanism that allows you to pull ropes between opposite walls. Things hung on such a structure do not interfere with the use of the bathroom, and after assembly the dryer becomes completely invisible.
Advantages:
- compactness;
- ease and convenience of use;
- aesthetic appearance (will not spoil the interior of the bathroom).
Flaws:
- small capacity (maximum load should not exceed 7 - 10 kg);
- installation (during installation it is necessary to drill the walls).
Hanging
In design, these models resemble wall-mounted ones, only their guides are attached to the ceiling. The height of the crossbars can be adjusted, and each of them can move separately, independently of the others. It is convenient to place this dryer directly above the bathtub so that drops of laundry do not flow onto the floor.
Advantages:
- hung things do not take up useful space and do not interfere with the use of the bathroom;
- compact size;
- aesthetic appearance;
- ease of use.
The disadvantages include the laboriousness of installation, since you will have to drill holes, as well as purchase strong and reliable fastenings so that the entire structure does not fall to the floor under the weight of wet laundry.
Bath and battery mounted
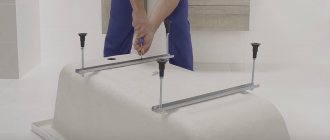
By design, these models are folding frames with tubes or strings. They can be installed either horizontally on top of the bathtub or at an angle on opposite sides. To prevent this design from slipping, it has special plastic clips. There are also models that can be hung on the side of a bathtub or radiator. They are very small and are only suitable for drying towels, socks or underwear.
Pros:
- little weight;
- ease of use.
There are many more disadvantages to this model. It is inconvenient and poorly functional. It is impossible to dry large things on it, and especially in large quantities. You cannot use the bathtub while drying either, since the dryer is located directly on it. All this causes a lot of inconvenience.
Heated towel rails
In many homes you can find a heated towel rail. It is necessary for drying things, as well as heating the bathroom during the cold season.
These designs come in two types:
- water (connected to a hot water supply pipe);
- electrical (connected to the mains).
Water heated towel rails are one or two pipe bends of the same diameter as the riser itself. They are directly connected to the heating system and heat the room by circulating hot water inside.
There are two ways to connect a heated towel rail:
- lower;
- lateral (considered the most effective).
Connection diagrams:
Electrical
Electric dryers also have a high demand in the market, despite the fact that their cost is higher than conventional dryers. These models are simply necessary in situations where you need to dry a jacket or blanket in a short time. Electric models are also very diverse.
They are:
- floor;
- wall-mounted;
- hanging.
Most of them are equipped with a special thermostat, which allows you to select a drying mode for a specific item, as well as a timer, which allows you to regulate the operation of the device.
Advantages of electric dryers:
- withstand loads of about 15 kg;
- work almost silently;
- provide fast and uniform drying of laundry;
- easy to use;
- When folded, they take up minimal space.
Flaws:
- high price;
- electricity consumption;
- the need to comply with safety regulations.
Types of wall dryers
Despite the fact that wall structures come in different types and types, they all have one common quality - they are installed on walls. It is worth familiarizing yourself with all the types and characteristics of such dryers in order to have a general idea about them.
Stationary
Stationary, in other words, ordinary rope models. They are stretched ropes located above the bathtub. Such a dryer has a fairly compact size and, after installation, does not bother anyone, quietly fulfilling its purpose.
The most convenient option for wall structures is a roller rope dryer. Its main advantage is that it can be used even when there is no access to the entire length of the ropes. If you can’t reach the thing you need, you can simply pull the rope towards you. Stationary models are installed both in the bathroom and on the balcony or loggia.
Advantages of this dryer:
- compactness;
- ease of installation;
- simplicity of design;
- low cost;
- ease of operation.
Sliding
Sliding dryers can be found both in the bathroom and on the balcony. Their second name is “accordion”, because in appearance they are very similar.
Model features:
- The structure is installed on the wall and can be pulled out if necessary. When the dryer is not needed, it simply slides back and does not take up much space.
- Made of metal tubes secured on both sides by a special mechanism.
- Can withstand high loads (up to 10 kg).
- Helps dry a large amount of laundry (has from 5 to 10 tubes). Narrow in width (from 500 cm to 1200 cm).
Folding
The most widely used among users is the folding dryer. It consists of several parts: a stationary one with a rotating drum (which is attached to the wall) and a mobile one (which is attached to hooks to the opposite wall as needed).
You can make this model yourself. To do this, you just need to secure the ropes of the required length using slats and screw them onto a drum (any cylindrical object will do as a drum). The only difference from store-bought ones is that in a homemade dryer, the drum will tension the ropes automatically.
Advantages:
- compactness (does not take up much space when folded);
- ease of use;
- low cost.
Flaws:
- low load capacity (up to 6-7 kg maximum);
- sagging ropes from frequent use;
- plastic base, which has weak strength.
Lift system
The elevator system is an exhaust structure with high parameters of convenience and practicality. Attaches not only to walls, but also to ceilings. Hence its common name - wall-ceiling dryer.
Design Features:
- It consists of 6 tubes secured with a metal base, which has increased wear resistance.
- While hanging, the handset can be lowered toward you for convenience, and then raised to the desired height.
- High load capacity - up to 20 kg of laundry.
In appearance and functionality, this is an ordinary electric heated towel rail.
The design has the shape of a ladder and is intended for a small number of things:
- towels;
- underwear;
- socks.
This device is electric, which ensures quick drying and heating of the product. But you need to be very careful with such a model. You must connect the heated towel rail yourself, keeping children away from it.
Accommodation
- Most of us wash all the laundry that has accumulated over a certain period in one day, making several “approaches” to the washing machine. Thus, the dryer ends up with clothes from several washes at once. In order not to test the strength of interior partitions, choose a solid wall for installing the dryer, preferably a load-bearing one. This way you will be sure that the wall will not gradually begin to crumble under the weight of wet laundry.
- When choosing a place for the dryer, keep in mind that it will be unfolded from time to time. While the laundry is drying, you should be provided with free access to all plumbing fixtures and cabinets.
- Try to place the dryer as close to the ventilation system as possible - this way the laundry will dry faster and excess moisture will evaporate in time. Monitor the condition of the fan and clean it periodically.
Types of dryers by material of manufacture
For any type of dryer, it is very important what material it is made from, because the durability of the structure depends on it.
Rope
Rope models, as a rule, have a low cost, and hence a fragile design. The base is made mainly of plastic, which soon breaks or cracks. Ropes tend to sag and wear out.
Aluminum
Aluminum models are much stronger than rope models, but they tend to deform, since aluminum itself is a fairly soft metal. Unpleasant properties also include metal oxidation, which results in stains on clothing.
Steel
Steel structures are among the most durable. They can withstand increased loads and do not deform. Their service life is much longer than the others. Even after 10-15 years, the dryer will retain its original qualities. The only drawback is its high cost, but it is completely justified.
Operating rules
Using Liana is very simple:
- If you need to hang laundry, you need to lower the tube by releasing the cord lock.
- Place the laundry.
- Pull the same cord so that the tube rises to the required height. Reinsert the retainer into the control mechanism.
Operating the Liana dryer is simple and convenient.
The design does not require specialized care. To extend the service life of plastic tubes, they must be wiped after each drying of laundry; for metal tubes, this procedure is not necessary.
It is necessary to wipe the tubes before each time you hang up the laundry, so that the dust that settles on them does not stain the washed items.
The most common breakdowns are: deformation of tubes and wear of ropes. Defects can be easily eliminated - you just need to replace the part that has become unusable. There is no need to buy a completely new design. It is necessary to completely replace the dryer if such parts have become unusable, without which the effective functioning of the product is impossible or which cannot be replaced with similar ones.
The service life of Liana dryers is from five to ten years. In this case, a prerequisite is the correct installation of the structure; also, in order for the product not to lose its functionality, it should not be overloaded.
Video: replacing the cord on a Liana dryer
Recommendations and selection criteria
The following parameters need to be taken into account:
- Construction type. It is necessary to navigate depending on the size of the bathroom. If the room has a very small area, then folding or sliding models would be an ideal option, since they take up practically no space when folded.
- Degree of load. The most optimal load capacity is considered to be 10 kg. If the dryer has this parameter less than 10 kg, then frequent overloads will quickly render it unusable.
- Material of manufacture. Rope models have a low cost, but are weak in operation (they tend to sag under the weight of clothing). Dryers made of plastic and metal will last much longer.
Review of popular models
With so many varieties of dryers, it is very difficult to make a choice in favor of just one. Below are the most famous models with characteristics that will help you decide.
Wall dryer Gimi Rotor-6
Budget Italian model. Perfect for a small bathroom. Wall tension structure (6 ropes). Attaches using self-tapping screws and dowels included in the kit. The maximum rope length is 3.6 m and the maximum load capacity is 10 kg. Has automatic return to the starting position.
Ceiling dryer "Liana"
Popular and easy to use model. Equipped with 6 metal strings that are separately adjustable. Each string can withstand a load of up to 2.5 kg. The length, depending on the model, ranges from 1.3 to 2 m.
Ceiling dryer Fortuna
It consists of two metal brackets with rollers on which two aluminum movable profiles are located. It has a simple mechanism that allows you to raise and lower the cables to the desired height, independently of each other. It is very convenient to hang hangers on steel cables so that clothes do not wrinkle while drying.
Wall dryer Leifheit TELECLIP
Compact, but at the same time roomy retractable model. Attached to the wall with self-tapping screws or dowels (included). The length of the rods is 1 m, and the maximum load is 4.5 kg.
Floor dryer Siena
Folding model with 3 drying zones. Lightweight and very roomy. Has 18 rods for drying clothes. When opened, it has dimensions of 55x180x112 cm. Maximum load capacity is 20 kg. Easy to fold and weighs only 2 kg.
Installation Features
Every owner can install a dryer, because this activity does not require any special skills. The order of fastening the elements may differ depending on the design model, but this does not cause any difficulties. Ceiling structures are considered the most difficult to install. Before starting work, you should check the complete set of elements.
The following devices may be needed during the process:
- pencil;
- hammer;
- drill.
Installation of dryer Liana
Basic steps:
- Before starting work, we select the optimal location of the dryer, after which we take brackets with rollers, attach them to the ceiling and mark points through the holes. It is important to keep the brackets parallel to each other, at the same level and the same distance from each other.
- We drill holes in the ceiling, then blow out the dust and hammer the dowels tightly. Next, we fasten the brackets with screws, closing the recesses from the fasteners with plugs.
- We attach a bracket to secure the cords on the wall opposite the brackets. It should be at a height of approximately 1.3 - 1.5 m from the floor.
- We attach the cords to each rod one by one. To do this, tie a tight knot at the end, place the cord in the groove on the rod and tightly tighten the knot inward.
- Let's start assembling the dryer. The cords must be pulled through the holes in both brackets. You should start with the fixing bracket. If it is difficult to push it into the hole, you can use a piece of wire bent into the shape of a hook. The free end of the cord must be pulled through 2 fixing caps.
- We pull the first rod up, fixing the top cap with a knot on the cord (put it into the cutout in the bracket). We do the same with the rest of the suspensions.
- We determine the lower (convenient for hanging) level of location of the rods. Having determined the level, we tie a knot on it and pull it into the lower cap. We cut off the remaining pieces of cord. After this, we pull the suspensions to their original position.
This video provides detailed instructions for installing a dryer with your own hands.
Fortuna dryer installation
Algorithm of actions:
- With a pencil we mark the fastenings of the brackets, two points for each. Together they should form a rectangle with sides of 1.8-2 m and 0.4-0.6 m. On the wall we also mark the mounting points for the control unit strictly along one vertical line.
- At the points we drill holes of the required depth. Using anchors, we fasten the brackets with rollers and the control unit.
- We pull the end of the steel cable into the holder (crab), tie a knot at the end and tighten it inward. We insert the second end of the cable into the plastic retainer and cover plate. Then we pull it through the roller located on the opposite side of the control unit.
- We move the cover close to the roller and clamp it with a clamp. After this, we pull the crab up on the cable, resting it against the latch. Then we pass the cable from the outside of the double roller and through the guide roller.
- On the control unit, unscrew the cap without losing the lock washer, which is located inside. We pass the free end of the cable through the cap, bend it in a loop and bring it out through the same hole. Now we pull the cable in the opposite direction, but from the inside of the rollers. At this time, the double roller should be turned towards the guide.
- We attach decorative pads under each roller, then put on the crabs and adjust the length of the cable so that when the crabs are at the very top, the distance between the control unit and the middle of the loop does not exceed 10 cm. Then we cut off the free end of the cable.
- We insert a lock washer into the middle of the loop and, without releasing it, tighten the cable into the cap. Then we unwind the cable with the handle on the control unit so that we can tighten the cap.
- The last step is to insert plastic linings into the holes and insert the profiles into the holders to the ceiling. The resulting structure should be positioned strictly horizontally. As a finishing touch, we put caps on the ends of the profiles.
This video shows the sequence of installation work for installing the Fortuna dryer.
How to make a dryer with your own hands
Before you begin, you need to decide what material and type of construction to choose for the future product.
Required tools and materials:
- 2 steel corners 25×25 mm and 1 m long;
- Grover washers 20×30 mm;
- drill with a set of drills;
- level;
- pencil;
- anchor bolts;
- clothesline for drying clothes in the bathroom.
Manufacturing instructions:
- In the first corner on one shelf we drill holes at a distance of 50 mm from the ends (in the middle). On the other shelf we make holes with a diameter of 6 mm in increments of 10 cm, departing from the ends about 2-3 cm. We do the same with the second one.
- We sand the finished corners and paint them to give the dryer a beautiful look. We use anti-corrosion paint due to the high humidity of use.
- After the paint has dried, we determine a convenient height for the dryer. To do this, we apply a corner to the wall and, having aligned it horizontally, put marks through the holes in the shelf. We carry out the same actions with the second corner on the other wall. All marks must be at the same level to avoid distortion.
- We drill holes at the marked points, clear them of dust and screw the corners to the wall with anchor bolts.
- We stretch a clothesline between the guides, threading it through the washers and securing the ends with knots.
This design will not withstand significant loads, the ropes will sag over time, but it is budget-friendly and made with your own hands.
Installation
- Installation of a wall-mounted dryer should begin with choosing the most suitable location. Read about placement requirements in the previous section.
- Please read the installation instructions carefully before starting work. It contains recommendations specific to this particular dryer model.
- Now take the bracket on which the structure will be attached and attach it to the wall in the selected location. Through the through holes, mark the locations of future fasteners.
- In accordance with the markings on the wall, drill the required number of holes.
- Secure the brackets to the wall using the set of fasteners included in the kit.
- Attach the remaining dryer parts to the brackets following the instructions in the assembly manual.
Related article: Cabinet with sink for washing machine