Home/Articles/What and how can you make a shelf for your bathroom with your own hands?
It is impossible to imagine the full use of a bathroom without the presence of various plumbing fixtures and accessories that optimize space and make our lives easier. The most popular items in the bathroom are all kinds of shelves and cabinets. Sometimes there is not enough money to purchase all these accessories, or the products on the market do not fit a particular space in size or design.
There is always a way out! You can make such products with your own hands, taking into account the individual characteristics and specific dimensions of the room.
How to choose and assemble a shelf for your bathroom with your own hands? Examples with photos
DIY bathroom shelves. Quick guide.
The moment has come when the bathroom renovation has already been done, the old plumbing has been replaced with new ones, the furniture and washing machine have taken their place. But the impression remains of incompleteness or, on the contrary, everything seems to be arranged, but suddenly it turns out that there is not enough space for storage. It can be not very convenient to use a closet or cabinet just to brush your teeth in the morning or get soap. Bathroom shelves exist for these purposes.
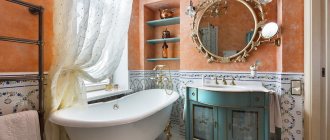
In this, of course, they have no equal. The most common and most convenient option is to place the shelf above the sink, at the same time as the mirror. There are options for mirrors along with a shelf. In general, it can be placed in a variety of places that are most suitable for a particular bathroom, in order to ensure a more comfortable pastime in the bathroom. In addition, this is not only additional storage space for all kinds of vials, bottles and bottles, but also an additional accessory to your bathroom. And if you also add lighting to the shelf, everything will look original.
You can beautifully complement the interior with an unusual shelf. You can make it yourself, and installing it certainly won’t be too difficult. To do this you will need:
- Roulette.
- Pencil or marker.
- Drill.
Mark the places for fastenings on the wall, check that the fastenings are at the same level. Drill holes, insert dowels and secure fasteners. Now you can install the shelf directly.
Types of bathroom shelves with photos.
Today's market provides a huge range of furniture and accessories for bathrooms, and shelves are not far behind in this variety. Of course, we understand that when choosing a shelf, as well as when choosing furniture, you need to adhere to the basic rules: shelves must be made of high-quality materials that will not be susceptible to moisture and large temperature changes. Main options:
- metal;
- wooden;
- plastic;
- glass.
The difference can be not only in materials, but also in the types of shelves, the method of their installation and the method of operation. The types of shelves are:
- fixed and removable;
- wall and corner;
- floor and wall mounted;
- open and closed;
- under the washbasin and under the bathtub.
How can you not get lost in this variety and make the right choice? Very easy. Answer yourself a few questions and you can make the right choice. What function will your shelf serve, purely decorative or for direct practical use? Which shelf is most suitable for the design of the room? Where should the shelf, wall or corner be installed? What is the size of the room? For example, glass shelves are very suitable for a very small space; they create the effect of floating and weightlessness. But if you try to make a shelf for the bathroom, look at the options in the photo, with your own hands, then in any case it will turn out to be exclusive.
This accessory has become so integral to our lives that it is impossible to imagine any apartment absolutely without shelves, much less a bathroom without a shelf. It is this room that needs it the most, because through it we increase functionality, add a dose of individuality and saturate our favorite bathroom with comfort.
ogodom.ru
Construction of a plasterboard shelf
If you want to use a plasterboard shelf in your bathroom, it’s easy to create such a product yourself. To do this, you need to act in the following sequence:
- Apply CD and UD profiles. They are ideal for manufacturing, which must be fastened with self-tapping screws.
- Try making niches if you are installing plasterboard sheets in the bathroom for leveling.
- After covering with plasterboard, you can cover the surface with tiles. If desired, the design can be combined with glass. It must be mounted in pre-built niches. This option will look attractive.
It is preferable to spend every effort to ensure that the product is of high quality and durable.
In general, making a bathroom shelf with your own hands is not difficult if you decide on the material in advance and make a list of the necessary work. For this room it is better to use a wooden or glass option. The first one is durable and presentable, but to prevent it from deteriorating under the influence of moisture, it is necessary to treat the surface with varnish or a water-repellent agent.
In general, making a bathroom shelf with your own hands is not difficult if you decide on the material in advance and make a list of the necessary work.
As for the glass structure, it is much more practical. Its main advantages are resistance to moisture and chemicals. This material does not rot, does not become stained or coated, and the installation of the glass shelf is carried out without any problems. Of course, the choice of material depends purely on the preferences of the apartment owner, but the properties of different types of raw materials must be taken into account.
It is preferable, of course, to make a shelf out of wood, since this material is resistant to any impact in any place.
This material does not rot, does not become stained or coated, and the installation of the glass shelf is carried out without any problems.
DIY bathroom shelf
Hello to all DIYers, the bathtub in every home should have a convenient shelf so that you can easily get the necessary towel, soap and other accessories. In this article I will tell you how the author made a convenient shelf for accessories in the bathtub. You don’t need a lot of materials to assemble it; all the parts can be made from leftover wooden planks or chipboard sheets that most people have.
In order to make this shelf, we will need: * 2 boards measuring 200 x 200 mm, the material can be either chipboard or wood, in this case the sides will be made of it. * 1 board measuring 200 x 400 mm, which will serve as the back side. * Chrome pipe with a diameter of 19 mm and a length of 410 mm. * Strong glass, 5 mm thick, 180 x 400 mm. * Dowels. * Glue for gluing wooden products. * Sandpaper of different grits .* 2 keyed brackets and 20mm screws.
You will also need tools, you can’t do without them: * A jigsaw for cutting steel, in this case you just need a metal file for the jigsaw instead of one for wood. * Electric drill * Quick clamps, or rather clamps, you can also use a vice. * Drawing tools tools such as tape measure and pencil.
Now all the parts with the tools are ready, first we put on a robe for protection, and also protect ourselves with safety glasses from accidental ingress of shavings or other possible particles. Well, now you can definitely start gradually making your homemade product.
Step one. First, you need to cut a sheet of chipboard or wood, we do this using a jigsaw; for greater evenness, it is most convenient to use a special stop that rests against the flat side of the board, which ultimately guarantees an even cut. You need to saw off the parts according to previously measured data, which you need to estimate according to the size of the wall so that it doesn’t look bulky or small. You need to glue an edge to the ends, which will cover the cut area and hide from view those very glued chipboard chipboard shavings.
Step two.
Now let's move on to measuring the parts, it would be better to measure in this case with a tape measure, since the length of the next workpiece from a chrome-plated pipe is 410 mm, it is at this mark that we put a line with a pencil, and then, installing a metal file in the jigsaw (this is done in no time , using a hex key at the base of the tool) we saw off the future part, which in turn is firmly clamped on the workbench using large clamps. If there are no clamps, then a vice will do, but before clamping the part, you need to wrap it with some soft material, for example, a rag, in order to leave the workpiece without noticeable dents or similar defects. Working with a jigsaw is very unsafe, so wear safety glasses and hand protection, be it gloves or special mittens.
Step three.
Armed with a tape measure, we measure 20 mm from the edge on both sides, and then, holding the drill in a screwdriver, we drill a hole where we will later install a chrome-plated pipe, but we do not drill through, but leaving a small thickness of the walls.
Step four.
Making grooves is not an easy job, but an edge mortiser will help us with this; it makes even grooves with good accuracy; they must be made in the side and rear sections.
If this tool is not available, you can use a more common method, namely, fastening it to spikes; they are made lighter, and in small quantities they will not take much time. Before the next step, check the coincidence of the sections to each other, if everything is fine, then move on.
Step five.
Now you need to set the cutting depth to the size of the dowels, then apply glue to glue the wood into the cut slots.
Step six.
We insert the finished dowels in one direction, and then assemble the parts together, installing them in the grooves coated with glue.
Excess glue will most likely come out, but this is not a problem, since in this case it will even be better, due to the fact that there will be a part in this place.
Step seven.
On the other hand, make inserts for the chrome tube before installing the side section; after installing the sides, you can finally clamp the entire structure until it dries completely, which is usually 24 hours.
Step eight.
Since the shelf will not stand on any surface, but hang on the wall, you need to think about how it will be kept on the wall, you don’t need to think long about it, this method is called mounting on brackets, which needs to be done in our homemade product . To install the bracket, mark with a pencil the future location of the brackets on the back wall.
Next, using a drill with a diameter of 10 mm, we drill a hole 5 mm deep and use 20 mm screws to fasten the brackets.
Finally, you need to install a glass shelf.
At this point the DIY bath shelf is ready, thank you all and good luck with your DIY projects.
Source
Become the author of the site, publish your own articles, descriptions of homemade products and pay for the text. Read more here.
usamodelkina.ru
Assortment of stores
A towel rack is not only a useful device, it is also a decorative element in the bathroom. It is important to buy not only the option that you like the most, but also to match it to the overall interior of the room. An important factor in the choice is the material from which the shelf is made.
Attention! The material from which the shelves are made must withstand the effects of high humidity and temperature changes.
Manufacturers offer towel shelves made of:
- Plastic is the lightest and most affordable option, but it is also the most fragile.
- Glass or mirrors are a little more expensive, but they do not add heaviness to the interior and are more reliable. They are easy to care for; just wipe the surface with a glass surface cleaner. Glass shelves never become moldy.
- Metal. It’s good if stainless steel was used for manufacturing, then the product will last a long time. Such interior elements also last a long time, but are slightly more expensive than the previous option.
- Tree. Not the most practical, but expensive choice. Wooden surfaces must be coated with moisture-proof varnish and this procedure must be repeated regularly. Otherwise, the shelf will quickly become unusable. Mold that appears is difficult to remove, and the towels will have an unpleasant odor. In addition, it is dangerous to health.
- Natural stone. Such shelves for towels are made only if the bathroom interior has other stone parts (countertop, sink).
Material
There are a wide range of models of bathroom shelves, so everyone can choose the right option for themselves.
- Glass. The transparent product is not afraid of moisture, is easy to care for and gives the room lightness and grace. Products made of frosted glass are popular, which do not allow objects to slide.
- Metal. Stainless steel and brass bathroom shelves are corrosion resistant, making them the right choice for high humidity areas. A metal mesh prevents water from accumulating on the surface.
- From tiles. The tiled structure is quite strong, easy to clean and fits perfectly into the environment, as if dissolving in it.
- Plastic. The material used in the production of such a shelf must be of high quality, otherwise the budget PVC product will turn yellow or break.
- Wooden. Eco-style lovers choose natural wood models for the bathroom, despite the low moisture resistance of the material. To extend their service life, products are protected with special impregnations (varnish, wax, oil), and recently thermowood or durable bamboo have been successfully used to create shelves.
- MDF/chipboard. An inexpensive option, often visually indistinguishable from wood. It is recommended to use laminated boards that are not susceptible to exposure to water.
- Fake diamond. An acrylic shelf in a bathroom will last for several decades if it is not subjected to mechanical stress. It is usually made to order, so it can have any shape.
- Drywall. Hides pipes and smooths out awkward corners, serving as a storage surface. Moisture-resistant gypsum board can be finished with tiles, mosaics or plastic and turned into an aesthetic shelf.
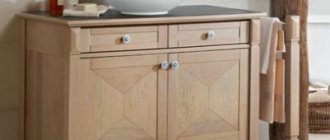
In the photo in the small bathroom, the shelves are made of chipboard, imitating light wood.
When choosing a suitable model for the bathroom, you should make sure in advance whether the product fits into the interior. Glass can match the doors of a shower stall, metal – with chrome-plated plumbing elements, wood – with a cabinet under the sink.
Installation methods
Bathroom shelves differ in installation method:
- Corner - well suited for installation above a washing machine, toilet or cabinet, saving space on the floor.
- Floor-standing - placed on any free space on the floor. Suitable for large bathrooms.
- Wall-mounted (wall-mounted) - like corner ones, free space on the wall above another piece of furniture is used for installation. Sometimes hanging shelves are also attached to the bathroom door.
Everyone wants to make the design of their apartment, and in particular the bathroom, original. To do this, you don’t need to buy expensive designer decorative elements or furniture. Handmade things add warmth and comfort. And this is also a good way to save money.
Using scrap materials, you can make cute bathroom shelves that can store towels and personal hygiene items.
Some nuances
Professionals have their own tricks, which we share with you:
- If foam concrete or gas blocks were used as the main material of the wall, then you can deepen the hole using a drill or screwdriver. Only a hammer drill can take on brick and concrete walls. Alternatively, you can use an impact drill, having first turned off the “impact” mode.
- For drilling tiles, it is preferable to use a pobedit drill bit. Then the hole will be small, and the tile itself will remain without any damage.
- Miniature bathroom shelves do not require additional reinforcement. Short screws will be sufficient. But in general, you should take into account the total weight of the items that are planned to be placed on the surface of the shelf.
That's basically all we wanted to tell you about corner shelves for the bathroom. Now, knowing the features of each model, you can choose the most suitable option.
Glass or mirror shelf
An excellent option for making your own is a glass shelf. To do this, you need to buy several pieces of glass or mirror of the required size at a hardware store.
The width of the material will be the width of the towel shelf. You can choose regular transparent or colored, smooth or textured glass.
Attention! The thickness of the material cannot be less than 4 mm. Otherwise the shelf will be too fragile.
In the same store you need to choose brackets - the parts with which the shelf will be attached to the wall. Pay attention to how the glass will be fixed in the fasteners. There are two options.
- When holes are made in the material. Suitable for fixing shelves wider than 20 cm. This fixing method is more reliable.
- Without holes, when the glass is tightly clamped in a special clamp. Suitable for small shelves.
Now let's assemble the interior element. We fix the glass or mirror in the bracket using the chosen method. Holes are made in the wall for dowels. First, install the dowel, then fix the core (nail, self-tapping screw). Now let's hang the shelf.
Types of shelves
The variety of types of shelves today is very large. If we take as a basis the material from which the shelf is made, then they can all be classified as follows:
- Glass and mirror;
- Wooden (chipboard, MDF, plywood);
- Polymer and plastic;
- From other materials that can be combined with each other.
If we take the design, appearance, structure and method of fastening as a basis, we can distinguish the following types:
Wall mounted
Wall shelves supported by other stable furniture or the floor. A positive feature of such shelves is that their special design allows them to withstand quite a large load, which makes them indispensable assistants in the house when you need a place to store something large and heavy.
Most often they are used for all kinds of equipment or storing shoes in the hallway. These shelves take up minimal space, which is also a positive feature, especially for small apartments.
Classic (rectangular)
Classic rectangular wall shelves attach directly to the wall. The advantage of this structure is that you can use both internal and external surfaces. The back wall may be missing, leaving the wall exposed.
You can put various interior items on top: vases, clocks, photographs, lamps, books, night lights and figurines. It is precisely these shelves that, due to their functionality, add coziness to the apartment.
Multi-tiered
Multi-tiered shelves on the wall look very original and also combine many different functions. This type of shelves can combine a combination of various horizontal, vertical and inclined planes, which turns out to be very convenient in everyday life.
However, they often simply make identical horizontal planes, which, firstly, have an equally beautiful appearance, and secondly, are very functional. In this case, you should give free rein to your imagination to make something that is both comfortable and beautiful, matching both your preferences and the surrounding interior.
Corner
Corner shelves make it possible to use all the empty corners in the apartment. They are most often used in bathrooms, but this type of shelf can be used anywhere. They are reliable and stable. They can even be made transparent, which will look very modern.
Where is the best place to place a bathroom shelf?
A shelf for a bathroom should be purchased according to the design and parameters of the room; its compact placement depends on this. It must be installed so that everything you need is at hand: near the bathtub or shower, above or under the sink.
Thanks to the use of shelves, even a small bathroom becomes comfortable and functional
If you don’t want to drill into the tiles, you can carefully attach the shelf using suction cups. The height should be optimal so that it is comfortable to reach with your hand. If the structure has hinged doors, it must be secured so that opening the doors does not interfere with standing nearby.
A bathtub screen with shelves or drawers is an excellent solution to save space and organize things wisely
The use of shelves in the interior
Wall shelves have become so integrated into our lives that it is difficult to imagine life without them. There is no place in the house where they would not find their use. People put them on the floor, hang them on the ceiling, screw shelves to the wall, mount them in closets, build them into chests of drawers, install them in mezzanines and other hard-to-reach places. After all, shelves are not only an elegant interior decoration, they are also additional storage space, which is always in short supply.
In addition, beautiful shelves in the interior will help to correctly place accents in the room, emphasizing its overall color. They will look even more attractive if they are equipped with additional lighting in the form of an LED strip that emits a soft light.
There are no special rules about where shelves should and can be placed. They can be installed anywhere. However, it is still advisable to take into account the functional purpose of the room:
- If this is a work office, then it is advisable to install them above the table, within reach of an outstretched hand, so that if necessary you do not have to constantly get up from your chair.
- The same method of placing shelves is suitable for the kitchen. Only in this case it is better to use open shelves, since every housewife likes everything to be in plain sight.
- Designers recommend installing wall shelves in a nursery or bedroom near or above the bed. This way you can dilute the empty wall space.
As mentioned above, in addition to functional benefits, wall shelves also need to bring aesthetic pleasure. To do this, you can place your favorite books and magazines on them, place photographs of smiling relatives and people close to you who will give you pleasant memories and warm feelings.
Shelves are a decorative household item whose main purpose is to decorate the interior. This item always attracts attention, so it is very important that the things placed on them are correctly and neatly arranged.
- If you want everything to look harmonious and tasteful, things must be arranged in a certain order. For example, large objects should not be located next to small ones; they are best placed separately and preferably higher, while small objects will look great on the lower tiers of the shelf.
- We must not forget about the correct combination of colors. Each element must strictly correspond to the overall style of the room. Bright colors should not spoil the interior, but rather complement it, correctly bringing the color palette of the room to perfection.
- Shelf space must be used both in height and depth. Taller items should fade behind shorter ones, while functional items should be placed in the front. However, you should not clutter the space too much so as not to create a heavy feeling of overabundance of decor. Ideally, the ratio of free and occupied space should be 50 to 50%.
Also, do not forget about the option of symmetrically placing items on the shelf. This method allows you to achieve the desired effect of a certain completeness of the interior. Types of home shelves.
The benefits of making shelves yourself
Self-made furniture production has long been no longer just a goal of saving money - it is an excellent opportunity to show your creative abilities. Today, designers are developing various models of decorative shelves that can be inspired by.
The main advantages of self-manufacturing of the structure are highlighted:
- Taking into account all, even the smallest requirements. Only by making furniture yourself can you do it exactly according to your preferences. After all, not every master can correctly understand an idea and then implement it.
- Saving money. When ordering furniture, you will have to spend money not only on purchasing materials, but also on the work of the craftsman. Not every person can find the extra amount to pay for such services. Therefore, you can try to build the structure yourself. This is especially true in cases where it is necessary to produce a large amount of furniture.
- Save time. Typically, experienced specialists have a long queue, which is why you will have to wait for your order for several weeks, or even months. While making furniture yourself will take much less time (even for beginners).
- Simplicity of the process. For some, it may seem that making shelves is a labor-intensive process, but this is far from the case. Following step-by-step instructions, anyone can cope with such actions. In this case, it is important to take correct measurements and place marks. In addition, the work uses a standard set of tools that can be found in every person’s home.
- Experience. Shelves are exactly the element of the interior with which you should start making furniture. Thanks to this, you can easily master the creation of other more complex structures. For some people, a craft can be turned into a business. It is worth noting that all family members can be involved in such simple work.
A simple version of functional shelves
Wooden shelves and racks
Fashionable and modern wooden shelves have long replaced huge and inconvenient racks and cabinets. These fashionable and practical elements fit perfectly into the design of any room. They go perfectly with any interior style, are easy to use and maintain, and are also an excellent place to store things.
Wooden shelves will not only be a beautiful addition to your interior, but also an integral attribute of modern life.
Buy or make it yourself
Today it is not difficult to buy a ready-made hanging shelf either online or in any furniture store. The advantages of such a purchase are obvious:
- There is no need to waste time making your own wooden shelf;
- You can buy certified high quality products that will last a long time;
- You can choose a rack, wardrobe or bed in the same color and design, since in stores hanging shelves are usually a separate element of a furniture set.
- You can immediately select the required size and number of floors of the shelf, thereby gaining confidence that it will withstand the load you need.
However, not everyone will like a store shelf; many prefer to make it themselves in order to get an original and unique item.
Making a wooden shelf with your own hands is not difficult, especially since today there are a lot of ideas and master classes on the Internet.
Master class on making a wooden shelf
There are models of hanging shelves that you are unlikely to find on the Internet - these are wooden shelves made from scraps of boards or bars, fastened with a piece of rope. They look very stylish and unusual in the interior. Here are the two most popular ways to make them: First option:
- We cut the board to the required size, process it with a sanding machine, and cover it with varnish or paint.
- On the sides on both sides at the same distance with a drill we make one hole with a diameter equal to the diameter of the rope on which our shelf will hang.
- We thread the ends of the rope or rope through the holes and tie secure, tight knots to hold the board on them. We fix the shelf in the chosen place.
Second option (multi-tiered):
- As in the previous case, we prepare the boards, this time there will be at least two of them. We will also need small bars of different sizes and thicknesses; they will become the side walls of the future model.
- We fix the main boards to the bars from above and below, using self-tapping screws and special wood glue. Then we give our workpiece some time to dry. The first tier of the structure is ready.
- In a similar way, using the same material, we make the remaining cells of the future shelf. We carefully ensure that the internal corners are straight.
- After the required number of elements for the shelf have been assembled using a rope or metal chain, we connect them together. The final step is to install the wall mount. A carabiner or an anchor bolt with a hook is best suited for these purposes.
As you can see, there is nothing complicated here. The shelves can be painted to match the color of the furniture, covered with stain or decorated with decorative elements to your taste.
How to choose the right shelf
Agree, hanging shelves in the interior always look impressive. If, of course, you choose them correctly and place them in the right places where they will look good. Now, fortunately, the choice of shelves is huge and their variety is simply amazing.
A shelf is not only a useful and necessary piece of furniture, but also an excellent design element that can bring beauty to your home.
In order to make a choice, let's remember what types of shelves exist:
- One of the most popular shelves is the wall shelf, which is attached directly to the wall;
- Also popular is a corner shelf that is placed between two walls. This allows you to save space in the room;
- Floor shelves that are placed on the floor are also very effective. And if they are also on wheels, then at the right time they can be moved, removed or rearranged;
- No less popular are hanging shelves, which are attached to the wall or ceiling using a variety of chains, cables, and belts.
- Folding shelves are also a great way to save space, as they can be folded down when needed.
- The shelf-table, the name speaks for itself, can take two forms: the table itself and the shelf. This is a great option for a small room.
- If the size of your room allows you to use more space, then shelving is perfect here.
Yes, as you can see, the variety of shelves is great, and there are quite a lot of them today. All you have to do is decide on the type of construction. The main thing is not to clutter the entire room with shelves. They should go well with the overall look of the room in which you plan to hang them.
If you need shelving to store important things: books, documents, photographs, then try to make them stable and strong. Especially if they are intended for children.
In this case, the shelves should not be placed too low, since children are very active and mobile. Also, don't opt for glass shelves. And their corners should not be sharp.
As for choosing shelves for the living room. Here you can give free rein to your imagination. Tetris shelves, shelves of unusual shapes, spiral shelves, frame shelves will look good here. In the bedroom you can get by with ordinary classic shelves. They will look most impressive above the bed, where you can place family photos.
It will be better for the kitchen if the material from which the shelf is made matches the material of the countertop. This will give the kitchen its own specific style and elegance.
Video: beautiful shelves in the interior
As you can see, there are plenty of types of shelves and their shapes, so the main thing is not to overdo it, but to focus on quality and durability.
The main thing to remember is that shelves on the wall should look very good in the room for which they are intended. But no one forbids you to add something new and unusual to their design. After all, with a successful choice of wall shelves and racks, your room can sparkle with new colors.
Similar articles:
- Attached terraces and verandas to the house are the best way to increase space
- How to create the perfect bedroom interior: advice from experienced designers
- Living room with a fireplace: 77 creative ideas that will decorate the fireplace in the interior
- High-tech style in the interior of an apartment and house
- Decorating a children's room - how to create comfort for your baby
- The combination of colors in the interior or how to create the best design
Useful tips
- Try to select bathroom shelves in the general stylistic direction of the interior. Otherwise, the result will be bad taste, which will ruin a comfortable stay in the bathroom.
- Decide on your purpose. If your goal is to display lightweight bottles and other cosmetics, it makes sense to purchase a glass or plastic shelf.
- It is desirable to have rounded corners to prevent unexpected injuries.
- Never place heavy objects on hanging shelves in the bathroom. It's better to store them on built-in shelves.
Choosing a suitable shelf design
- Shelves on the wall are compact hanging structures that fit perfectly into the design of a small bathroom. Toothbrushes, razors, deodorants and other personal hygiene items are stored on shelves mounted above the sink.
- Corner shelf - solves the problem of filling unpromising areas.
- The shelf above the washing machine is a convenient place to store products used when washing clothes.
- A niche is a stylish interior element and a universal storage system. It allows you to completely avoid cabinets and bedside tables that clutter up the room.
Shelf design
It's better to start with drawings. A schematic representation allows you to realistically assess the amount of work to be done. Measurements must be accurate and verified so that during installation there are no problems with fitting. With the help of a drawing it is easier to make the correct calculation of materials.
You need self-tapping screws, dowels with spacers, reinforcing mesh, and primer. You will also need a whole set of tools and accessories:
- Tape measure, plumb line, leveling rod.
- Pencil.
- Screwdriver, grinder, electric planer.
- Hammer, pliers.
- Knife, hacksaw.
- Spatula, brush, sandpaper.
Now you can start installing it yourself:
1. Attach the guide rails to the wall, forming the volume of the frame from them. To strengthen the structure, it is better to place profiles on the ceiling and floor, and install jumpers between them.
2. Sand the ends with sandpaper or an electric plane.
3. Attach the gypsum board to the frame using spacer dowels. The end parts can be made in two ways:
- Secure solid sheets in which to cut openings of the desired shape.
- Install ready-made elements immediately.
4. To smooth out the sharpness of the corners, cover them with perforated corners. Such linings are made of plastic, aluminum and galvanized metal. They serve not only as a means of decoration, but also as good protection against abrasion of drywall.
5. Sand the cut ends. Apply a thin layer of putty to them.
6. Seal the seam joints with reinforcing mesh. Re-treat with putty, evenly distributing it in a layer of 1-2 mm. This helps hide the marks from the screws. Allow the material to dry well.
7. Clean all surfaces with abrasive paper until completely smooth.
8. Apply primer.
The finished structure can be painted or decorated with tiling or mosaics yourself.