Ways to get out of the situation
Firstly, it should be clarified that reducing the bathtub is radical, but it is not the only way to solve the problem. The following points are worth considering.
Make a groove in the wall for the bathtub. An excellent way out of the situation, the bathroom will gain additional support from the side, and the structure will become much more rigid. But this method is very dirty, and is only possible if the tiles were not enclosed, since cutting the laid ceramics is a big risk. A load-bearing wall can also become an obstacle; It is strictly forbidden to make horizontal grooves in it.
If the above methods do not suit you, there is nothing left to do but cut out the bathtub. We will look at how to do this correctly and with less losses below.
Types of bath borders and their installation
All bathroom borders can be divided into two large categories, each of which has several subtypes:
- polymer and PVC: plastic (PVC) curbs for bathtubs;
- plastic corners;
- self-adhesive tape;
- foam or polyurethane (ceiling) borders.
Several profiles of plastic bath borders
- ceramic:
Products from the first group are more affordable in price, and they are also easier to install. Ceramic, marble or granite borders are more expensive and difficult to install, but they also look much more colorful. True, the design of the bathroom should also be appropriate.
These can be ceramic or marble
Underwater rocks
What to do after the sawing work has been carried out and how to protect yourself from possible negative consequences?
- Due to a decrease in the rigidity of the edge on the cut side, during operation there may be some disruption of the bathtub geometry, as experts call LED. In this case, experienced craftsmen advise installing the bathtub on standard legs and on a durable frame.
- The required edge stiffness can be restored using the fiberglass repair kit and epoxy bumper mentioned above. You need to glue them not with a cut, but with the inner surface of the fold of the edge of the bathtub, by 1-2 centimeters. This will help create additional edge support.
- Can be attached to the wall from the undercut side, aluminum profile or wooden block. The side of the tub will rest on them. This will increase the rigidity of the entire structure.
It's worth remembering that cutting the bath will void your warranty. Unfortunately, nothing can be done about this.
How to dry a free-flowing bathtub
Over time, the coating becomes hard. If you find defects, you should wait until polymerization is complete, which lasts 48 hours, and then use the factory repair kit. The mixture must be removed from the floor immediately, otherwise it will be difficult to remove. The bathroom should be closed for 2 days to prevent dust and small debris from getting onto the surface of the drying bowl.
We suggest you read How to clean water stone in the bath
Installation of drain and overflow.
Acrylic dries in 48 hours. After this time, it will be necessary to install a drain-overflow piping. Before starting work, you should remove the storage tank intended for draining enamel. To remove drips you need to use a knife. It is recommended to check the suitability of the gaskets on the harness. If they become less flexible, they should be treated with sealant.
You will need to install the drain and overflow, put the drain pipe in its original position, connect the piping, release the faucet from the film and open the water. The drain should not leak. After such procedures, the bath will be ready for use.
How to shorten it correctly?
If you still decide to remove a few centimeters from your bathtub, you should read the instructions below:
- Take all measurements carefully and decide exactly how much to cut. Measure the cut seven times just for this.
- Cover the surface where the cut will be made with masking tape. This will prevent cracks and chips from appearing, and it will be more convenient to mark on it.
- Carefully and slowly mark the future cut. Draw the line of the cut with a felt-tip pen or felt-tip pen.
Can it be cut to length?
A bathroom should never be cut to length. Therefore, you will definitely greatly violate the rigidity of the structure, and the font will probably burst over time. It’s better to get out of this situation differently: make a strobe after all.
Is it worth cutting any material?
First you need to decide what material your bathtub is made of and whether it can be sawed. There are two main varieties:
- Made from ABS plastic , they are produced using a very simplified technology. The acrylic layer is very thin, about 2 mm, essentially molded fiberglass painted with acrylic paint.
- Made from cast acrylic , layer thickness from 5 mm, with the necessary antiseptic additives and reinforcement added.
Products made from cast acrylic last much longer than models made from ABS plastic.
Some manufacturers provide a 15-year warranty on their products. During this time you will have to replace three cheap bathtubs, so the price of cast acrylic is completely justified. Such fonts cost from 12,000 rubles. Baths of the first type do not last long and quickly lose their presentation. It is not advisable to cut such baths.
Cracks and scratches will certainly appear, and the structure will lose its rigidity. Bowls of the second type can be cut if done correctly.
How to shorten it correctly?
If you still decide to remove a few centimeters from your bathtub, you should read the instructions below:
- Take all measurements carefully and decide exactly how much to cut. Measure the cut seven times just for this.
- Cover the surface where the cut will be made with masking tape. This will prevent cracks and chips from appearing, and it will be more convenient to mark on it.
- Carefully and slowly mark the future cut. Draw the line of the cut with a felt-tip pen or felt-tip pen.
Share with your friends:
Do-it-yourself puttying of walls under wallpaper Preparing plastered walls for processing is the most important stage of restoration work. This is not very difficult, so putting putty on the walls with your own hands for further painting or wallpaper will not be a problem.
How to choose metal entrance doors These days, understanding the huge range of entrance doors from different manufacturers is not easy. In this article we will tell you how to choose metal entrance doors to your apartment, taking into account all the nuances and requirements.
How to deal with fungus in the bathroom and why it is dangerous. A rather unpleasant surprise for any tenant would be to encounter fungus or mold in their own bathroom. People who have had to deal with them know that it can drag on for a long time and take a lot of effort.
READ What You Can Cut with an Electric Jigsaw
Is it possible to glue wallpaper onto wallpaper on the ceiling or wall? It was decided to renovate the apartment, but I really don’t want to dilute the dirt, dust, and then wash it all. In this regard, the question arises quite reasonably: if the wallpaper on the walls or ceiling holds up well, can you stick the wallpaper on it again?
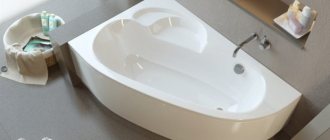
Perhaps the dimensions of the room were not taken correctly; the bathroom is longer and a little wider than we need.
Is it possible to somehow shorten (cut off) an acrylic bathtub, is it not worth it?
Technically, cutting an acrylic bathtub is not difficult.
Much simpler than, for example, cast iron.
But still I would not recommend doing this.
The rigidity of an acrylic bathtub is still not great.
This is several times worse than in a cast iron bath and much worse than in a steel bath.
By cutting the bathtub boards to length or width, you will loosen the entire structure as a whole.
Even if it is a high-quality acrylic bathtub (cast acrylic, plus fittings).
You have several ways out of the situation:
You cannot take a bath, install the bath according to a temporary scheme, make markings and then such strobes are made (cut) in the wall.
Gates can be made along the length of the side of the bathtub and along the short side.
If the bathtub does not fit in length, it is longer and much longer, then we make 2 strobe, on one side of the bathtub and on the other (in parallel).
The bathtub (sides) in the grooves is an additional fastening, that is, the entire bathtub will be installed more rigidly.
Of course, problems will arise during dismantling, but bathtubs have been used for decades and even acrylic, if you follow a number of certain rules during its operation.
If you still decide to cut, then first we make markings and mark the line with a marker.
Acrylic is easy to cut, you can use a hacksaw, you can use an electric jigsaw and fine tooth files for it.
You can even use a grinder, but the grinder needs a speed controller, for a grinder there is a cutting wheel for metal, we set the minimum speed.
Installation technology for a ceramic bath border
Ceramic borders consist of straight, corner and end elements. The number of straight elements is calculated based on the size of the bathtub/shower tray, corners and ends; standard placement requires two for a bathtub; for a shower tray, there can be one corner. Take the number of straight elements with a small margin - for trimming.
It is advisable to inspect all elements before installation. If there is a need (they are not joined accurately, there are differences in thickness, etc.), the back side can be slightly improved with a file. It is better not to use an angle grinder - the chance of doing more harm than correcting it is too great.
Layout options
Installation methods
The method of installing a ceramic border depends on the finish of the wall and the size of the gap. If it's tile, you can use waterproof adhesive. If the tiles are embossed or the wall is simply plastered, installation with adhesive does not provide the required level of tightness. In this case, install a ceramic bath border using a special tile adhesive for wet rooms. It is sold in bags in dry form; before use, a certain amount is mixed with water until smooth.
Colors can be different, but more often they use white - to match the color of the bath
Sequencing
The whole process consists of a sequence of steps:
- The surface is cleaned of deposits and dust. If there is mold, remove it, treat the wall with an antibacterial compound, and let it dry.
- If the gap between the bathtub and the wall exceeds half the width of the existing curb, it must first be sealed. It’s better to make formwork from below and fill it with cement mortar. The second way is to attach moisture-resistant gypsum board in two layers. If the shelf turns out to be large (more than 5 cm), it must be made with a slope. Maybe about 5%. This way you can use the shelf (put something on it) and the water will not stagnate on it. If necessary (if the border does not cover the entire wall), the tiles used to decorate the walls are first laid, and then the installation of the ceramic border for the bathtub continues.
- Start from one of the corners. Set the angle, then two adjacent straight segments. A layer of glue is applied to the back side of the border and leveled. It is installed in place, pressed, and leveled.
- Then continue laying to one side. End elements are installed on the sidewalls.
A ceramic baseboard for a bath can be like this
The process of installing a ceramic border for a bathroom is not much different from laying tiles. The actions are the same. It is necessary to align the elements in two planes - so that both the edges and the plane go smoothly and without differences.
Ways to get out of the situation
Firstly, it should be clarified that reducing the bathtub is radical, but it is not the only way to solve the problem. The following points are worth considering.
Make a groove in the wall for the bathtub. An excellent way out of the situation, the bathroom will gain additional support from the side, and the structure will become much more rigid. But this method is very dirty, and is only possible if the tiles were not enclosed, since cutting the laid ceramics is a big risk. A load-bearing wall can also become an obstacle; It is strictly forbidden to make horizontal grooves in it.
If the above methods do not suit you, there is nothing left to do but cut out the bathtub. We will look at how to do this correctly and with less losses below.
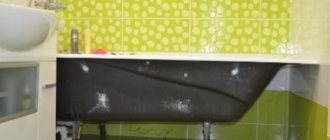
Acrylic bath
You can cut 2cm from the end of the bathtub (acrylic) to make it fit, what are the implications for the plastic? Peels off, etc.
Where are you all going to put your ACRYLIC bathtub? If it was cast iron, then no problem. Acrylic bathtubs were cut, and more than once. Nothing will happen to plastic. The only thing that needs to be restored before installing the cut-off bathtub is to attach, for example, an aluminum corner to the wall. All
Is there a better way to sand a wall?
I think so too, especially since the end is usually rounded down, forming a rigidity
I would advise not to experiment. If you can't dive into the wall, try asking your question directly to the manufacturer.
I completely agree with you. Anything that can be cut off. Only then can the consequences be dire.
Of course, you can cut more than once. But, you need to think in advance, maybe you should cut off one centimeter on both sides? You need to glue the corner of the border.
It’s better and more careful to screw it into the wall! Did you not lay tiles before installing the bathtub?
Perhaps, if you then cover it with a border or corners, the bath itself will not peel off or crack!
It is safer to grind, even if the tiles are laid out, a grinder with a diamond blade and off you go. On the side where the drain is, the curb tape will close, only you need to go to the silicone tape!
If Basco is LIGHT, the MOST way to direct her is to OPEN the bathhouse. DO NOT CUT, PICK UP THE FISH
Acrylic bathtubs should not be zipped into the gutter (read the installation instructions) because when the temperature expands there will be nowhere for it to go and it will crack.
Where are you all going to put your ACRYLIC bathtub? If it was cast iron, then no problem. Acrylic bathtubs were cut, and more than once. Nothing will happen to plastic. The only thing that needs to be restored before installing the cut-off bathtub is to attach, for example, an aluminum corner to the wall. All
Thank you for your competent advice, it’s a pity that I didn’t find your team earlier.
We and cast iron when they cut it. By the way, any bathtub can be cut off without consequences, well, in general, everything is correct.
Cut nothing will peel off, checked.
Can be cut off, only rigidity is lost
If you don't ruin her toughness
I agree with Vitalik Arkhipov. Cut more than once))
It’s better to cut a channel in the place on the wall where the bathtub rests with a small sander, 5 mm larger than the side of the bathtub, and then, like a bathtub, install either foam plastic or silicone sealant in the void.
Dear masters! If there was an opportunity and desire to install a bathtub without threads, then I would not raise the question, not for the first year after my husband.
You can cut off the bathtub, but what's the problem? Better to hit the wall. We put cast iron 1.50 in a room 1.48
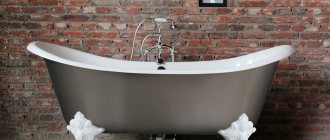
Casting acrylic enamel into a bathtub
Acrylic liner is great for cast iron surfaces.
The sanitary bowl is updated with an acrylic liner made from polymer acrylic. This restoration method has many advantages, since the bathtub does not need to be dismantled and can be restored in a few hours. The liner is affordable, it does not absorb dirt, is easy to clean, and does not rust. Thanks to this element, the bowl will look great for the next 10-15 years.
The acrylic liner retains heat, connects well to the cast iron surface and works like a double-glazed window. The liner is installed quickly, in a couple of hours, and the bath itself becomes suitable for use after 7 - 8 hours.
Bathtub enamel.
After mixing is completed, you should immediately begin enameling. If the mixture is exposed to air for 30 minutes, it will become unsuitable for pouring.
Acrylic is poured into the bath not from a bucket, but from a small plastic container. It is recommended to cut a 1.5 liter plastic bottle in half and wipe it with a rag. The acrylic container must be completely dry. The bucket and cut bottle are placed on a stool.
Sides
You need to start pouring acrylic on the left along the edge, gradually moving to the right. The enamel should cover the sides. It is poured onto these parts of the cast iron bowl once, adding acrylic to the container as needed. It is important to be careful not to pour enamel in large quantities, otherwise it will spill onto the floor. The remaining voids must be filled with a spatula.
The enamel must cover the sides.
Walls
These parts of the bowl are coated in 2 stages. First, the enamel is poured from the edge of the back, where the acrylic layer does not flow so quickly. Then pour from the level to which the composition was drained when first poured. Once the mixture completely covers the back of the bowl, you will need to distribute it evenly across the bottom.
In the second stage of casting, the composition must be applied from the level to which it drained during the first pour.
Repairing bald spots
If you find areas that are not completely sealed, you need to collect a small amount of enamel from the bottom and cover the untreated surfaces with a spatula. It will be necessary to inspect the walls and identify errors. In some places there may be drips that can be removed with a spatula.
We invite you to familiarize yourself with Therapeutic baths in the Victoria sanatorium in Kislovodsk
If bald spots become noticeable after acrylic coating, you need to repair them with a spatula.
Bottom coating
A thick layer of enamel forms at the bottom, which is evenly distributed with a spatula and left. The coating will level itself. Drops remaining on the sides are removed with a spatula.
The acrylic on the bottom of the bathtub must be evenly distributed with a spatula.
Ways to get out of the situation
Firstly, it should be clarified that reducing the bathtub is radical, but it is not the only way to solve the problem. The following points are worth considering.
Make a groove in the wall for the bathtub. An excellent way out of the situation, the bathroom will gain additional support from the side, and the structure will become much more rigid. But this method is very dirty, and is only possible if the tiles were not enclosed, since cutting the laid ceramics is a big risk. A load-bearing wall can also become an obstacle; It is strictly forbidden to make horizontal grooves in it.
If the above methods do not suit you, there is nothing left to do but cut out the bathtub. We will look at how to do this correctly and with less losses below.
Underwater rocks
What to do after the sawing work has been carried out and how to protect yourself from possible negative consequences?
- Due to a decrease in the rigidity of the edge on the cut side, during operation there may be some disruption of the bathtub geometry, as experts call LED. In this case, experienced craftsmen advise installing the bathtub on standard legs and on a durable frame.
- The required edge stiffness can be restored using the fiberglass repair kit and epoxy bumper mentioned above. You need to glue them not with a cut, but with the inner surface of the fold of the edge of the bathtub, by 1-2 centimeters. This will help create additional edge support.
- Can be attached to the wall from the undercut side, aluminum profile or wooden block. The side of the tub will rest on them. This will increase the rigidity of the entire structure.
READ Chainsaw Poulan 2150 Carburetor Adjustment
It's worth remembering that cutting the bath will void your warranty. Unfortunately, nothing can be done about this.
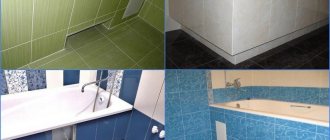
Reasons for the formation of a gap between the wall and the bathtub
When installing a bathtub, a large gap of 50 - 300 mm is formed between its top side and the wall for several reasons:
- lack of water outlets - cold water and hot water pipes fit to the mixer between the wall and the bathroom;
The bathtub cannot be pressed against the wall due to the pipes. - a bowl shorter than the wall is a standard situation for combined, separate bathrooms;
Length discrepancy between partition and bathtub. - obtuse wall angle – the gap between the wall/bathtub in the shape of a wedge.
The bathroom is in the shape of a trapezoid.
Attention: This manual does not cover narrow gaps of 0.5 - 2 cm, which can be sealed with sealant, baseboards, tile profiles and finishing defects - lack of right angles when laying tiles, “waviness” of the cladding.
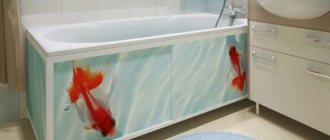
If the width of the gap between the plumbing fixture and the partition is less than 1 m, this space becomes unusable. To ensure tightness during bathing, you can use a curtain on an L-shaped curtain rod, as in the photo below.
However, it is much more effective to close this gap in order to increase the area of the sides of the bathtub for placing detergents and toiletries on it.
Advantages and disadvantages of an acrylic bathtub
The sanitary acrylic used to produce this product is a high-tech material. The inserts inserted from it have:
- Light weight;
- High heat dissipation;
- Great mechanical strength;
- Sound absorption when cleaning water;
- Low cost.
Improper handling of such material leads to surface damage, scratches or melting very easily, so caring for the product requires compliance with the following rules:
- Do not use abrasive or aggressive cleaning products;
- For cleaning, use only a sponge that is soft on all sides;
- Avoid contact with coloring products and chemicals such as hair dye.
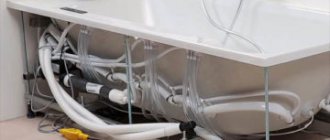
Why and how to drill, saw and trim an acrylic bathtub
At first, the insert does not have holes for draining and pouring water. Naturally, they need to be done, or rather. Drill.
This is done using a regular drill or a cordless screwdriver using a 5mm drill and a special bit for holes in wood or stone. Its diameter should correspond to the circumference of the drain and overflow.
To ensure the holes are perfectly aligned, place the liner in the main container and mark the centers of the drains. Then center the drill bit and drill through the piece from the outside and then from the inside. Turns should not be too large.
After drilling, sand the edges with fine sandpaper.
The acrylic insert can be compared to a jar lid. It has sides that go along the edges of the container. If the bathtub fits tightly against the walls, then these sides must be trimmed or cut.
Tools you can use:
- Electric grinder;
- Electric jigsaw;
- Electric hand-held circular saw with corresponding saw diameter.
When cutting edges with a grinder, we use cutting discs for any metal 1 1.6 mm thick.
Using a jigsaw, install a special saw with a fine thread, then the cut will be cleaner.
Before you start cutting or sawing , take very precise measurements and mark them on the sides of the insert using a felt-tip pen. The liner should fit perfectly into the container, maintaining uniform contact between the edges and the wall.
Cut with a clear, confident motion to avoid jittery, wavy edges.
You may have decided to remove your old bathtub to install tile behind it. In this case, it is better to install the acrylic insert without cutting. Then deformation can be avoided, and in no case will water get under the liner. This will increase its service life.
If you want to get a new, beautiful, practical and comfortable bathroom without spending a lot of extra effort and money, make an acrylic bathtub using an insert. It will serve you for a very long time.
Is it possible to wash an acrylic bathtub with Sanox?
Leading detergent manufacturer Stork produces Sanox gel, made using the latest cleaning formula. When figuring out the best way to clean an acrylic bathtub, it is worth noting the main advantages of Sanox, which include its disinfecting properties and effectiveness in combating various contaminants. Thanks to the high concentration of active ingredients, you can save a lot on cleaning costs. To care for an acrylic bathtub, apply the gel to the dirt for 10 minutes and then use a sponge to go over the surface.
Is it possible to wash an acrylic bathtub with washing powder?
List of products that should not be used alone to care for acrylic products, including laundry detergent. The thing is that there are small solid particles in it, and they can scratch the surface, and the bathroom will get dirty even faster. For those wondering how to clean an acrylic bathtub, home remedies need to be chosen carefully, and in the case of powder, can be used to prepare a soap solution that removes minor stains.
Is it possible to wash an acrylic bathtub with citric acid?
A safe folk remedy that works well against lime and whitens. Citric acid. With proper care, the acrylic bathtub is cleaned according to the following scheme:
- Dissolve the acid in water, taking into account that there should be one standard sachet for 2 liters of liquid.
- Soak a sponge in the prepared solution, treat the stains and leave for 20 minutes.
- After this, repeat wetting and treat the base surface. All that remains is to wash everything off.
Detergent for acrylic bathtubs Avuar
AVUAR produces high-quality household care chemicals, but it is important to note that phosphate-free warehouses are allowed for acrylic bathtubs. They are sold in concentrated form, so they work well with various types of dirt. Detergent for acrylic bathtubs is applied for 5 minutes. On the dirt and then rub with a sponge. If the spots remain, you can repeat the treatment.
Is it possible to wash an acrylic bathtub with Pemolux?
Restoration with liquid acrylic: the pros and cons of the method
One of the main advantages is the long service life of the bathtub. After updating, it can be used for more than 10 years. Acrylic is evenly distributed over the surface of the cast iron product because it is poured rather than applied with a brush. The product fills microscopic cracks, leveling the surface.
Restoration enamel is harmless to health and does not emit a strong odor. It dries quickly, so work is completed in a short time. But this restoration method has a drawback. To start using the bath again, you will have to wait 2 days. It is best to keep the bathroom closed during this time. Otherwise, dust particles settled on the drying layer of acrylic will ruin the appearance of the bathtub.
Acrylic bath care products
Is it possible to clean an acrylic bathtub with a Sif?
Ideal for plumbing maintenance Cif, which can be purchased as a cream or spray. The first option is more popular. If you are wondering the best way to clean an acrylic bathtub, then know that Cif is versatile and can handle a variety of stains. It contains micro mineral granules and biological additives that remove various stains and rust. It is better to apply Sif to the dirt, leave for 5-10 minutes, then rub with a sponge and rinse.
Is it possible to wash an acrylic bathtub with vinegar?
Table vinegar. Popular household cleaning product. It removes rust and lime. Care for an acrylic bathtub is carried out as follows:
- To whiten and remove plaque, you can only use 7% vinegar. Add it to the bath using approximately 2 liters of solution. It should be left until 10:00, but no more. If these rules are not followed, microcracks may appear.
- There is another way to clean an acrylic bathtub from yellowness, for which you prepare 9% vinegar and borax, which is known for its excellent bleaching properties. These components must be mixed in equal quantities. Soak a sponge in the prepared mixture and wipe the dirty areas. When the process is finished, rinse the vessel with clean water.
Is it possible to clean an acrylic bathtub with Domestos?
This manufacturer enjoys authority in the household chemicals market, so many people buy it to care for their plumbing fixtures. As part of Domestos there is hydrochloric acid, which copes well with various contaminants. When describing whether a Domestos acrylic bathtub can be washed or not, it is worth mentioning other advantages of this tool: safety, reasonable cost, efficiency and no risk of damage to the surface. Apply the gel to a sponge, walk through the dirt and leave for 5 minutes, then rinse with plenty of water.
Sources:
https://comfortdo.Ru/mozhno-li-podrezat-akrilovuyu-vannu-po-dline.Html https://zaokskiylesorub.Ru/vanna/mozhno-li-podrezat-akrilovuyu-vannu-po-dline https:// remontkd.Ru/poleznye-sovety/mozhno-li-sverlit-akrilovuyu-vannu.Html https://womanadvice.Ru/uhod-za-akrilovoy-vannoy-kak-derzhat-ee-v-chistote
Which acrylic to choose for the bathroom
The domestic market offers many products designed to restore cast iron bathtubs. The most popular: “Plastol”, “Standard” and “Stakryl”. These are two-component enamels costing up to 1,600 rubles, packaged in 3.5 kg packages (the quantity is calculated for a bowl 1.5 m long).
Plastol. Stokryl. Standard.
Each enamel manufacturer has its own technology, the secret of which is carefully guarded. Depending on the brand, the product contains a hardener or degreasing liquid. It is recommended to purchase products from trusted manufacturers whose products are of high quality:
- "Stakryl Ecolor";
- "Plastol";
- "Ekovanna";
- "YarLi."
Ecovanna brand products have proven themselves in the market.
Developers who have technical laboratories at their disposal have experience in the production and sale of products. Unscrupulous competitors copy the products of these brands, producing inexpensive enamel that is vaguely similar to the original. Trying to save money, the consumer risks purchasing a low-quality product.