Just a few decades ago, people didn't have many options when it came to decorating their bathroom. They used mainly ceramics - since there were simply no better materials (and even this was difficult to obtain thanks to connections). Fortunately, today the situation has changed dramatically for the better and more and more people are wondering what to decorate their bathroom with besides tiles.
Today we will answer this question, and at the same time consider an excellent finishing material for bathrooms. Plastic tiles for the bathroom - what is it, what is good about this material and why should it be used in your apartment today? But first things first.
Plastic tiles for the bathroom are an excellent solution these days
Features of PVC tiles and its main types
In the manufacture of plastic tile coverings, various types of materials are used with the obligatory addition of polyvinyl chloride (PVC). In production, 2 types of cladding are obtained from different mixtures using pressing:
- single-layer (homogeneous);
- multilayer (heterogeneous).
Thanks to polyvinyl chloride in the surface of single-layer products, good strength is achieved, in no way inferior to multi-layer tiles. However, in the choice of colors, a heterogeneous coating for bathroom cladding has a significant advantage.
Manufacturers use quartz vinyl in the manufacture of plastic floor coverings to enhance wear resistance. It contains fine river sand without foreign impurities and pure shell rock. With their help, PVC finishing acquires the properties of a durable coating, which is important for the floor.
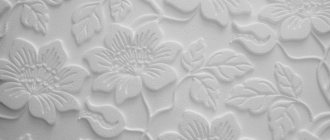
The range of vinyl tiles for ceilings, walls, and floors is quite wide. It varies in shape, relief and size. With its help you can create a stylish interior in your shower. The material is difficult to distinguish from natural wood or stone. Designers use this advantage in places where difficulties arise when finishing with natural materials.
PVC on walls and other elements
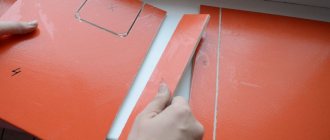
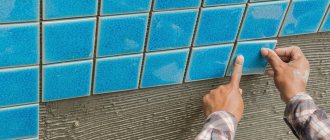
It is recommended to install wall products in strict order. The main condition is to free the wall from wallpaper and other finishing materials. Then potholes and protruding areas are sealed. Be sure to remove all dust and treat the area with a deep penetration primer. The material for the kitchen walls should sit for 3-5 days to get used to the room temperature.
Then the panel is measured and the required part is cut out of it. It is better to cut with a jigsaw. The sawn parts are installed to the ceiling or floor. The visible part should have a clear pattern of solid tiles. Before installation, a layer of adhesive 5 mm thick is applied to each part of the moisture-resistant wall panel on the reverse side. The glue is applied especially well to the edges of the sheet. You can also glue using liquid nails.
The sheets are pressed against the walls, excess glue is removed with a damp sponge. A distance of 1-1.5 mm should be left between adjacent parts in case of possible expansion of the material under the influence of heat. At the joints of walls, at the floor and at the ceiling, the gap can be 3 mm. After 12 hours they are sealed with sealant. After this, decorative moldings, baseboards and other elements are installed.
Advantages and disadvantages of finishing material
In application, plastic panels will delight you with many advantages:
- ease of installation and cleaning;
- a variety of designs imitating any natural materials, ceramic tiles, natural stone and more;
- affordable price;
- the ability to change a boring pattern or build a new panel without great expense;
- The moisture-resistant material of PVC panels does not harm others.
When choosing vinyl tiles for the bathroom, you need to pay attention to the negative aspects of the building material:
- The panels for the walls are mounted on a sheathing that takes 4 cm from the wall, so the size of the room is reduced.
- The cost of additional sealing increases.
- Weak strength, so if defects occur, the panel will need to be replaced completely.
- Do not leave open areas for moisture to penetrate.
- Heat can deform PVC products, so it must be installed no closer than 30 cm to a lamp, water heater, or radiator.
Many buyers increasingly prefer this building material, because it has more advantages than disadvantages. With its help, finishing of bathrooms is carried out quickly and efficiently.
Advantages of plastic tiles
People buy this material because it really has many advantages. Now let’s take a closer look at the most relevant ones:
- Available at a moderate cost (when compared with the old ceramic counterpart);
- Installation work is easy - even a beginner in construction can handle the task;
- The appearance is really attractive, and beauty and aesthetics excite almost everyone these days;
- High hygiene is also important. All traces of shampoos, detergents, all greasy stains and soap stains from plastic tiles can be removed without problems - just use a simple rag;
- The level of tightness is high - another undeniable advantage of the finishing material.
Laying features
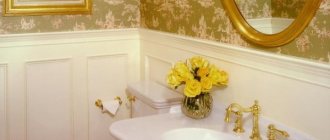
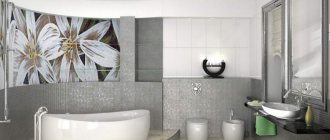
Bathroom lined with plastic tiles
- Please note that laying the ceiling and walls in the bathroom using plastic tiles is much easier if you compare the process with laying ceramic tiles. To finish the surface, it is not at all necessary to level the surface and purchase building mixtures for this;
- To lay plastic tiles, you can always use lathing and drywall - due to this, all repair work is carried out very quickly;
- If you have some construction experience and dexterity, even in one day you will be able to finish the ceiling and walls in your bathroom. At the same time, you will also save significantly - laying the material is carried out in approximately the same way as parquet boards.
Preparing the base
Before installing a plasterboard structure to finish the bathroom with plastic tiles, it is important to carry out certain manipulations with the surface to be finished.
Namely:
- The base should be carefully treated with a primer.
Treatment with a primer is required in order to provide the room with protection from harmful fungi. Therefore, you cannot ignore this procedure - it will cost you more.
- What to do next in preparation for finishing with such material? We need to take care of the thermal insulation of the walls. The heat-insulating layer is usually laid between plastic blocks;
- When the tiles are laid, it’s time for additional waterproofing - sealant is applied at the joints. This is done generally around the entire perimeter of the bathroom.
If you decide that plastic tiles for the bathroom are the material that is ideal, you need to take into account some important points. For example, plumbing fixtures will need to be positioned correctly.
- It will be necessary to maintain a certain gap between the tiles and the heated towel rail - at least 40 mm;
- In addition, it is necessary to ensure that hot water pipes (the installation of which can be done with ingplast.ru butt joints) do not touch the surface of the tile.
Experts say that it is best to sheathe the areas where taps and valves are located with some other finishing material so that there are no difficulties during their operation.
Recommendations for choosing cladding
It is worth giving preference to branded tiles, to which the manufacturer includes instructions or recommendations for installation work. It indicates the materials used when lining the shower room with PVC panels. Manufacturers often make their own adhesive specifically for the cladding.
Depending on the installation location, the panels are of 3 types:
- ceiling;
- wall;
- for the floor.
Using PVC finishing in the shower room, you can create a sealed covering for a heated floor, since it does not allow moisture to pass through. If the design of the room includes any special protruding elements, then you need to select a flexible base.
Manufacturers and brands
The most popular manufacturers of plastic tiles are:
- The Lino Fatra company (Thermofix brand), which produces products for flooring with a large number of visitors: in offices; shopping centers, etc. It is also suitable for home use.
- The LG concern produces fire-resistant tiles of the “LG Decotile” brand with a high-strength surface. The manufacturer provides a twenty-year warranty for such a product.
- Tarkett Art Vinyl New Age is one of the best manufacturers of PVC tile flooring with designer texture. Their different patterns can be used to create a chic interior.
- Rinotex produces collections of semi-flexible PVC finishes with a speckled base, making stains less visible.
For repair work, it is better to purchase building materials from one manufacturer so that there are no strong differences.
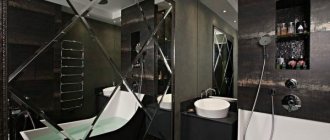
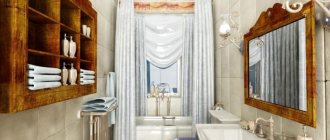
Plastic panels
Plastic panels are an ideal solution for cladding work
Remember that tiles and panels for finishing walls in the bathroom are completely different materials. To have a complete picture of plastic tiles, let’s look at what plastic panels are.
PVC wall panels are also a fairly aesthetic, durable and practical material, with which you can always decorate the walls in your room. Any person can install panels - but some ideas, even superficial ones, about painting and finishing work will never hurt.
Panels for bathrooms are popularly called “plastic lining” - they are often used. In order for the final result to be worthy, you need to choose good materials and not make a mistake when choosing.
Modern wall panels may differ from each other in width - during installation this characteristic is of great importance.
Everything is simple here - if you finish a large room with panels of small thickness, it will take a lot of time, and the waste from such material will be an order of magnitude greater. Also, when taking measurements and when adjusting/cutting material, there will be more errors - after all, quite a few products need to be processed. The panels are available in different colors, there are also many design styles - here everything is selected exclusively to the taste of the owners.
Step-by-step instructions for laying PVC tiles in the bathroom
Lining a shower room with PVC construction products is not difficult, but any repair requires a phased implementation. To install vinyl flooring, you should take into account step-by-step instructions that will make it easier and faster.
How to calculate the number of tiles?
To calculate materials, it is necessary to determine the coverage area:
- You should measure the width of the walls and multiply them by the height to which the cladding will be done.
- Calculate the area of window and door openings and subtract from the resulting total area.
- Multiply the length of one PVC part by the width and get the area of 1 unit of material.
- Divide the surface area without windows and doors by the area of one PVC product.
Non-standard protrusions are divided into squares and the area of each of them is calculated.
How to choose tile adhesive?
It is recommended to study the instructions for PVC bathroom products, in which manufacturers indicate the name of the glue. If it is not on sale, then you need to choose another one by looking at the composition. It should be alcohol based, not water based. Moisture can be absorbed into the adhesive and soften it so that the tile will not stay in place and will fall off. The most popular alcohol-based ones are:
- The Dragon;
- On set;
- Titanium.
You can test the glue: stick a small piece and after a day tear it off the wall. This procedure will make it clear how firmly the tile will stick.
Preparing the base
PVC tiles will adhere perfectly if you prepare the surface in advance. It is imperative to level out all the depressions and treat the working area with a primer. The shower room is constantly damp, so waterproofing materials must be used for the walls.
All work is carried out in stages:
- You need to knock down everything that doesn’t hold well and clean the surface of the room from dirt and dust.
- Treat the working area with a good soil solution.
- Level the surface using solutions that can withstand moisture.
Apply the primer with a high-quality solution (for example, contact concrete). Waterproofing will prevent the formation of fungus and the destruction of walls.
Preparing tools
To cover the prepared surface with PVC tiles, you should make sure you have the following tools at hand:
- knife;
- scissors;
- masking tape;
- plumb line;
- level;
- meter or ruler.
You will also need a pencil to mark the walls. If the tiles are attached with screws, you will need a screwdriver and other tools.
Surface marking
It is better to start marking and pasting the walls with PVC tiles from the doorway deep into the shower room, placing it from top to bottom. They complete the work in the far corner and, if necessary, perform the final trimming there. The marking is done as follows:
- The panels are laid out to determine the location of the pattern and where to trim.
- Make a guide, a colored thread for the first row, or use a level (a laser can be used).
Laying tiles
On the reverse side of PVC tiles, glue is applied strictly to the protruding parts. Avoid getting glue on the failing parts, as when pressed they can stick and lose their appearance. Leave for 30-60 seconds and stick on the wall. Secure with tape to prevent it from slipping.
On the second panel, check that the pattern matches correctly and glue it. If glue gets on the front side, it must be removed immediately with a knife. The fabric is not suitable for this.
It is important that when gluing the tiles, no dust gets in and there are no gaps between the surfaces.
Laying tiles with interlocking joints
Laying a tile covering with interlocking fastening does not require the use of screws or other fasteners, unless they are specified by the manufacturer in the instructions.
Laying self-adhesive tiles
The surface of the self-adhesive tile is protected by paper, which should be removed and then the product should be glued to the surface. The main condition when applying PVC coating to walls is to carefully eliminate gaps so that moisture does not accumulate in them.
Adhesive or interlocking vinyl tiles?
Both adhesive and interlocking PVC tiles are suitable for wall finishing; however, laying with adhesive is the best solution . The castle version has a number of significant disadvantages:
- Planks are heavier.
- Locking joints are inconvenient to snap into place in a horizontal position (due to the elasticity of the plates).
- The adhesive layer on the wall (necessary for fixing the PVC tiles) creates an obstacle to the sliding of the plates when the lock is snapped into place.
A number of manufacturers of interlocking SPC laminate (Refloor Fargo, Art Stone) also claim the possibility of laying the coating on vertical surfaces. However, in any case, we recommend additionally gluing the strips.
Caring for polymer tiles
The facing tiles will retain their appearance for a long time if they are provided with good care. A few tips will help increase service life:
- During wet cleaning, it is necessary to use special detergents or a simple soap solution with the addition of an antistatic agent to reduce the electrical resistivity inherent in this type of material.
- To remove dirt, you should avoid using dry powders containing strong organic solvents and abrasives.
- Do not allow the surface to come into contact with wet newspapers, as stains from printing ink may remain.
- Wipe off dust from the ceiling with a slightly dampened cloth or use a vacuum cleaner with a brush.
- Do not direct the stream at the cladding surface when using Dichlorvos or Insect Prima.
- Felt pads glued to furniture legs will protect their PVC floor covering from damage.
- It is better to place heating devices and lamps at a distance of at least 30 cm from the surface lined with plastic tiles.
- Periodic treatment with mastic and wax will protect against premature cracking, loss of color and destruction.
- To increase the service life of tile flooring, it should be treated with a polymer dispersion or waterproof emulsion.
Compliance with all of the recommendations listed will make it easier to care for the polymer coating and help maintain its original appearance for a long time.
Cork for walls - in what form does the material exist?
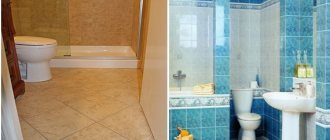
Wall tiling
Cork materials are universal - this is, in principle, considered the main advantage of the material. This is due to the ability to decorate not only residential, but also industrial premises. The main thing is to be able to correctly combine cork materials in the overall interior of the room. Cork is a natural material that does not pose any harm to human health; it absorbs various impregnations that protect it from unpleasant odors and moisture. There are the following types of cork materials:
- Wallpaper made from cork
- Cork tiles or panels
- Liquid plug
- Technical
Cork tiles are the most durable type of all of the above. It does not absorb water, and therefore can be used for swimming pools and bathrooms. It can also be placed on the floor - this allows you to move around different rooms safely.
OSB and technology for finishing the material with ceramic elements
How to finish OSB tiles
OSB boards are very often used during renovation work in premises. With their help you can level the plane of walls and floors, but after that they need to be finished. Decorative tiles are one of the most popular options after wallpapering. OSB board has the following characteristics:
Tile laying technology:
- Before gluing the material onto OSB, make markings along which the cladding process will take place in the future.
- Most often, decorative tiles are installed from the center, so the cut pieces will be in the corners and under the wall. A rubber mallet helps to tap the material, and the level helps to control the evenness of the installation.
- Plastic crosses will allow you to make identical seams between the tiles. They are removed one day after the finishing process is completed.
- According to this principle, it is allowed to glue materials to the floor and walls, but if the decoration with tiles is for the wall, then there is a need to install a support rail. It is this that protects elements that have not yet seized from slipping.
Important! Stone-effect wall tiles look great in modern room interiors. Being much lighter than the natural version, it does not carry much load on the walls, and installation is quite possible with your own hands.
It should be noted that decorating the OSB base with tiles is considered a stupid idea, since low adhesion will not allow the tiles to adhere well to the surface. The best option would be to install additional flooring made of glass-magnesite or cement-bonded particle board. The base of such materials is covered with fine crumbs, and it allows you to decorate the premises with high-quality tiles. Fastening such flooring to OSB is possible using self-tapping screws and construction adhesive.
Types of Vinyl Flooring
There are two types of vinyl finishing materials available – vinyl laminate and rolls. The fastening also varies. Vinyl can be secured with locks, like parquet, or glued to a base, like laminate.
In addition, vinyl coatings differ in manufacturing technology and composition.
- Vinyl pressed tile is a mixture of vinyl, resins, stabilizers and plasticizers. On average, the thickness of such a coating is 3 mm.
- Vinyl quartz tile is a mixture of vinyl, quartz and additives.
In this case, the amount of quartz reaches 80%. This coating is durable, hard, and does not conduct electricity. Thickness from 1.5 to 3.5 mm. Vinyl tiles in different colors - Self-adhesive vinyl tile is a flooring with an adhesive backing. At the same price range, such tiles are installed faster and easier.
Vinyl floor installation
The installation process determines the chosen type of fastening: glue or using locks.
Installation using the locking method is not much different from laying laminate flooring. Therefore, let us dwell in more detail on laying tiles using an adhesive, mastic.
Installation is carried out on dry concrete screed, chipboard, plywood or fiberboard floors. The smoother the floor, the stronger the contact between the two surfaces. The tiles are joined so that straight lines are formed, or tied together (like brickwork).
To begin, mark a central point in the room. Moving from this point towards the wall, determine the place from which installation begins. First, the tiles are laid out on a dry surface to calculate their number and determine the number and size of the cut tiles.
The mastic is applied with a trowel. Laying tiles begins with the marking line. The quality of installation of the entire floor depends on the accuracy of the placement of the first tile.
Self Adhesive Vinyl Tiles
First, whole tiles are laid out. For the remaining unfilled spaces, tiles of the appropriate size are marked and cut. In order to cut the tile evenly, use a ruler to mark the cutting line. Then make an incision with a knife and break it off. After this, the tiles are laid in place on the mastic.
In damp rooms, it is recommended to seal the gaps between the floor and baseboards. This can be done conveniently with silicone sealant using a dispenser syringe. This procedure can be carried out carefully using masking tape applied along the baseboard and on the edge of the floor. After the sealant has hardened, the tape is removed.