Renovating a bathroom is an expensive and time-consuming undertaking. Wall decoration requires a lot of money. But there are materials that allow you to quickly and inexpensively put everything in order. One option is moisture-resistant wall panels for the bathroom. They are of different types and in different forms of release. The general thing is speed and ease of installation and low cost (when compared with tiles).
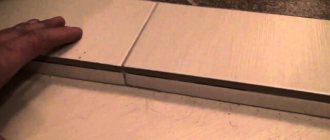
The plastic under the tiles looks good
What are moisture-resistant wall panels
Moisture-resistant panels are a finishing material that is resistant to humid environments. Available in flat sheets of different sizes and shapes.
A number of materials with varying levels of hygroscopicity are used in production:
- polyvinyl chloride (PVC);
- cork;
- pressed wood fibers, shavings and dust (chipboard and MDF);
- mirror;
- glass or acrylic.
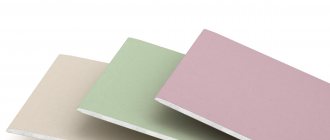
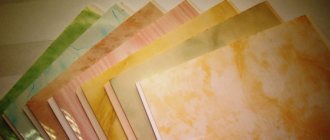
Moisture-resistant wall panels are decoratively attractive: they are available in a wide range of colors, various reliefs and structures. The laser technique of applying a pattern to the surface imitates expensive finishing textures:
- ceramic tiles;
- marble covering;
- natural wood;
- wild stone.
Photo printing techniques are used on polymer materials. The products are used to decorate the kitchen wall apron and are used as a bright accent in the design of bathrooms.
Sheet type products
Sheet moisture-resistant wall panels are the highest quality materials. They are made on the basis of fiberboard boards consisting of eucalyptus fibers. Natural resins and natural oils present in the material give the product the necessary strength and fire safety.
You can also find panels made of polyvinyl chloride in sheets. In this case, they will look like a large piece of plastic (1.22 x 2.44 meters), the front side of which is made in the form of various patterns and reliefs. Such elements are coated with protective compounds that protect them from the negative effects of aggressive environments and mechanical damage.
The main advantage of such materials is their increased size, due to which the cladding has a minimum of seams, and finishing work is completed much faster.
Varieties
Panels for interior wall decoration have different shapes and dimensions.
Produced in three types:
- leafy;
- tiled;
- rack and pinion
Sheet panels
The dimensions of the sheet panels are large: height 2.20 m - 3 m, standard width - 1.25 m. This is a clear advantage over other types: quick assembly. With variations in height, it’s easy to find the optimal parameters so that the panel occupies the space from floor to ceiling in one sheet, without joints. Width joints can easily be turned into a unique design solution.
The panels are made from PVC and laminated particle boards. They imitate natural wood, brickwork or natural stone. They come in plain colors: monochrome or with a pattern.
If the wall surface is moderately uneven or has flaws, when installing moisture-resistant wall panels, you can do without preliminary preparation: leveling or lathing.
Slab panels
Tile panels - square or rectangular. Popular sizes: 1 m x 1 m and 1.20 m x 0.80 m.
During installation, a sheathing with cells of identical sizes is required.
Sometimes individual fragments are connected using connecting profiles. They are visible between the slabs and often have a contrasting shade. Due to this, the volume of the decor is created.
Slatted panels
These are long and narrow products. Their dimensions:
- length 260 – 300 cm;
- width 8 – 50 cm.
The technique of laying slatted panels requires perpendicularity: if the laying is horizontal, the sheathing is attached vertically; with vertical fastening, a frame with horizontal slats is required.
Materials for production: glass, polyvinyl chloride (PVC), laminated MDF and chipboard. Plastic is more common.
Ceiling methods
There are several ways to properly sew a ceiling with plastic.
Installation of panels on a rough ceiling
The rough ceiling does not require special preparation. The finishing elements are laid as follows:
- Treat the surface.
- Antiseptic compounds are applied to the base and left until dry.
- It is recommended to install a waterproofing material, such as polyethylene film.
- The joints are taped.
Measure the distances between walls located opposite each other. The skirting boards are cut so that when two parts are combined, an angle of 45° is formed. It is not recommended to fasten the part with self-tapping screws. When installed on an uneven surface, the additional element will sag.
Liquid nails are used for fixation. At this stage, only 3 skirting boards are installed, the fourth is installed after laying the cladding.
- Panels are cut. The element fits into the plinth by 2 cm. Having measured the distance between the walls, add 1.5 cm to the resulting value. The remaining 0.5 cm makes installation easier.
- Re-measure the ceiling. If there are minor errors, they are eliminated by changing the size of the gaps between the lamellas. It is recommended to align the panels in hidden places. Open areas must have smooth joints.
- The end of the lamella is inserted into one plinth. The element is slightly bent and the second end is inserted into the opposite profile. The long side is inserted into the third plinth.
- Pressing the lamellas tightly against each other, they are fixed with staples. The more tightly the elements are installed, the stronger the connections will be. When fixing on an uneven ceiling, pieces of plastic are placed under the end of the panel. This will help prevent cracks from appearing.
- After installing the entire elements, measure the width of the uncovered part of the ceiling. Taking into account the obtained value, the material is cut using the previously selected method.
- The lamella is inserted into 2 skirting boards. One edge is connected into a lock, the second is secured separately. The element is fixed with liquid nails or self-tapping screws.
- The fourth plinth is removed from the base part. The remaining part is treated with glue and installed on the wall.
Installation of panels to the ceiling on a metal frame
This method is used when finishing an uneven ceiling yourself. The work is carried out as follows:
- Mark the installation locations of the supporting profiles. The parts are placed in increments of 0.5 m. If there are pronounced irregularities, hangers are used. They are mounted in the same way as on the walls.
- 3 skirting boards are glued using liquid nails. If there are no right angles, the cuts will have to be adjusted. The plinth is attached both to the wall and to the metal frame. After applying the plastic element, it is removed for 2-3 minutes. After reinstallation, the correct position is checked with a level. The corners are sealed with sealant.
- The ends of the lamellas are inserted into the baseboards. The finishing material is laid along the long side of the ceiling. This reduces the number of cuts and waste. The plastic sheathing is attached to the profiles with self-tapping screws.
To prevent the screwdriver bit from coming off from damaging the finish, place a metal spatula on the ceiling when screwing.
- The finishing panel is cut, taking into account the dimensions of the uncovered part of the ceiling. The back side of the fourth plinth is removed. The remaining parts are lubricated with glue and pressed to the base. After the glue has dried, they proceed to placing the lighting fixtures.
Application area
A popular material for renovating rooms with above-average humidity levels is ceramic tiles.
Finishing with tiles is an expensive and time-consuming process. If repairs are required quickly and the budget is small, moisture-resistant wall panels are a good alternative to traditional finishing. Without fear, waterproof panels can be used in the kitchen, bathroom and toilet. The service life of the material is more than 10 years. Simple installation and an affordable price will satisfy anyone who wants to update their design quickly and on a budget. And this distinguishes panels from tiles.
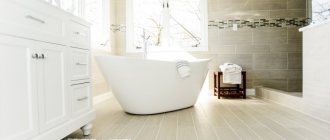
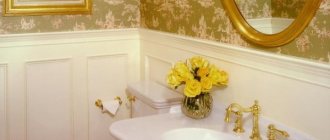
Plastic panels for the bathroom in light colors
A feminine, delicate interior, which is created using pastel shades, will always be a winner. Currently, the most popular interior design trend is pairing light plastic panels with cold concrete or raw wood. Plastic panels are also excellent soundproofing materials. They reduce sound and also provide a form of thermal insulation. The benefits can be listed for a long time, so if you are thinking about using such a finish in your bathroom, then be sure to use this idea.
The best moisture-resistant materials for finishing the bathroom
The following characteristics are important for finishing materials in the bathroom:
- Increased water and vapor resistance.
- Heat resistance.
- Resistance to mold and mildew.
- Resistance to aggressive household chemicals.
- In addition, the finishing should hide communications and ensure installation of lamps without difficulty.
- Panels made of PVC and glass have the above qualities. To a lesser extent - MDF and chipboards with a laminated surface, cork coverings.
- Plastic and glass are initially waterproof due to the characteristics of the material. The cork partially absorbs water, but does not collapse. Laminating film gives water-repellent properties to boards made from wood chips and small fibers.
- PVC panels are lightweight and easy to work with. The disadvantages are low strength and a “cheaper” appearance. The reason is that they imitate “expensive” textures (tiles, marble, wood) quite averagely. Plain-colored options look more dignified.
- MDF products are durable and will give the walls additional sound insulation. The downside is excessive hygroscopicity, despite the lamination.
Cork is a natural material that is harmless to humans. It looks impressive and has a pleasant structure. Flaws:
- medium strength;
- high cost: up to a thousand rubles per square meter.
Glass products are becoming popular: a unique and aesthetic material, resistant to impact and hygienic. UV printing is applied to glass matte or glossy surfaces, and a wide RAL palette of painting techniques is used. For lamination, a light-diffusing, durable film coating is used. Installation is no different from assembling other materials. The disadvantages are fragility, significant weight, high price and the likelihood of damage.
Materials can be combined with each other - this will bring a bold design concept into reality.
Advantages and disadvantages
It is worth noting that not everyone can afford expensive materials for decorating the walls in the shower room. MDF panels for the bathroom are an effective way to get out of this situation. They are distinguished by their availability, strength, and durability. They are convenient to mount on the wall. Sheet products are made not only from wood sawdust, but also from other wood components that are specially processed.
MDF panels for walls are in stable demand in the domestic market. They are usually used instead of tiles in the shower room. Sheet wall products are in no way inferior to ceramic counterparts, while significantly benefiting in price. In addition, MDF has an attractive appearance, it is made like a rectangle, and has no gaps at the edges or at the ends. Strengths of moisture-resistant wall panels:
- ease of installation;
- long service life;
- ease of processing;
- affordable price;
- good thermal insulation;
- high strength;
- environmentally friendly material;
- ease of operation;
- a wide range of.
In addition, it is necessary to note the ability of sheet models to be combined with other finishing materials. They can be mounted on the wall together with stone, under tiles, and can also be used with other types of finishes.
The dimensions of the panels allow the products to be used in any shower room, regardless of its size. Moisture-resistant MDF is equally suitable for both small rooms and a large bathroom.
However, it is worth noting that sheet panels for the bathroom also have their drawbacks. This is an absolutely normal phenomenon, since today it is difficult to imagine any material without weaknesses. In addition, with proper skill, you can avoid creating unpleasant situations. Currently, MDF products have the following disadvantages:
- low impact resistance;
- poor resistance to scratches;
- fire hazard.
According to their characteristics, moisture-resistant sheets for the wall are distinguished by high performance qualities. As for the shortcomings, here it is worth taking them quite seriously. However, the degree of risk should not be exaggerated, because weaknesses can be minimized, for example, by not attaching sheet products to the wall near the workspace. For other indicators, the material, in principle, does not need recommendations.
Installation features
Moisture-resistant wall panels are classified into three groups according to the method of connection during installation:
- Seamless. With this method, the panels are connected using the tongue-and-groove principle. When installation is carried out correctly, the result is a perfectly flat surface with barely noticeable joints.
It is important to take into account the quality of the material: the slightest deformation of the slab will make the joint noticeable.
- With chamfer. This is a type of seamless connection. The difference is that the ends have chamfers - decorative recesses, which after installation create a relief on the surface.
- Embossed. Connecting the slabs with a visible seam is part of the decor. Often the decor is stylized to look like lining, which is installed in this way. These are tough and resistant to mechanical damage products.
The panels are installed directly on the wall if it is level enough. Vertical or horizontal fastening is installed with glue.
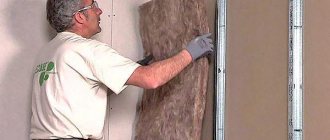
When the walls are uneven, with flaws and depressions, wall panels are installed on a sheathing - a wooden, plastic or metal frame connected to the wall with dowels. The result is a smooth wall.
Glue option
You can attach moisture-resistant MDF products in the bathroom with glue only on a flat surface. With the help of solutions, models of various sizes are installed on the wall quite firmly. However, during dismantling this significantly complicates the process. This method will save shower space and also improve the moisture resistance of the room. Sheet panels must be laid on a layer of adhesive not exceeding 5 mm.
Moreover, it is best to apply the adhesive composition with a notched trowel, as this allows various surfaces – panels and walls – to be bonded together more effectively. In order to carry out installation correctly, you need to start from the bottom corner of the product. Then continue laying the MDF to the side until it stops. Thus, by analogy, subsequent rows are applied.
The protruding glue should not be smeared, but the excess mixture should be removed. The distance between moisture-resistant products should not exceed 1.5 mm. To increase efficiency, it is necessary to use a sealant with a silicone component. This will make it possible to increase the moisture resistance of the coating. In addition, you can use moldings to decorate the gaps between panels.
This method will not only visually hide the joints, but also improve the operational characteristics of the room. It turns out that MDF panels are a moisture-resistant and environmentally friendly material that has all the necessary qualities for use in a room with high humidity and changes in temperature, i.e. bathroom
What parameters should you pay attention to?
To ensure that there are no problems when installing waterproof wall finishing, the following should be taken into account at the purchase stage:
- When choosing a PVC finish, it is important to inspect the cross-sections of the lintels: thick lintels mean high strength.
- Products must have the same thickness, and the pattern and color must match. Inspect the entire shipment before payment.
- When choosing chipboard panels: the formaldehyde emission parameters (the binding element used in the production of the material) should be E0 and E1.
- The laminating film must adhere tightly to the base material.
- When purchasing, ask if there is a certificate of conformity guaranteeing the safety of the product.
If you don’t have a lot of money allocated to transform your bathroom, you need a quick renovation, and you want a bright design, moisture-resistant wall panels are an excellent choice.
Photo gallery of interior solutions
Stylish design
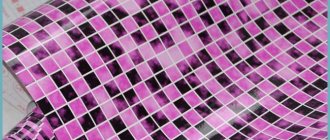
Raspberry color
In a small room
Dark bathroom
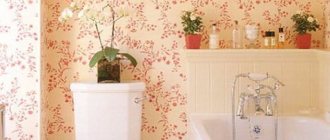
With pattern
Small bathroom
With an image
For PVC bathrooms
Like on safari
Pink color scheme
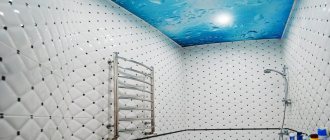
Marine theme
Mosaic design
Blue
Alternating stripes
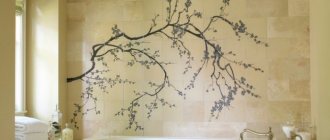
With flowers
Frigate
Green cool tones
MDF wood effect