02/04/2015 windows | for beginners
Previously, I already wrote about how to connect a TV to a computer in different ways, but the instructions were not about wireless Wi-Fi, but about HDMI, VGA and other types of wired connections to the video card output, as well as about setting up DLNA (more on this later and in this article).
This time I will describe in detail various ways to connect a TV to a computer and laptop via Wi-Fi, and will consider several areas of application of a wireless TV connection - for use as a monitor or for playing movies, music and other content from the computer’s hard drive. See also: How to transfer an image from an Android phone or tablet to a TV via Wi-Fi.
Almost all of the described methods, with the exception of the last one, require the TV itself to support a Wi-Fi connection (that is, it must be equipped with a Wi-Fi adapter). However, most modern Smart TVs can do this. The instructions are written in relation to Windows 7, 8.1 and Windows 10.
How to connect a laptop to a TV
You are comfortable working on a laptop, often like to surf the Internet, use office programs, and communicate with friends. However, what if you want to watch the newly downloaded movie on the big screen? This article is just for you.
It turns out that connecting a laptop to a TV is quite simple. First you need to know something.
There are two types of connections:
Let's look at each of them.
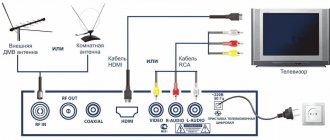
A wired connection is simpler, just a few steps and you are already watching the long-awaited movie on the big screen. Connect your laptop to your TV using the two most popular and used cables, VGA and HDMI.
HDMI connection.
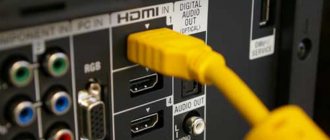
All modern laptops have an HDMI output, and TVs have an HDMI input. Using this type of connection is better; it allows you to transmit image and sound without loss of quality. To connect using this type, you need to have: a laptop with an HDMI output, a TV with an HDMI input, and an HDMI cable of the required length. After connecting, you need to select the video source type “HDMI” in the TV menu (or the special “source” button). Your TV may have more than one HDMI port, so choose the one that suits you best. On the laptop desktop, right-click and select “display extension”, in the “multiple displays” field, select “duplicate these displays” from the drop-down list.
VGA connection.
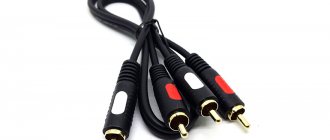
The VGA cable is intended for video signal transmission only. Even older laptop models have a VGA output. Find the VGA input on the TV, connect the laptop and TV, repeat the steps described for the HDMI connection. Avoid using a cable longer than 5 meters as this will significantly reduce the quality of the content you are transmitting. Sound can be transmitted using a multimedia cable 3.5 mm (male) = 2XRCA (tulips).
So, you can connect your laptop to the TV yourself. However, we are often asked the question: “How to connect a laptop to a TV without cables?” Now we will learn how to connect a laptop to a TV without cables.
Wireless connection.
In order to stream content without cables, your TV must support WiDi or Miracast technology (a technology that is capable of transmitting content via wifi without a router). Most TVs since 2013 support this technology; you only need to select the type of video signal source in the TV settings - WiDi. The laptop must be equipped with an Intel Core i3/i5/i7 processor and the Windows 8.1 or Windows 10 operating system. Then everything is simple:
- find “Devices” in the laptop settings;
- select the item “Transfer to display”;
- click on “Add wireless display”;
- We wait until the TV appears and select it to transmit content.
The only disadvantage of this connection is the transmission of content with a delay, you won’t be able to play your favorite game, so a wired connection has a big advantage.
How do you connect your laptop to your TV? Write your answer in the comments.
itcrumbs.ru
Wireless monitor
This method allows you to turn a TV into a computer monitor. The technology has certain similarities with WiDi. Therefore, there should be no problems synchronizing your laptop and TV. The main condition is that the TV and Wi-Fi module of the laptop support the Miracast function.
Connect via Wi-Fi to the wireless monitor. You must first open the main TV menu to activate the Miracast function. If this item is missing, then simply activate Wi-Fi on both devices.
On the laptop, press the Win + P button combination, and then select to connect to a wireless monitor. Wait a few seconds. When the connection is established, the image from the laptop screen will be projected onto the TV display. This is how a full-fledged external monitor is created.
Some users use third-party software to achieve this goal:
The second program is a universal solution. Synchronization is configured via the local network. The user installs the utility and then runs it. The software allows you to connect to a wireless monitor.
How to connect a computer to a TV wirelessly
These days, smart phones, computers, TVs and even smart homes are no longer news. Televisions have long been able to access the Internet, find news themselves, find movies on the Internet, and at current Internet speeds, all this happens almost instantly. But some people have problems connecting the TV to their PC. Let's look at how to connect a computer to a TV wirelessly or with wires.
How to connect a computer to a TV wirelessly
Not stupid TVs
In short, a smart TV is a small computer built into a TV. It is specially adapted for the operating system that is installed on it. Those. You are unlikely to install Windows on it (although there are Kulibins).
Using a smart TV, you can not only watch movies, videos and listen to music, but also access social networks, chat with friends and talk on Skype with loved ones.
All covered in wires
Let's first figure out how to connect a TV via a wired interface. There are several types of ports: VGA, DVI, HDMI, Display port. They are all connected using wires. There are adapters from one type of port to another (for example, from VGA to DVI). Typically, laptops are equipped with one or two such ports, usually VGA, sometimes VGA + HDMI, and extremely rarely DVI or DVI + HDMI. Moreover, only HDMI carries sound, the rest only carries image.
And if with wires everything is more or less clear (which connector is there, that’s where we put the cable), then with the wireless interface everything is a little more complicated. There are 2 options for connecting a computer to a TV, simply as a network device (possibly as a data storage), or as a monitor, let's look at both of these types.
1. Just as a device, the TV can be connected as one of the devices on your home network. This means that you need a computer, a router and a TV that has a network card with a WIFI adapter on board. In other words, if the TV can pick up WIFI, that’s good. We connect to our WiFi and create a home network on the computer, in which there may be either just a hard drive, or just a device, or there may be nothing at all, it all depends on the coolness of the TV equipment.
c-use.ru
Possible connection types
Regardless of your laptop model and manufacturer - Samsung, Philips or Lenovo, its connection will depend on the port that is available. To work together, you only need to connect a certain cable to the products, and then you need to make settings, which, if you have the skills, does not take much time.
It is very difficult to predict in advance which connection will provide the best audio and video quality. Before connecting a TV to a laptop, you need to carefully consider all the possible options and interfaces that are available on the TV and laptop.
How to connect a computer to a TV
Want to play your favorite games, watch videos or view photos with your family on the big screen?
Does your computer have a huge monitor and still want an even bigger one? Or maybe your laptop screen is quite small?
Your computer hardware won't magically turn into a huge TV, but you can connect your computer to your TV for optimal viewing. You will need a VGA, HDMI cable or wireless transmission.
Why you should connect your computer to your TV: Key benefits.
Why do you want to connect your computer to your TV? As mentioned, this comes with many benefits.
Imagine your favorite game or car moving with a 15" x 40" screen.
Not only that, you can get plenty of modern graphical features and impress your friends with endless enjoyable entertainment.
You can also look at it from a completely different perspective. We downloaded a movie that we have been wanting to see for a long time.
What's the best way for your entire family to fit around a small laptop screen or a slightly larger PC screen for the fun and excitement of a special session with loved ones?
You can start a slideshow and sit back in comfort, have a snack and enjoy the highest quality images in superb resolution.
The possibilities are truly endless, but do you want to quickly learn how to connect your computer to your TV? In that case, let's get down to business.
Methods for connecting a computer to a TV
Before you finally answer the nagging question of how to connect a computer to a TV, you need to find out what equipment you have, what connection is possible at all, and if so, special cables may be required.
Let's start with the TV. If your black box was purchased several years ago, then your living room probably has a flat panel LCD or plasma.
In this case, there should be no problems with the hardware connection - they usually have a digital input adapter and the necessary cables.
This way you won't need external hardware. If your TV remembers the first years of its childhood, then the work becomes a little more complicated.
Unfortunately, you will be forced to invest in a converter. Dont be upset! The device is not expensive and you can find it at any electronic accessories and TV store.
Even a Chinese-made one will do, at least once upon a time it never let me down.
The last thing we are interested in at the moment is the availability of connections. To use VGA, DVI, HDMI, you need special inputs both on the TV and on the computer/laptop.
Before we start connecting the TV to the computer, let me explain the most important differences between them.
Several years ago, an S-Video cable was one of the most popular methods for connecting a computer to a TV because it was one of the cheapest and every laptop had a corresponding port.
In general, there are two types of S-Video cable. 4-pin and 7-pin. Most computers have a 7-pin input - if your TV has a 4-pin port then unfortunately you'll have to find a different cable, or as I mentioned earlier, buy an adapter.
The quality of the screen image transmitted via the S-Video cable is satisfactory and does not hurt your pocket.
If you are not looking for super-hyper-space quality, then I recommend this solution. The S-Video port, at the same time, does not have support for audio distribution - you will need another separate cable that will be responsible for its transmission.
VGA is similar to S-Video cable and is one of the most popular cables used in TVs and computers.
This cable cannot be confused with any other - it has a large tip, a spear-shaped oval with a clearly defined head. There are also often two screws to provide a more secure and reliable slot connection.
VGA certainly provides better quality than S-Video. Plus, it's still cheaper. Unfortunately, once again, you may forget about audio support.
DVI is the standard acronym for Digital Visual Interface, with the word digital being the answer to all the puzzles.
Digital signal transmission guarantees much better quality than what S-Video and VGA conversions offer.
Of course, the computer and TV must have appropriate ports. While almost every modern PC and laptop is equipped with corresponding holes.
In this case, the TV must belong to HDTV. Otherwise, you may forget about receiving the signal.
More recently, these cables were quite expensive, but now they are cheaper.
The problem comes from some differences. You can purchase a DVI-I (single link type), DVI-I (Dual Link type), DVI-D (single link type), DVI-D (Dual Link type) and DVI cable.
Why are they so popular? First of all, good signal transmission quality and support for analog TV.
If something is called High-Definition Multimedia Interface, then it should certainly work well.
High image quality, which previously could not be dreamed of, will be possible if you have an HD TV.
Even though HDMI is extremely popular these days, small older laptops don't have these ports built-in. Luckily, it's compatible with DVI ports (you can buy an adapter almost anywhere).
The big problem could be the price. HDMI cables are among the most expensive. Of course, you can invest in a very cheap alternative, however, the video and audio quality will suffer.
HDMI cables are divided into several types (Class A-E), the various options include audio quality, 3D image processing, 4K resolution support, Ethernet access, etc.
You have to admit that despite their high price they are the best option. Image and sound are transmitted over one cable. So if you want to connect your computer to your TV, then this method is the most convenient.
Another “quality” DisplayPort cable or an alternative is Mini DisplayPort.
These cables were created to complement HDMI and their main advantage is the ability to support four streams of audio and video with a single cable.
What does it mean? Among other things, you can communicate with each other using four monitors with a resolution of up to 1920 x 1200 pixels or 2 monitors with a resolution of 2560 × 1600 pixels.
HDMI, of course, is still more popular, however, DisplayPort connectors are increasingly being equipped in Apple products. If you recently purchased computer equipment, then it is likely that it has just such a port.
The latest available solutions are wireless hardware connections between a computer and a TV.
How to connect a computer to a TV wirelessly – would you say it’s impossible? Before you get excited, you should remember that nothing is impossible.
Your TV can easily see your computer and transmit sound without unnecessary interference. This issue will be discussed later in this guide.
Once you know everything about the cables, adapters, adapters and types of ports located on your computer and TV, we can move on to action.
Most modern computers and televisions allow you to transmit audio and video in one cable.
In some cases it will be necessary to use two independent pipelines. If your computer has an HDMI input and a sound card that supports this standard, then you won't have to worry about anything.
If your PC's audio output jack is only 3.5mm (usually marked green) then you will need an independent audio cable.
However, you can use this port and connect directly to your TV through its channel audio.
Describing all the possibilities for connecting a computer to a TV, I mentioned wireless signal transmission.
Thanks to new technologies, modern TV and computer equipment can be synchronized with each other without cables - the whole process is simple, pleasant and the equipment looks neat and aesthetically pleasing when standing in the living room.
But a unified and universal system for wirelessly connecting a computer to a TV has not yet been developed.
These solutions are sold by individual manufacturers and are patented. This is why, and because of the relatively high cost, this method has not yet gained much popularity.
If you still want to know how to connect your computer to your TV wirelessly and what the most popular options are, then go ahead.
Apple TV
If you have an Apple computer made after 2011 (MacBook Pro, MacBook Air, iMac or Mac Mini), you can wirelessly transfer images from your computer to your TV in Full HD using Apple TV.
This is an independent unit initially priced at $99. Prices start at $300. Additionally, only the latest products from Apple's solution support AirPlay Mirroring.
Intel Wireless Display
The feature is available on computers, but was missing from Macs for many years. Luckily for Windows users, things have changed over the past few years with Intel's WiDi (Intel Wireless Display) technology for wirelessly transferring video and audio between your computer and TV.
Of course, one of the biggest disadvantages of WiDi technology (as in the case of apple'owego AirPlay) is its relatively recent appearance on the market - only the latest models of PCs and laptops will support the solutions presented by Intel.
If you are planning to purchase new equipment in the near future, then you should be interested in a model that supports this technology. Transmitting a signal to a TV that supports Full HD is relatively very simple.
Only a few models supporting WiDi technology are currently available on the market. The problem, however, can be “worked around” if you buy a special adapter that allows you to transmit such signals.
Wireless systems - how to connect a computer to a TV wirelessly
Wireless kits and adapters are available on the market, so that almost every computer and TV can use wireless signal transmission. Among the most popular solutions on the market today are the following:
- Veebee HD - supports video and digital audio playback. Unfortunately, prices start at $130.
- Netgear Push3TV - is based on WiDi technology and requires a computer that supports Intel Wireless Display. No support for Mac.
However, it allows you to stream almost any TV. What about the prices? To purchase a Netgear Push3TV you should expect to spend several hundred dollars.
- Imation Link - wireless HD audio and video connection. The price is very similar to the two predecessors.
One of the biggest problems when it comes to how to connect a computer to a TV is the hardware and the TV does not display the image at the same resolution.
For example, a diagonal HDTV 1280 x 820 display is called XGA 1280 x 960 - as you can see, this is not exactly the same thing. In contrast, the closest screen to 1920 × 1080 TV is WUXGA 1920 × 1200 – again the values are slightly different.
In most cases, this leads to so-called overscan'em, when the image on the computer screen does not completely fit on the TV screen.
Overscan is one of the biggest problems with SDTV, where the native screen resolution is much lower than the computer resolution.
If you want to use your TV as an SDTV monitor, then you must reduce the resolution to 800×600 pixels.
In the case of HDTV, overscan problems are also experienced - they usually lead to cropping of the edges of the image.
The big problem arises when the TV "refuses" to convert the signal into an image that does not fit into the clearly defined native resolution.
Fortunately, most TVs have the ability to scale the input signal regardless of its native resolution.
This requires converting the signal to a lower resolution to improve quality, or "degrade" it in the case of older TVs. Of course, this is not an ideal solution, but it suits a home environment perfectly.
In some cases where the image is not displayed, you will need to use additional software.
Currently, two programs are the most popular to solve problems between the computer and the TV.
For Windows it is PowerStrip, while for Mac it is DisplayConfigX. Thanks to them, you can fine-tune the video card resolution to the native TV resolution.
When, for example, there is an HDTV that supports 1080p quality, you can switch to your computer's resolution up to 1920×1080 pixels.
So you have learned how to connect a computer to a TV, what are the capabilities and available technologies that allow you to use wireless signal transmission. Good luck.
vsesam.org
Necessary tools for synchronization
Wi-Fi technology is a wireless information exchange network. Make sure your TV has this feature or contents this basic option. Stationary units, unlike laptops, do not support wireless connections. Therefore, to connect a TV via Wi-FI, you need to purchase a special adapter. There are two types of this gadget: internal and external.
- External: connects via USB and looks like a regular flash drive. It is easy to install (you need to insert the adapter into the appropriate port and initiate the driver installation process) and operation. There are two disadvantages: the USB port is always busy and the data transfer speed is relatively low (this is due to the features of the universal bus). It is advisable to insert the adapter into a 3.0 format port - this will guarantee maximum device performance.
Tip: if you don't have enough free ports, buy a USB hub. Such a device is inexpensive (on average from 300 rubles) and will bring a lot of benefits.
- Internal: mounted directly into the system unit. Equipped with special equipment and an antenna, it is attached to a PCI slot. It features increased data transfer speed and lower price (compared to the previous example). Unlike an external adapter, it does not occupy a slot. The only drawback of such a device is the complexity of installation (you need to disassemble the case and insert the adapter into a specific slot). For a person who does not understand technology, such a task will be impossible.
The latest generation Samsung and LG TVs support Smart TV (internet connection setup). Older models do not have this option. The user buys an external adapter that is connected via the TV's USB input. It would be wiser to get an adapter and TV from the same company, thereby avoiding compatibility problems. Tip: if you have a computer without a Wi-Fi receiver and a TV without a Smart TV function, a rational solution would be to use an HDMI cable. This is cheaper (you don’t have to buy an adapter, and the cable costs about 500 rubles) and simpler, since you don’t have to waste time on setup - you just need to insert the cable into the appropriate connectors. IEEE 802.11n is considered the optimal version of adapter signal transmission. It connects the TV to a computer, providing high-speed Internet for quick file exchange. Before organizing the broadcast, update the network card drivers. We recommend using the DriverPack utility, which independently checks for the presence of fresh drivers and installs them automatically (without user intervention) mode.
How to connect a computer to a TV via wifi? | Your networker
The question “how to transfer video from a computer to a TV” is relevant for all those who like to watch movies in good quality from the “big screen”. In one of the previous articles, we described in detail how to connect a computer to a TV using a cable, but here we will look at connecting a TV to a computer via wifi.
However, before you synchronize your TV with your computer wirelessly, you should make sure that:
How to connect a computer to a TV via wifi?
Now about the connection itself.
- Communication between a computer and a TV via wifi can be carried out using Miracast and WiDi technologies.
Accordingly, it is necessary that both devices support this technology.
Synchronizing a computer with a TV is not particularly difficult:
- — In the network settings, enable “Miracast” or “WiDi” support (depending on the TV model), and the “wifi module” must be activated.
- — Go to the computer.
Open the "Intel Wireless Display" program - you will be asked to connect to the found monitors - mark your TV and click "Connect". After this, a digital code will appear on the TV, which will need to be entered into the program on the computer.
Most relevant for Windows 8/8.1/10 operating systems.
Click on the “Device” button in the lower right corner of the screen, then “Projector” - “Add a wireless display” and add your TV in the same way as the previous method.
For Windows 10, the procedure is slightly different. Open "Settings" - "Devices" - "Connected devices" and click "Add device".
A few words about the advantages and disadvantages of these technologies:
Pros:
- - support for high resolution - up to 4-K;
- — ability to use screen extension (second monitor).
Minuses:
- — a relatively small number of devices support this technology;
- — slight playback delays are possible.
Pros:
- — multiplatform standard;
- — connection is made directly.
Minuses:
- - frequent unstable work;
- - support (mostly) only new devices.
How to connect a computer to a TV via wifi using a “DLNA” server and the “Home Media Server” program?
Like the previous connection option, this connection of a TV to a computer via wifi is not particularly difficult: the program is intuitive and understanding it will not be difficult.
The main condition for synchronization is technology support from the TV and computer.
How to display a movie from a computer to a TV: setup steps
- Download and install the Home Media Server program: it is free, but it is best to download it from the official website.
After starting the program, you will be asked to make initial settings:
— At the first stage, select the “Device Type”, “File Support” and “Color Palette” of the program.
— In the next step, select which folders will be available for viewing: mark only what you need and click “Done.”
- — Carry out the proposed “Backup” of data;
- — In “Settings” in the “Network” section, specify the name of your server to facilitate search on the TV (by default it is “HMS Comp”);
- To turn on the “Media Server”, click “Launch” - your TV will appear in the “DMR Playback Device” section - click “Play”.
- Now on the TV, open “Sources” (usually the “Source” button on the remote control) and select the server created using the program from the list.
- Next, you will be asked to select the desired file to play from the folder directory.
How to display video from a computer to a TV using Chromecast from Google?
It should be noted right away that this device is worth the money spent, and setting up the connection between the computer and the TV is done as follows:
- — connect “Chromecast” to the “HDMI” connector on the TV, and the power cord to the network (or to a free “USB” port);
- — on your computer in the Google Chrome browser, go to “chromecast.com/setup” and click on “Set up a Chromecast device on this computer”;
- - the setup program will automatically detect the device - select it and click “Configure”: all you have to do is open the video of interest in the browser and click on the “Broadcast” button.
Here, in principle, are all the most current options for connecting a computer to a TV via wireless data transmission.
tvoi-setevichok.ru
Screen mirroring using Widi Miracast
“Sharing” folders and setting up public access are key elements of synchronizing a laptop and TV via DLNA. The WiDi function is noticeably different. It allows you to duplicate the image from the laptop display to the TV screen. The technology is implemented through the use of a wireless channel. Users often call this option Miracast.
Setting up synchronization using this technology has several specific features. You will need a laptop with an Intel central processor, a discrete graphics card and a Wi-Fi adapter. For example, almost all modern Samsung laptop models connect to TV via WiDi.
First download the drivers for the wireless display. It is possible that you will have to download them from the official Intel portal. It is important that the TV works with WiDi. Older models do not support this technology. Therefore, users buy additional equipment - adapters. First of all, we need to clarify this point.
Setup instructions:
Sometimes you have to enter an additional PIN. Mostly these are simple combinations of numbers - 1111 or 0000.
To finalize the WiDi setup, go to the “Charms” section. Select the "Devices" section and then "Projector". Here you need to add a TV screen. If the name of your TV is not here, then update the Wi-Fi module drivers.
Using additional equipment
If the device you are using does not support the Smart TV platform, but has an HDMI interface, then a wireless Wi-Fi connection is configured using additional equipment. Buy a Google Chromecast. This device will allow you to connect your TV to your laptop to watch video content.
An alternative option is Android Mini PC. In addition, you can buy an Intel Compute Stick. Gadgets are connected to TV mainly via HDMI or USB connector. Some users prefer Miracast adapters. The final choice directly depends on the specifications and model of TV equipment.
An external Wi-Fi adapter allows you to set up a wireless connection between your laptop and your TV. You just need to connect to your home network, and then you can display the image on the big screen. Each device has its own advantages and disadvantages.
Source