How to connect a digital set-top box to an old TV
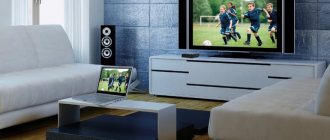
For many TV viewers, the transition to digital means the need to purchase additional equipment.
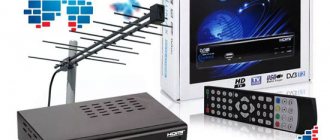
Modern TV models are equipped with a built-in DVB-T2 module, but older devices will only be able to receive a digital signal if they have a special tuner. Of course, purchasing a new TV is a productive, but very expensive solution to the problem. If your budget is limited, you can buy a digital tuner. DVB-T2 set-top boxes are relatively inexpensive. The budget model will cost the user 700-800 rubles. More expensive devices have an extensive list of functionality.
Connecting a set-top box to an old TV
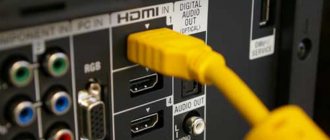
The advent of broadband television has become a catalyst for differentiated transmission of sound and video. To connect a digital set-top box to old TVs, the AV interface is mainly used. The decoding of the abbreviation is very simple - audio/video. The peculiarity of the connector is to ensure signal transmission to the antenna input. This means that to set up digital television on an old TV you will need a set-top box that is connected using a special cable. Then the cable is connected to the antenna connector.
There are certain disadvantages of this method that cannot be kept silent. For example, you can connect a digital set-top box to an old TV using an AV cable, but the image quality will be unsatisfactory - somewhere at the level of analog TV. The low quality of the broadcast is due to the limited screen resolution.
Digital set-top boxes are connected to old TVs via “tulips”. The interface is presented in the form of a cable with three plugs, one of which transmits sound, and the other two transmit image. Some users prefer to buy RCA adapters to connect equipment using an HDMI cable.
Antenna cable
On older TVs there is often no need to choose interfaces, since they are equipped with a limited number of connectors. Quite often, users connect digital tuners via the antenna input. This connector is mainly marked as follows - “RF-OUT”.
This requires a special cable. The main disadvantage of this connection scheme is that the quality of the broadcast is significantly reduced. However, at the same time, it is worth considering that users initially do not put forward serious demands on outdated technology.
To Soviet TVs
Of course, equipment produced in the USSR does not support digital television broadcasting standards. Therefore, problems may arise when connecting a DVB-T2 receiver to an old TV. Don't rush to go to the electronics supermarket to purchase a new TV. The connection is configured as follows:
The coaxial cable processed in accordance with the above recommendations must be connected to the tuner and TV. The described method is especially relevant if we are talking about a very old TV: “Ruby” or the “Horizon” lamp model. You can connect a digital set-top box to an old TV yourself without the help of specialists. The main thing is to follow expert recommendations.
How to set up the receiver
After you have managed to install and connect the digital set-top box to your old TV, the tuner needs to be configured. Here the algorithm of actions is as follows:
- Enter the menu using the remote control. By the way, for many models there is an option with an online remote control.
- Go to channel settings, select the country and select the appropriate standard (for example, DVB-T2).
- Set up channels automatically and save the changes.
If the automatic search fails, you need to know how to manually set up a digital set-top box for your old TV. The algorithm of actions is as follows:
- Enter the channel settings menu and set the necessary parameters.
- Select manual search.
- Specify exact data or set each channel using the frequency selection method.
- Save the information.
For more precise tuning, it is better to study the CETV map with information about channel frequencies for your region. But when you figure out all the settings, you can get confused and connect your smartphone to the TV via a set-top box. Yes, yes, it’s possible there too.
Setting up channels
Immediately after connecting the set-top box for digital television, you need to start setting up the equipment. The number of channels directly depends on the type of television broadcasting: terrestrial, cable, satellite. Today, 2 multiplexes are successfully operating. This means that each subscriber will be able to tune in about 20 channels, including regional programs.
There are a huge number of different digital TV providers operating in Russia, which provide the opportunity to configure viewing of additional channels. The size of the monthly subscription fee largely depends on which tariff plan the user chooses.
How to connect two or more TVs to a set-top box
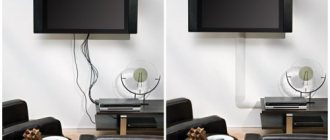
Using the antenna connector, you can connect several TVs to one digital set-top box. To correctly formulate the equipment connection diagram, you need to buy a special device called a splitter. The only drawback of the proposed method is that absolutely all TVs will work synchronously. They broadcast the same channel since only one receiver is used.
There are alternative methods for connecting two TVs to one set-top box. The point is to use unused interfaces. For example, you can use one TV through “tulips”, and the second using the HDMI interface. If absolutely all inputs are occupied, then you can purchase a high-frequency modulator.
An RF modulator is a compact device that provides separate signal decoding for each TV. Using this adapter has only one significant drawback - high cost. The price of the modulator can significantly exceed the cost of the set-top box itself.
Common problems
From the above instructions it is clear that a modern set-top box can be connected even to a regular, outdated TV. But here you need to be prepared to eliminate problems that arise. Let's consider several situations:
- Broken picture, pixels appearing, interruption, message No signal. In this case, change the position of the antenna, check the quality of the connectors, and check the integrity of the cable. If pixelation appears only on some TV channels, the multiplexer may be the cause.
- Black and white picture. In this case, it is necessary to correctly install and connect the antenna, and restart the automatic search.
- Some TV channels are missing (shows 10 instead of 20). Change the antenna location and restart the search.
- There are no channels at all. Try reconnecting the antenna, run automatic scanning.
If all else fails, call a professional. He knows how to properly connect a digital set-top box to an old TV and helps with solving problems. For consultation, you can contact a specialist by phone or call him at home.
Solving the main difficulties
Practice shows that almost all users encounter one common problem - the set-top box is connected, but the old TV does not recognize the receiver. What to do in such situations? It is necessary to carry out diagnostics:
The main reason for problems with the operation of the tuner is a failure in the equipment settings. Immediately after installing a digital set-top box, experts recommend updating the software. Some users encounter problems while searching for channels. First, use the automatic search. If this does not give results, you can try a manual search.
During the manual search process, you need to specify channel frequencies. Therefore, this procedure can take quite a lot of time.
If automatic and manual searches did not produce results, it is possible that technical work is currently being carried out. Now you know how to connect a digital set-top box to your old TV.
Source
Possible problems and their solutions
It seems that everything should go well - connected, configured, saved and ready. But no. Problems have arisen. And this is absolutely normal, since the TV is no longer “new”. You can solve them by following the procedure for dealing with a certain breakdown.
Braking
Annoying freezing of the picture, lag of the sound from the image, one output - a weak signal. This is influenced by such components as:
Black and white image
The days of Charlie Chaplin are long gone, but black and white pictures are still on your TVs. A common problem caused by:
Missing channels
In a situation where there are channels, but not all are shown, re-enable automatic search. Probably the channels that are not working have changed the transmission signal. Rotating the antenna can also help.
If all the channels were showing and suddenly, out of the blue, everything was interrupted and now not a single one is showing. Don’t worry, maybe the TV tower is undergoing maintenance. It’s another matter if the channels are not in the list after the first connection. This means that the connection was made incorrectly. Double-check everything again.
The TV does not see the set-top box
The set-top box is connected, but the TV refuses to “work” with it. First of all, check the following components:
One of the common problems is resetting the receiver settings. Once you have your set-top box installed and running, update its software. This is done through the receiver settings.
Standard equipment for digital set-top box
Let's look at what is included in the standard set of the receiver; this information may be useful when connecting it to a television receiver.
Standard equipment for digital set-top box
Let's list what is shown in the figure:
The basic configuration may differ slightly from what is shown in the photo (for example, the “Tulip” is replaced by an HDMI cable).
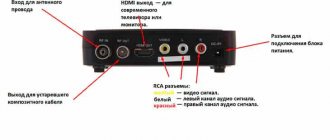
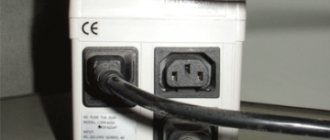
Connectors and their purpose
There are various connectors on the back of the device; we’ll briefly explain what they are for.
Figure 3. Connectors of the SDT-96 receiver from the SUPRA range
Explanation of the picture:
Some devices may be additionally equipped with a “SCART” connector; a TV, VCR or DVD player with a video recording function can be connected to it.
Receiver with SCART connector
In addition, you may find devices that have D-SUB (Fig. 5) or DVI outputs instead of an HDMI jack.
Fig 5. Digital set-top box with standard VGA (D-SUB) output
Please note that such interfaces do not transmit sound, so an additional connection using “tulips” will be required to transmit it.
What is a tulip
The cable itself is used to connect home theaters, sound bars, DVD players and game consoles to TV. What does he look like? One part of it is a contact pin extended forward, the diameter of which can be 3.2 or 3.18 mm. External length – 9 mm. This is the open part. Closed internal length – 6 mm. This pin is located inside a cylindrical contact with an internal diameter of 8 mm. The outer diameter of the rim depends on its thickness and does not have a specific standard. In slang, this part of the cable is called “dad”. On the other side of the cable there are three multi-colored connectors. Their colors are standard and are necessary to determine exactly which connector each of these connectors should be inserted into. The scheme is as follows:
- yellow is used to transmit a video signal;
- white transmits a mono signal or left audio channel;
- red is responsible for transmitting the right audio channel.
The process of connecting a digital set-top box to a new TV step by step
Important! All manipulations must be done with the equipment turned off. If you connect working equipment, there is a high probability of its failure.
Let us describe the order of our actions:
This interface allows you to transmit video and audio, so the connection can be made with one cable.
If the TV does not have a digital input, it can be connected using any analog interface; the easiest way to do this is using tulips. In the case where the device only has a bulky SCART connector, you can purchase a tulip adapter for it. In this way you can connect almost any model, except for very ancient ones.
As you can see, the colors of the connectors match the colors of the sockets (4 in Fig. 3).
This completes the connection procedure, and you can begin setting up channels. If your TV does not have the interfaces listed above, do not worry, we will tell you how to get out of this situation.
Instructions for connecting a digital set-top box to an old model TV
Since the nationwide transition from analogue to digital broadcasting took place, owners of old TVs have been faced with a problem: what to do next?
CRT “boxes” obviously do not perceive “digital”. You need to connect a receiver set-top box, but the methods are not always obvious. Let's figure out how to properly connect a digital set-top box to an old TV and what needs to be done to avoid pitfalls.
Necessary equipment
A gradual transition from analogue to digital broadcasting is taking place throughout Russia. Some channels can still be viewed using the TV's built-in tuners that decode the analog signal. But it will be possible to receive a larger number of consistently broadcast television channels with improved parameters of video and audio signals only by switching to the new DVB-T2 standard.
What's already included: standard equipment
Most modern TVs from well-known electronics manufacturers have a built-in DVB-T2 tuner. Information about this can always be found in the instructions for your existing television receiver.
For earlier models and older TVs, to receive a signal in digital format, you will have to purchase a DVB-T2 set-top box (receiver), of which there is currently a wide variety. They differ not only in appearance, case material and equipment, but also in the processor and the functionality of the tuner itself.
The standard receiver model usually has the following equipment:
- packaging box with user instructions and warranty card;
- DVB-T2 set-top box, which decrypts and converts the digital signal into analogue;
- IR remote control with two batteries;
- network adapter for converting AC mains voltage into 5 V DC, if the set-top box itself does not have a built-in power supply;
- connecting cable 3RCA-3RCA (“tulips”), allowing you to connect the set-top box to most televisions of old and new generations.
What else is needed: additional equipment
To receive a digital signal, in addition to the set-top box, you need a television antenna with a decimeter range of received frequencies (UHF, frequencies from 300 MHz to 3 GHz).
When choosing an antenna, the most important factors are:
- distance to the repeater;
- the number of obstacles between the repeater and the receiving antenna.
If the TV tower is in direct line of sight, and the number of wall partitions to the outer wall is not large, it is best to purchase an indoor antenna.
If the distance to the repeater is large, and the house is located in a low-lying area or is blocked by tall buildings, you need to buy an external active (with a built-in amplifier) antenna, which can be installed on the roof or on a special mast. In this case you will need:
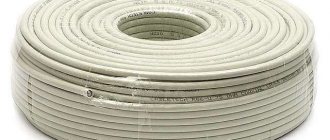
- connecting coaxial cable of the required length with two plugs;
- external current source to power the amplifier.
To connect the set-top box to the TV, instead of the standard analog RCA connection, you can use an HDMI cable if these devices have the appropriate connectors.
Its use, thanks to its high bandwidth, allows it to support the transmission of multi-channel digital audio signals and high-definition digital video signals.
Connection options
Via RCA
This is the oldest type of connector in use. Its basis was developed in the 1940s and is still successfully used in a bunch of different audio and video equipment.
The connection diagram via the “tulip” is as follows:
Via SCART
If the old TV was originally designed to receive a low-frequency signal via "Euro-AV" (as the SCART connector is often called), then the connection looks like this:
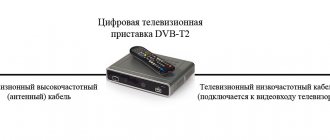
Via antenna connector
It may turn out that the TV simply does not have a connector for an AV signal. This usually happens if old Soviet receivers are used (“Beryozka”, “Horizon”, “Record”, etc.). In this case, you must use the TV's antenna input.
An additional problem arises: most digital tuner models do not support high-frequency signal output to the TV. Some have an antenna output, but this is usually intended to connect to the next set-top box, and only some models can broadcast a decoded RF signal. There is only one way out - using an external RF modulator.
The connection is made according to the following scheme:
The TV will receive an analog high-frequency signal with digital channels. You need to configure the device for reception in the same way as was done before with analog terrestrial television programs.
Problems that may arise during work
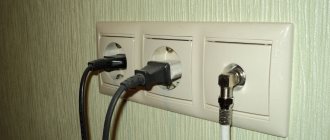
How to connect tulips to a TV? Sometimes, after connecting, problems may arise. They begin to appear immediately. Among the most common are:
- disconnecting the cable (the plug came out of the hole);
- burnt-out electronics (to avoid such a nuisance, the connection is made with the TV turned off);
- no image (connector inserted in the wrong place);
- there is no yellow connector on the TV (there may be a blue, white, green, two red. In this case, when connecting a digital set-top box, you should go to its settings and mark the color system “PAL” or “SECAM”);
- the device does not have inputs and outputs for “tulips” (you can purchase an adapter);
- when connecting to a VCR, there are no colors corresponding to the “tulips” on the TV (you should take the “OUT” signal from the connected device. On the TV, find a group of “tulips” responsible for “IN”. Before connecting, you should press “AV” in the TV menu);
- If you start the connection not from the ground, but from the signal wires, then due to the potential difference between the grounds, you can destroy the interface.
If you are careful and follow safety precautions, many troubles can be avoided. The best option would be to invite a specialist who will professionally and quickly solve the problem.
Subscribe to our Social networks