What it is
LEDs have long been popular lighting devices. This is due to their excellent energy efficiency and long service life (compared to conventional light bulbs). In addition, prices continue to fall as production of these products increases.
Main advantages:
- durability – up to 10 years of continuous glow;
- durability - not afraid of shocks and vibrations;
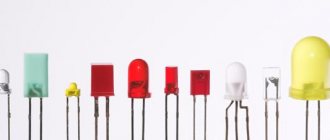
- variety - many standard sizes and colors of light;
- low energy consumption - about 10 times more economical than a conventional light bulb with similar characteristics;
- fire safety - due to low energy consumption they do not overheat, therefore they are not capable of causing a fire.
LED (light emitting diode) is an abbreviation for light emitting diode. From the school physics course we know that it is polar. Therefore, the LED will not work if the polarity is not observed, and there is also a possibility of it burning out (breakdown will occur). The reverse breakdown voltage of the semiconductor structure is 4-5 volts. At the same time, it can still work if connected correctly, but destructive processes will begin in it, which will significantly reduce its service life.
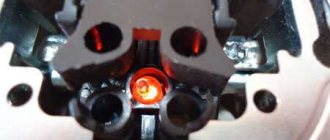
LED element close up
Simply put, a light-emitting diode (LED) is a semiconductor device that glows when electric current passes through it. Because light is generated in a solid semiconductor material, LEDs are described as solid-state devices. The term "solid-state lighting" distinguishes this technology from other sources that use heated filaments (incandescent and tungsten halogen) and discharge (fluorescent) lamps.
How to choose an LED to connect to 12 volts
The required type of diodes is selected based on specific tasks. There are many options on the market, from indicator to heavy duty. To illuminate buttons and indicators on the instrument panel in a car, you can use low-power diodes. To illuminate the interior of an apartment or car, simple, super-bright ones are used. For installation in head optics, daytime head lights of cars or flashlights, powerful LEDs are installed.
From a technical point of view, there are no restrictions on power and current consumption. The main thing is that the diode voltage does not exceed the voltage of the power source.
An important factor is the size and shape of the case. Depending on the purpose, diodes in a round case or surface-mounted parts (SMD) can be used. It all depends on the needs and tasks.
Connection options
It's time to familiarize yourself with the main connection options.
To one resistor
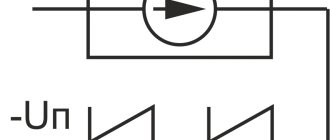
Typical connection diagram.
As we already found out above, the LED has polarity. Therefore, it is connected to a DC power source. The most common types consume about 10-20 mA. In fact, this is the main characteristic of the part. The second parameter indicates the voltage drop. For conventional LEDs it is in the range of 2-4 V.
The only correct connection diagram is with a current-limiting resistor. It is selected according to Ohm's law. Resistance is calculated as the difference between the source voltage and the voltage drop divided by the product of the maximum diode current and the safety factor (usually 0.75).
Ohm's law: “the amount of current in a section of a circuit is directly proportional to the voltage applied to that section and inversely proportional to its resistance.”
It is also necessary to calculate the power of the resistor. It is calculated using a simple formula: the difference between the source voltage and the voltage drop squared, divided by the resistance in ohms.
Daisy chain connection of several LEDs
Schematic diagram of serial connection.
Serial connection is the installation of two or more LEDs in one row. This circuit also uses one current-limiting resistor. The calculation formula is similar for a single diode, but the voltage drop is summed up.
For example, let's take our theoretical white LED of 3 volts and 20 mA. We connect three units in series. Thus, the sum of our voltage drop will be 9 volts. We divide the remainder of three volts by a current of 0.02 amperes with a safety factor of 0.75. As a result, we find out that we need one 200 Ohm resistor.
Each diode to a separate resistor
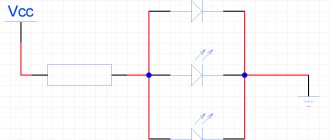
Schematic diagram of parallel connection.
In this circuit, each LED is connected to the plus and minus of the power source. Despite the fact that you can find circuits with one common resistor on the Internet, in practice such a solution is impractical. Even within the same batch, diodes differ in terms of current consumption and voltage drop. As a result, we will get different glow intensities of the diodes. Resistance is calculated for each diode separately.
Features of connecting LEDs
In most cases, plug-in LEDs require current limiting using resistors. But sometimes it is quite possible to do without them. For example, flashlights, keychains and other souvenirs with LED bulbs are powered by directly connected batteries. In these cases, the current limitation occurs due to the internal resistance of the battery. Its power is so low that it is simply not enough to burn the lighting elements.
However, if connected incorrectly, these light sources burn out very quickly. A rapid drop in the brightness of the glow is observed when normal current begins to act on them. The LED continues to glow, but it can no longer fully perform its functions. Such situations occur when there is no limiting resistor. When power is applied, the lamp fails in just a few minutes.
One of the options for incorrect connection to a 12-volt network is to increase the number of LEDs in the circuits of more powerful and complex devices. In this case, they are connected in series, based on the battery resistance. However, if one or more light bulbs burn out, the entire device fails.
There are several ways to connect 12 volt LEDs, the circuit of which allows you to avoid breakdowns. You can connect one resistor, although this does not guarantee stable operation of the device. This is due to significant differences in semiconductor devices, despite the fact that they may be from the same batch. They have their own technical characteristics, differing in current and voltage. If the current exceeds the rated value, one of the LEDs may burn out, after which the remaining light bulbs will also fail very quickly.
How to connect to 12 volts
Visual connection diagram.
The diagram for connecting an LED to a 12 V power source does not differ from the standard one, but it is necessary to calculate the resistance and power of the resistor. To check or pre-test the assembly, one 1 kOhm resistor is sufficient.
For example, let's take the most common type of LED - white with a maximum current of 20 mA. In fact, voltage does not play a special role. The main thing is that the current does not exceed the maximum permitted parameters. The voltage drop, depending on the model, ranges from 1.8 to 3.6 V. For ease of calculation, let’s take 3 volts.
Resistance for LEDs
Formula for calculating resistance.
We calculate the parameters:
- The difference between the power supply voltage and the voltage drop is 12-3=9.
- The product of the maximum current (amperes) and the reliability factor is 0.02*0.75=0.015.
- We calculate the resistance (kOhm) – 9/0.015 = 600 (kOhm).
Formula for calculating power.
Resistor power calculation:
- The difference between the power supply voltage and the voltage drop is 12-3=9.
- According to the formula, we square it – 9*9=81.
- Divide by the resistance of the resistor in ohms - 81/600 = 0.135 W.
Thus, the MRS25 resistor (0.6 W, 600 Ohm, ± 1%) is ideal for us. As of mid-2021, its cost is about 8 rubles. There is usually no need to calculate the power of the resistor. However, it is important to do this to test a future build.
Calculation of LED connections in 12 and 220 volt circuits
A separate LED cannot be connected directly to a 12V power source because it will burn out immediately. It is necessary to use a limiting resistor, the parameters of which are calculated using the formula: R= (Upit-Upad)/0.75I, in which R is the resistance of the resistor, Upit and Upad are the supply and drop voltages, I is the current passing through the circuit, 0.75 – LED reliability coefficient, which is a constant value.
As an example, we can take the circuit used to connect 12-volt LEDs in a car to a battery. The initial data will look like this:
- Upit = 12V – voltage in the car battery;
- Upad = 2.2V – LED supply voltage;
- I = 10 mA or 0.01A – current of a separate LED.
According to the formula above, the resistance value will be as follows: R = (12 – 2.2)/0.75 x 0.01 = 1306 ohms or 1.306 kohms. Thus, the closest would be a standard resistor value of 1.3 kOhm. In addition, you will need to calculate the minimum resistor power. These calculations are also used when deciding how to connect a powerful LED to 12 volts. The actual current value is preliminarily determined, which may not coincide with the value indicated above. For this, another formula is used: I = U / (Rres. + Rlight), in which Rlight is the resistance of the LED and is defined as Up.nom. / Inom. = 2.2 / 0.01 = 220 Ohm. Therefore, the current in the circuit will be: I = 12 / (1300 + 220) = 0.007 A.
As a result, the actual voltage drop of the LED will be equal to: Udrop.light = Rlight x I = 220 x 0.007 = 1.54 V. The final power value will look like this: P = (Usupply - Udrop)² / R = (12 - 1.54)²/ 1300 = 0.0841 W). For practical connection, it is recommended to increase the power value slightly, for example to 0.125 W. Thanks to these calculations, it is possible to easily connect the LED to a 12 volt battery. Thus, to properly connect one LED to a 12V car battery, you will additionally need a 1.3 kOhm resistor in the circuit, the power of which is 0.125 W, connected to any contact of the LED.
Connecting powerful LED diodes to 12V
When connecting modern powerful crystals or their assemblies, the principle does not change. A quenching resistor must also be present in the circuit. For example, you can take the LED, which is popular on Chinese trading platforms. This is an assembly of several crystals connected in parallel. The current consumption is 350 mA, and the voltage is still 3.4 volts.
Substituting the parameters into our formula, we can easily find out that we will need to install a resistor with a resistance of 32 Ohms and a power of 2.2 W.
Effective connection to one IP
We have already found out above that an unlimited number of LEDs can be powered from one power source. The main thing is that there is enough power. However, simply connecting bulbs in parallel with a resistor for each is ineffective. From the previous paragraph we saw that more than 2/3 of the power is dissipated in the current-limiting resistor. Therefore, the question often arises of how many LEDs can be connected to 12 V.
The most effective connection to 12 volts is considered to be a chain of three serial LEDs with one resistor. All LED strips powered by a 12 V power supply are produced using the same scheme.
How to connect LED to 3 or 5 volts
Most low-power LEDs operate normally at 3 and even more so at 5 volts. You can calculate current-limiting resistances for them using the above formula.
When manufacturing structures with autonomous power supplies, especially if they use ultra-bright “powerful” LEDs, this approach is not acceptable. The power dissipated by the quenching resistor significantly reduces the operating time of the device.
Therefore, modern hand-held flashlights powered by low-voltage batteries use electronic voltage converters - drivers. Losses in drivers are much lower than in current-limiting resistors. Drivers are now available and can be easily found in stores.
Having some knowledge of electronics and skills in working with a soldering iron, you can make a simple driver yourself. One of the simple converter circuits for a high-power LED is shown below.
Connection problems
Schematic diagram of connecting LEDs.
Schematic diagram for connecting LEDs:
- Do not use a current limiting resistor. Since too much current will flow through the LED, it will soon fail.
- Series connection without resistor. Even if you think that feeding four 3-volt resistors to a 12-volt network is a good idea, you are mistaken. Due to poor current control, elements are quickly destroyed.
- Using one resistor when connecting diodes in parallel. Due to differences in characteristics, the diodes will shine with different intensities. The rate of destruction increases.
We recommend watching a video on the topic: Correct connection of LEDs.
Connection principles
Volt-ampere characteristics of an LED
To install LED lamps, there are several important principles that should be followed:
- It is important to observe polarity when connecting the LED. Otherwise, it will fail faster or will not light up at all.
- The location of the anode and cathode is indicated on the bulb base in the form of notches and green dots.
- It is prohibited to mount lamps of different colors in series in one line and on one resistor. This affects their performance and, in principle, their glow.
- Information about polarities can be found in the LED technical documentation.
For every 12 V you can connect no more than 6 LEDs.