How to find out the voltage drop?
In order to determine how many volts an LED is, you can use theoretical and practical methods. They are both good and are used depending on the situation and the complexity of the device under test.
Theoretical method
To analyze the characteristics of an LED in this way, a big clue is provided by the dimensions of the device, the color and shape of its body. Impurities of various chemical elements cause the crystals to glow from red to yellow. Of course, if the color of the case is visible, then you can determine some parameters of the LED by its appearance. But if it is transparent, you will have to use a multimeter. We set the tester to “open” and touch the LED terminals with the probes. The current passing through the LED causes the crystal to glow faintly.
These products contain various semiconductor metals. This factor affects the voltage drop across the pn junction. To indicate such characteristics, regardless of the brand and manufacturer of the LED, they are painted in different colors. But it’s worth knowing that it will be incorrect to say specifically how many volts an LED is, based only on its color. The colors of these instruments provide approximate values for measurements. Approximate color parameters are given in the table.
The forward voltage of the LED is not affected by the dimensions or variations of the housing, but the number of crystals that emit light and are connected in series may be visible. There are types of SMD elements where the phosphor hides a chain of crystals.
Three white crystals are connected in series in the SMD LED housing. They are most often used in 220 V lamps made in China. Due to the fact that such LEDs begin to react only from 9.6 volts, it will not be possible to test them with a multimeter, since its battery is designed for 9.5 V.
Theoretically, you can use the Internet by downloading a special datasheet program, in the search engine of which you can enter the known parameters of the LED and its color. This will allow you to find approximate specifications where voltage drop and current values may not be accurate.
Practical method
Doing the testing in a hands-on manner allows you to obtain the most accurate current and voltage drop values. The characteristics of the device calculated in this way allow it to be used safely and for a long time for its intended purpose. To obtain unknown parameters, you will need a voltmeter, a multimeter, a power supply rated for 12 V, and a resistor of 510 Ohms.
The measurement principle is similar to that described above for testing an LED for rated current. It is necessary to assemble a circuit with a resistor and a voltmeter, and then gradually increase the voltage until the crystal begins to glow. When the brightness reaches its highest point, the readings slow down. You can read the nominal voltage of the LED from the screen.
At 1.9 volts there may be no glow. In this case, the infrared diode is often checked. To clarify this, you need to transfer the emitter to a telephone camera. If a white spot is visible on the screen, then this is an infrared diode.
If it is not possible to use a constant 12 V power supply, you can use a Krona battery rated at 9 volts. In the absence of the above power sources, a mains voltage stabilizer is ideal, which can produce the required rectified voltage, you just need to recalculate the resistance value of the resistor involved in the circuit. In this case, you also need to increase the voltage until the LED lights up. The voltage at which the glow occurs will be the nominal voltage for which it is designed.
If the characteristics of the LED are unknown, it is imperative to calculate its rated current and voltage drop to prevent rapid failure.
How to find out which LED is in the lamp
The easiest option is if the lamp is fully operational. In this case, you just need to measure the voltage drop across any of the elements. If, when power is applied, one or more elements do not light up (or all), you need to go a different way.
If the lamp is built according to a circuit with a driver, then the output voltage is indicated on the driver in the form of upper and lower limits. This is due to the fact that the driver stabilizes the current. To do this, he needs to change the voltage within certain limits. You will have to measure the actual voltage with a multimeter and make sure it is normal. Next, visually (using the tracks of the printed circuit board) determine the number of parallel chains of LEDs in the matrix and the number of elements in the chain. The driver voltage must be divided by the number of elements connected in series. If the voltage on the driver is not indicated, then it can only be measured after the fact.
Driver for operating current 300 mA and output voltage 45-64 V.
Starikov Mikhail
Senior Electronics Engineer
Ask a Question
This method gives an accurate result only with a fully working lamp. If some of the elements (or all of them) do not burn, then to stabilize the current, the driver will reduce or increase the voltage within 10%. For practical purposes, such an error may be sufficient, but this must be kept in mind.
If the lamp is built according to a circuit with a ballast resistor and its resistance is known (or it can be measured), then the LED voltage can be determined by calculation. To do this you need to know the operating current. In this case, you need to calculate:
- voltage drop across the resistor – U resistor = I work * R resistor;
- voltage drop across the LED chain – Uled=Usupply – Uresistor;
- divide Uled by the number of devices in the chain.
If Irab is unknown, it can be taken equal to 20-25 mA (a circuit with a resistor is used for low-power flashlights). The accuracy will be acceptable for practical purposes.
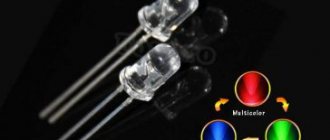
Types of LEDs
- Through-hole LEDs: These are available in a variety of shapes and sizes, and the most common are 3mm, 5mm, and 8mm LEDs. These LEDs are available in various colors such as red, blue, yellow, green, white, etc.
- SMD LEDs (Surface Mount LEDs): Surface Mount LEDs are special packaging that can be easily installed on a PCB. SMD LEDs typically vary depending on their physical dimensions. For example, the most common SMD LEDs are 3528 and 5050.
Bi-color LEDs. The next type of LED is bi-color LED, as the name suggests, it can emit two colors. Bi-color LEDs have three terminals, usually two anodes and a common cathode. Depending on the wire configuration, the color will be activated.
RGB LED (Red - Blue - Green): RGB LEDs are the most loved and popular among hobbyists and designers. Even computer assemblies are very popular for implementing RGB LEDs in computer cases, motherboards, RAM and so on.
High Power LEDs: An LED with a power rating greater than or equal to 1W is called a high power LED. This is because normal LEDs have a power dissipation of several milliwatts. High-power LEDs are very bright and are often used in flashlights, car headlights, floodlights and so on.
Consumption depending on LED type
Indicative
The current consumption of products of this class does not exceed 20 mA; at a voltage of 3V per hour, the electricity consumption during their operation will be only 0.06 W or a little more than 0.5 kW per year of continuous glow.
Lighting
Unlike indicator models, for models intended for lighting, the area of the pn junction, and, accordingly, the area of the light-emitting surface and brightness, is significantly higher.
The current consumption of the crystal can be 150-300 mA, with a supply voltage of 3.3V this is from 0.5 to 1W. Powerful diodes may contain several elements on one matrix. The power of the LED matrix used in spotlights can reach several hundred watts.
How to determine current parameters for an LED: methods, calculation examples
Determining the parameters of an unknown LED can be done in various ways, based on one or another technique. Some of them are purely mathematical, obtained through calculations based on the data obtained. Other options involve measuring the characteristics of LEDs using special instruments (testers or multimeters).
Why do you need to know the current?
Information about how much current a given LED consumes will allow you to avoid overloads or disruption of the operating mode when operating the lamps. A slight decrease in voltage helps to extend the service life, but exceeding the parameters sharply accelerates the failure of individual elements or the entire circuit.
If you are assembling a circuit from a large number of lamps, be sure to measure the current strength and compare the obtained value with the passport data. If the specified 20 mA is exceeded, it is necessary to increase the damping resistance (select resistors with a higher value). If the current in the circuit turns out to be slightly less (about 18 mA), then nothing needs to be corrected. This value will not significantly reduce the brightness of the glow, but will soften the operating mode and increase the service life of the lamps.
Methods for determining current, voltage and other parameters
Not everyone knows how to determine the current and other parameters of an unknown LED. There are different options that require certain knowledge and practical training, or simply the presence of a measuring device. The accuracy and correctness of testing the device depends on the methodology used. Users usually resort to the simplest and most accessible method for determining performance characteristics, although this may not be the most effective. The following options are known:
- measurement with special devices (multimeter);
- calculation of parameters using theoretical techniques;
- visual identification of LED type.
The choice of one or another type of verification is determined by the capabilities and level of training of the user. Let's take a closer look at them.
Multimeter
There are two main operating parameters to be measured by the tester:
- operating current;
- forward voltage drop.
It is necessary to correctly identify the anode and cathode. Elements of a conventional design (with long legs) have a longer anode. On parts soldered into the circuit, the test is performed by sequentially changing the polarity, if it was not determined correctly the first time. On the multimeter, the switch is set to the appropriate position:
- DCV - DC voltage measurement;
- DCA - DC current measurement up to 200 mA.
The tester's readings provide fairly accurate data, limited only by the inherent error of the device. The value of this method lies in the direct measurement of the device under specific conditions. The data displayed on the display allows you to draw conclusions about the operating mode and state of both the LED itself and the entire circuit.
According to Ohm's law
The theoretical method for determining parameters is convenient in that it allows you to do without the use of instruments and determine how many volts are in the LED purely by calculation. The check consists of calculating the parameters using the well-known formula:
Or, more simply, voltage is equal to current times resistance.
By appearance
Visual determination of parameters is a very dubious exercise, giving a minimal and not always correct concept. However, in situations with LEDs, external signs can sometimes provide quite reliable information.
For example, a blue tint in a working element indicates that the supply voltage is too high. The forward voltage drop of LEDs is usually within certain limits that provide a given element color.
A change in mode may indicate the absence (or short circuit) of a quenching resistor in the circuit.
Accurate power determination
You will need:
- Multimeter
- Power supply in which you can smoothly increase the voltage
- 500 ohm resistor
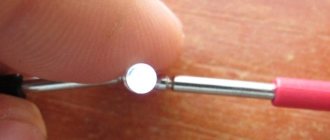
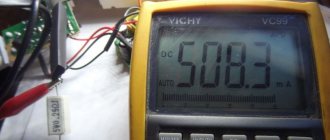
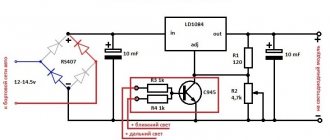
This technique is not applicable to laser LEDs! Connect the LED to the resistor and power supply. Observe polarity! It can also be determined using a multimeter. Smoothly increase the voltage on the power supply, comparing the readings on it and on the LED. It will be more convenient to use a power supply that shows the operating voltage, or use two voltmeters. What will happen? the initially identical voltage will gradually change on the block and the LED. It is important that the LED glows at normal brightness.
Let’s see how to check the performance of an LED with a multimeter in practice. To do this, we need to connect an regulated power supply with a constant voltage of up to 12V, a multimeter (voltmeter), a 580 Ohm resistor (more is possible - it doesn’t matter).
Basically the circuit works as follows: the resistor limits the current, the voltmeter will directly monitor the forward voltage drop. When the voltage from the power source gradually increases, it is necessary to observe the voltage reading on the voltmeter (multimeter). As soon as the threshold is reached, the LED itself will begin to glow. When the maximum values are reached, the readings on the multimeter will stop increasing sharply, which will mean that the pnp junction is open and the voltage will now be applied only to the resistor. The current reading will be the rated forward voltage of the LED. If the power is not interrupted, the current flowing through the semiconductor will increase. Excess current will lead to overheating of the LED (crystal) and breakdown.
How to determine the polarity of an LED - 2 simple ways
LED is a semiconductor optical device that transmits electric current in the forward direction. When connected inversely, there will be no current in the circuit, and, naturally, no glow will occur. To prevent this from happening, you need to maintain the polarity of the LED.
The LED in the diagram is indicated by a triangle in a circle with a crossbar - this is the cathode, which has a “-” (minus) sign. On the opposite side there is an anode with a “+” (plus) sign.
LED designation in the circuit
Wiring diagrams must include a pinout (or pinout) to identify all connection contacts.
How to determine the polarity of a diode while holding a tiny light bulb in your hands? After all, for a correct connection you need to know where it is minus and where it is plus. If the pinout is mixed up, the circuit will not work.
Visual method for determining polarity
The first method of determination is visual. The diode has two terminals. The short leg will be the cathode; the anode of the LED is always longer. It’s easy to remember, since the initial letter “k” is present in both words.
LED Lead Length
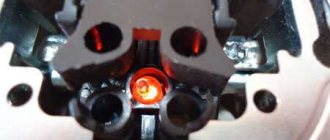
When both pins are bent or the device is removed from another board, their length can be difficult to determine. Then you can try to see a small crystal in the case, which is made of transparent material. It is located on a small stand. This pin corresponds to the cathode.
Also, the LED cathode can be identified by a small notch. New models of LED strips and lamps use surface-mount semiconductors. The existing bevel key indicates that this is a negative electrode (cathode).
Sometimes LEDs are marked “+” and “-”. Some manufacturers mark the cathode with a dot, sometimes a green line. If there is no mark or it is difficult to see because the LED was removed from another circuit, you need to test.
Testing with a multimeter or battery
It's good if you have a multimeter at hand. Then the polarity of the LED will be determined in one minute. Having selected the ohmmeter mode (resistance measurement), it is easy to perform the following action. By applying the probes to the legs of the LED, the resistance is measured. The red wire should be connected to the positive, and the black wire to the negative.
When turned on correctly, the device will produce a value approximately equal to 1.7 kOhm, and a glow will be observed. When turned back on, the multimeter display will display an infinitely large value. If the test shows that the diode shows low resistance in both directions, then it is broken and should be discarded.
Determining LED polarity using a multimeter
Some devices have a special mode. It is designed to check the polarity of the diode. Direct switching will be signaled by a backlit diode. This method is suitable for red and green semiconductors.
Blue and white LEDs only provide an indication at voltages greater than 3 volts, so the desired result cannot be achieved. To test them, you can use multimeters like DT830 or 831, which have a mode for determining the characteristics of transistors.
Using the PNP part, one lead of the LED is inserted into the collector socket, the second into the emitter hole. In case of direct connection, an indication will appear; inverse connection will not give a similar effect.
How to determine the polarity of an LED if you don’t have a multimeter at hand? You can resort to a regular battery or accumulator. For this you will need any other resistor. This is necessary to protect the LED from breakdown and failure. A series-connected resistor, the value of which should be approximately 600 Ohms, will limit the current in the circuit.
Checking polarity using the power supply
And a few more tips:
- If the polarity of the LED is known, it is no longer possible to apply reverse voltage to it. Otherwise, there is a risk of breakdown and failure. With proper use, the LED will serve well, since it is durable, and its housing is well protected from moisture and dust;
- Some types of LEDs are sensitive to static electricity (blue, violet, white, emerald). Therefore, they need to be protected from the influence of “statics”;
- When testing an LED with a multimeter, it is advisable to perform this action quickly; touching the terminals should be short-term in order to avoid breakdown of the diode and its failure.
How to find out what voltage an LED is designed for
All of the above applies to conventional LEDs operating without additional built-in elements. Existing technologies allow additional components to be built into the device body. For example, quenching resistors. This is how LEDs are produced for higher voltages - 5.12 or 220 V. It is almost impossible to visually determine the ignition voltage of such devices . Therefore, there is only one way left.
If the previous methods did not produce results and you are sure that the LED is working, you should try applying increased voltage to it. First, 5 V, then increase the voltage to 12 V; if there is no result, you can try increasing it further, up to 220 V. But it is better not to experiment to such values - this voltage is dangerous for humans. In addition, in case of an error, the LED housing can be destroyed. This may cause a slight bang, melting of the wire insulation, fire, etc. Nowadays, technology has come a long way, and LEDs are not so expensive that you would risk your equipment and health because of it.
Advantages
In a short amount of time, super-bright and other diodes have become quite popular and in demand in various fields. The reason lies precisely in the advantages, which we will now consider.
- Energy efficient products. Among all available light sources, this type is considered the most economical. Typically, the use of diodes can reduce electricity demands by up to 80%. The ultra-bright white LED consumes the most compared to the others.
- The product can work for a long time without requiring special maintenance or preventive inspection.
- The diode is not very selective with regard to temperature conditions. Therefore, it can be used in any conditions.
- If you need a light source that is protected from moisture and can withstand impacts, then there are such models among super-bright diodes.
- The product does not heat up during operation. The only thing you need to keep an eye on is the power supply. It is he who takes the entire load and heats up.
Technical characteristics of LED strip
When choosing, the consumer takes into account the dimensions of the strip product, power, voltage, type of LEDs, their number per meter, color, cutting capabilities.
Operating voltage
The first LED strips were produced with 12 V drivers. After the advent of powerful chips, 24 and 36 V strips began to be produced to avoid overheating of the printed circuit board and burnout of conductive threads by reducing the current on each chip. Then varieties appeared that operate from the mains through a rectifier, diode bridge and connector.
Type of diodes and number of LEDs per 1 meter
Dependence of power on types of LEDs and quantity on the meter
| LED type | Size(mm) | Number of diodes per meter (pcs.) | LED Power (W) | Power 1 m (W) |
| SMD 3528 | 3.5 x 2.8 | 30 | 0,08 | 2,4 |
| 60 | 4,8 | |||
| 120 | 9,6 | |||
| SMD 5050 | 5 x 5 | 30 | 0,24 | 7,2 |
| 60 | 14,4 | |||
| 120 | 28,8 | |||
| SMD 3014 | 3x1.4 | 60 | 0,1 | 6 |
| 120 | 12 | |||
| 240 | 24 |
Glow color
The RGB+White canvas is two-row, the glow temperature of the white row can reach 6000 Kelvin. White color makes it possible to dilute the glow intensity of RGB diodes to obtain soft pastel shades. This lamp can be used as a source of main lighting if you turn off the RGB row.
White-MIX canvas is ideal for illuminating interior items. Chips with different light temperatures make it possible to make transitions from cold to warm glow. White-D-MIX tape is made from SMD 3528, there are 2 types of phosphors in one chip, the tones are mixed evenly. White-TRIX canvases are distinguished by a white board; channels with cold, daylight and warm light are controlled separately.
SPI (dynamic) tapes are rarely used in everyday life. For them, “Running Fire” controllers are produced, which allow you to create various dynamic color effects. Similar products are chosen for restaurants and bars. Pixel Light RGB strips are connected through controllers that can control each chip. These products are used to create 2D screens to display video effects.
DIP-LED strips are used outdoors to illuminate facades, signs, and vehicles. Based on the principle of operation, blades made of SMD 335 with side radiation are similar to it. For both products, the beam extends parallel to the board, which is convenient for illuminating individual objects.
Base color
The base of any LED strip is covered with glue
If a decorative profile is not used during installation, it is important to choose an LED strip with a base color that matches the color of the interior
There are several types of base:
- transparent;
- white;
- gray;
- brown;
- black.
Security class
Strip LED products with protection class IP20 are suitable for use in heated, dust-free rooms with normal humidity levels.
IP54 and IP65 are afraid of sub-zero temperatures; for outdoor use you need to choose a product marked IP67. IP68 is used to indicate maximum protection. Products with this marking are suitable for bathtubs and fountains, they can even be placed in an aquarium.
Cutting parameters
Cutting lines (scissor icons) are indicated throughout the strip. On a canvas made of SMD 3528, the distance between them is 5 cm, from SMD 5050 - 10 cm.
On tapes powered by 220 V, 60 chips are connected in series. Such a strip can be cut into pieces 50 cm long (if the density is 120 pieces per 1 m) or 1 m (if the density is 60 pieces per 1 m).
Related Posts
- Parameters and characteristics of LED 2835 smd led
- Checking the LED strip for functionality. troubleshooting
- Calculation of a resistor for an LED: how to choose a current-limiting element
- Calculation of resistor resistance for LEDs: online calculator
- LED Polarity Determination
- Types, characteristics and features of LED strips
- Resistor resistance
- How to use a multimeter correctly
- Correct choice of current transformer according to GOST
- Calculation of the resistance of parallel connection of resistors
- Why is the LED lamp blinking?
- Features of parallel and serial LED connections
- Adjustable voltage stabilizer
- Advantages of using LED strip for plant growth and development
- How to check basic battery parameters with a multimeter
- Instructions for installing LED strip on the ceiling
- Surge protection: overview of available options and effective devices (90 photos)
- Two time relay circuits with turn-off delay for 220V
- Do-it-yourself powerful voltage stabilizer: circuit diagrams + step-by-step assembly instructions
- How to check grounding
- DIY repair instructions for a 220V LED lamp
- How pulse voltage converters work (27 schemes)
- Uninterruptible power supplies for heating boilers of any type
- Current and voltage transformers
- DIY LED phytolamp for seedlings
Read with this
- Parameters and characteristics of LED 2835 smd led
- Checking the LED strip for functionality. troubleshooting
- Calculation of a resistor for an LED: how to choose a current-limiting element
- Calculation of resistor resistance for LEDs: online calculator
- LED Polarity Determination
- Types, characteristics and features of LED strips
- Resistor resistance
- How to use a multimeter correctly
- Correct choice of current transformer according to GOST
- Calculation of the resistance of parallel connection of resistors
Main characteristics
Technical parameters of LEDs differ depending on the model. General indicators are:
- current consumption;
- nominal voltage (product voltage);
- power of consumed electricity (volt-ampere diagram);
- glow temperature;
- luminosity (level of luminous flux).
There are other characteristics, but they are used in rare cases. For domestic use, it is enough to take into account only these LED parameters.
LED current consumption
The indicator allows you to find out the amount of current consumed electrically by a device (LED). For devices with one active crystal, a value of 0.02A is sufficient. If the quantity is greater, the characteristic increases by a multiple of the number of elements. Based on this parameter, a resistor (stabilizer) is selected, which is installed at the input.
The stabilizer allows you to keep the device in working condition during voltage drops, regardless of the reason. Moreover, fluctuations in the LED current change the color temperature of the light from warm to brighter, cooler. If the voltage surge is significant, without an additional resistor the diode will burn out instantly.
To choose the right stabilizer for current conversion, you can use a special online calculator.
Rated voltage
The magnitude of the voltage is the amount of current in the conductor at the output.
For the manufacture of LEDs, different materials are used, the electrical characteristics of which directly affect the level of permissible voltage and the color of the lighting. Thanks to this dependence, you can find out what voltage specific LEDs are designed for, even “by eye”. For example, if the glow is yellow or red, the voltage is in the range of 1.9-2.5 Volts, blue - about 3 Volts. The current and voltage indicators of the LED must match. Otherwise, the diodes will either burn out quickly or will not produce light at the declared level.
To find out how many volts an LED is, you can use a multimeter or determine by the color of the glow. For the first method, you will need a multimeter and a resistor - the value will appear on the display after assembly.
Light diode resistance
The final resistance depends on the electrical circuit into which the element is connected. The same LED can show different values. For example, at the input - about 1 kOhm, at the output - several MOhms. However, resistance is not a linear characteristic. The indicator is inversely proportional to the voltage supplied to the mains. The higher the LED supply voltage, the lower the resistance level of the device.
Light output and beam angle
Comparing the light output of different lamps is quite difficult. For example, a 5 mm LED produces 1-5 Lm of light, and a 70 W incandescent lamp produces 750 Lm. The dispersion angle is selected based on the area of the room. In the corridor, a 30° diode is enough; in a room it is better to use elements of 90-120° or several at the same time. The maximum angle of LED lamps is 120°. The most illuminated place is the center; light scatters towards the periphery.
LED lamp power
The diode power depends on several related indicators. For LEDs, the value ranges from 0.5 to 3 W. It is calculated according to Ohm's law: it is necessary to multiply the values of current and voltage. The current-voltage characteristic (volt-ampere characteristic) of the LED is also determined.
The choice of power supply for the device depends on the power level and current-voltage characteristics of the LED. It is not allowed to use inappropriate elements - the lamps will burn out if the voltage and current supply are excessive.
Colorful temperature
This indicator is similar to the characteristics of other lighting devices, especially LED fluorescent devices. The temperature of the LED is indicated in K (Kelvins); sometimes on the packages there is a corresponding diagram - a scale on which the range is indicated in color. Matching light and meaning:
- 2700-3000 – warm, yellowish;
- 3500—4000 – daytime, neutral;
- 5500-7000 – cold, with a blue tint.
The main shades are presented. In practice there are much more colors. The temperature is selected based on the purpose of the room, the required level of comfort and user preferences. For example, it is recommended to install lamps with warm light in the bedroom, and with a natural shade in rooms without windows.
LED element chip size
When purchasing, you can find out the chip size only from the information on the packaging. You will not be able to independently verify the correctness of the specified data. Average device sizes: 45×45 ml, 24×40 ml and 24×24 ml for 1W, 0.75W and 0.5W, respectively. In the usual measurement system, 30×30 ml is equal to 0.76×0.76 mm. Due to its small size, you can find out the exact dimensions by disassembling the device completely.
The number of chips (crystals) varies, depending on the model and type of LED. In color elements (RGB), which do not contain a phosphor coating, their number can be counted.