Parameters and appearance of an LED floodlight with a sensor
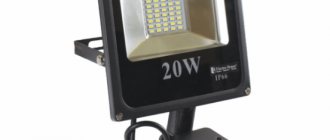
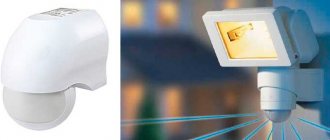
So, I need to install an outdoor LED floodlight (lamp) with a motion sensor, the box for which is shown in the first photo.
Here are the parameters of a floodlight with a sensor type LL-222:
2_Parameters of the floodlight with sensor LL-222
And here are the instructions:
3_Instructions for use of the floodlight with sensor
The assembled spotlight itself looks like this:
4_LED street floodlight LL-222 with motion sensor_appearance
5_Spotlight - rear view
6_LED spotlight_fastening and adjustments
Please note that the mounting strip (bracket) must be unscrewed before installation. In my case, this required an M8 key and quite a lot of force. Couldn't unscrew it with pliers.
How to connect a lighting fixture
Motion sensor for alarm
Before connecting the photo relay to the lighting, you should make sure that the following rules are observed.
- The installation location is determined. For this purpose, power line supports, roof gables, fence posts, and walls of high-rise buildings can be used. The devices are secured using screws, ties, cables, and brackets. It is necessary that the device is protected from easy access.
- The coverage area of the photosensor is checked for compliance with the area of the area that needs to be illuminated.
- The possibility of access to the lighting fixture for repair or adjustment is checked.
The photosensor is connected to the lamp using three single-core wires. Usually a section of 1.5 mm² is sufficient for this. The terminal block of the device from the electrical network to the corresponding contacts (indicated by the letters “L” - line and “N” - neutral) two wires are connected. A separate wire is provided for grounding. The power cable from the sensor (connected to the third terminal) is connected to one of the lamp terminals. The neutral wire is connected to the lamp from the corresponding terminal of the photo relay. The screws must be tightened tightly.
Important: floodlights with motion sensors are connected to the network through an automatic switch, the current rating of which is selected according to the power consumption of the lighting device. The machine is mounted in a break in the phase supply wire of the network.
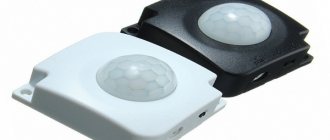
Adjusting and configuring the motion sensor
To adjust the moment and time of turning on the spotlight, two regulators are used, shown larger below:
7_Motion sensor adjustment controls
1. Light adjustment (DayLight control, left)
In the extreme left position (when rotated clockwise), the motion sensor will only work at night. This is necessary when installing a floodlight with a motion sensor for street lighting. What is it, in fact, intended for?
In the extreme right position of the dimmer, the sensor will turn on at any time of the day, in any light level. This is necessary when the spotlight is installed in a room where the sun practically does not penetrate.
2. Adjusting the on time (Time regulator)
Everything is simple here: the regulator is clockwise all the way - the switching time is maximum (can reach 10-15 minutes in different sensor models). Counter-clockwise regulator – the sensor activation time after activation is about 20-30 seconds.
The instructions for the sensor (above, in photo 3) do not contain this data, but it’s not difficult to figure it out yourself.
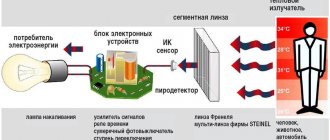
The principle of operation of a motion sensor on the street
Having gained popularity in the security industry, motion sensors are actively being introduced into everyday use. Thanks to it, lamps and household appliances work as needed, eliminating unnecessary waste of electricity.
The operating principle of an outdoor motion detector is to supply power to the lamp when a subject moves through a certain area. Ultrasonic, microwave and infrared devices are used as sensors. The last type is most widespread in everyday life, since it is the safest.
Technical features for the street
The automatic lighting system for the local area retains generally accepted principles, which are complemented by the following features:
- Uninterrupted operation in a wide range of humidity and temperatures.
- Increased controlled area.
- Turn off time delay.
- Availability of a day/night sensor.
- No sources causing false alarms.
- Autonomous power supply.
In addition to resistance to environmental changes, street lighting devices must be equipped with protection from vandals, birds, animals and insects.
Achievable goals and what benefits we will get from using them
The motion sensor included in the street lighting circuit ensures energy savings without compromising comfort. A device connected to a smart home system allows you to remotely control your home environment. A suddenly turned on light warns the actions of intruders and informs both the owners and residents of neighboring houses about a late visit.
Most outdoor floodlights with motion sensors are equipped with LED or halogen lighting sources. The use of incandescent lamps is not advisable. Frequent switching on and off negatively affects their resource.
Self-installation of floodlights with sensors
Industrial samples of lighting devices with motion detectors do not create difficulties during installation and connection. With skillful hands and knowledge of electrical engineering, plumbing, and tools, installation does not require the presence of specialists and can be done independently.
Before installing a street floodlight with a motion sensor, you need to make sure of the configuration, assemble the circuit and check its functionality. Then the device is disassembled and installed.
The procedure includes several stages:
- Selecting a location for the lamp and motion sensor, followed by mounting in standard places.
- Wiring and connection of electrical wires.
- Settings.
- System testing.
To avoid electric shock, installation and maintenance work on lamps with a motion detector is carried out with the power turned off (except for adjustments).
Diagrams and videos
Schematic solutions for devices with motion sensors do not differ in variety, except in cases where voltage conversion is necessary.
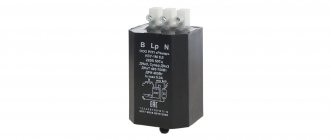
In the standard version, most DDs are equipped with a terminal block on which 3 contacts are located:
- L – phase;
- N – zero;
- A (L out) – load.
To visually identify the wires of a 220V power cable, their insulation is painted in different colors. The phase corresponds to brown or red. The neutral wire is represented in blue. For protective grounding (PE), a yellow-green color is provided.
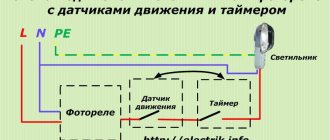
The most common street lighting schemes
The simplest scheme
The sensor terminals are connected to the corresponding network wires and luminaire terminals. In a quiet state, the power supply circuit of the lighting source is broken. When the sensor is triggered, the relay contacts close and the phase is supplied to the lamp (Fig. 1).
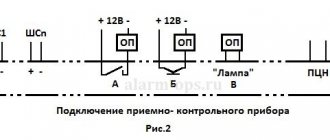
Scheme with disabling the motion sensor
Figure 2 shows a diagram that allows you to forcibly exclude DD from the system. By duplicating the sensor contacts, the switch allows you to supply power to the lighting device, bypassing the detector. This option is relevant when it is necessary to illuminate an object for a long time, as well as when the sensor fails.
Circuit with a common switch
When introducing the switch according to the diagram in Figure 3, the user has the opportunity to completely de-energize the system, which is convenient for preventive maintenance, troubleshooting and replacing lamp lamps.
Circuit with multiple motion sensors
If it is necessary to simultaneously connect two or more motion sensors, use the circuit shown in Figure 4. The detectors are connected in parallel. Triggering of any of them causes the circuit to close and the lighting device to turn on.
Circuit with separate power supply
In addition to the standard 220V power supply, some systems use 12, 24 and 36V lamps. Such parameters are typical for stand-alone devices, as well as for use in places where increased security measures are required. To achieve the result, a converter is introduced into the lighting source circuit (Figure 5).
Each device purchased in an official manner is supplied with instructions with the order and connection diagram. To obtain information about the nuances of installing a floodlight with a motion sensor, you can use the video:
Operating rules
Since a street floodlight with a motion detector is a fully automated system, with proper installation and settings, its operation comes down to periodic maintenance. Maintenance includes cleaning the working surfaces of the detector and light source, checking electrical wiring and contacts, and, if necessary, replacing lamps.
LED floodlight motion sensor device.
I’m just publishing a photo here, since this topic is covered on the site (see links at the beginning of the article).
15_Disassemble the motion sensor
16_Motion sensor power board
This relay (the blue one) most often fails in such a sensor.
18_Control board_rear view_1
19_Power board_view from the solder side_2
If the connection is incorrect (if the pins are mixed up), the tracks on the board under the relay light up, and the relay itself...
Connecting a floodlight with a motion sensor
The explanatory dictionary interprets the word spotlight as “ a device for lighting . ” It consists of lenses and mirrors used to obtain light output at a certain angle.
The floodlight is not used to illuminate the entrances to the house or parking areas, as it is very blinding. In theory, it should turn off even before the high beam headlights reach it.
At the moment, floodlights are also called those lighting devices that illuminate streets at a large angle. The power of such spotlights is completely different - from 10 to 100 watts. They are equipped with motion and light sensors.
In fact, the buyer only needs to connect the cable to the spotlight, and the whole system will work, but the manufacturer reserves the right to set up the user. [ads-pc-1]
Installing a street spotlight with your own hands.
Here we must first of all talk about the unsuccessful, in my opinion, mounting of floodlights with such a design. I'm talking about the bracket (mounting plate) that holds the spotlight. The only advantage of this type of fastening is the possibility of rotation if you fix the bracket only at the central point (through the hole in the middle).
The fasteners that come with these spotlights are completely worthless. It just falls through the holes in the bracket. Therefore, we safely throw away the little bag with Chinese dowels and self-tapping screws, and for reliable installation we will need:
- dowel with a diameter of 6 mm (preferably
 at least 40 mm long - 3 pcs.
 - self-tapping screw with press washer (white, sharp) – 3 pcs.
- reinforced washer (wide) for M5 or M6 – 3 pcs.
This is roughly what it should look like (I was a little confused about the washers; I didn’t have the ones I needed on hand):
20_Floodlight mounting plate
Don't pay attention to the bottom cable in the corrugation, it's not relevant.
We fasten the spotlight to the bracket with bolts (see photos 6, 7). Connect the power.
21_Street floodlight installed
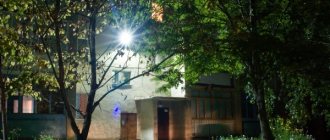
Turn on the power and move:
22_Spotlight in action
The photo was taken at night.
With a consumption of only 10 watts, the brightness is quite sufficient to well illuminate the area in front of the porch.
In conclusion, I recommend using an advanced switching circuit for the motion sensor, which allows you to control such a sensor as you wish.
Varieties
At the moment there are several classifications of spotlights. So, there is a spotlight:
- industrial, street and decorative;
- for underwater, terrestrial, matrix, linear and panoramic lighting;
- LED, halogen and battery.
There is also the following classification: for indoor and outdoor lighting.
LED
The most popular and high-quality light source. Operates for 80 thousand hours. Does not require any maintenance throughout the entire period of use. It is used both in everyday life and in industry and commerce. Due to the high light flux density, it is used to illuminate a large area. The advantages include high efficiency, impact resistance, and safety. The disadvantage is the high cost.
LED apparatus
Solar powered
A modern system that allows you to completely eliminate network energy consumption. The floodlight is complemented by durable or built-in solar panels. They are used both to illuminate the facade of a building and an architectural element, and to maintain security and order in the local area. They work around the clock and autonomously, are very easy to install and maintain, and work regardless of the weather. It has an even and bright light flow and can be installed in any hard-to-reach place.
It is worth noting that during rain the performance of solar panels decreases. Therefore, sometimes the spotlight may turn off. Due to low temperatures, operation failure also occurs. The light becomes dimmer. Another disadvantage is that the equipment is not disassembled. As a result, if one element is damaged, you will need to completely buy new equipment.
Solar powered source
With halogen lamp
The halogen spotlight creates a spot-like, shadow-free lighting appearance that has a warm tint. This device is used to illuminate billboards or building facades. It is also used to illuminate large objects such as dams or bridges. The light bulb in it works the same way as an incandescent lamp. The only difference is the use of halogen instead of mercury. The advantages of such a device are low cost, high reliability and compatibility with dimmers. Disadvantages include high heating and energy consumption.
You might be interested in How to make the desired luminous flux coefficient
There are also metal halide models. They are distinguished by a more powerful light flux, reliability and immunity to network current surges.
Note! They are actively used in commercial activities. They have a long service life.
Motion floodlight with built-in halogen lamps
How to convert a motion sensor into a light sensor
August 20, 2013: Thanks to my reader Vladimir for sending me the photo, which I publish below.
Redesigned motion sensor control board.
It is shown how to convert a motion sensor into a light sensor (light sensor) using jumpers on the board. The description can be read in the comments.
How can you adjust the detector?
In modern motion sensors (MS), you can adjust the sensitivity, illumination, delay time for turning off the light and installation angle.
All these parameters, when properly configured, can save up to 50% of energy, which is a very significant figure. However, it should be immediately noted that not all motion sensors have three controls. In older models, you can adjust only two parameters - delay time and sensitivity, or delay time and light level, as in the photo below:
We recommend viewing the instructions, which explain how the detector works:
Sensor overview
Now we will look separately at how to set up a motion sensor on a spotlight or other type of lamp.