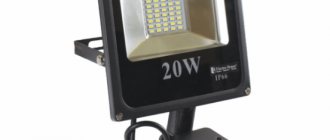
To illuminate an area in a dacha, an approach to an entrance, a tunnel, an arch on the street, to bring light into a garage and other buildings, powerful lighting devices are used - spotlights. Modern technologies make it possible to make this type of lighting economical and automatic. Such problems are solved by connecting a motion sensor to the lighting device. It is not difficult to mount a device that controls the appearance of a person to a lamp. Even a person without special knowledge can perform the work.
Work principles
The main task of the motion sensor is to turn on the spotlight when a person appears in the control zone and turn off the light after a certain period of time until the next time it is turned on. When installed correctly, this system saves up to 70% of energy. In addition, a light device with a sensor that suddenly turns on can scare away uninvited guests, performing a security function.
The lighting device operates by connecting to the power supply if the sensor detects infrared radiation other than the environment. Using a Fresnel lens, the presence of movement in the controlled area is determined. When an object moves, the electrical circuit is closed, turning on the spotlight.
The motion sensor can be purchased separately or together with the lighting fixture. The question of how to connect a motion sensor to a spotlight arises during the initial installation of a lighting device or during the reconstruction of an existing lighting system.
How to install DD to turn on the light: 2 main schemes
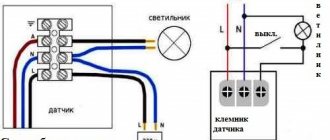
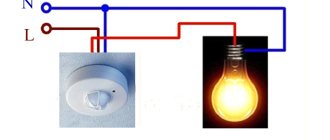
It is recommended to install the sensor-lamp system separately from general lighting. In order for the DD to turn on the light to work instead of a switch, a separate line is installed where only the device and the lamp will work. But often it becomes necessary to include a switch in this circuit. This will allow you to turn off the lighting if necessary.
In the photo: a) connecting the sensor without a switch; b) connection with a switch.
Where can I buy
You can purchase lighting equipment as quickly as possible at your nearest specialty store. The optimal option, in terms of price-quality ratio, remains purchasing from the AliExpress online store. Mandatory long waits for parcels from China are a thing of the past, because now many goods are in intermediate warehouses in destination countries: for example, when ordering, you can select the “Delivery from the Russian Federation” option:
| LED floodlight with motion sensor from 10 to 100 W | Street floodlight with DD and remote control | Solar panel lamp with DD |
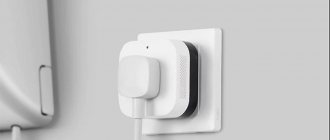
| LED floodlight with IR motion sensor | PIR sensor for lamp | LED floodlight with PIR motion sensor |
Sensor setup
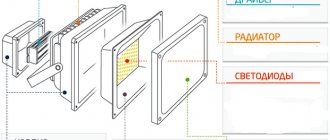
First of all, it is necessary to correctly install the street floodlight itself (LED) with a motion sensor. The main requirement for installation is to direct the sensitive sensor elements into the space that needs to be monitored. And after that you can configure the motion and light sensor.
Note that the design and composition of the sensor itself is quite complex. It includes several elements on which the ability to capture the temperature of a moving object depends. It is the heat flows that are collected by a special lens, named after its inventor. This is a Fresnel lens. The collected heat fluxes are focused and supplied to the pyrodetector sensor. The sensor itself is infrared. Next, the received data is processed by special electronic devices that decide whether to turn on the lamp or not.
Even when installing a spotlight, it is necessary to take into account two criteria that will affect the quality of the sensor, and, accordingly, the spotlight.
- Action distance (range).
- Deflection angle. Here we mean deviation, both horizontally and vertically.
The first indicator ensures that the spotlight turns on when an object approaches. If the distance is set and the object does not reach its border, the lamp will not turn on. The same goes for the coverage angle. That is, the object must fall into three-dimensional space for the spotlight to turn on. Both indicators: range and angle, are indicated in the passport of the street LED lamp. They will need to be set after connecting the device.
It should be noted that the modern lighting equipment market today offers a wide variety of LED floodlights with motion and light sensors. There are simple models, and there are complex ones, which is why they are configured differently. For example, there are models with only two adjustment screws, and others with three screws. But the essence of the setup is almost the same.
- First, you need to set the on time. In this case, a sensor will be triggered that will respond to the appearance of an object. This can happen immediately in a few milliseconds, or it can happen with a delay of up to 10 seconds.
- Secondly, the spotlight can be turned on at night. This also happens automatically. Once a certain degree of darkness occurs, the lamp should light up. You can set it so that it does not turn off even during the day.
These are the two main functions. The third additional one is adjusting the clarity of response to a moving object. Essentially, this is the sensitivity of the sensors. Such models with three types of settings are more expensive, so you will have to choose between the two, taking into account the budget allocated for organizing lighting.
Connection diagram
Incorrect connection of the sensor to the electrical network can result in damage to the device or short circuit. The instructions for the motion sensor must contain a diagram for connecting the device. But even in its absence, connecting the device is quite simple.
Before connecting, you should determine the optimal locations for the motion sensor and spotlight. They may vary. The sensor should be oriented to the place where people are expected to appear. The viewing angle and maximum response distances must be taken into account. The devices should be positioned to accommodate the size of the required cable so that the system can be easily installed after testing.
The figure shows a standard diagram for connecting devices.
L (brown wire) – incoming phase;
N (blue or cyan wire) – zero;
A (red wire) - outgoing (switched phase).
Compliance with the rules for marking electrical wires simplifies the task. To connect the motion sensor to the electrical network, you need to open the cover intended for connecting the wires.
You can determine the phase by ringing the cable with a tester. The phase wire is connected to the sensor terminal with the brown wire. The zero must be connected to both the spotlight and the device (blue wire). Then you should connect the remaining terminal of the IR sensor with the red wire to the free line of the lamp.
It is often useful to leave a switch in the circuit. By connecting it in parallel, you can, if necessary, leave the light on for a longer time than provided for with automatic control. The diagram on how to connect a floodlight with a motion sensor and a switch is in the following figure.
In this case, the automatic switching on of the spotlight will only work when the switch is in the open position.
There may be situations when it is necessary to connect several sensors to the lamp. This is required in situations where there are several approaches to the illuminated area, or when the coverage area of one sensor is insufficient. In this case, the IR sensors are connected in parallel. The lamp turns on when power is supplied through any sensor. The following figure shows a diagram for connecting a spotlight with two sensors.
It is best to connect a floodlight with a motion sensor to a panel with automatic machines. However, the cable can be connected to a nearby outlet via a plug or direct contact.
Some floodlights have a yellow-green ground wire. If available, connection is required.
Some lamps are immediately designed with a motion sensor. This is the simplest option. To connect a floodlight with a motion sensor, you need to connect the wires of the device to the electrical wiring, observing the color match.
Two sensors in a circuit
Now let's study the connection diagram of several sensors in one circuit. This is necessary where the room is very spacious or its shape is specific, which does not allow the device to operate as correctly as possible.
If the corridor has a curved shape, then one motion-activated device will not work when an object is around the bend. Here we need a circuit with several sensors connected in parallel to each other.
Phase zero runs separately and is not interrupted. It is supplied to all devices, and then the wires are connected to the lamp. One of the sensors will trigger and close the circuit, and voltage will be supplied to the lamp.
We advise you to study a 3G antenna to enhance reception
The devices must be connected to one phase, which will eliminate the possibility of a short circuit.
The circuit for connecting two sensors in a circuit is also suitable for connecting any number of devices.
Adjusting the IR Sensor
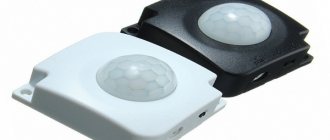
Modern motion sensors have two or three controls.
The first one, “SENS,” is designed to control the sensitivity of the device. By changing the position, you can set the size of the object to which the sensor will react, and the distance to the object.
The second - “TIME” determines the duration of the lamp after the machine is triggered. You can set it for a few seconds. Experts advise setting it for 1-2 minutes to prevent the device from constantly triggering.
The third - “DAY LIGHT” adjusts the operating time of the sensor depending on the daylight hours. It is possible to turn on the device only in the dark, or at any time of the day.
The user determines the position of the regulators empirically. The sensors themselves can move up and down, left and right, depending on the model. This allows you to determine the optimal angle of inclination and coverage area of the device.
Classification of floodlights with motion sensors
Motion sensors on the market can be divided according to several parameters.
- According to the mounting method - wall and ceiling;
- For protection from dust and moisture. For outdoor use, sensors with a protection level of at least IP65 are recommended.
Lighting devices can use different lighting sources. Incandescent lamps, due to their unreliability and high energy consumption, are rarely used in floodlights. Until recently, halogen lamps were the most popular. However, the low service life and high energy consumption of halogen floodlights lead to their replacement with more modern lamps.
Floodlights with LEDs are considered the best. They consume less energy and last a long time.
The connection diagram for spotlights does not depend on the light source. However, motion sensors must be selected taking into account the power of the lamps used.
DD to turn on the light: how to make 3 mistakes
The most suitable place for installing equipment in apartments is the hallway, where all the interior doors lead. The installation location is determined on the apartment diagram, taking into account the diagram of the sensor beams.
In rooms where the action of wall-mounted DD alone is ineffective, combined installation of both ceiling and wall equipment is used.
To connect the light switching device, no special knowledge or skills in the field of electronics are required. Manufacturers include instructions with each DD with recommendations on how to install correctly. The user needs to connect the cable and DD wires correctly.
But a situation occurs when one detector cannot cope with the assigned tasks and does not cover the entire area of the room. Then you need to install additional equipment that is connected according to the following diagram.
Connection diagram for additional device
The sequence of connecting an additional DD is the same as the main one. A phase and a zero are connected to the sensor, the phase passes through the detector and is connected to the lamp, and the second end from the lamp goes to zero.