What are the types and types of sensors?
Motion sensors for lighting come in 2 types: active, passive. Active DDs constantly monitor the room. These include microwave and ultrasonic devices.
In the first case, the device responds to sound waves, after receiving which the contacts close and the lamp lights up. The advantage of microwave devices is that they pick up the signal even through walls or other obstacles. They are more in demand at sites under protection. Such devices can work together with a video camera. But there is also a drawback - an increased likelihood of a false response.
Ultrasonic devices are less popular among users. They emit waves that have a negative effect on the human body with prolonged exposure.
Infrared motion sensors to turn on the lights on the stairs respond to heat. They can be active or passive. In the first embodiment, the receiving element and the transmitter are installed in different places. When the signal between them breaks, the contacts close and the light comes on. In the second case, the devices monitor the external temperature.
Passive devices also include acoustic devices that respond to conversation, clap and other noise effects. There are mixed options, i.e. Such devices are simultaneously equipped with active and passive components. The percentage of false positives of DD is minimal, so they are more expensive.
Sensor placement rules
In order for the DD to work most efficiently, it is installed in areas with heavy traffic of people. Configuring the sensor for indoor and outdoor lighting is carried out according to this rule.
According to the type of installation, DDs are divided into ceiling and wall. But their working principle is the same. The operation of the devices may only be affected by local operating conditions.
Ceiling placement devices are more often used inside buildings. The recommended installation height for motion sensors for lighting is 250-300 cm. The device will pick up signals at a distance of 5-10 m.
Wall-mounted devices can be mounted indoors or outdoors. But more often they are used when arranging external lighting. Recommendations for placement:
- Inside buildings, it is recommended to install wall-mounted DDs at a distance of 2-2.5 m from the floor, preferably in the corner of the room. This will make it possible to get the maximum viewing angle.
- On the street, sensors can be placed at a height of up to 10 m, and should be directed in the direction of maximum human movement. For effective operation of the device, it is recommended to mount it at an angle of 40º to the ground surface.
The range of wall-mounted devices is different for each model (see technical specifications when purchasing). It should be taken into account that the percentage of false alarms of the device increases significantly when the beams are widely scattered.
Connecting a motion sensor: diagram and step-by-step instructions.
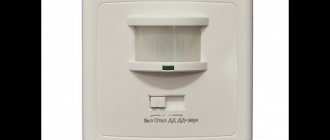
If you need a certificate or passport, you can request it from our technical specialists, to do this, send a request to e-mail: info st-ekb. The motion sensor DD LDD black is a product that has proven itself well among both Russian and foreign buyers.
The motion sensor DD LDD black is produced under the IEK trademark, in compliance with all technological processes and undergoes multi-stage quality control. On our website you can buy a black DD LDD motion sensor, as well as other products from the Motion Sensors range on favorable terms, we guarantee low cost, the shortest delivery time, professional assistance in choosing. Payment for orders by clients - legal entities is possible only by bank transfer.
Payment is made according to an invoice issued by the online store manager. The invoice payment deadline is 5 days. If necessary, it is possible to extend the invoice payment period - to do this, you need to contact the manager. The goods are shipped within 3 business days, subject to availability in the warehouse, after receipt of funds to the company's account.
An important distinction regarding protection from dust and moisture. There are many negative factors on the street that should not affect the quality of operation of the device. The optimal level of protection is IP. This means that the sensor is completely protected from dust and no water gets into it, regardless of the direction of the jet.
You can find recommendations to use a sensor with IP44 protection, but this is not enough for the street.
And it's true. Let's say we entered the bath.
Indicates protection against penetration of objects larger than 1 mm and protection against drops or splashes flying at an angle. This is not enough for the smooth operation of the mechanism. When purchasing a device, you should pay attention to the angle and range of the coverage area. At the same time, compare it with the installation location and the size of the area that needs to be covered during the operation of the sensor.
for electricians and DIYers
Whether the system with a spotlight and a motion sensor will work at all depends on the correct connection. The most important reference point is the user manual, which describes in detail how to connect to the volt network.
If the spotlight body and sensor are separate elements, then they can be placed independently of each other. This solution is considered optimal, and the sensor should be oriented to the place where people will appear. In this case, it is necessary to take into account the viewing angle and response zone. As for the spotlight, it can be placed in a place convenient for lighting in order to fully cover the required area with its light.
To connect the motion sensor to the spotlight, you need to open the cover on the device, which will give access to the wire connection terminal. Before you start working with electrical wiring, you should find a phase cable, to do this, ring them with a tester. It should be connected to the sensor terminal with the brown wire. The zero is connected to the spotlight and to the sensor.
How to install a motion sensor, instructions
Sequence of installation of DD for spotlights:
- The sensors are installed in pre-prepared holes.
- Before starting installation work, the electricity supply is turned off.
- The protective cover made of plastic is removed from the device.
- The conductors are being connected. Each model uses its own connection diagram, which the manufacturer provides along with the product’s operating instructions.
- The fixing springs on the sensor are bent upward, then it is inserted into the hole, the clamps return to their original position, and the device is fixed to the base.
At this point, the installation of the device is completed, you just need to configure the motion sensor for lighting, and then be sure to check its functionality.
Devices screwed into the cartridge are easier to install. In this case, you need to use light bulbs whose power is allowed according to the product data sheet. It is recommended to purchase lamps specifically designed to work with detectors.
To install remote-type DDs, a hole is pre-drilled in wall, ceiling bases or lighting fixture housings. The device is secured with self-tapping screws. The electrical cable is connected to the sensor terminals according to the manufacturer's diagram. Electrical installation work is carried out only when the mains power is turned off.
Motion sensor DD 201
This device, unlike the previous ones, is a built-in ceiling type. If you look closely at its appearance, you can guess that it can be installed in the sockets for spotlights on a suspended ceiling, which is a good reason for using it in such a place.
In terms of incoming load and other characteristics, it is practically no different from previous models. The only thing worth noting is that since this is a ceiling detector, the maximum installation height is higher than that of wall detectors (up to 4 meters). In addition, its viewing angle is 360 degrees.
We recommend to buy
Settings
To achieve energy savings of up to 50%, you need to correctly set the device’s operating parameters. Modern DD models are equipped with 3 regulators:
- SENS - responsible for response sensitivity.
- LUX - adjust the lighting for the work area.
- TIME is the delay period for turning off the light.
Installation angle
Inside buildings, the devices are placed in the corner of the room near the ceiling. This makes it possible to capture an area where intensive movement of people is expected.
For example, in a corridor the DD is mounted so that the rays cover its entire area. All rooms of the apartment and the kitchen can open into the room. When a person or pet leaves any door, the sensor detects the movement and the lighting turns on.
Outdoors, such devices can be mounted in different places and at different heights. But the main thing is that the perimeter of their action does not include moving objects to which the sensor is capable of responding, for example, tree branches.
“Dead” areas, where the rays of the device will not reach, are not excluded. But with the correct location of the device, they can be minimized.
Sensitivity
You can also configure a floodlight with a motion sensor so that its rays will only recognize a moving person. The SENS regulator is responsible for this function. It is recommended to select the average value, then when moving small objects the motion sensor for light does not work.
It is recommended to divide the operating range into separate sectors of 45º with restrictions. This will allow you to create areas with more accurate detection.
Illumination
The regulator, designated on the device as LUX, allows you to set the required illumination level. If the maximum parameter value is selected when adjusting the motion sensor, it will not work in natural light. The signal to turn on is given only when it is completely dark outside, and in rooms where there are no windows.
More expensive models of flashlights with a sensor are additionally equipped with a special function - a delay period for turning off the light. For cheap devices you need to purchase a photo relay separately.
Delay time
The delay period for turning off the light is set individually. You can set any time up to 10 minutes, but it is recommended to set it to 1 minute.
When you turn it on for the first time, the DD will respond, but the light will turn off later than set in the settings. And the next time the device is triggered, the timer will start working accurately.
Posting rules
Before you set up the motion sensor, you need to install it correctly. Motion detectors are subject to external influences from magnetic fields, precipitation, winds and ultraviolet radiation.
DD should not be installed near fans, heaters and air conditioners. The field of view should not include moving parts of operating mechanisms. It is necessary to avoid places where there are sources of electromagnetic fields.
When connecting the sensor to a spotlight on a free-standing mast, you must ensure that the detector is equipped with a moisture-proof housing. Such sensors are installed in rooms with high humidity levels: greenhouses, greenhouses, swimming pools, etc.
Important! When externally connecting DDs on the facades of houses, they are mounted under roof overhangs or protective canopies.
Difference from presence sensor
Presence sensors (PS) differ in their functional purpose from motion detectors, although they are similar in many respects. DP are very sensitive devices. They can respond to head shaking and hand movements of a person present in the control area of the device.
When the last employee leaves the office, the presence sensor sends a signal to the switching device to turn off the lights, air conditioners, or switch the heating systems to economy mode. Also, a dual-purpose device can turn on a DVR, which is necessary for the operation of a security video surveillance system.
The motion sensor can also perform security functions: turn on sound alarms, video recording cameras, and regulate the operating modes of various equipment. Still, the main task of the DD is to record the appearance and movement of a person in the control zone, and accordingly turn on the lighting and all of the above equipment.
Which DDs are better for adjusting lighting?
Based on the principle of motion registration, sensors are divided into three types, these are detectors:
- ultrasonic;
- microwave;
- infrared.
Ultrasonic
DD is used to record the movement of an observation object by perceiving a reflected wave in the VHF range. The sensor propagates sound waves with a frequency from 20 to 60 kHz in the control zone. The detector picks up the reflected signals and compares their characteristics with the outgoing signal. If the parameters diverge, the DD alarm device is triggered.
Ultrasonic devices are insensitive to ambient temperature and humidity. They are immune to the thermal background of the object and scare away insects and small animals that hear ultrasound. However, DDs may not react to a person walking slowly. This is a significant disadvantage in the use of devices in security systems of apartments and private houses.
Microwave
Unlike ultrasonic devices, these sensors emit electromagnetic pulses with a frequency of 5.8 GHz. The operating principle is similar to the operation of a radar station (radar). The sensor emits electromagnetic waves in a certain sector of space. In the absence of movement, the reflected signal is compared with the original pulse. If the frequency of the reflected signal is stable, the device will be in standby mode. Otherwise, the DD is triggered, recording the movement of a body.
The disadvantage of microwave sensors is that electromagnetic radiation can be harmful to human and animal health. Therefore, DD of this type is used in automated systems where the presence of people is excluded.
Infrared
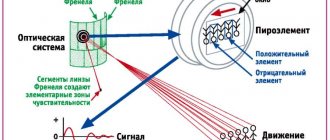
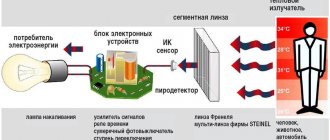
The operation of the infrared sensor (IDS) is based on recording changes in the thermal background of the surrounding space. All living organisms emit heat in the infrared range. The main part of the IDD is a pyroelectric element (Fresnel lens).
When the thermal background of the controlled area changes, the concentrated reflected IR rays change the potential of the electric field of the lens. As a result, a relay is activated, which closes the power supply circuit of the signaling device and lighting devices.
Note! From all of the above, we can conclude that the best option for a device as a regulator of lighting modes is an infrared motion sensor.
SENSOR PROTECTOR
The use of DD will eliminate undesirable consequences for the driver of the car and a deliberately created situation, popular several years ago, when a short person (for criminal reasons) climbed under a car from behind (under a heavy-duty one - even more convenient) and, after the car started moving, imitated an accident causing minor injuries, demanding financial compensation from the driver.
So how to install DD on a car?
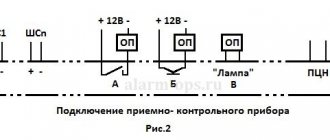
Rice. 1. Connection diagram of the motion sensor DD-010 to the electrical circuits of the car
Motion sensor DD-010 disassembled with the actuator board removed and an additionally connected siren (sound intensity 100 dB) type KRS-4510
Rice. 2. Schematic diagram of the 12 - 24 V adapter
As a rule, the electronic “stuffing” of the sensor is designed for power supply with a constant voltage of 11 – 14 V, which is confirmed by the transformerless power supply with ballast capacitors at the input located in the same housing with the DD. To adapt a household DD for a car, you need to supply power from the car battery to the control points of the printed circuit board (MV-013-1 or similar) marked “+” (black conductor going to the pyroelectric detector board) and “-” (white). according to polarity.
The control point, marked on this board with the letter “K” (from it the yellow wire goes to the pyroelectric detector board) has a special meaning. When the sensor is triggered, voltage (12 V) is present at point “K”; it is the control for the electromagnetic executive relay YJR-ЗFF-S-Н. The control voltage comes from a key transistor from the pyroelectric detector board, turned on in current amplifier mode. This key transistor can control a load with a current of up to 100 mA, which is important to know for turning on an additional relay where it is not provided - in motion sensors for household alarms. The executive relay contacts, in turn, are designed to control the load on a 220 V network (current up to 10 A).
The printed circuit board itself (MV-013-1) with a transformerless power supply, an executive relay and a 78L05 stabilizer for the DD-010 sensor needs to be slightly modified.
1. Carefully cut off (with a scalpel or other suitable object) the conductive tracks on the printed circuit board leading from the elements of the transformerless power supply (from the 78L05 stabilizer) to the control contacts “+” and “-”. Solder the power conductors from the battery to these points themselves (through a switch of any model).
2. Solder the conductors included in the electrical circuit break from the battery to the sound emitter with a built-in generator KPI-4332 or similar to the normally open contacts of the executive relay (see connection diagram in Fig. 1).
After the described simple modification, the DD is installed on the rear bumper of the car and the active surface (Fresnel lens) is turned towards the most likely appearance of a living object. When a heat carrier (human or animal) appears in the sensor response zone (up to 3 m), the sensor is triggered, the executive relay contacts close the power circuit of the sound capsule, and an alarm sounds.
In heavy trucks and buses (due to their large dimensions), manufacturers and some drivers, in terms of personal initiative, install additional mirrors to control places “invisible” from the cab: the rear bumper (and the space up to 3 meters from it), the front bumper and the space 1.5-2 meters in front of the cabin windshield, along the sides at a level of 1 m from the ground. All these zones are recognized as dangerous and “problematic”, some even call them “dead zones”, in terms of visibility control by the driver from the cab. The use of motion sensors in this case will help prevent a collision with a person or animal that accidentally or intentionally ends up near the front or rear bumper of the car.
To power the DD in cars with a 24 V on-board voltage, you will need a simple adapter, for example, the circuit of which is shown in Fig. 2 (or similar).
Other motion sensor applications
DD can also be used as an additional element of a car security alarm to prevent theft and theft. To do this, the DD is installed inside the car, turned (there may be several of them) in the direction of the most likely appearance of a person (intruder), and the executive contacts of the relay are connected accordingly to the open circuit of the starter or ignition of the car. In terms of connections, there may be other options, such as to the alarm sound generator (capsule), to the limit switch contacts at the end of the doors and to other contacts involved in the car alarm system; when they open/close, an alarm is triggered and a sound and light warning of unauthorized entry into the vehicle is triggered by a siren or (if available) by a key fob with radio notification.
An alarm sensor installed in the passenger compartment and connected to the power supply of the active elements of the security alarm (for example, in the power circuit parallel to the shock/shock sensor), facing the door at the glass level, will work even when a person approaches the car 1.5 - 2 m away ( sensitivity is adjusted on the board of the pyroelectric detector DD), which in some cases can prevent a crime, and prevention is better than subsequent correction of the situation. This option can be turned on and off, just like the standard alarm system, from the remote control (key fob), which is very convenient for the car owner.
Of course, for all the cases considered, other models of motion sensors can be used, including those that do not have a power supply and are intended for protecting premises. The methods of modification for adaptation to cars are approximately the same for them (similar to the above recommendations).
A. KASHKAROV,
Saint Petersburg
We recommend reading
- MODEL CONSTRUCTION 1995-09 IN THE ISSUE: Public Design Bureau: I. Khoroshev. If you need a truck (2). Small mechanization: A. Zotov. Walk-behind tractor (5). : Z.Petrov. “Fur coat” for the door (8)….
- THREE-DOWN GLIDER High-speed radio-controlled models with electric drive are very popular both among novice ship modelers and seasoned athletes. This is greatly facilitated by the laconic exterior…
Here you can evaluate the author's work:
Connecting the IDD to the lighting fixture
On the back panel of each motion sensor there are three wires for connecting the device to the electrical network and lighting fixture. The wire that is connected to the phase is designated by the letter “L”. The neutral wire is located under the letter “N”. The third terminal “A” is the conductor of the output phase connected to the lighting lamp.
The neutral terminal of the lighting device is connected to wire “N”. Typically, the insulation of IDD wires is painted in the following colors:
- phase – red;
- zero – black or brown;
- power output to the lamp - blue or cyan.
Installing the sensor yourself
Connection diagrams
If a home craftsman has minimal experience in installing home electrical wiring, then installing a motion sensor with your own hands will not cause any particular difficulties. If in doubt, it is better to study the accompanying documentation. As a rule, the manufacturer indicates a diagram for connecting the motion sensor to the lighting device. In some cases, an additional switch is built into the connection diagram. It is used if you need to temporarily turn off the device. Below are two diagrams for connecting the IDD to the lamp.
It is important to choose the correct installation location for the device. This largely depends on the type of execution. It can be a ceiling, corner or walk-through version of the model. After this, you need to determine how much wire will be needed to mount the sensor.
If you need to mount the device to a ceiling or wall made of monolithic or precast concrete, then you need to stock up on a hammer drill and dowels. To attach the IDD to the tree, you will need a screwdriver and screws.
Before installing the device, you need to think about the type of wiring: it will be hidden or open wiring. Accordingly, you will need to prepare the appropriate tools and materials.
Additional Information. In some models there is a fourth terminal, designated by the letters “PE”. It is intended for connecting protective grounding. The terminal should under no circumstances be confused with the working neutral wire “N”.
Checking and adjusting the sensor after installation
After connecting the sensor, just move your palm in front of the screen. He will instantly respond by turning on the light. Otherwise, you need to carefully reconsider the correct connection of the wires.
Configuring the sensor consists of several simple operations. On the body there are three regulators in the form of rotary buttons with slots for a screwdriver. How they are used to configure and adjust the motion sensor to turn on the light is indicated below in a separate chapter of this article.
Basic electrical connection diagrams
Connecting a motion sensor to a circuit to control a lighting device as a whole should not cause much difficulty even for an ordinary user who is not very versed in electrical engineering. Of course, such installation is best left to a professional electrician, but to save money, you can familiarize yourself with the circuit diagrams below and connect everything yourself.
Two-wire connection of a motion sensor
This method of connecting a motion sensor is done using two wires and assumes the presence of only a phase (without using zero). Such devices are often used for installation in standard socket boxes to replace conventional switches or for joint use of switches and motion sensors.
Such motion sensors have only two terminals: the first is used to connect the supply phase, and the second is for the outgoing phase conductor to the lamp. All connections are made by analogy with a conventional single-key switch without using a zero.
This method is often used when introducing motion sensors into rooms that have already been renovated, as it allows you to replace key switches with a switch with a motion sensor.
Three-wire connection diagram
The most common scheme for connecting motion sensors is the one that has a three-wire connection diagram. They are used both indoors and outdoors (when installing outdoors, it is important to pay attention to the degree of dust and moisture resistance).
To connect three-wire sensors, it is necessary to connect phase and zero to them. The diagram looks like this:
Settings
Installation angle
By turning and tilting the device head, the control zone is adjusted. By mechanically adjusting the position of the interface, maximum visibility of the desired area is achieved. Usually they try to install the device in such a way that when a person appears on any side of the room, the light instantly turns on.
Sensitivity
The parameter is adjusted by a screw on the sensor body with the inscription “SENS”. The level of sensitivity is determined experimentally. The screw is set to the middle position. They check how quickly the device will respond by turning on the light when a person appears in its control field. By turning the screw, you achieve the most effective position of the regulator.
How to connect a motion sensor for lighting: detailed instructions
Let's look at connecting the motion sensor dd 010, there are no particular difficulties. But each stage should be thought through in detail.
So, to connect a motion sensor from a 220 W network with our own hands, we must do the following:
- Select the connection diagram.
- We select the place where the sensor will be installed. Please note that the place must be open; if the installation is indoors, then you need to install it on a corner or on the ceiling. Before installation, check the viewing angle to avoid mistakes in its installation.
- We turn off the electricity, because you will have to connect the cables with your bare hands.
- We look at the selected circuit and connect three wires to the terminals on the sensor body. It is necessary to observe the color markings, and also observe the polarity.
- Setting up the sensor. Each sensor has a specific functionality, for example, some can be configured to start working only at certain times of the day. There are also settings related to sensitivity and time to turn off the light. For details about setting up, read the instructions for each motion sensor.
- Test everything.
Wireless motion sensors
The device operates on the basis of a radio transmitting device that connects the sensor with a switching unit, which, in turn, turns on and off the lighting in the room. The disadvantage of such a device is its high cost compared to wired analogues.
Motion sensors not only ensure comfortable movement of people in the dark and perform a security function, but also bring significant savings in energy costs. In the electrical engineering market you can always find a device that meets the most demanding consumer preferences.
Motion sensor DD 035
This device has absolutely the same characteristics as the previous one, being, in fact, a detector of the same type, but a little more technically equipped.
Taras Kalenyuk
auto RU
What's the difference? The DD 035 motion sensor is also capable of capturing sound, while the previous model only reacts to the movement of warm objects.
The described device has several operating modes:
- included;
- disabled;
- Motion Detector;
- motion detector + sound.
The maximum total load on this device should not exceed 500 W, and the sound volume to which the DD 035 motion sensor can react is represented in the range from 30 to 90 decibels. The previous detector does not have the ability to switch modes while working in one. Accordingly, there is some difference in price.
Motion sensor DD 035
Parameters to be adjusted
Adjusting the motion sensor for lighting does not require the user of the device to have special knowledge; the entire process is carried out by trial and error. However, in order not to become like the heroine of the fable “The Monkey and the Glasses,” it is worth having a general idea of what you are going to regulate and what consequences it leads to.
The motion sensor is configured using two methods:
- Hardware, when you make changes to the operating parameters of the device.
- Changing position.
Hardware adjustment
On the side or front of the device body you can see one, two or three adjusting screws with a straight slot for a screwdriver. They are equipped with an explanatory inscription and a mnemonic symbol showing the direction of change, up or down.
Modern motion sensors allow you to change three parameters:
- Sensitivity, usually referred to as "Sens". The magnitude of the minimum impact from which the device is triggered, as well as the detection range, depends on this parameter. For thermal sensors, this is the temperature emitted by the body of a person, animal, or car engine. For microwaves - mass (for volume sensors) or frequency shift, if the device works to detect moving objects. Setting sensitivity is the most complex and controversial process. The higher it is, the greater the number of false positives will occur. For example, excessive sensitivity of microwave sensors in the entrance can lead to the fact that the light will turn on when residents move around the apartment. You should not excessively roughen the receiving path, in this case the motion sensor will not work at all and will play the role of furniture. The optimal option is to make the sensitivity such that the device detects a person with average anatomical parameters at the border of the light spot of a flashlight or an illuminated area.
- Turn-on time, designated “Time”. For example, the light in the entrance should burn as long as necessary to overcome one or two flights of stairs. Otherwise, the light will turn off before you reach your goal.
- Illumination, denoted by the word “Lux”. The device does not need to know the time of day, so it will turn on the light regularly even at brilliant noon. To prevent such an incident, you can set a minimum level of natural light in the area, upon reaching which you need to turn on the lamps.
How to configure a motion sensor using hardware methods is usually written in detail in its data sheet.
Positioning
This may not seem obvious, but the correct location of the sensitive sensor in space is the key to success in setting it up. It is worth turning the potentiometers only after you have installed the devices in their regular places.
There are motion sensors that have a transmitter and receiver separated in space. These are photoelectric elements, triggered by interruption of the beam, and narrowly targeted microwave - ultrasonic and microwave emitters. For them, positioning is the main method of adjustment, since the beam must accurately hit the “target” - the signal receiver. A laser pointer will be a good help for this.
The receiver of the sensing element has a wide viewing angle, referred to in the scientific literature as a “directional pattern.” Its diagram is similar to an irregularly shaped daisy, consisting of one large, wide petal, as well as several dozen narrower and shorter ones. The signal can also be received by the side lobe, for this you will have to maximize the sensitivity of the device. But the bulk of information will go through the main one, directed in the other direction. As a result, you will get a huge percentage of false positives when the light turns on spontaneously due to the movement of branches, a flying bird and other unimportant factors. This is why it is so important to adjust the position of the sensor in space. All data about its viewing angle can be read in the passport.
If the radiation pattern of the device receiver has the shape of a hemisphere, then the best option would be to place it on the ceiling. It is worth considering the type of both the lamp and the sensor. The LED flashlight heats up slightly, so the infrared sensor can be placed next to it. Microwave devices should be shielded from the surface on which it is installed - put a metal plate under it, which will prevent the side lobes from penetrating the building structure and receiving false signals.
Devices with a main lobe width of 40-60 degrees are usually equipped with hinges that facilitate their positioning. Academically, it would be correct to draw a scale drawing, choose the optimal placement option with a minimum of dead zones and objects in the field of view (branches) that could cause a false alarm. In practice, it is better to use a hand-held flashlight, the beam of light of which diverges at approximately the same angle. Secure it where you plan to install the sensor. As a result, you will quickly get a clear picture of the space coverage. Combining the spotlight with a motion sensor will simplify the positioning process as much as possible.
Setting up motion sensors is a creative process. As it progresses, you can and should attract helpers. Not only active ones, helping you carry a ladder, tools, but also passive ones (this could be cats, dogs, even children), playing the role of targets.
IR motion sensor parameters
- Supply voltage – 220 – 240 V, 50 Hz.
- On time (delay timer) – from 2 seconds to 8 minutes. The desired time for which the light will remain on after the sensor is triggered. Set by regulator.
By the way, in most of the simplest models, movement “does not accumulate.” That is, if a person was running in front of the sensor the entire time it was turned on, and froze before turning it off, to turn it on, you need to move again. To prevent such an unpleasant effect from occurring, in cases of continuous movement, the sensor output must be short-circuited with an additional switch.
- Photosensitivity – from 2 to 1000 Lux. Usually set by a switch (in cheap models, 2-3 positions) or smoothly adjusted. The parameter shows at what ambient light the sensor operates. When setting the illumination to 100 Lux, the device will only work at night. When setting the maximum external illumination, the sensor will work at any time of the day.
- Viewing distance (detection distance) – up to 15 meters.
- Response speed – from 0.5 to 1.5 m/s. If the detected object moves very slowly, its temperature will merge with the general temperature background without triggering. If it is fast, the sensor will not have time to operate, and the object will leave the coverage area.
- Maximum switching current . May vary depending on the application. Burglar alarm systems use low current and use normally closed contacts. In lighting applications, the sensors mainly use an electromagnetic relay, which determines the load power. Household sensors are mainly produced for currents from 1000 to 1500 W.
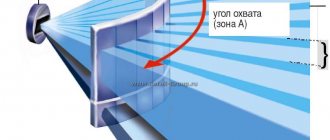
- Capture area (viewing angle). In ceiling sensors this angle is usually 360 degrees. But it is obvious that the coverage area will also be determined by the height. Wall sensors have a viewing angle of 120 to 180 degrees.