Principle of operation
The motion sensor allows you to automatically control the switching of the electrical network. The principle of operation of the detector involves operation if the degree of illumination decreases below the specified value.
The device detects wave vibrations in the infrared range, reacting to a moving object entering the field of action of the element. Customization options include adjusting the duration of the device.
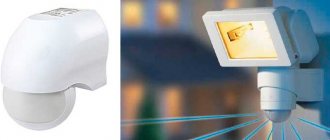
Externally, the sensor is made in the form of a plastic box with an opening covered with a film with a Frenkel lens that monitors a moving object entering the zone of influence of the device.
Sensors triggered by ultrasound and microwave operating principles have also been developed.
Installation and connection errors
Now let’s look at situations where the motion sensor suddenly starts working incorrectly. One of the main troubles is false inclusions. This is the situation here. If your device suddenly starts turning on spontaneously, then first of all you need to look for extraneous factors. For example, if the sensor is installed on the street, then there is a high probability that the movement of trees in the wind caused the trigger.
It's easy to check. It is necessary to close the device window with opaque tape. If it continues to “glitch”, then the reason is in it, or rather in its malfunction. If the lighting does not turn on, it means that you just need to configure the device correctly. Or move it to another place.
The next mistake is that the phase and zero have been swapped. In principle, for two-wire devices it makes no difference which wire passes through it. Its task is to open and close the circuit. But in terms of safety, the sensor must crash into the phase wire.
Ceiling sensor cannot be installed on a wall Source dachadecor.com
The third situation is when the light bulb suddenly turns on again after being turned off. This usually happens when incandescent light bulbs are installed in the lamp. After all, they do not immediately extinguish, because the filament must cool down. And this is additional radiation of infrared rays. The latter are picked up by the sensor and triggered by their impact. Therefore, the lamp must be installed so that it does not directly hit the window of the motion device.
The fourth situation is when the ceiling sensor is installed on the wall, or vice versa. That is, when purchasing a device, you should know that manufacturers offer ceiling and wall models with different viewing angles. This means they work differently in terms of coverage of the traffic area. Therefore, ceiling models cannot be mounted on a wall, and vice versa.
Fifth, the instrument window is dirty or has a crack. Not everyone knows that there is more than just transparent glass installed on the sensor window. This is the so-called Frenkel lens. It is she who focuses infrared radiation, transmitting signals further along the chain. Any defect or small speck of dirt makes the motion device operate incorrectly.
And other situations of incorrect operation of the motion sensor: glare from windows, a strong gust of wind, operation of an external air conditioner unit, convection of heating devices, movement of warm air.
Types and price of sensors
Various types of devices are offered, differing in application conditions and design features. Depending on the operating conditions, the following types of these elements are distinguished:
- Outdoor – used outside the home. They have a wider range of action from 100 to 500 m. These devices are suitable for installation in the local area.
- Indoor - installed indoors. Such devices are not designed for operation under conditions of significant changes in ambient temperature and humidity and should be used indoors.
Depending on the principle of operation, there are devices operating on the following principles:
- Ultrasonic – capturing waves of the corresponding spectrum.
Ultrasonic - Infrared – determining the degree of illumination.
Infrared - Microwave – operating on the principle of a radar locator.
Microwave
The cost of this equipment ranges from 400 to 900 rubles and above, depending on the following factors:
- like,
- characteristics,
- prestige of the manufacturer,
- conditions of use.
The most expensive of those presented are microwave ones, intended for outdoor use.
Basic terminal designations
Like any electromagnetic device, the motion sensor is equipped with an electronic circuit that is connected to power. The vast majority of devices are connected to a regular home electrical network, where the voltage is no more than 220V. Only radio sensors operate on regular batteries.
To find this information, just look at the body of the device, since manufacturers are required to apply markings there (for example, with plastic embossing). Depending on the model and manufacturer, the type of designation is determined. These may be letters or colors that indicate what phase and wire identification methods should be used.
The marking “L” with an arrow to the left indicates where the phase wire should be connected, and the letter “N” indicates where the neutral wire should be connected. The wire that goes to the light bulb can be found on the device under the letter “L” with a stroke and an arrow to the right.
The operation of the motion sensor is not possible without providing power to its terminals in the “L” and “N” positions. To do this you will need a piece of double wire. On one side a plug is installed on it, and the other end of the wire with the insulation removed from it is connected to the “L” and “N” terminals. When choosing the length of the wire, you need to install the device next to the outlet or purchase an additional extension cord.
You don’t have to worry about making a mistake when connecting the wires: the sensor simply won’t work, and the blinking light will stay on.
Often, motion devices are equipped with a special LED indicator that indicates the status of the equipment. When it is connected to the power supply and is in operating mode, the light bulb blinks every second. If the sensor is triggered, the indicator begins to blink several times faster. Therefore, when choosing an installation location, even without connecting to the power supply, you can only determine by the blinking frequency whether the device has worked or not. It is important not to forget that there are types of devices that begin to function after connecting to power not immediately, but after a few seconds (up to 30 seconds).
Advantages and disadvantages of equipment
The use of these automatic elements allows the user to achieve the following benefits:
- increasing the level of comfort - lighting control is performed automatically, without user intervention;
- saving energy resources;
- the possibility of obtaining additional options using one device - the sensor can signal the appearance of a third-party object, the occurrence of a fire, and in other situations.
The disadvantages are associated with the need to purchase additional equipment and the complexity of the home electrical network.
Choosing a motion sensor model for your home
Based on the method of detecting the presence of a person in the control zone, motion sensors are either active or passive.
Active ones work like a radar or echo sounder. They emit a signal and analyze its reflection. If the distance that the signal travels from the sensor to the obstacle and back has changed, then it is triggered. Passive sensors simply detect heat emitted by a person. There are also combined ones, which combine active and passive control methods.
Active sensors operate in ultrasonic or high radio frequencies. The ultrasonic range lies within 20,000 Hz; humans cannot hear such a sound, but dogs, cats and other animals hear it and begin to behave restlessly. If there are living creatures in the house, then it is not permissible to use motion sensors operating in the ultrasonic range.
Active motion sensors operating at high radio frequencies do not “notice” obstacles in the form of walls or furniture, and only detect the movement of objects. If installed incorrectly, they can even react to the swaying of trees outside the window or the movement of people in a neighboring apartment, causing false alarms. Moreover, they are the most expensive.
To control the switching on of lighting in an apartment, passive infrared motion sensors that respond to heat emitted by the human body are best suited. Therefore this type is the most common.
You should also pay attention to the horizontal and vertical detection angles of the motion sensor and the range. Typically, the detection area for ceiling-mounted motion sensors is 360° in the shape of a circle. Motion sensors designed for installation on walls usually have a horizontal detection angle of 180° and a vertical detection angle of about 20°.
In the drawing, blue lines indicate the outline of the room, and the figure formed by red lines is the detection zone of the motion sensor. As you can see, the detection zone does not cover the entire volume of the room, therefore, when choosing an installation location, the detection zone is the determining criterion.
The detection range of motion sensors is usually limited to 12 meters, which is quite enough for home use. If the room is large, has a non-rectangular shape or is multi-story, for example, like an entrance to a house, then in this case several devices are installed to detect the presence of a person throughout the entire area.
By design, motion sensors can be movable or fixed. The movable device allows you to change the detection zone by moving the sensor relative to the base in horizontal and vertical directions.
As you can see, this motion sensor provides the ability to change the position of its head, thanks to which, after installing it on the wall, you can change the control zone within small limits.
How to choose the right sensor
Equipment should be purchased taking into account the following points:
- conditions of use - depending on installation outdoors or indoors;
- location of the device - this determines the requirements for fasteners and type of equipment;
- viewing angle - if the device controls the input and output, 180° is sufficient; for ceiling devices, all-round access to the scope of action will be required;
- operating time settings - this issue is especially relevant if the devices are installed in large rooms with the simultaneous use of several devices.
It is also necessary to take into account the financial capabilities of the owner in order to select a device with sufficient characteristics that at the same time suits the buyer at a price.
Placement nuances: how to connect an infrared motion sensor correctly
Passive infrared tracking devices have their own characteristics that determine placement rules.
- Despite the protection from false alarms in the “daylight” spectrum by a Fresnel lens, it is not advisable to place the devices in direct sunlight, under lighting fixtures.
- In the “visibility” zone there should be no large objects or partitions (including glass) that block the view.
- “Blind spots”, unseen areas of the room, should be avoided.
- In large rooms, it is better to mount sensors on the ceiling - this provides a wide coverage angle.
- If there are animals in the house, it is better to use models with a limit on the mass of the tracked objects.
Since the rays incident on the tracking device have the form of a fan converging towards the lens, the location of the device is selected taking this factor into account. The same applies to determining the installation height of the model.
Schemes and connection of the sensor
The sensor can be connected according to various schemes, depending on the conditions of use and the assigned tasks. Let's take a closer look at the possible connection schemes.
With switch
If the device is connected with a switch, the following diagram applies:
This method is convenient when it is necessary to prevent spontaneous turning off of the light if a person is in the room without moving. In this case, a three-position switch is used.
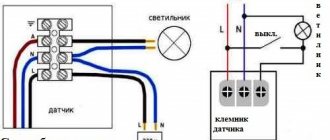
The connection is made taking into account the following points:
- the neutral wire from the junction box is routed to the sensor and to the lighting fixture;
- phase wire - to the corresponding contact of the switch at its input;
- the second contact of the sensor is connected to the middle terminal of the switch;
- the lighting fixture is also connected to the top terminal of the switch.
In this case, the light is controlled using a switch.
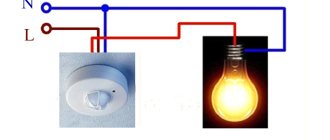
Without switch
A simpler circuit is possible, without using a switch:
To connect you need:
- from the neutral wire in the junction box, connect the sensor and lighting device;
- the phase wire is supplied to the lighting fixture through a sensor, similar to a conventional switch.
In this situation, turning the lighting on and off is controlled solely by the sensor.
Circuit with starter or contactor
The use of a circuit with a starter and contactor is necessary when using equipment with a power of more than 1 kW, which is not often found at home:
In this situation, current is supplied through the starter, and the contactor coil is controlled by the sensor. The output on the sensor is connected to a coil, combining the neutral wires.
Connecting two sensors
With a complex room configuration, several lighting fixtures may be installed in the room, with the need to turn them on and off separately. In this case, several automatic devices can be installed, connected according to the following scheme:
The operating principle of the devices assumes the following:
- when entering a long corridor, the light turns on;
- when approaching the second sensor, the next source is turned on without turning off the previous one;
- when turning a corner, the next sensor is activated without turning off the others;
- when the corridor is left, the light turns off.
The number of devices is not limited and depends on the room conditions.
Connection diagrams for a three-wire network
Combining a motion sensor with a switch
To ensure constant operation of the lamp, regardless of the level of illumination and the presence of a person in the range of the sensor, a switch can be installed in the circuit. A single-key type switch can be used as it. When it is turned on, the switching contacts of the sensor are bypassed, which ensures constant lighting mode.
The neutral or neutral wire from the switch goes directly to the luminaire (lamp) from the network, the phase wire passes through the switch, the contacts of which are parallel to the switching group of the sensor. If a starter is used in the circuit, then its winding must be powered from the switch.
Connection diagram for several sensors
The first type of scheme is widely used in rooms of simple shape. This can be a square, rectangle or circle, in general, something where only one specific area needs to be controlled. If you want to organize automatic switching on of lighting in complexly shaped rooms with additional branches and bends, for example, in curved corridors, then you need to use several sensors. But this scheme also has its own nuances. For example, if you need to organize the comfort of movement along a long corridor, but at the same time it is necessary to ensure maximum savings, then the sensors should be turned on independently of each other, that is, in parallel.
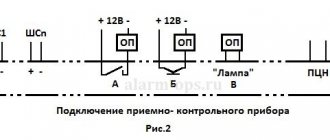
If you want to create a reliable security system, then connecting the motion sensor to the light should be done according to the diagram presented below.
Here the sensors are interconnected by a phase wire from the network. The neutral wire is supplied to all sensors and lamps or alarms without intermediate switching
It is important here not to confuse the colors of the wires and control the phase on all devices so as not to create a short circuit in the circuit. When any of the sensors is triggered, the main signal light or sound warning system will turn on. When creating a system with controlled lamps, a switch is installed parallel to the contact group of sensors
If the circuit consists of several motion sensors, and it is necessary to ensure independent switching on of each of the lamps, then a switch is installed on each sensor
When creating a system with controlled lamps, a switch is installed parallel to the contact group of sensors. If the circuit consists of several motion sensors, and it is necessary to ensure that each of the lamps is switched on independently, then a switch is installed on each sensor.
Before checking the motion control device, you should make sure that the colors of the wires are correct and that they are securely clamped in the terminals.
Configuring and testing sensors
After installing the device, you need to configure it to ensure proper operation by following these steps:
- the regulator on the device body sets the level of illumination for operation;
- using the second regulator, the duration of the shutdown delay is adjusted;
- The rotation angle is set depending on the area to be covered.
After completing the setup, the device is tested by trial. If individual parameters do not suit the user, additional adjustment is necessary.
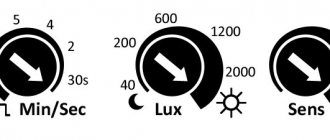
Purpose of the parameter adjustment knobs
There are knobs on the body of the motion sensor for adjusting its parameters. Depending on the model and its purpose, there are from two to four handles. Next to the knobs there is usually a letter designation of the type of adjustment, a picture of the purpose of the adjustment and the direction of rotation of the knob to change the setting. Therefore, before installing a motion sensor, you need to understand what parameter and how each of the handles affects and in what position they should be installed for optimal operation in specific conditions.
Before you start looking for a place to install the motion sensor, it is advisable to adjust its parameters on the table and mark it with a marker to make it easier in real conditions. In low light, the factory markings are difficult to see.
| Name and designation of the motion sensor parameter | |||
| Designation | Parameter name | Function | Note |
| LUX | Illumination | Adjusts the level of light at which the motion sensor is triggered | from 5 to 10000 Lux |
| TIME | Time | Duration of timer activation | from 5 to 420 seconds |
| SENS | Sensitivity | Adjusts range | up to 12m |
| MIC | Microphone | Adjusts the noise level at which the motion sensor is triggered | 30-90 db |
LUX dimmer
allows you to set a light threshold above which the motion sensor will not respond to movement.
Why turn on the lights during daylight hours if you can already see clearly. Initially you need to set it to maximum
.
TIME Timer Time Controller
motion sensor.
This is the time during which the light will remain on after the motion sensor is triggered. Initially set to minimum on time
. It should be noted that if, after the motion sensor is triggered, a person continues to move in the detection zone, the timer is restarted, and the countdown until the motion sensor turns off will begin from the moment the person stops moving. For example, if you set the timer to 10 seconds, and a person moved or waved his hands in the detection zone for 10 minutes, then the light will be on all this time.
SENS sensitivity control
Rarely installed on motion sensors, as it is of practical necessity. It happens, it is needed if you want to not control part of the room, and this can always be done by adjusting the position of the motion sensor during installation. Initially you need to set it to maximum.
MIC sensitivity control
It is present very rarely, since it is not in demand in everyday life and has low noise immunity. The noise of a passing truck or a child's scream in the entrance of a house can trigger a motion sensor. But to perform the security function, if properly adjusted, it can serve as an excellent means of protection, since the detection zone will be practically unlimited. Initially you need to set it to minimum.
Now that the preparatory work has been completed and all the controls are set to the required positions, you can begin to determine the installation location of the motion sensor. To do this, you can temporarily mount the sensor on a stepladder or board, and by placing the motion sensor in the intended installation locations, try to find the best one. As I wrote above, a rapidly blinking LED will indicate that it has been triggered.
It is convenient to connect the motion sensor for lighting to the electrical wiring in two places, in the junction box or directly at the point where the chandelier is connected to the wires coming out of the ceiling or wall. Therefore, before searching for a location to install the motion sensor, you need to determine where it is easier to connect it. It is difficult even for a professional electrician to deal with the wires in the distribution box, especially in houses built a long time ago, and the boxes are often covered with wallpaper or located under plaster. The easiest way to figure out the connection is to a chandelier or wall lamp.
After determining the installation location of the motion sensor, you can begin mounting it on the wall and installing electrical wiring.
Attention! Before connecting the motion sensor to the electrical wiring, to prevent electric shock, it is necessary to de-energize it. To do this, turn off the corresponding circuit breaker in the distribution panel and check the reliability of the shutdown using the phase indicator
Operational problems or connection errors
Using motion sensors for lighting may result in the following problems caused by equipment malfunction or connection errors:
- incorrect supply of phase and zero - from a safety point of view, the device is connected with a break in the phase wire, similar to a switch;
- false alarms – if the sensors are positioned incorrectly or are affected by unexpected factors in the form of thermal radiation, tree branches, etc.;
- unjustified switching on immediately after switching off - when a lamp or other light source is pointed at the device;
- improper use - when installing a wall-mounted device on the ceiling or using an indoor device outdoors;
- the influence of glare and air currents - a draft or reflection of sunlight can cause spontaneous operation of the element;
- Damage or contamination of the sensing element - as a result, the sensitivity of the device decreases.
To avoid problems, install the device by a qualified electrician. The device should be checked before purchase to exclude any visible defects. The connection must be made strictly according to the diagram.
The use of automatic lighting control sensors allows you to take home comfort to a new level. But it is necessary to select and install the device correctly to eliminate possible problems.
Variants of motion sensor activation circuits
There are several options for connecting motion sensors to turn on the lights. The choice of a specific one is up to the customer. This is due to the fact that the sensors can be different, that is, with different contact groups. Not all device models can be used to connect devices with high current consumption, for example, spotlights with incandescent lamps. In this case, it is better to use starters as intermediate switching components, and to increase the reliability of the presence monitoring system, use different types of sensors, combining their switching circuits. For example, ultrasonic and infrared.
If we consider the models of sensors, depending on the production technology and operating principle, then these can be either ultrasonic or microwave, or infrared. But it should be remembered that the first two types of sensors have a built-in high-frequency generator, which can be excited due to various interferences and powerful electromagnetic waves. Therefore, they must be installed in places remote from all these factors. These could be warehouses, checkpoints, etc.
For home use or in environments with a lot of interference, sensors with infrared emitters are more suitable. In this case, both active and passive ones can be used.
Generalized diagram for switching on motion sensors
The simplest circuit for connecting a motion sensor includes only a few components:
- sensor;
- connecting wires;
- lamp or audio warning system.
Almost all sensor models have a single structural device, which is a housing, a contact block, a scattering sphere or glass. The sensor itself has only 3 contacts, so there should be no difficulties with its electrical connection. Moreover, almost every model comes with installation and configuration instructions.
The figure below shows the simplest circuit for switching on a motion sensor, consisting of the sensor itself and the lamp. Installation of such a sensor can be done in almost any convenient place.
Important points when connecting according to this diagram is to maintain the polarity of the wires. The phase wire from the alternating voltage network must be switched through the sensor to the lamp. You need to pay attention to the color. As a rule, blue is zero, brown is phase, red is the output of the switch. Colors may differ between manufacturers, so it is advisable to use a phase indicator or other devices. As the latter, you can use not only a lighting device, but also an audible alarm. When installing a powerful floodlight with a consumption of more than 0.5 kW, it is recommended to use an intermediate starter and install it in a separate installation box. This is necessary to prevent burnout of contacts when switching a low-resistance load.
Choosing a location for installing a light motion sensor
Before installing a motion sensor, in order to ensure its reliable operation and eliminate false ones, you need to take a responsible approach to choosing the installation location. It is necessary not only to provide the necessary detection zone, but also to protect the motion sensor from the influence of external factors that cause false alarms or block the operation of the sensor and take into account the need to connect it to the electrical wiring.
It is not recommended to install motion sensors near electric and central heating radiators and pipes supplying hot water, in close proximity to air conditioners, near thermal and electrical appliances that emit electromagnetic interference.
Even if you take into account all the recommendations and understand the technical characteristics, it is theoretically difficult to correctly choose the best location for installation without practice. Therefore, it is advisable to conduct a little research before performing electrical installation work.
An example of installing a motion sensor in an apartment
I decided to equip the toilet with an electronically controlled bidet function. For safety and energy savings, you need to turn on the bidet control device only when necessary, that is, when a person visits the toilet. The best option is to connect in parallel with the lamp. When laying wires from the lamp to the installation site of the additional socket, I decided to install a motion sensor at the same time, so that I didn’t have to touch anything with my hands at all.
It didn’t take long to choose a location to install the motion sensor. Since the toilet room is small and windowless with a single entrance door, only one place was suitable, below the lamp.
After dismantling the lamp, the following picture opened. Two stranded ones were connected to two copper single-core wires by twisting with a clamp. The stranded wires, in turn, were connected to the lamp socket using screw terminals mounted in the socket. The wires coming out of the wall were very short and of different lengths.
In this case, it was most expedient to connect the motion sensor and an additional socket using a three-pin terminal block, which easily fit into the base of the lamp. The wires were aligned in length, the insulation was removed from them, the ends were cleaned with sandpaper, inserted into the terminal block and clamped with screws.
Before dismantling the lamp, markings were made to drill holes for dowels to mount the motion sensor on two self-tapping screws.
The plaster on the brick wall was quite loose, and the distance between the centers of the holes had to be maintained to the nearest millimeter. I used a simple jig and a certain sequence of drilling holes in the wall. To make the conductor, a piece of plywood was taken, in which two holes were drilled, 4 and 6 mm. After drilling the first hole in the wall, a dowel was inserted into it and the jig was screwed through a 4 mm hole with a self-tapping screw. A second hole in the wall was drilled through a 6 mm hole in the jig.
With this simple technique, using plywood trim, it was possible to drill holes exactly in the specified places.
All preparatory work has been done, and you can begin installing the electrical wiring and installing the motion sensor. But in order to carry out the work competently, and not just mindlessly connect the wires to each other, it is worth familiarizing yourself with the chandelier connection diagram.
Electrical diagram for connecting the sensor
As can be seen from the diagram, the neutral wire, which is designated by the letter N
, is connected directly to the chandelier light bulb, and the phase one, which is designated
L
, is connected to the second terminal of the chandelier light bulb through a switch.
In practice, you may encounter the fact that the switch opens not the phase wire, but the neutral wire. From a safety point of view, this is incorrect, but opening the neutral wire does not affect the performance of the chandelier. If there are many light bulbs in the chandelier or there is a double switch, then the chandelier connection diagram is more complex. To meaningfully connect a motion sensor, it is enough to consider how to connect it to a chandelier of one light bulb.
From a functional point of view, a motion sensor is an ordinary switch, only it turns off the light not from pressing the switch key with a person’s hand, but from movement in the detection zone. Since the motion sensor has an electronic circuit, for it to work it is necessary to apply supply voltage to this circuit.
Motion sensors are available for installation instead of a switch. But to connect it, you need one more additional wire and, of course, the detection zone with such an installation must correspond to the required one. Three wires sometimes fit to the switch to separately connect two groups of chandelier bulbs. If such use of the chandelier is not necessary and the detection zone is suitable, then you can install a motion sensor instead of the switch without laying additional wires by making connections in the junction box.
Wiring diagram
The simplest case is when the motion sensor is connected to the terminal block of the chandelier. Since my lamp did not have such a block, I had to install it. I made the connection according to the wiring diagram below.
As can be seen in the diagram, the phase wire is connected to the upper contact of the terminal block and from it goes directly to the terminal block terminal, designated by the letter L. The neutral wire is connected to the middle terminal of the terminal block and then goes to the terminal block terminal, designated by the letter N. It also goes to it two wires are connected, going to the light bulb and an additional socket.
Phase wire L is connected to the normally open contacts of the relay, in the same way as to the contacts of an ordinary key switch. Next, from the relay contact, the wire goes to the lower contact of the terminal block and is then connected to the lower contact of the chandelier terminal block. The second terminal of the light bulb and socket are also connected to the same contact. When the motion sensor is triggered, the relay closes the contacts and voltage is supplied to the light bulb and socket.
As a light source, you can connect not only incandescent lamps to the motion sensor, but also energy-saving LED lamps and monochrome and RGB LED strips connected through adapters. You can also connect a radio or any other device.
Before connecting the wires, prepare sections of them long enough for free connection with the terminal blocks. The insulation is removed from the ends of the wires and, according to the diagram, the wires are twisted together. After twisting, tinning with solder is performed using an electric soldering iron. If you do not plan to pass large currents, then it is not necessary to tin the wires.
When the ends of the wires are prepared, they are connected to the terminal block of the chandelier.
All that remains is to screw the base of the chandelier to the wall and screw the shade into it. As you can see, all the wires and the terminal block are hidden under the base of the chandelier and do not protrude anywhere.
I laid the wires to the additional outlet in a cable channel, since I didn’t want to scratch the wall and spread dirt. During the next toilet renovation, I will hide the wiring in the wall.
Now you need to make adjustments, set the timer time, the sensitivity of the motion sensor and the work can be considered complete.
Although the light has now begun to turn on and off automatically, out of habit, when approaching the door, the hand reaches for the switch, and when leaving, everyone constantly turns off the light without even noticing. I had to short-circuit the terminals of the switch on the wall so that it would no longer affect the turning on of the light, since if the light is turned off by the switch and turned on again, the motion sensor is triggered only after the time set by the timer has expired.
Possible problems and their solutions
If the sensor turns on the light properly, but there are problems turning it off, the first thing you need to check is the light delay switch. Perhaps the TIME regulator is set to the maximum operating time, which is why the intervals between operations are too short: the lamp does not have time to turn off.
Advice! It is possible that the detector sensitivity is insufficient or the LUX parameter is incorrectly configured. You need to unscrew the knobs to the maximum and check the serviceability of the device.
You might be interested in this PSU from an electronic transformer
TIME and LUX layout option
Incorrect installation location selected
To install the device correctly, it is necessary to take into account the principle of its operation: the IR sensor responds well to “past” movements, but may not work when moving towards it, while ultrasonic and microwave sensors perceive movement “towards themselves”.
If there is any object between the device and the coverage area, this also causes misfires: it is necessary to remove obstacles in front of the emitter. Sometimes electrical appliances give false alarms when they are close to the lamp. If such a problem is noticed, you need to place the lamp a little further away.
Advice! Infrared detectors respond to any object that emits heat. Therefore, it is worth inspecting the room for the presence of heating devices.
Motion tracking technologies
Lamp burnout
If the device does not react at all to an object entering the zone, the cause most often turns out to be a normal lamp burnout. Before installation, you should test the bulb in another lamp.
Wiring faults
When all possible causes of problems have been checked, but the sensor still does not start, you need to test all sections of the circuit with a multimeter. If the problem is in the wiring, you need to de-energize the system and reconnect the device.
Important! Sometimes the problem lies in the connection of the wire to the terminal block. Due to dust and debris, the wire oxidizes and the detector stops working. It is necessary to clean the cable from oxidation and crimp the end with NSHVI.
NShVI tips
Defects and incorrect operating conditions
It happens that the cause of problems lies in the device itself: a manufacturing defect or damage during transportation (typical of cheap devices with a low degree of protection). If the sensor does not have good protection from moisture, but it was placed in a place open to water (outside a protective canopy, in the bathroom), then water could get inside, causing the electrical appliance to fail.
Advice! Before purchasing, you should always inspect the detector for visible damage; if possible, it is better to check its functionality in a store. You cannot throw away warranty cards and boxes from equipment: if there is a problem, you can replace the device under warranty.
Motion sensor packaging
You don’t need to be a master to understand how to properly connect a motion sensor to automatically turn on the light: just follow the simple instructions for operating and setting up the device. A motion sensor can save up to 50% of electricity, which, coupled with ease of use, will pay for the cost of the device many times over.