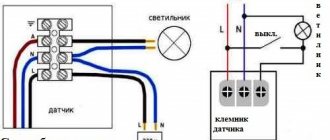
How should the sensor work? As soon as a moving object (person) enters the area that needs to be illuminated, the sensor sends a signal to the lighting device - the light turns on. After the time specified in the settings, the light turns off. What needs to be configured for the sensor to work properly? Let's tell you in order.
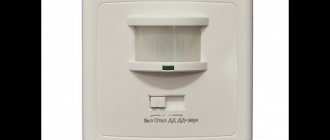
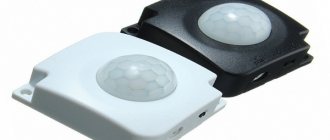
There are regulators on the back wall of the device. First of all, sensitivity (denoted SENS ). This parameter determines how the sensor will react to movements. You need to move the regulator micron-by-micron to achieve precise adjustment. The check is carried out as follows: enter the coverage area; If the light does not turn on, it means that the sensitivity of the sensor needs to be increased. If the device reacts too often to minor movements, for example, swaying tree branches or the appearance of animals in the detection zone, the sensitivity should be reduced.
the glow time correctly (indicated by TIME ). Decide approximately how much time the person will spend in the illuminated area. For example, on the landing or in the corridor - no more than 1 - 2 minutes, on the porch or parking lot - a little more. We recommend adding another 1 minute to this time and setting the desired value using the regulator on the sensor. In order to save money, you should not set the minimum value: the light will constantly turn on/off, which is not entirely comfortable for a person and negatively affects the resource of the device.
Many models of motion sensors have a light intensity (indicated by LUX ). It is necessary to ensure that the light turns on only at night. This is especially important for rooms with windows, where during the daytime there is natural light and when people appear, the lighting device should not be turned on. This parameter is configured in this way: the regulator moves from the “sun” icon (daylight hours) towards the “month” icon (dark time). So, the sensor will only work at dusk and in the dark.
Difference from presence sensor
Presence sensors (PS) differ in their functional purpose from motion detectors, although they are similar in many respects. DP are very sensitive devices. They can respond to head shaking and hand movements of a person present in the control area of the device.
When the last employee leaves the office, the presence sensor sends a signal to the switching device to turn off the lights, air conditioners, or switch the heating systems to economy mode. Also, a dual-purpose device can turn on a DVR, which is necessary for the operation of a security video surveillance system.
The motion sensor can also perform security functions: turn on sound alarms, video recording cameras, and regulate the operating modes of various equipment. Still, the main task of the DD is to record the appearance and movement of a person in the control zone, and accordingly turn on the lighting and all of the above equipment.
How to place the sensor
For a device with a sensor to perform its functions, it must be placed correctly. To obtain maximum savings, it should be installed in areas with the greatest concentration of people.
Ceiling sensors are installed mainly in small rooms. If possible, they are installed at a height of 2.5–3 m. Then the range of action will be 10–20 m.
Wall sensors are popular in indoor and outdoor applications. They need to be installed at a height of two to three meters. To get a larger viewing radius, it is better to mount it in a corner. It is important to remember to point the device at where people are passing.
In exceptional situations, the device can be placed outdoors at any height up to 10 m. Then the device must be installed in such a way that it hangs at an angle of about 40 degrees to the horizontal surface. It is important to remember that the larger the radius, the higher the chance of false inclusion.
Useful tips
Proper connection of the motion sensor to turn on the light is far from the only condition for the reliability of its operation. A number of conditions must also be met:
- All extraneous lighting devices must be removed from the device’s coverage area, including light from a street lamp.
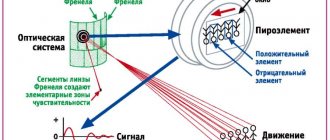
- Heating radiators and other sources of air currents should not enter the sensor lens, due to which it may begin to trigger falsely.
- There should be no large objects, decorative elements, or furniture between the detector and its scanning area.
Recommendations for choosing an installation location in different conditions
In everyday life, a motion sensor for turning on the light can be installed in a variety of situations, and there are individual recommendations for its installation and adjustment:
- In the garage, attic, pantry, boiler room and other utility room, the device is mounted opposite the door so that the lighting is activated immediately.
- In the bathroom, toilet, toilet, it is better to use a ceiling sensor that operates on a permanent basis.
- It is necessary to install several sensors and lights on the stairs so that its entire surface is covered by the devices.
- On the street, in the yard, over the gate, on the path in the garden and in the parking lot, detectors can be installed for each lamp separately, taking into account adjustments to cover the entire trajectory of movement.
When choosing a sensor to turn on light in a rectangular room (standard rooms) based on the movement of an object, preference should be given to those models that have a circular or oval detection diagram.
General recommendations before connecting
Correctly installing and adjusting motion sensors to turn on the lights is not enough - it is important to comply with the conditions for safe handling:
- The sensor body is made of plastic, so their installation and operation should not involve mechanical damage.
- Devices installed outdoors, as well as in rooms with high atmospheric humidity, must have reliable protection. Outside the house, it is better to install them under a canopy.
- Not all detector models work well with LED and fluorescent lamps.
- For ease of use, the motion sensor can be mounted with a parallel switch. When necessary, you can turn on the light as usual, and then for short-term use, switch the chandelier to the initiation mode from the movement of an object - in the “off” position of the switch.
Basic installation recommendations
While paying a lot of attention to adjusting the motion sensor to turn on the light, we must not forget about the features of its installation:
- To prevent the detector from triggering when a cat or dog runs by, it is necessary to adjust the angle of the field of view so that the detection zone begins at least one meter above the floor level.
- When installing the device with a visibility of 180 degrees, the best location for it will be a wall or ceiling.
- Models whose viewing sector has a customization function can be installed anywhere in the room (taking into account the range). However, you need to remember that the lens must include doors or a passageway.
Attention! Modern models of motion sensors are multifunctional devices that can not only turn on the lights, but also the air conditioning system, audio and video system, TV and other electrical appliances in the house.
How to set up a motion sensor for an indoor lamp
By purchasing a detector to trigger a luminaire in response to detecting movement of an object within the coverage area, one configures it to suit specific operating conditions. However, let's look at how to configure a motion sensor for indoor lighting in a general situation:
- Install and connect the sensor in accordance with the manufacturer's instructions and electrical installation rules.
- Adjust viewing angle.
- Test the device with factory settings.
- Make adjustments, if necessary, by tightening the regulators.
All modern motion sensors are equipped with two or three regulators. Below we will look at how to configure them correctly.
What indicators can be adjusted in the sensor?
As a rule, all the latest models of motion sensors have the ability to adjust the illumination, sensitivity, delay time for turning off the light, as well as the installation angle.
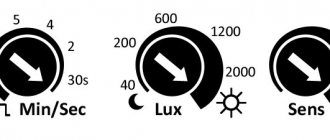
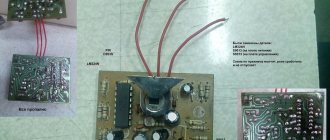
If you adjust all these indicators correctly, you can save up to 50%, which is quite significant. And it is worth considering that in outdated models of motion sensors there can only be two adjustable indicators - sensitivity and delay time or illumination. Example in the photo below:
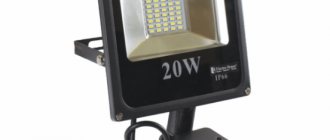
Now let's take a closer look at how to adjust the indicators on a lamp or spotlight.
Setting up sensor readings
First of all, the working coverage area of the sensor is adjusted. In new models of motion sensors, the detector is made as a separate component, which is mounted on hinges. You just have to configure it in such a way that the infrared rays can cover as large a detection area as possible. It is also worth considering that the installation height of the motion sensor also plays an important role in this matter, so you should try to choose the most optimal installation height.
Motion sensor sensitivity
Next, you reduce the sensitivity value until you get the optimal operating mode of the sensor. However, you should understand that if you have a large dog that can run past the sensor, then setting the sensor to ignore its presence most likely will not work.
Motion sensor light indicator
Next, you can adjust the illumination indicator (directly on the sensor this indicator is indicated as “LUX”). Using the illumination indicator, you can adjust the operation of the sensor so that it is triggered and turns on the lighting only when it gets dark, since lighting during the day is usually not required. Just like with sensitivity, we first need to set the limit value of the indicator and then, when it gets dark, we can adjust the operation of the sensor according to the required level of illumination.
Motion sensor delay time
At the very end, you have to adjust the delay time indicator, which is usually marked “TIME” on the sensor. This indicator is the easiest to set up; you just need to set the time from 5 seconds to 10 minutes at your discretion. It is worth noting that there are motion sensors in which the delay time can increase with each new operation. For the first setting, it is recommended to set the TIME control to its minimum value. This will help you check your performance as quickly as possible.
You can buy motion sensors of various designs from the well-known manufacturer IEK directly on our website via the link /datchiki-dvizheniya-i-fotorele/
How can you adjust the detector?
In modern motion sensors (MS), you can adjust the sensitivity, illumination, delay time for turning off the light and installation angle.
All these parameters, when properly configured, can save up to 50% of energy, which is a very significant figure. However, it should be immediately noted that not all motion sensors have three controls. In older models, you can only adjust two parameters - delay time and sensitivity, or delay time and light level
Sensor placement rules
In order for the DD to work most efficiently, it is installed in areas with heavy traffic of people. Configuring the sensor for indoor and outdoor lighting is carried out according to this rule.
According to the type of installation, DDs are divided into ceiling and wall. But their working principle is the same. The operation of the devices may only be affected by local operating conditions.
Ceiling placement devices are more often used inside buildings. The recommended installation height for motion sensors for lighting is 250-300 cm. The device will pick up signals at a distance of 5-10 m.
Wall-mounted devices can be mounted indoors or outdoors. But more often they are used when arranging external lighting. Recommendations for placement:
- Inside buildings, it is recommended to install wall-mounted DDs at a distance of 2-2.5 m from the floor, preferably in the corner of the room. This will make it possible to get the maximum viewing angle.
- On the street, sensors can be placed at a height of up to 10 m, and should be directed in the direction of maximum human movement. For effective operation of the device, it is recommended to mount it at an angle of 40º to the ground surface.
The range of wall-mounted devices is different for each model (see technical specifications when purchasing). It should be taken into account that the percentage of false alarms of the device increases significantly when the beams are widely scattered.
Checking the correctness of the settings
Before fully connecting the motion sensor, you need to check the correct operation of a number of parameters:
- Viewing angle. If the sensor sensor responds with a delay, you need to recheck this parameter. It may not be adjusted correctly.
- Illumination. Correctly set illumination level will allow the light bulbs to work as economically as possible. If the sensor is triggered at the time of day when it is needed, it means that the setting was made correctly. If the sensor triggers when it is still too light, then additional adjustment is required.
- Delay. The lights should turn off at the set time. Desirable, no more than 1 minute.
- Sensitivity. The optimal value can be determined exclusively experimentally. Therefore, the user must check whether the sensor responds correctly to people and ignores animals.
Setting up motion sensors yourself
After connecting and installing, let's take a closer look at what controls are on the sensor. There are only three of them:
- "LUX". Illumination;
- "Time". Response time;
- "SENS". Sensitivity.
Initially, you need to choose the right angle so that the device works correctly and covers the maximum area. The promise that the DD will react to everything that moves is just words to sell. And it's not even a matter of price.
An incorrect “viewing angle” and placement will cause the device to turn on the light prematurely; it will even react to the movement of branches during a gust of wind when it is placed near trees.
The tilt angle is adjusted by turning the body of the already installed DD. By turning the levers in one direction or another, the device is configured. And depending on how well it is configured, the DD will work!
Let's look at setting up a motion sensor in more detail. We start by setting the response time. This setting determines how long the light will remain on after being turned on. On average, you can set the operating time of street lighting from one to ten minutes. Turn the lever under the “Time” inscription towards “+” or “-”.
It is important to correctly adjust the light level. This will determine when the motion sensor is triggered. It is important that the DD does not operate during the daytime. To do this, turn the “LUX” lever. To set this parameter correctly, it is best to do the adjustment at dusk, when it starts to get dark.
Setting the “SENS” parameter is directly related to the angle of placement of the motion sensor and the coverage of the territory by infrared radiation. It expands or narrows the motion detection area.
Setting the required sensitivity can be a real test for the nervous system. The device can even react to small animals (the same cats walking around the yard). Even more so for large dogs.
The frequency of false alarms will largely depend on how the sensitivity of the motion sensor is configured.
What can be configured
Correctly setting up a motion sensor on the street or in the house will help reduce energy waste by up to 50–70%. The user can adjust the sensitivity, delay, illumination and operating angle. The first three parameters are set on the device itself.
Some may not detect one of the switches on their sensor. This indicates that an outdated model is being used. On these, the delay and one of two parameters are usually adjusted - either sensor sensitivity or illumination.
Delay time
This aspect refers to how long the light will remain on after the motion sensor to turn on is triggered. The sensor is configured according to this parameter taking into account the individual needs of the user. On the device it is usually marked with the word “TIME”. Most models allow you to set the time from 5 seconds to 10 minutes. Experienced users believe that the optimal time is 1 minute.
Setting the delay time is as simple as possible. You need to turn the regulator to the desired position. When the user has set the time, the first time the sensor is triggered, the selected parameter may not be strictly observed, but from the second start everything will work as it should.
When adjusting a new motion sensor for the first time, it is recommended to set this parameter to minimum so as not to wait a long time during the test.
Sensitivity
Sensitivity on the device is indicated by the word “SENS”. Low is indicated by the word low or min, high by high, max or +. This parameter is especially important for pet owners. Setting sensitivity is considered one of the most difficult, because you need to find the value when the motion sensor on a spotlight or other device will not respond to small objects, but will not let a person through. If configured incorrectly, there is a high probability of false positives.
To begin with, it is recommended to set the indicator to maximum and test the correct operation. Then you will need to reach the correct value, gradually reducing the sensitivity.
Do not forget that if there is a large dog in the house, it will not be possible to configure the sensor so that it does not react to it. The only way out in this case is to install a motion sensor to turn on the light where the animal will not fall within its range.
Illumination
The “LUX” regulator can be used to set the lighting conditions under which the sensor will be triggered. This is necessary so that the light does not turn on during the daytime. Firstly, this is a waste of electricity. Secondly, it's not practical.
If you increase the regulator to the maximum, the sensor will only operate in the dark. This is what is best done during the first setup, and then gradually change the sensor response parameter. It is optimal to turn on the lighting when the sun has set and it is already starting to get dark, but the human eye can still see what is around.
On older device models, the “LUX” control may be missing. In this case, an additional light sensor will help optimize operation. It will need to be configured according to the same principle. Therefore, the process of how to set up a motion sensor with two controls can be more problematic than setting up with three.