General wiring requirements
Ensuring fire safety rules when installing electrical wiring guarantees the safety of your home.
Electrical installation in a wooden house can be open, which is the most common, or hidden, which is less common. Electrical installations must be arranged in accordance with the requirements determined by the PUE (Electrical Installation Rules). Wood is a very flammable material, so compliance with all standards and technology is extremely important.
To supply electricity to a private home, you must consider the following:
- Insulation quality. It is advisable to install the electrical panel in a room where there is a partition made of non-combustible material. It must be well insulated;
- Conductor reliability. It is not recommended to lay the cable in PVC corrugation. An insulated three-core copper wire is suitable;
- Efficient and serviceable automation. All groups of devices in the electrical circuit must contain a circuit breaker that operates depending on the permissible current load. To prevent the conductor from overheating, the values should not be overestimated;
- Level of fire and electrical safety. The cable in a wooden house must be laid in such a way as to prevent overheating of the insulation. To do this, the wire cross-section is selected with a margin of approximately 30%, and voids are left in the corrugation and cable ducts. To increase safety, open wiring is installed, which allows you to visually assess the condition of the electrical cable and repair damage in a timely manner.
No. 1. Requirements for wiring in a wooden house
Wood is one of those types of materials that ignite easily and burn well. A wooden house can easily catch fire from a simple short circuit in the electrical circuit, so the wiring process is to minimize the likelihood of a short circuit, and if it does occur, to minimize the consequences. The following requirements are put forward for wiring in a wooden house :
- use only copper conductors with a fireproof sheath;
- insulate conductors in non-flammable material;
- perform the correct calculation of the cross-section of the electrical cable so that the current load does not exceed its capabilities;
- It is better to use open wiring;
- hidden wiring must be located in a metal pipe - using a metal hose or even PVC corrugation with a self-extinguishing effect is not recommended;
- the panel must have an RCD and a circuit breaker;
- It is better to use high-quality materials from trusted manufacturers, since the savings associated with buying cheap Chinese products can result in big problems.
We divide consumers into groups
When planning electrical wiring in a wooden house, a diagram is drawn up. All connection points on it are divided into consumption groups.
So there will be one common circuit breaker for the ground floor sockets, a separate circuit breaker for the interior lighting of the house, and an additional circuit breaker for external lighting fixtures.
Also, individual machines should be installed if there is any powerful electrical equipment: stove, boiler, boiler.
To increase security, it is advisable to create as many separate branches as possible. In this case, costs and the number of machines will increase, but the number of connections that are potentially dangerous will decrease.
It is better to designate consumer groups in the room wiring diagram in different colors for clarity.
How to lay wiring in a wooden house?
When installing external wiring in a wooden house, cables are laid through:
- PVC cable ducts. The most popular method, characterized by simplicity. The only thing is that sometimes it is difficult to calculate in advance the required number of plugs, corners, etc. It is possible to choose the boxes by color, which will make them completely invisible.
- Metal channels.
- Electrical plinth. A modern solution that combines functionality and aesthetics. In addition, such skirting boards are equipped with core clamps.
- Through a metal hose. Of course, visually this is definitely an unaesthetic option. A wooden house will look more like an industrial premises. The corrugated surface of the metal hose is unruly and will sag in the future.
Hidden wiring in a wooden house cannot be laid through metal pipes and corrugated pipes. Moreover, it is forbidden to use plastic boxes.
Methods for installing open electrical wiring
Open wiring in a wooden house is mainly arranged using:
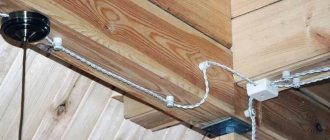
- Insulators. Suitable if rounded logs were used in the construction of the house. Ceramic rollers are good dielectrics. First they are fixed, and then the wires are connected to them. This technology is rarely used and is considered outdated. Ideally, you should use twisted pair cables of different colors;
- Korobov. Wiring in a cable duct or corrugation. Suitable for houses with flat walls, for example, finishing using lining. The wires are well cooled because they are open, which prevents overheating. In addition, they are accessible, which makes them easier to replace or repair. Cable channels are filled to no more than 60% to ensure ventilation;
- Retro wiring. Ceiling wiring and lines along the walls are camouflaged in an unusual and very effective way;
- Staple This method is used when it is impossible to use insulators or boxes.
Basic installation recommendations:
- For wooden houses, it is better to choose VVGng-ls wires (NG marking means that it does not spread fire);
- To pass the line through wooden partitions, walls and ceilings, use metal sleeves;
- It is necessary to arrange a metal platform - a fireproof base for the use of electrical appliances;
- Use only external overhead sockets and switches.
External wiring is installed quite simply:
- The routes are drawn according to the diagram;
- Distribution boxes are fixed where needed;
- A channel is fixed between them where the wires will be laid.
Pros and cons of open wiring in a wooden house
Open electrical wiring in a wooden house has its drawback, which is that all the cable channels on the walls will be visible.
The advantages of this method include the following:
- Ease of installation;
- Use of wires with a smaller cross-section;
- Repair without damaging the finish.
Cable brand for wiring in a wooden house
Electrical wiring in wooden buildings, in addition to its immediate functions, must be safe, therefore there are increased requirements for the methods and quality of its installation.
Judging by statistics, more than half of fires in wooden houses occur due to faulty electrical wiring. The main cause of such malfunctions is a short circuit.
Most often due to violation of wire insulation due to mechanical damage or increased load on the electrical wiring.
Why is this happening? In order to save money and time, the wire is often installed on wooden structures, hidden between wooden beams or behind the surface of the ceiling, in wooden voids and baseboards.
VVGng-LS and NYM are best suited
. NYM is more expensive, but it has an additional layer of insulation and is generally more reliable, in addition, it is more convenient to cut.
The cable must be three-wire (for sockets). Regarding lighting lines, it is also necessary to have grounding of lighting devices; this should be taken into account, but as a rule this rule is neglected.
The best option is to ground at least powerful lighting fixtures, such as street lighting floodlights or large powerful chandeliers.
In wooden houses, wiring can be installed either hidden or in cable channels (ducts). If the wiring is internal (hidden), then it must be done in pipes or a metal sleeve. It is unacceptable to use plastic corrugation for internal wiring; in rare cases, fire-resistant corrugation is used.
Rules for electrical installation of closed wiring
Installation of hidden wiring in a wooden house must comply with certain rules:
- Horizontal laying is done only after the walls have been installed. Vertical channels are drilled when the crowns of the log house are installed;
- In order to stretch the line, a conductor wire is laid inside the pipe;
- Interior passages and installation sites must be insulated using liners, asbestos, metal boxes, alabaster, etc.;
- It is necessary to take into account the number of highways when attaching. If one armored sleeve contains several cables, then greater thickness is required;
- It is necessary to avoid contact between wires and wooden surfaces. The wiring must be completely protected by a metal box or pipe;
- To mount the tube into the wall, you will need to make a hole for fastening, a hole, or cut out a recess.
The nuances of installing hidden wiring in a wooden house
Hidden electrical wiring in a wooden house has some nuances:
- Wherever there are sockets, switches or distribution boxes, you need to leave a tail of 100–150 mm for wiring and connection;
- The height of the electrical points is set at your discretion;
- For internal wiring, the wire is taken with a larger cross-section than for external wiring;
- Insulated cables are used, which are pulled into a corrugated sleeve made of metal or non-flammable plastic;
- Distribution boxes are needed above the switches;
- During installation, you will additionally need self-tapping screws, brackets for fastenings, a drill, and a wood crown;
- Hidden wiring along the wooden ceiling is located 150–200 mm from it;
- To prevent the wiring from creating obstacles when finishing a log house, the corrugated wires are fixed between the logs with self-tapping screws and clips.
CS-CS.Net: Laboratory of the Electroshaman
In a post about Kabanovo, I touched on the topic that everyone adores so much about hidden wiring in a wooden house and the fact that it should be carried out in steel pipes, and not all sorts of corrugation and other crap. One customer had Kofulso pipes that surfaced, and it seems that for sections up to 2.5 square meters the thickness of the pipe wall is not standardized and therefore such pipes will be rolled.
BUT it turned out that now this is NOT SO. I give my word to Alexiy, as a great specialist in regulations and new rules .
On March 2, 2021, it was approved by Order of the Ministry of Construction and Housing and Communal Services of the Russian Federation dated August 29, 2021 N 602-pr and SP 256.1325800.2016 was put into effect, which states that the minimum wall thickness of steel pipes for wiring is 0.5 mm. And the wall thickness of the Cofulso pipe is 0.25-0.3 mm.
Here's how it was in SP 31-110-2003:
Old GOST (pipe cross-section for 2.5 is not standardized)
Here's how it turned out in SP 256.1325800.2016:
New GOST (pipe cross-section for 2.5 is already standardized)
There is a joke here with the interpretation of the data in this table. This is incomprehensible to my mind! [ from CS : this is if you approach the standards strictly and formally. It’s clear that this is “up to 2.5”, but go and prove it to the court or insurance companies when examining fire cases and compensating for damage]
If you read it literally, then the maximum copper cross-section for fixed wiring “up to 2.5” is exclusively 1.5 mm square. (after all, it’s not simply written “2.5” or “up to 2.5 inclusive” or “2.5 or less”). A 2.5 mm sq. for copper it is completely absent from the plate!!! Therefore, for 2.5 mm sq. take as for 4 mm square. - is it logical?
Thus, for 1.5 mm sq. wall is at least 0.5 mm, and for 2.5 mm sq. - 2.8 mm - so what? Or for 2.5 mm sq. — 0.5 mm? How is this to be understood?!
Despite the fact that the simplest extrapolation shows us even in the most optimistic version (in order for the Trend line to coincide with the points of the graph, we need to take not 2 and 2.5 mm, but 2.65 and 2.7 mm!):
Extrapolation of sections and wall thickness
Wall thicknesses of 2 and 2.5 mm are taken as standard - from GOST for water and gas pipes, which are usually used for electrical wiring (Table 1 - full range, Table 2 - light series for thread rolling).
Table of wall thicknesses of VGP pipes
In short, changing the table did not add much clarity.
Another question is that the bellows are produced with a standard wall thickness of 0.3 mm, and the metal hose is 0.2-0.45 (usually 0.25 or 0.3 mm) and therefore does not meet the requirements for a wall thickness of even 0.5 mm.
Thus, it is no longer possible to interpret the wording “not standardized” as “any thickness” - a specific value of 0.5 mm is indicated and corrugations do not fit this value.
That's it! Thank you, Alexiy! It means that just as I continued to tear everyone down for amateur performances, I will continue to tear them down!
Retro wiring
Wiring in a country house in a retro style consists of attaching insulators (ceramic) to the wall along a drawn line at equal intervals, onto which a two-core cable twisted into a bundle is mounted. Everything else is no different from the open method.
There is no additional protection against fire, since the line does not touch the wooden surface.
One of the advantages of retro wiring can be considered a noticeable revitalization of the interior due to the created ambience.
Wiring in an antique wooden house
Installation of external electrical wiring in a wooden house on insulators is carried out with a copper twisted three-core cable in a triple braid. Cable support systems are ceramic insulators attached to the wooden base of the ceiling and wall slabs of the building. Switches, switching terminals of junction boxes, sockets are mounted in the form of an overhead mechanism covered with a ceramic housing. They can also be manufactured in various variations: suspensions, profiles, consoles, fasteners, and various fixing accessories. To lay cables for electrical wiring in a wooden house, craftsmen most often use ceramic insulators.
Modern retro cables are manufactured by manufacturers taking into account modern technologies. Their installation reliably imitates antiquity and surpasses the original in many operational and technical characteristics. According to modern quality standards, wiring is made from materials that ensure reliability, durability, and complete safety. The basis of the first insulating ball is vinyl. The second layer consists of braids (decorative fiberglass, silk threads or cotton fibers and non-flammable fibers). To ensure fire safety, the fibrous fabric insulation is impregnated with fire-resistant varnish.
Retro-style electrical wiring is classified as a decorative segment of installation work. Antique electrics in a wooden house are carried out when installing lighting. Not only lighting fixtures (spotlights, chandeliers, sconces), but also transitions between them and sockets and switches are designed in retro style. On the market you can purchase a huge number of different materials for installing cables on insulators. Among suppliers, European companies occupy leading positions. The cost of electrical installation in a retro-style wooden house varies from 450 rubles/m2.
Why is a ground loop needed?
If you plan to do wiring in a wooden house, then it is necessary to provide a grounding loop. It is mainly needed for the electrical safety of residents, so that they do not receive an electric shock when they come into contact with household electrical appliances. In addition to two wires: zero and phase, there must also be a protective one - PE. In this case, electricity will flow through it down to the ground loop.
In addition, grounding is arranged to protect the electrical appliances themselves, since a person is able to tolerate static electricity, which can harm electronics. It is also necessary to ground so that the static charge does not accumulate on the housings of the devices, but goes into the ground.
Fire protection measures
The main fire protection measures include:
- Selecting a residual current device (RCD) with the required parameters and its design;
- Guarantee that the grounding on each section of the circuit is inextricable;
- Installation of overhead sockets only;
- Organization of a grounding loop;
- Application for hidden installation of metal pipes and cable channels;
- Installation of an additional potential equalization system (EPS) and ensuring its functionality.
Regulations
All rules and regulations regarding electrical wiring in a wooden house are set out in three main documents:
- PUE (ed. 7). The main document for designing electrical networks in residential buildings. Includes all the basic recommendations for choosing auto protection devices, cables, lighting fixtures, junction boxes, etc.;
- SNiP 3.05.06-85. Contains information about the main methods of wiring and introducing electrical equipment into premises;
- SNiP 02/31/2001. Additional information and advice on residential electrical wiring.
For people who do not have a construction education, the technical terminology of SNiPs may be incomprehensible, so studying the PUE will be quite enough.
Installation rules according to PUE
Installation of electrical wiring in a wooden house must be carried out taking into account the requirements of the PUE. For example, you need to keep the following in mind:
- If the wiring is arranged in a hidden way, you need to focus on the PUE (ed. 7) and GOST R 50571.1-2009;
- You should not rely only on the insulation of the wire and its strength, since it is impossible to predict what processes occur in wooden recesses and this can lead to a fire. Over time, the line wears out due to temperature changes, changes in humidity, dust and damage to the insulation;
- Do not install the cable on a wooden surface and then cover it with wooden trim;
- The risk of a short circuit increases when a large current begins to flow through the wires due to the fact that many electrical appliances are turned on at once. There must be a non-flammable reflective surface near the wire, otherwise a fire may start, despite the wood being impregnated with special fire-resistant compounds.
Wiring Requirements
Wood is the most popular material used in the construction of private housing. Despite its advantages, wood is a fire hazardous and flammable material.
Regardless of the material - brick, gas silicate blocks, concrete, timber, if a fire occurs, the open fire spreads to the furniture and interior decoration of the room. First, everything inside the room burns, and only then the load-bearing walls, partitions and roof begin to burn.
Basic requirements for electrical wiring in wooden buildings:
- Safety - Wiring must be routed in such a way as to minimize the likelihood of overheating and ignition of the cable, as well as to prevent the transmission of open flames to adjacent wooden structures.
- Design - the technical characteristics and performance of the wires and components used must correspond to the calculated peak load on a specific section of the electrical network. To prevent heating, the cable cross-section is selected with a margin of 20–30%.
- Laying method - it is preferable to carry out the electrification of wooden buildings using the open method. This allows you to easily and regularly diagnose the state of the electrical network.
- Insulation - the location of the input unit (electrical panel) must be isolated from interface with wooden structures. It is ideal if the electrical panel is installed in a room with a partition made of non-combustible materials.
- Conductor - it is better to use a three-core copper cable with insulation made of non-combustible materials as a conductor. Laying the cable in PVC corrugation is strictly prohibited.
- Automation - a circuit breaker must be installed for each group in the electrical network. The current rating of the circuit breaker is selected in accordance with the load on the site. It is highly not recommended to overestimate the current rating, as this will lead to overheating of the conductor.
It is not recommended to independently lay a power cable and install an electrical network without appropriate experience - this should be done by specialists. But every owner of a private home must know the basic rules of electrification. This will allow him to diagnose existing wiring, and will also provide an opportunity to control the quality of work of hired electricians.
Regulations
Electrical Installation Rules is the main document for electrical wiring design
General requirements and rules for electrical wiring are described in the following documents:
- PUE, edition 7 - the main document used in the design of the electrical network. It describes in detail the choice of conductor, switchgear, automation and lighting.
- SNiP 3.05–06–85 - electrical wiring in old and new houses. Methods of wiring and rules for introducing power cables into residential premises.
- SNiP 31–02 - requirements for the installation of power supply systems in residential buildings. The document complies with the norms and rules described in the PUE.
The information contained in these sources is described in technical language and may not be understandable to an unqualified person. When studying on your own, we recommend relying on the “Rules for Electrical Installations”, since this document most clearly formulates the meanings and concepts necessary for installing wiring in private homes.
Posting calculation
For the calculation you will need the following information:
- What devices will be installed and where;
- Open or hidden wiring is planned;
- Power consumption (here you need to take into account the reserve in case of purchasing new equipment).
Designers often don’t study house drawings at all and don’t take field measurements. They make an approximate calculation:
- The square footage is taken as the area of the room multiplied by 2;
- In simple rooms, choose a cable with a cross-section of 2.5-3 mm2 (usually this is enough to spare);
- For powerful appliances that consume electricity, such as electric stoves, a cross-section of about 6 mm is set.
Drawing up a diagram
Before you start wiring the house, you need to draw up a diagram. When constructing it, you need to take into account the following points:
- Switches should not be covered with furniture; the height to them is at least half a meter from the floor;
- The placement of sockets, panels and meters should be in always accessible places;
- The location and number of sockets will depend on where you plan to place electrical appliances and how many there will be (the height to the socket from the floor is 0.25-0.5 m, approximately one per 6 m2 of area);
- Distribution boxes – do not use metal, plastic or wood materials only;
- Kinks and twisting of the wires should be avoided; they are placed above and below at a distance of 0.15 m from the ceiling and floor.
Preparing a home power supply project
First you need to calculate the total power from all electrical and lighting devices. To do this, you need technical specifications, which can be requested from your electricity supplier.
The project is then developed like this:
- A house diagram is constructed indicating sockets, electrical appliances, lamps, switches, etc.;
- Depending on the electrical point, the type of cable is selected;
- The project indicates the location of all distribution boxes and the power of each device;
- Mark the distance between electrical points and horizontal surfaces: floor, ceiling, as well as between cables and openings;
- You only need to turn the cable 90 degrees;
- Indicate that switching occurs using differential automatic machines;
- To determine the load on the input circuit breaker, the maximum power is calculated (if all appliances in the house are turned on at once).
Selecting cables and electrical devices
The cable for wiring in a wooden house can be selected based on the cross-section to load ratio tables from the electrical engineering reference book. The choice of cable will also depend on the cross-section, which is selected depending on how many electrical appliances there are in the group and what power they have. NYM copper wires are often used in wooden houses; they are durable, additionally insulated and easy to use. If an aluminum wire is used, it should not be bent frequently, otherwise it may break. The safety of lamps and sockets is increased by three-core cables. Don't forget about grounding, including for street lighting devices.
Selection of input cable and circuit breaker at the input
If it is necessary to update the electrical wiring, you can also replace the input cable. Having installed new machines and changed the wiring, they are often faced with the fact that the supply cable cross-section is not enough. And this can lead to a fire. Its cross-section is selected after calculating the load of the devices.
To replace the input line, you need to contact the electricity supply company, since doing this yourself is prohibited.
Single-phase networks are more common, for which one- and two-pole differential circuit breakers are suitable, for three-phase networks - three-pole ones.
When choosing an automatic switch, you should focus on power that is sufficient to break the circuit and prevent a short circuit, and not completely turn off power to the entire house.
Rating and type of machine for single-phase power supply
When choosing an automatic machine, as a rule, they rely on the formula for determining the total power of all devices and the permissible current load:
Imax=P/U*cos φ, where cos φ is the power factor, which is equal to 0.8.
A correction factor of 1.1 is applied to the resulting value. This way you can find out at what current the circuit breaker will trip.
To determine the type of machine, you need to calculate the minimum short circuit current. In the case of a single-phase 220 V network, the following formula applies:
Iкз=3260*S/L, where L is the length of the wire, m, and S is its cross-section, mm2.
The ratio of Ikz to Imax is the main parameter of the machine.
In wooden houses, type C circuit breakers are usually used (mixed load networks).
The input machine is located after the electric meter. The RCD and these devices are fixed in a shield fixed to a metal profile.
Selection of sockets and switches
Switches and sockets are selected based on whether the wiring is planned to be open or hidden, as well as based on the current load and the possibility of switching the block and switch in one frame.
Before installing switches and sockets, a metal mounting plate is first attached to the wall; it can also be made of non-flammable plastic. This is done to improve fire safety.
For the safety of modern appliances, it is often recommended to use three-wire grounded outlets.
Cable for wooden houses is the main element of electrical wiring
The installation of electrical wiring in a wooden building has a number of differences from installation in buildings made of other materials. Therefore, the choice of cable for wooden houses is of key importance for the safe operation and operation of the entire electrical network.
VVGng cable structure for wiring in a wooden house
Features of wooden buildings
Features of the use of cable in wooden buildings are related to the properties of wood:
- Heat-saving, thanks to which the cable does not receive proper cooling during operation, as, for example, in brick houses.
- Flammability, which imposes increased safety requirements.
Important!
Overheating can be minimized by calculating electricity consumption and, accordingly, current loads, and choosing the right cable.
Before carrying out wiring installation work, a project is required that will reflect the main parameters. To prepare a project, knowledge and experience are required, so it is advisable to turn to professionals.
The choice of cable for wiring in a wooden house is influenced by the following parameters:
- Intended purpose of the cable (for external wiring or for internal use).
- Calculation of power consumption for each electrical point in the house.
- Cable resistance to temperature (overheating) and fire (non-flammability).
Cable laying in a wooden house
includes:
- Connecting the power cable to the building and then leading it into the house.
- Laying cables inside the house, from the internal switchboard to each electrical point.
Variety of cables used for wiring in a wooden house
External connection
To connect the cable from the power line to the house, depending on the method, the following is used:
- With the air method. Typically, an aluminum cable of the SIP brand (SIP 2A, 3 or 4) is used, which has a special coating that is resistant to precipitation and can withstand overloads well. One of the disadvantages is difficult bending. The desired cable cross-section is at least 16 sq. mm, which provides a capacity of up to 63A.
- With the underground method. Typically, a copper cable of the VBBShV brand is used, which has a special protective sheath and a steel inner braid.
To enter a cable into a wooden house, a reinforced metal pipe with mandatory grounding is usually used, through which it is brought inside.
Cable entry into a wooden house
Important!
The use of corrugated or rubber pipes for entry is prohibited.
Connecting external and internal cables is done in one of the following ways:
- Connecting the SIP cable to the internal cable using special clamps.
- By connecting the SIP cable directly to the distribution board.
- The connection is made using a machine to which the SIP and internal cable are connected, and the rating on the machine should be higher than that installed inside the house.
Internal connection
To connect wiring inside the house, regardless of the method (hidden or open), a cable with other parameters is used:
- The wires carrying the current are made of copper (preferably).
- The cable and wire sheath is resistant to fire and overheating.
Usually this is a cable brand VVGng-LS or a more expensive analogue NYMng-LS.
The marking “ng” indicates the non-flammability of the shell, and “LS” indicates reduced smoke and gas emissions. If, for example, you use a VVG cable, then when one cable burns, the process will spread to others, while in a non-flammable type the process will be localized.
VVGng cables come in a variety of forms, but the most practical is flat.
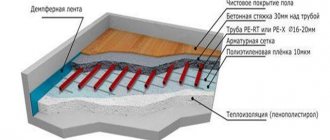
As a rule, cables with a cross-section of 3 * 1.5 sq. mm are used to connect lighting, and for sockets 3 * 2.5 sq. mm. If the house is supposed to use a high-power device, it is possible to use a wire with a larger cross-section.
Table of cable cross-section, power and current
Of the two wiring methods, open installation is safer, and installation using cable channels for a wooden house is also affordable and aesthetically pleasing.
Cable channels for wiring
Installation of wiring using cable channels is simple and quick. The use of additional connections and transitions allows you to obtain any desired design, and the use of plastic in several colors allows you to make it invisible in almost any interior.
Cable channels are made of non-flammable PVC and are best suited to houses with flat walls. One of the main advantages of this type of wiring is the ability to easily make changes if necessary.
Important!
The cable channel must be no more than 60% filled with wires and cables, otherwise the wiring may overheat.
Using cable channels in a wooden house
Tips and tricks
It is recommended to choose the best cable for electrical wiring in a wooden house, since quality is a guarantee of the safety of the house and its residents. Even if the possibilities are quite limited, it is advisable to follow all these recommendations, saving on other materials.
Hidden wiring is the most undesirable and requires the most stringent precautions during installation and project preparation. The cable for open and hidden wiring is no different.
The external method, as already mentioned, is the safest. But nevertheless, a cable for open wiring in a wooden house must in any case have a non-flammable coating and the ability to localize a possible fire.
Preparation of materials and tools
Before installing electrical wiring, you need to prepare the tools and materials that may be needed.
Tools will be needed, both electric and manual:
- Hammer;
- Construction knife;
- Pliers;
- Rubberized shoes;
- Various screwdrivers;
- Latex gloves;
- Voltage tester.
The handles of all electrical tools must be insulated.
Materials are prepared taking into account the installation method, load and subsequent finishing.
Which wire to use for wiring in the house
Despite the fact that aluminum cables are cheaper and easier to install, for a wooden cottage it is still preferable to use copper wires. Although they are almost twice as expensive, their service life can be up to 60 years, while aluminum will last three times less.
Nowadays, wires from pure aluminum are practically not produced; they mainly use an alloy, which will last even less.
In addition, copper has less resistance, which means that with the same power of electrical appliances, the aluminum cable must have a larger cross-section.
As a rule, for frame houses made of timber, logs and other wooden structures, wires that do not support combustion with low smoke emission are used: VVGng, VVGng-LS or NYM.
What are glasses for sockets made of and how to choose them
If several built-in sockets are installed, it will be convenient to use plastic cups, but you need to take into account that they require some distance between the centers of the holes. In this case, it is worth considering the option of metal socket boxes for wood, which will not require additional calculations.
For external sockets, it is necessary to provide a gasket between the wall made of non-combustible materials. Despite the fact that many electrical points already have a back wall, it is still better to use metal to enhance security.
Do-it-yourself installation of electrical wiring in a wooden house, step-by-step instructions
Do-it-yourself electrical wiring in a wooden house, step-by-step instructions:
- First you need to place the input power cable;
- Then install the distribution board;
- After installing the line;
- Secure sockets and switches;
- Organize contact switching;
- Check the functionality and serviceability of the network.
Color-coding cables can make the installation process much easier. For example:
- A yellow, yellowish-green, or green wire indicates ground;
- White-blue or blue – zero;
- The remaining colors mark phase ones.
Entering the power line into the house
It is better to entrust the introduction of electricity into a wooden house to professional electricians. This is a very important section of electrical wiring. Cable entry is essentially the distance from the power line to the distribution box in the house.
The line laying can be:
- Air. Simple line design, inexpensive installation. The main negative point is low aesthetic qualities. The line can easily be damaged by stuck snow or trees hanging over it. The distance to the ground must be at least 2.75 m. Connection to power lines is carried out using special cable fittings and self-supporting insulated wire (SIP). It is necessary to have hooks on the house and supports to secure the reinforcement;
- Underground. The wiring is hidden and looks much neater compared to the overhead line. The use is convenient and safe. The input cable is no longer so easy to damage. However, this method will be more expensive. Installing an underground line is more complicated, since you will need to think through the route of laying the cable and dig a trench under it. At its bottom you need to place a sand cushion, and sometimes wiring is done in pipes, usually steel.
Installation of distribution panel
No branches of the input cable should be allowed in the area up to the main distribution panel, which includes:
- Automatic input. Two or three poles are selected. The seal is placed by the organization supplying electricity;
- Housing made of metal or plastic. For wooden houses it is better to choose a metal body. There are no clear requirements for its dimensions, so it is selected individually with some margin and taking into account possible network modernization in the future;
- Single-pole additional circuit breakers with DIN rails. For each section of the electrical network, a separate circuit breaker is provided (for example, one part is for external lighting of the yard and buildings, the other is for rooms, etc.). The power of circuit breakers is calculated individually, the main thing is that they operate in a timely manner, even with small overloads.
Installing a residual current device (RCD) requires additional costs, so not everyone installs it. When a leak is detected, the device triggers an emergency power shutdown to prevent electric shock. It is better for a professional electrician to select the appropriate RCD parameters.
How to place automation in an electrical panel
In the electrical panel, if there are at least two DIN rails, from left to right at the top there will be an input circuit breaker, an RCD (general) and an electric meter. Further and below are all the other RCDs with automatic machines.
When everything is fully connected, the energy supply system in the house is tested. Turn off all lighting and electrical devices and, one by one, supply power to the lines by turning on the input circuit breaker.
You can go inside the house if not a single machine has turned off. First, turn on all the lamps in the premises and, using indicator screwdrivers, check the phases at the sockets and the absence of voltage at zero and ground.
After making sure that everything is working properly, you can turn off the input machine and tighten all the contacts.
Features of the electrical panel
The electrical panel is arranged as follows:
- Taking into account the diagram, the casing is attached;
- The counter is fixed;
- The input machine is installed on a DIN rail;
- Zero and phase are connected;
- Electrical input into the house and connection to the meter using input terminals is organized;
- Voltage relays and circuit breakers are installed for different wiring groups;
- Electrical devices are connected by wire.
Cabling
The cable is usually laid under baseboards or in channels. This is done in several stages:
- The wire is cut into pieces according to the number of switches and sockets, the length of which is equal to the distance between the switch and the socket plus 150–200 mm;
- Cable channels are installed horizontally and vertically using a building level;
- At the last stage, the cable is laid in the channels.
Popular methods of internal cable routing
Wiring inside the house can be done in different ways:
- Open.
- Laying in corrugated metal pipes – metal hoses;
- Use of electrical boxes;
- Open method.
2. Hidden.
- Using metal pipes;
- With application to the plaster line: at least a centimeter on each side.
Electrical installation of distribution boxes
In the distribution box, power lines are separated and distributed throughout the room. It is installed in places where switches and sockets are connected to the main cable.
To secure the cable in the box use:
- PPE caps. They differ in size and color. Strip the end of the wire by 3 cm, twist it, thread it into the cap and twist it. The ends are placed in the box so that they do not touch the rest of the twists;
- Twist with electrical tape. After stripping the ends, they are twisted together and wrapped with electrical tape. The insulated twist should also be located inside the box;
- Special vags. They differ in cross-section and number of holes for wiring. Selected for specific sizes. The cable is stripped to 1-1.5 cm and inserted into the holes until it clicks. The ends are connected in different directions to prevent short circuits.
Protection of wires between junction boxes
The highest priority way to protect electrical wiring is corrugation and cable ducts. Both must be made only from non-flammable materials. In addition, there is very little oxygen inside them necessary for combustion. In the event of a short circuit or fire, the machine will turn off the electricity supply, and the wiring in the corrugation will not burn.
Installation of switches and sockets
Before attaching switches and sockets to the wall, you need to lay asbestos or aluminum insulation. The sockets should not wobble, so they should be screwed firmly and tightly. If a three-core cable is used, then a green-yellow wire is used for grounding.
Installation of lighting fixtures
There are three main types of lamps installed in a wooden house:
- Built-in;
- Invoices;
- Street.
To increase fire safety, a metal platform must be provided under wall lamps (sconces) and similar ceiling lamps. Each lighting fixture has contacts so that it can be connected to a three-phase network.
Grounding device and installation of RCD
An approximate ground loop arrangement looks like this:
- A triangular depression is dug in the ground (each side is about 1 m);
- Metal rods (3 m in length and 3 cm in diameter) are inserted into the corners, which are combined with metal corners or welding;
- A loop is welded in one of the corners, to which a steel rod is attached; it is laid in a trench and connected to the ground in the electrical panel.
The RCD is mounted in the panel behind the meter and provides additional protection. The device’s task is to respond to a leak in time.
The nuances of connecting an RCD to the home electrical network
RCD connection option
To prevent the RCD from tripping for no reason, the following basic mistakes should be avoided when installing it:
- Do not ground the neutral wire after the RCD;
- Do not connect zero to ground;
- The neutral wire should not go past the RCD;
- Damaged insulation should not touch the housing of electrical appliances;
- With several RCDs, do not attach the zero and phase of one to the terminals of another;
- Do not connect the phase to the zero contact and vice versa.
Circuit breaker
For wooden houses, a type C circuit breaker is suitable; it works in networks with different electricity consumers.
If the house has a three-phase wiring, then the machine must be three-pole, if it is single-phase, it must be single-pole.
The input circuit breaker is mounted after the electricity meter.
The machines in the panel are attached to a DIN rail; they have special fastenings. Wiring in the premises is done after installing the machines.
When choosing an input circuit breaker, you need to take the maximum voltage as a guide.
RULES FOR LAYING HIDDEN ELECTRICAL WIRING IN A WOODEN HOUSE
In order to prevent a fire caused by the listed reasons, among other measures, the PUE proposes to carry out hidden installation of wires and cables in metal pipes, hermetically connected to each other at the joints.
It is this rule that most “stresses” home owners and electricians who perform wiring installation work.
What does this give?
I will now consider the main points of installing hidden wiring from the standpoint of compliance with PUE standards and compare them with possible alternative options.
1. Protection of hidden wiring:
- when subsequently carrying out housework;
- damage to insulation by rodents.
It should be noted that in both cases a metal pipe is the best option, but let's mentally replace it with a metal hose.
At the same time, if during repair and other work we take into account the location of the cable routes, then we will not face the first problem. By the way, mice won’t chew it either.
2. Fire due to overheating.
It should be noted that the pipe as such is not protection from this. It itself can become red hot and cause a fire.
A circuit breaker protects against short circuits (overcurrents) in the wiring.
By the way, when choosing it, you should take into account that it triggers almost instantly only during a short circuit. When overloaded, the shutdown time can reach tens of minutes. However, in the link provided it is written about this.
Current leaks are detected by residual current devices (RCDs).
In the context of the topic of installing hidden electrical wiring in a wooden house, we can talk about a fire protection RCD, that is, with a differential current of about 300 mA.
As for bad contacts in sockets and switches, the way to avoid the problems caused by this is to correctly select switching devices for your home and periodically monitor their condition during operation.
Another weak point is the twisting of the wires. They should be completely excluded. All wire connections should be made using standard connectors (terminals, plugs, etc.). Moreover, they should not be in hidden routes at all.
Talking about exceeding the load on the wiring is, to say the least, ridiculous. Obviously, when calculating it, all involved capacities must be taken into account, and subsequently there is no need to “add on” additional consumers. This is the only rule that works effectively.
Installation errors
Errors in electrical wiring can result in a fire. When installing electrical equipment, the following should be taken into account:
- The cable is in a groove without insulation. Installation in a groove is allowed, but in this case it is necessary to lay the wiring in a metal corrugation or in a steel tube;
- Laying along the baseboard. There should be gaps in the baseboard of at least 1-1.5 cm. Due to lack of space, the wiring will touch the baseboard, which can lead to overheating;
- Hidden wiring on a wooden ceiling. Additional insulation measures and a properly selected cross-section are needed. The line should not go too close to the ceiling or other wooden surfaces.
Boxes for switches and sockets must be metal. Plastic structures and corrugated PVC pipes cannot be used.
Common installation mistakes
Making mistakes when installing wiring in a wooden house often leads to fires and fires.
The most common mistakes made during work:
- Conducting a hidden electrical cable under the ceiling. This solution is often implemented in wooden houses with several floors: the cable is laid in the interfloor ceilings. However, what is not taken into account is that in this case the cable is unacceptably close to the tree, and if the cross-section is chosen incorrectly, it will become very hot. This increases the likelihood of fire.
- Route the electrical cable under the baseboard. The main danger in this case is insufficient space. The cable will again come into contact with the wood and overheat. Therefore, normal gaps in plastic skirting boards are no less than 1-1.5 centimeters.
- Electrical wiring through corrugated PVC pipes. It is better to use metal channels.
- The electrical cable is carried out without insulation. This error occurs when installing hidden wiring. It is necessary to place not a bare wire in the groove, but a corrugated metal or a steel tube. Boxes for switches and sockets should also be made of metal.
Electrical wiring test
Electrical wiring tests are carried out by electrical engineers using special equipment. Such measures help prevent breakdowns and accidents. The check includes:
- Visual assessment;
- Ground resistance measurement;
- Control of automatic machines and protective devices;
- Checking the circuit between the devices and the ground electrode;
- Testing the phase-zero circuit.
After all activities, a test report is drawn up and issued.