Protecting floors and walls from moisture in the bathroom and other rooms with running water is the most important stage of finishing work, since there is a possibility of leaks.
This measure is even more significant in a wooden house: wood is an organic material, therefore in damp conditions it becomes a place for intensive reproduction of fungi and other microorganisms.
We will consider methods of protection against moisture in this article, the topic of which is waterproofing a wooden floor in a bathroom: materials.
What waterproofing materials are there?
The construction market offers a wide range of waterproofing materials. All products can be divided into several groups if classified according to the method of applying waterproofing.
Group #1: painting
This group includes all types of mastics and emulsions produced on a polymer or bitumen basis. After applying these compounds, a stable waterproof surface is created.
Painted waterproofing must be applied in layers, maintaining a certain time interval between approaches.
Group #2: stick-on
This group contains roll or film materials made on a bitumen or polymer base. Gluing materials onto a wooden surface is done using hot or cold mastic applied in several layers.
One of the significant disadvantages of using adhesive waterproofing is the presence of seams between the sheets, into which moisture can penetrate.
The problem is solved by laying the sheets overlapping, as well as pouring rolled waterproofing with waterproof cement-based compounds, such as hot bitumen or pitch.
Before applying heated bitumen, sheet or roll waterproofing is covered with reinforced fiberglass.
After the applied composition hardens, a seamless layer is formed over the entire surface, which meets all technological requirements for waterproofing.
Group #3: impregnating
This group includes all impregnating materials that contain water-repellent cement with the addition of crushed sand and chemicals.
When applying such waterproofing, the surface of the wood is impregnated and made waterproof. This type of waterproofing is not recommended for residential premises.
Of the listed groups, only the first two are suitable for waterproofing a bathroom in a wooden house.
They are often combined, using mastics for waterproofing hard-to-reach places, and rolled materials for smooth surfaces.
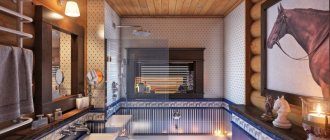
The wooden walls of the bathroom in the house are impregnated with a moisture-resistant composition, and a waterproofing layer is provided under the tiled floors
How to apply waterproofing material correctly?
Before applying waterproofing, the surface is cleaned and primed with deeply penetrating compounds. After the primer has dried, a layer of bitumen mastic is poured in, with special attention paid to sealing the cracks present in the places where communications are laid and coating the corners.
Remember, while the mastic is drying, you cannot dust it. A day after the bitumen mastic has dried, the next layer of waterproofing is laid in the form of canvases cut to the size of the bathroom.
Their number is calculated taking into account the fact that they will overlap each other, overlapping each other by 10-15 cm.
It is recommended to make the floor in the bathroom lower than in the rest of the house. A small headroom will save you from flooding the entire house in the event of a sudden emergency such as a pipe break or a leak in a connection, a washing machine breakdown or other incidents.
Waterproofing your floor will prevent water from seeping into your basement or lower level of your home. The water will stand until its level rises above the remaining supply.
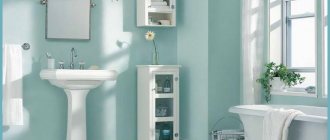
Particular attention is paid to the so-called “wet” zone, which includes, in addition to the floor, walls near the bathroom, shower stall, and around the washbasin within a radius of 50 cm.
The ceiling in the bathroom is made suspended from moisture-resistant plasterboard or glossy PVC panels. Wooden structures, camouflaged behind the finishing, are primed and coated with mastics.
Scheme of required places for applying waterproofing in a bathroom in a wooden house, taking into account the minimum distances around plumbing fixtures
Video description
About mistakes when waterproofing premises in the video:
Stages of work
For walls there is also a preparatory stage, which has almost the same appearance as for the floor:
- cleaning of old coating;
- correction of surface defects;
- applying a primer with hydrophobic and antiseptic properties.
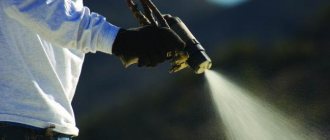
After the soil has dried, apply a waterproofing solution with a spatula or trowel and spread it evenly over the wall. And since this is not putty, a perfectly flat surface is not needed here - small unevenness and roughness is compensated by a layer of tile adhesive.
Even moisture-resistant drywall needs to be protected Source finkarus.ru
Details about waterproofing a wooden floor
In wooden houses, as a rule, the floors are also made of wood. Concrete screeds are not welcome, as they increase the load on the foundation of the house and act as cold bridges through which heat flows out of the living space.
Therefore, in a wooden house, floors are laid on joists, which are thoroughly impregnated with waterproofing materials.
Before starting to process the logs, waterproof the foundation by coating it with mastic or plastering it with a special solution obtained from a mixture containing polymer additives.
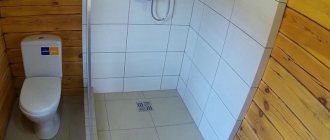
A subfloor is laid on antiseptic-impregnated logs, which is covered with rolled waterproofing. Floor tiles are laid on top of this material.
Technology for laying roll waterproofing on the floor
One of the main factors influencing the choice of materials in modern construction and renovation is the speed of their installation. This can be achieved through:
- reducing interlayer laying intervals;
- reduction of intervals for performing related technological processes.
Self-adhesive bitumen-polymer film used for waterproofing the floor in the bathroom of a wooden house is one of these materials.
This option is also suitable for waterproofing interfloor ceilings, bathrooms, rooms with wet technological processes, and kitchens.
The film adheres perfectly not only to concrete bases, but also to wooden ones. Therefore, this roll material can be used for waterproofing horizontal and vertical surfaces in a wooden house.
The entire process from preparing the floor to applying ceramic tiles to it is carried out without interruption, that is, in one cycle. Waterproofing a bathroom floor can be done using this technology in one day.
Particular attention must be paid to preparing the base, since the quality of installation of the waterproofing membrane depends on this stage.
Schematic illustration of the installation of moisture-resistant floor and wall surfaces in a bathroom located in a wooden private house, cottage or townhouse
Work execution algorithm
- First, sweep or vacuum all dust and dirt from the subfloor to ensure good adhesion of the waterproofing film to the wood base.
- The next step is priming the floor, during which a bitumen emulsion primer is applied to the entire surface with a roller, which does not have an unpleasant odor, since it is diluted with ordinary water and not a solvent. The primer is also applied to the walls around the perimeter of the bathroom, with a strip width of 20 cm. In corners and places difficult to reach with a roller, the primer is applied with a brush.
- Check the degree of drying of the applied primer using a cotton pad, which is applied to the treated floor. If the cotton pad remains clean, the bitumen primer has dried. Please note that the entire drying process at a room temperature of 20 degrees will take no more than 20 minutes.
- After the primer has dried, they immediately begin laying the waterproofing membrane, which can be used as a self-adhesive bitumen-polymer roll material. Its installation does not require the use of open fire, which is very important for wooden buildings. The material can be easily installed on your own; in exceptional cases, you can get by with the help of your wife or mother-in-law.
- When rolling out the roll, measure out a piece of the required length and cut it off with a sharp stationery knife, allowing the material to rest for a while. Then they twist the fabric from both ends to the center, cut the protective film, carefully remove it, unwinding the roll in the opposite direction, while the material is firmly glued to the base.
- Air bubbles are removed with a brush, which is used to iron the laid fabric several times.
- The next sheet is laid with an overlap, the width of which should be at least 100 mm. The overlap area is treated with a primer or bitumen mastic. Roll thoroughly with a heavy roller.
- After applying the roll waterproofing to the horizontal surface of the floor, they begin to treat the walls adjacent to the floor. To do this, canvases 30-35 cm wide are cut, of which 10 cm goes on the floor, and the rest on the wall. An incision in the film is made at a distance of 10 cm from the edge. First, the waterproofing material is glued to a vertical surface, that is, to the wall, and then placed on the floor, previously lubricated with primer.
- After completing the installation of self-adhesive roll waterproofing, they immediately begin laying ceramic tiles on the floor.
Types of wood for bathroom floors
Tree species tolerate the effects of moisture differently.
In the bathroom and other similar rooms it is recommended to use the most moisture-resistant:
- larch;
- teak. This wood is richly impregnated with oil, which explains its increased resistance to moisture;
- Cork tree. This breed is attractive not only for its moisture resistance, but also for its durability. Cork is the bark of a special type of oak tree. It is called the cork tree, as well as the cork and western oak;
- thermotree. This is wood treated with superheated steam in an oxygen-free environment. As a result, it becomes resistant not only to moisture, but also to fungi.
Coating waterproofing: the optimal solution
To protect the surfaces of the floor and walls in the bathroom of a wooden house, water-repellent coating materials produced in the form of various mastics are ideal:
- Polymer-bitumen mastics are easy to apply and durable in use.
- Polymer-cement mastics are capable of forming a strong layer of waterproofing film, one of the properties of which is a good degree of bending resistance.
- Bituminous mastics are among the cheapest coating waterproofing materials with reduced quality, since they become brittle at subzero temperatures.
- Bitumen-rubber mastic compositions have higher plasticity, and therefore are able to withstand those low temperatures at which conventional bitumen mastics begin to collapse. Naturally, bitumen-rubber mastic is sold at a higher price.
Another scheme for installing waterproofing in a room with a high level of humidity, which includes a bathroom in a wooden house
Polymer-cement mastic consists of a powder containing moisture-proof binders and inert fillers. It also contains water-dispersed acrylic polymers.
After mixing all the components, a waterproofing material is obtained that has a high ability of adhesion (adhesion) to any type of base.
Tip #1:
If you additionally lay a reinforced fiberglass mesh between the layers of polymer-cement mastic, the waterproofing will be even stronger and more reliable.
Tip #2:
Seams connecting vertical surfaces to horizontal planes must be reinforced with elastic sealing tape.
Wall and ceiling protection
Waterproofing walls in shower rooms is done in several ways.
And quite often without tiles, using wood finishing elements. The simplest, but at the same time least preferred, method of moisture insulation in houses made of timber or logs is impregnation of the log house elements with specially water-repellent compounds without additional finishing.
This approach is acceptable only when the bathroom is located in the interior of the house. But even in this case, after two or three years, serious problems with inter-crown seals may arise.
Vapor barrier under the frame
The standard solution is to install a frame on which either drywall is attached (under tiles) or lining made of durable wood is mounted.
Direct waterproofing - with the application of insulating mastics to the walls - is carried out only in “wet” areas. Over the rest of the area, the walls are sheathed with a vapor barrier film, and in such a way that there is a ventilation gap between the film and the next level of finishing.
When performing vapor barrier work yourself, you should always control the direction of the membrane. The smooth side of the film should be directed towards the insulation (or towards the wall, if internal walls are sheathed), the fleecy side - towards the room.
Rule for laying vapor barrier
Protection of ceilings is carried out using the same technology as for walls, only instead of a frame under plasterboard or lining, a suspended ceiling structure is installed.
Preparing a wooden floor for waterproofing
Before applying coating waterproofing to the surface of a rough wooden floor, a number of preparatory measures are required to seal the cracks.
This will reduce the consumption of mastic, which will not seep through cracks, chips and crevices in the floor.
The subfloor must be cleaned of dirt, a sheathing of bars must be laid on it, and insulation must be inserted into the cells, for which it is better to use polystyrene foam, which forms a hard and even surface after installation.
The joints between polystyrene foam boards and joists should be treated with sealant. Instead of polystyrene foam, you can lay mineral mats, but they will have to be covered with waterproof plywood.
Preparing a wooden subfloor in the bathroom of a private house for application of the selected waterproofing material
Alignment
Hydro-thermal insulation pie
The next stage is to create a strong and level base for finishing. Since in most cases ceramic tiles are used as flooring in showers, such a base must be as durable as possible.
Separately, we note that the difference between the “heavy” and “light” flooring options lies in the method of implementing this stage.
The lightweight version involves filling the cavities between the joists with mineral wool insulation and then covering the insulation with a vapor barrier film.
An important point: there must be a ventilation gap (at least 30 mm) between the vapor barrier and the next floor level.
OSB board
In this case, leveling the base is done by laying OSB boards or moisture-resistant plywood on the logs.
In some cases, to give the floor special rigidity, OSB boards or plywood are laid in two layers, with the joints overlapping.
A simpler, and also more often used, is a “heavy” floor, in which a concrete screed acts as a leveler.
Several factors speak in its favor:
- lower price;
- solidity, completely eliminating deflections and shrinkage under the tiles;
- the possibility of using coating or liquid waterproofing for showers without a tray;
- lower height.
Film - mesh - screed
Please note that even if there is a joist, the screed is still made with metal mesh reinforcement. Therefore, the leveling process using a concrete screed is carried out in several stages:
- installation of communications;
- installation of reinforcing mesh;
- pouring the concrete mixture.
To ensure that the coating is smooth and without cracks, we recommend using ready-made mixtures with plasticizers for filling.
When leveling the floor for showers, remember that its height must be at least 20 mm lower than the level of the other floors. This is necessary to minimize the risk of water spilling from the shower into other rooms.
Technology for applying coating waterproofing
- Mix liquid rubber with the activator, and immediately apply the resulting composition to the floor using a roller. Using a brush, carefully coat the joints of the floor and walls.
- Wait until the liquid rubber has completely dried, then evaluate the quality of the resulting waterproofing. The surface of the film should be uniform and smooth to the touch. You can apply an additional second layer of waterproofing so that the final thickness of the protective film is about 2 mm.
Laying the finishing floor covering in the form of tiles directly on the waterproofing layer is not carried out, since tile adhesive does not adhere well to rubber compounds.
This drawback is corrected by pouring a thin concrete screed reinforced with reinforcing mesh.
Coating-type waterproofing applied to floors, adjacent walls, bathroom screens, areas near pipes of water supply and sewerage systems
Coating waterproofing is used to protect wooden and concrete surfaces. This method is suitable not only for finishing bathrooms, but also for renovating rooms with even higher levels of humidity.
Such objects include swimming pools, water parks, washing departments of bathhouses, etc. The undoubted advantage of coating technology is the ease of installation of waterproofing, which is very important when decorating a bathroom in a wooden house with your own hands.
Mastics, which are fluid masses, are simply applied to the surface, leveled and dried for the time required for this process.
Once dry, the waterproofing film acquires excellent water-repellent properties and becomes capable of stretching and subsequently restoring its original shape.
That is why coating waterproofing is considered the optimal solution for protecting a wooden floor in a bathroom.
Video description
The whole process and possible nuances are clearly shown in the video:
The minimum number of layers is 2. Each next one is applied after the previous one has dried.
After completing the creation of the waterproofing layer, the floor is ready for pouring the screed and laying the finishing coating (tiles or self-leveling polymer floors).
Self-leveling 3D floors can be misleading Source pol-master.com