Types of concreting pillars
The type of concreting of the pillars is determined by the architectural design and the required capital strength of the gate and fence as a whole. Concreting of gate supports can be partial or complete.
Preparation of the solution
Mortar for concrete pillars is poured into molds
To fill the pillars you will need a concrete solution, which you can prepare yourself. To do this you will need the following components:
- Portland cement grade not lower than M-250;
- water;
- gravel;
- sand.
All components are mixed in the following proportions:
- cement – 1 part;
- water – 0.5-1 part;
- gravel - 3-4 parts;
- sand – 2-3 parts.
To obtain high-quality concrete, all ingredients must meet certain requirements.
- The shelf life of cement must correspond to that indicated on the packaging.
- The cement must be dry and crumbly. The presence of stuck together lumps is not allowed.
- The sand must be washed and sifted. Foreign inclusions (clay, soil, debris, etc.) are not allowed.
- The gravel must be washed and free of soil particles and debris. Must have a homogeneous fractional composition.
Drilling holes
The hole is lined with roofing felt to prevent moisture from damaging the post.
Preparing holes for installing poles is the most labor-intensive process. The easiest way to do them is with a motor drill, which can easily cope with this task even on clay soil. If such equipment is not available, use a garden (hand) drill, although the labor intensity of the work will increase several times.
The main parameters of the pits are their depth and shape. The depth of the drilled hole must exceed the freezing depth of the soil, which can range from 1.2 to 1.8 m.
Most often, the pillars are installed in a regular cylindrical hole. However, on heavily waterlogged soils, you will need a cylindrical pit with an expansion at the bottom. You can get it using a special nozzle. If it is not available, you will have to drill a hole of a larger diameter and concrete the base of the pillar. Only after this the excess space is covered with earth.
Partial fill
Partially poured concrete supports are used to hang lightweight gates or gates that do not experience severe wind loads. The technology for partial concreting is simple - the hole in which the post is installed is half filled with poured water and a carefully compacted mixture of sand and gravel. The remaining space in the pit is filled with concrete mortar, which is also carefully compacted and the air is removed from it by bayoneting.
Full concreting
Methods for installing pillars in the ground
Full concreting differs from partial concreting in that the pit with the installed post is completely filled with concrete, having previously prepared a sand and gravel cushion. This structure can be strengthened by connecting the pillars into a single monolith with a recessed concrete grillage.
A recessed grillage will increase the reliability of the gate, as it is located below the freezing level of the soil. However, it will take a lot of time to arrange such a structure, and a lot of building materials will be needed.
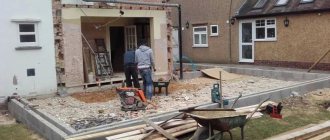
Installation of gates in a single slab
To avoid misalignment of the gate, which may appear a year or two after its installation, it is best to install the gate in a single slab.
Install the supports as follows:
- Dig a trench 0.5 m wide and 0.5 m longer than the width of the gate. The depth of the trench for heaving soils should exceed 1.8 m, and for non-heaving soils - about 1.2 m.
- The thickness of the sand and gravel cushion, which is installed at the bottom of the trench, is 20–30 cm.
- To prevent the entire structure from falling into the trench during installation, pipe sections whose length must exceed the width of the trench are welded perpendicularly onto the load-bearing supports.
- The gate frame is hung on the poles and the entire structure is installed in place. Welded pipe sections give it additional stability.
- Using a level, set the gate strictly vertically and horizontally.
- After making sure that the gate is installed correctly, the entire trench is filled with concrete. If possible, concrete is reinforced with reinforcement or mesh before pouring.
- After the concrete has completely hardened, they begin finishing the load-bearing supports and gates.
Do-it-yourself concreting of fence posts
Concreting fence posts guarantees that the fence will last for quite a long time. This is especially important if the fence is solid and high, since it will be difficult for the supports to withstand lateral loads from strong winds. In addition, a smooth and beautiful fence adds decorativeness to the entire area.
Selection of material for supports
If a gardener decides to install a new fence and no longer return to it every year for minor repairs, then he needs to take seriously the issue of determining the material for the posts. Based on what the fence will ultimately be like, you should choose the material for the posts. Sometimes, on the contrary, there are already pillars, then the fence must be made such that the supports can support it without any problems. Typically, the following material is chosen for racks:
- Wood is the most affordable material. In addition, wooden posts are easy to process. Their disadvantage is their short service life.
- Asbestos cement - usually small-diameter pipes made from this material are chosen for racks. Gardeners do not really like such pipes, since they often break and it is very difficult to connect them with fence joists.
- Concrete - it will make eternal supports, but since the material is very heavy, the installation process is complex and time-consuming.
- Metal is a commonly used material for making supports. Both metal pipes and corners of different sizes are suitable for this. The only drawback is the need to periodically paint it.
- Brick - it is believed that when used, the most decorative fences are obtained. But still, this material has more disadvantages, so it is rarely used. And only a gardener with mason skills can install such a fence.
Having selected suitable supports, they begin to install them.
Pole installation technologies
There are several ways to install supports. It’s worth taking a brief look at everything to understand why concrete pillars are better and more reliable . The following installation methods are currently used:
- Hammering - applies only to supports made of metal. It is considered the fastest way, but it has many disadvantages. In this case, the composition of the soil on the site plays an important role. In sand, sandy loam and light loam, such pillars will lose stability over time. Therefore, this method is suitable for temporary fences or lightweight fences.
- Backfilling with crushed stone is another installation option that does not require concreting. In this case, dig or drill a hole with a drill, at least 80 cm deep and with a diameter 10 cm larger than the cross-sectional area of the post. Using a level, install the support in the center, and fill the free space with crushed stone. The filling must be compacted. The good thing about this method is that the crushed stone plays the role of drainage and the base of the pillar will not freeze.
- Partial concreting is a method that combines driving and concreting fence posts with your own hands. To do this, prepare a hole 40 cm deep, place a support on the bottom in the middle and hammer it in another 40 cm. The column is leveled and the hole is filled with the prepared concrete solution. You can prepare a hole to a depth of 80 cm, but fill only half of it, and fill the rest of the space with crushed stone. This method is used if they want to save on the volume of concrete.
- The next method is complete concreting of the support, which is worth considering in more detail.
Preparatory work
The first step is to carry out a complete marking along the perimeter of the area where the fence will stand. To properly concrete fence posts, you need to start from the extreme points , as well as the places where the gate and gate will be located. First, the outer holes are dug, preferably to a depth below freezing of the soil and at least a third of the length of the prepared supports.
Usually, a depth of 1.2-1.5 m is sufficient. Then they begin to prepare the racks. If these are wooden supports, then they are treated with an antiseptic, and the part that will be in concrete is painted over with heated bitumen or mastic based on it. Metal blanks are treated with an anti-corrosion primer. If these are pipes, then it is necessary to plug both ends. By the way, the same manipulations should be done with asbestos-cement pipes.
Answers (18)
Andrey 3 years, 6 months ago
The real test of professionalism comes in spring with its floods and thaws, when the posts begin to protrude from the ground, breaking and warping the entire fence. The most common solution to this problem is to deepen the hole below the soil freezing level and fill it with concrete. But for some reason these events have to be repeated every year. The conclusion suggests itself: if everything is done correctly, then for what reason are frosts accompanied by bulging of securely fastened pillars? It turns out that this method is not so good... The favorite method of installing a fence for many summer residents is to drill a well into which a post is installed, after which the free space is filled with concrete. But has anyone ever thought about what concrete actually “clings” to? For the same soil that was recently easily removed with a drill or shovel! That is why the pillar along with the concrete is pushed out of the ground. The force of soil heaving is such that it can easily cope even with the foundations of multi-storey buildings, let alone lighter buildings! The heaving process occurs due to the moisture contained in the ground (clay accumulates it). Therefore, heaving does not occur only in sandy soils. Trying to protect fence posts from the action of heaving soils, many increase the depth and diameter of the holes, which leads to enormous consumption of concrete. The method is partially effective, but there is a solution that is less expensive and more effective. If the soil on which the site and the fence enclosing it is located is not heaving, then concreting can be completely eliminated because it is unnecessary. It is enough to drill holes that exactly match the size of the fence posts. True, drilling must be ideal: strictly in a straight vertical line. To cope with heaving soils, a drainage method is suitable. It consists in the fact that the column is installed in a dug hole, which is then filled with crushed stone. The drainage replaces the heaving soil around the post, so when it freezes, the moisture will not try to push it out along with the concrete pad, but will pass through the rubble without causing serious damage to the post. This method is also successfully used to repair a fence whose base posts have already been pulled out. If they were concreted, then it is better to remove the concrete (beat it off), and fill the free space in the soil with crushed stone and compact it. Naturally, the hole should be deeper than the soil freezing level, and it is enough to immerse the posts only a third of the length. (they write this on the internet.) So the question is, what would be better for the soil would be clay, loam, driving or concrete pillars.
The method is correct, but only suitable for light structures.
beat off the boundaries of the future fence, using a hole drill per meter of the hole - watch the distances - install a metal pipe - fill it with concrete. checked - nothing comes out (due to heaving) and if you clean the grader in a snowy winter, your corrugated sheet will not fall inside the site. the same principle with gates and wickets. If you have concreted it yourself a couple of times, do it. There are nuances - everything is written out on the net.
drill a hole with a diameter of 200 mm and a depth of 1.2 m, compact the bottom of the hole i.e. expand as much as possible, insert a 150 mm pipe 1.0 m long, pour concrete into the pipe and lift the pipe so that a pear is formed at the bottom of the hole, which is not allowed. remove, it is better to cover the pipe with bitumen, but not with anything else. fill it with sand around the pipe and compact it, one columnar foundation is ready further according to the diagram, you can make a reinforced concrete grillage between it. where is the foreman who accepts the work?
Andrey 3 years, 5 months ago
The secret to a stronger connection between the pillar and the concrete
In order for the metal pole to hold more firmly in the concreted part, additional fastenings need to be made. Options for such fastenings on the bottom of the pillars:
- Cut the metal post in the shape of the letter “H” and unscrew the resulting ends at an angle of 90 degrees. At the same time, the pillar will have “ears” (two on opposite sides). This is the most rational option that allows you to do without welding.
- Weld two small pieces of reinforcement to the bottom of the post (preferably perpendicular). An option for those who find it easier to use welding.
- Make a rectangular cutout in the profile pipe at a distance of 12-15 cm from the edge of the lower part. The length of the neckline is arbitrary (also 12-15 cm). This is the simplest option, which allows concrete to get inside the pillar and thereby further strengthen it. It will be almost impossible to pull out such a pillar.
Thanks to such fastenings, the post will better adhere to the concrete and will not be pulled out by a strong gust of wind or other impact.
Installation of gates and wickets
Canopies for wickets and gates are welded in advance - before laying bricks
After installing the supports in the ground, pouring concrete, welding the mortgages and lining the pillars with bricks, you need to start hanging the gate. Preliminary welding of the hinges to the posts is required. You cannot attach parts to mortgages. They must be welded to the channel sections. The load of the gate when unlocked is distributed unevenly between the hinges. There is more pressure on one element than on the other. With prolonged use, this will cause bending of the metal and warping of the canvas. A loop welded to the bracket will provide a more uniform load. The welding sequence depends on the type of parts. Work with a direct configuration is considered.
The process involves the following steps:
- The channel is welded to the embedded parts.
- The places where the loops are attached are marked.
- The upper halves of the parts are welded to the gate lying on the ground.
- The lower parts of the loops are grabbed onto the posts in the marked area.
- The gate is lifted in weight and put on the hinges. You can't lower them all the way.
- The loops are caught in several more places. Supports are installed under the gate.
- The pieces are welded into place by making a seam from top to bottom.
- After the loops have cooled, the seam is placed one more time on the other side.
- The seams are cleaned using a grinder.
Approximate cost
When calculating the estimate required for the construction of brick supports, you need to know the total cost of building materials and work (if builders are hired). It is difficult to make an exact calculation, since it all depends on the method of laying the bricks. The approximate price of brick supports (height - 2.1 m, width - 380x380 mm), taking into account materials, is about 9,000 rubles.
Installation in the private sector
The variety of types and variable methods of filling the spans of wickets and gates allow you to select the most suitable material for a particular site and landscape design of the territory.
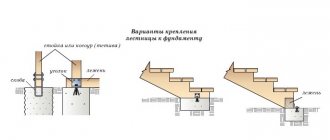
Sketch of fastening swing gates to mortgages
A properly poured foundation and high-quality work on laying pillars will make the installed structures reliable and can last more than 50 years.
Pillar selection
When moving, the gate puts a large load on the supporting supports. If the pillars are not strong enough, under the weight and movement of the gate they will very quickly become loose, and the gate will warp and will not close. At the same time, all fence posts should look the same to keep the gated fence neat and attractive. Brick pillars, asbestos-cement pipes, and metal pillars are best suited for this.
Such supports are very strong, practical, durable; If properly sized, they will withstand even the heaviest doors. If metal racks are used, their cross-section should not be less than 80x60mm, and the metal thickness should not be less than 3mm. Asbestos-cement pipes can be taken the same for the entire fence, but the gate posts need to be additionally reinforced with reinforcement and dug deeper. Brick pillars are also reinforced with a reinforcement frame, and metal channels are used to fasten the gates.
Brick fencing
Brick fences are made from clinker or facing bricks. Clinker is more expensive, but it looks strict and natural.
Kawabanga! Concrete cutting saws
The hedge turns out beautiful when using colored brick .
Options for installing posts for metal gates
Installing gate posts is not an easy job. If you do not have experience in correctly installing gate posts, the result will be disastrous. Over time, gate posts will tilt, the gate will jam, or stop working properly altogether. All this can be avoided. What you need to know before you start installing gate posts.
The first thing is to pay attention to the material of the gate posts. A suitable material would be thick-walled rolled metal
For example, hot-rolled channel 14, 16 or a channel of smaller cross-section, pre-welded into a box. Metal posts for gates can also be profiled pipes with a cross-section of 100 x 100 mm and a wall of at least 5 mm. The thicker the pipe wall, the stronger the gate post.
Secondly, the design of metal gate posts must have lower crossbars at the base. Ideally, the pillar before concreting should rest on the crosspiece of the corner 50, 63. And the other crosspiece should be recessed 100 - 200 mm from the surface of the ground. The length of the crossbars varies from 500 mm to 1 meter.
Third, it is mandatory to fill the base of metal gate posts with concrete. In this case, the gate post must be installed to a depth of at least one and a half meters, and somewhere more. It all depends on the composition and properties of the soil where the gate posts will be installed.
Fourth, do not neglect pouring liquid concrete into the gate post. This will make it possible to make a strong reinforced concrete pillar from a hollow pipe with external reinforcement, thereby achieving the most rigid pillar structure possible.
Fifth, it is more reliable if the foundation of the gate posts is part of the general foundation of the fence. And concreting when installing gate posts will be carried out simultaneously with the general pouring of the foundation.
Sixth, it is more expedient to provide additional fastening between the gate post and the fence in its upper part. If you are laying a fence made of brick, then the brick post inside which the gate post is hidden must be additionally tied with a thick metal strip to the fence itself. It often happens that a brick pillar tilts due to the load of the gate and breaks away from the fence masonry, forming a crack between them.>
Seventh, sometimes, in difficult clay soils, it is impossible to install gate posts in a strictly vertical position and securely fix them. In this case, you need to use additional upper and lower crossbars (lintels) between the gate posts. The lower lintel is made of metal similar to that used for gate posts, and is buried in the ground to a depth of 300 - 400 mm. Subsequently, a regular driveway is installed on top of the lower lintel. The upper crossbar is installed along the upper ends of the gate posts. Of course, the top lintel will not add beauty and neatness to the gate, but it is a necessary measure and a very effective one. The upper crossbar must be made removable to allow passage in case of tall vehicles or large cargo being transported through the gate.
- Installation of support pillars
- Manufacturing of gate leaves
- Installation of sashes on support pillars
Gates installed at the entrance to a suburban area are distinguished by a variety of designs, materials used and have different functionality. The main types of gates for country houses and suburban areas include lifting, sliding and swing. The most common are swing gates. Compared to other types, they are quite simple to install and their installation is less expensive. Swing gates can be made from various materials and decorated with a variety of decorative elements. You can assemble and install this type of gate yourself.
In a suburban area there is a need to install gates. They enhance your safety and are certainly a beautiful addition to your home.
It can be done on paper or on a computer screen. At this stage, the dimensions of the structure corresponding to the operating conditions are calculated. The design features of the device, the list and quantity of necessary materials are determined. The sketch should show the gate leaves in the closed and open positions to accurately display the dimensions. The main tools you will need for the job: welding machine, grinder, square, tape measure, building level.
Basic methods of concreting and installing fence posts
Content:
A fence is an integral element of a suburban area. And many home craftsmen, having decided to install the fence with their own hands, ask the question: is it necessary to concrete the fence posts? In order to get a specific answer to this question, it is necessary to determine the type of soil and the features of the fence structure. What will be discussed in this article.
Basic Installation Methods
Today there are various designs of fencing. However, no matter what type you prefer, the installation rules will not differ significantly. The technology for carrying out such work may differ, perhaps only in the concreting of fence posts. There are four basic principles for their installation:
- The simplest and most ancient, which involves driving into the ground. Suitable for well-compacted and stable soils.
- Partial concrete pouring is the most common method, but not the most reliable.
- Complete pouring of concrete - this method is the most reliable.
- Tamping or butting. Well suited for “heavy” soils.
So, let's look at everything in order.
Driving into the ground
Is it possible to do without concreting and how to hammer in fence posts? Naturally, it is possible. This method was used in ancient times. The work is carried out in several stages:
- A hole is drilled in the ground. In this case, its diameter should be less than the installed base.
Advice! The easiest way to drill a hole is to use a hand drill.
- Now you need to drive the support into the resulting hole. To do this, use a hammer, or better yet, a sledgehammer. And the narrower and deeper the hole is, the stronger it will stand.
Photo. Driving in the support
Let's look at the pros and cons of this method:
- The advantages are that it is very easy to install and certainly does not require specialized equipment. You also don't need to have any special skills.
- Disadvantages - this option is applicable exclusively for lightweight fences that are not characterized by a “sail” effect.
Material like corrugated sheeting cannot be used here, but chain-link or picket fence would be excellent options.
Important! After rains or winter, such supports can become distorted, as a result of which you will have to return them to place again using a sledgehammer.
Partial pouring of concrete
Now let's look at how to concrete posts for a fence or gate. This method is very similar to the previous one. The only difference is that after installing the support, it is partially filled with cement. This significantly improves its stability compared to the first method.
Let's look at how to concrete a column using this method:
- We drill a hole, the diameter of which should be smaller than the support being installed.
- We hammer the pipe.
- We pour concrete inside it.
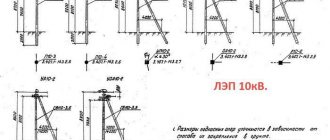
Scheme. Installation of poles
Pros and cons of the method:
- Pros. This installation method is very reliable, because such a support can withstand both significant precipitation and winter cold without distortion.
- Minuses. If installed on heavy soils that do not absorb water well, the foundations may sag after winter. Therefore, before giving preference to this method, you need to familiarize yourself with the characteristics of the soil.
Advice! In the case when you plan to install a lightweight fence, there is no need to fill the entire post with concrete (full concreting is suitable for medium-weight structures). Partial concreting is not suitable for massive fences.
Complete pouring of concrete
Although the most reliable method, it is more expensive and complex than the previous two options.
Let's look at how to properly install fence posts:
- We drill holes for supports. Their diameter should be about 20 cm.
- We drive the pillars into the holes.
- We pour the solution for concreting the pillars into the pipes.
Advice! Very often, in order to strengthen the strength of the base and avoid its distortion, the area around it is replaced with sand, and then filled with concrete. This must be done in areas with strong groundwater.
Like any similar method, it has both advantages and disadvantages:
- Advantages - supports installed in this way are not afraid of cold weather and precipitation. They are suitable for installing heavy fence panels. This is an excellent option for areas characterized by sandy soil or groundwater.
- Disadvantages - in extremely rare cases, the pole may become askew after winter. Therefore, if your site is characterized by heavy soils, then the fourth installation method is better for you.
Backfill materials
Let's figure out what to use to ram fence posts. The best bulk material is granite or gravel crushed stone with a fraction of 20–40 and a strength (crudibility) of M600 (for tall structures it is advisable to use M1000).
Table of crushed stone grades by crushability
It is worth paying attention before butting to the content of needle-shaped or flat stones (flakiness). According to SNiP this figure should be 5–15%
A large number of irregularly shaped grains will prevent high-quality compaction of the backfill and the butting of pillars. To compact it (uncling), sand, fine gravel or screenings are additionally used.
When installing fence supports for temporary buildings or low fences, it is permissible to use:
- crushed pieces of concrete: the disadvantage of this type of backfill is the impossibility of using fragments of the same size and shape, as a result of which significant voids can form in the soil;
- gravel, a product of natural weathering of rock; The disadvantages of this material include low frost resistance and strength;
- crushed brick: structures made from it will last only a few years, and then collapse under the influence of negative temperatures and moisture;
slag: has low frost resistance, some of its types have too high a degree of moisture absorption.
Schemes for butting a rack for crushed stone fencing and concreting
New to the building materials market are liquid polymer aggregates used to strengthen the soil. They are quite durable, do not rot, are insoluble in water and are able to seep into the smallest voids. However, the cost of polymer masses is quite high, plus special equipment is required to work with them.
It is not difficult to calculate the required amount of crushed stone for butting pillars. You can use an online calculator for this. You will need to enter three values – the height of the hole for the fence post, its radius or diameter. The result is then multiplied by the number of fence posts. The resulting figure must also be multiplied by a compaction factor of 1.3.
The photo shows a fence made of corrugated sheets of a private house.
Backfilling with crushed stone
Required Tools
To install support posts with your own hands you will need:
- regular building level and tape measure;
- twine;
- garden auger;
- sledgehammer for driving pipes into the ground;
- shovel-selection for backfilling;
crowbar or bayonet shovel for compaction.
The photo below shows the pole before butting.
Installing a profile pipe before attaching the corrugated sheet
How to make a concrete fence with your own hands
Preparatory work
First you need to select the material for mixing the solution. For this you will need:
- Cement M400 or M500.
- Crushed stone of small fractions - 19–20 mm.
- The sand is coarse-grained.
- Water.
By mixing them in a certain proportion, you get a solution that must be used immediately - otherwise it will harden. The time required to gain structural strength is four weeks.
It should be remembered that the more sand in the solution, the lower the strength of the concrete will be.
Table: recipe for preparing concrete mortar
| Proportions for preparing the solution | For concrete blocks | For foundations for pillars and fences |
| Cement | 1 part | 1 part |
| Crushed stone | 1 part | 2 parts |
| Sand | 3 parts | 2 parts |
To make concrete blocks, a little plasticizer is added to the solution - it will give greater plasticity to the raw material and allow you to create the required shape for the blocks. Water is added to the solution until it has the texture of viscous thick sour cream.
The solution can be mixed in a large trough, but having a concrete mixer will speed up the process.
When working with a concrete mixer, crushed stone is first loaded into it, filled with a small amount of water - so that the cement does not stick to the blades of the inner drum, and only then - cement and sand.
Preparing tools and molds
The mixture for the solution is already mixed in a concrete mixer, now all that remains is to prepare the tools for work:
- spatula, level;
- molds for solution;
- steel reinforcement (4 mm cross-section for the fence and 8 mm for support posts).
Calculation of the number of slabs and concrete for erecting a fence
If you have already decided on the type, then you can start making the slabs. For a regular level fence you will need removable formwork and mortar. The amount of volume for one slab can be calculated based on the formula:
V = L x H x B, m 3, where V is volume, m 3; L—length, m; H—height, m; B - width, m.
Thus, for one slab measuring 1.6x1.5x0.15 m, the volume of the solution will be 0.36 m 3. The width of one slab of a homemade fence must be at least 150 mm.
The number of slabs will depend on the perimeter of the fenced area. It should be remembered that the total length of the fence also includes the size of the support pillars, the cross-section of which is 300x300 mm.
Again, for an area of 36 m2 (6.0x6.0 m) you will need 12 slabs:
N = P/L = (2 x (a+b) - 0.3x16)/1.6, pcs., where P is the perimeter of the fenced area, m; a and b—sides, m; 0.3 - length of one column, m; L is the length of one slab, m.
The number of pillars for the entire perimeter is 16 pieces, obtained from the calculation (a-3xL)/s, where a is the side of the site = 6.0 m; s - 0.3m - pole length, m.
There are 4 posts on one side of the fence, therefore, a total of 16 pieces should be installed.
The total volume of solution on the slabs will be at least 0.36 m 3 x 12 pcs = 4.32 m 3.
The base for the slabs (although it is preferable to arrange a strip foundation) will take a little less: with dimensions of 1.6 x 0.5 x 0.3 m, the solution volume is V = 0.24 m 3. For slabs in the amount of 12 pieces, concrete will be consumed V = 0.24x12 = 2.88 m 3.
In total, the total volume of concrete solution will be 4.32 + 2.88 = 7.2 m 3
The width of the foundation for the fence should be twice the width of the slab.
If the choice fell on a concrete fence made from ready-made forms, then everything is simpler. You just need to follow the instructions for making the amount of solution for a specific form.
Kawabanga! Review of construction vacuum cleaners for cleaning floors from concrete dust
Device from ready-made molds
- The concrete mixture is loaded into a concrete mixer.
First, crushed stone is loaded, then sand and cement
- A pouring mold is placed on a flat surface, lubricated with oil or a special compound that prevents the frozen solution from sticking.
- Reinforcement is placed into the mold to ensure the adhesion strength of the concrete.
Laying of reinforcement for both the form and the foundation itself follows the same pattern
- After laying the reinforcement, you can pour the mortar. Having filled the form to the brim, the concrete should be leveled with a spatula.
When the filling dries, the surface is modified: rubbed or sanded directly in the mold
- After drying, the finished product is removed and laid to dry completely - under a canopy. After making the required number of molds, they can be installed on the foundation, fastening the sections together using support pillars.
For decorative elements of the fence, silicone molds are used - the most common and easy to use.
Video: constructing a concrete fence from ready-made forms
Construction using formwork
When constructing a fence yourself without using a form, the whole process boils down to the fact that instead of ready-made forms, you will need to install removable formwork and a foundation.
The foundation for the fence must be wider than the main structure.
This is done as follows.
First, a solid (preferably strip) foundation is built for the future fence, for which a ditch with the required width is dug, a sand cushion with a layer thickness of 20–25 cm is placed there.
The layer is then filled with concrete mortar and left until it reaches its original strength - usually for a month. It is advisable to periodically moisten the concrete structure with water for greater strengthening.
While the foundation is gaining strength, you can prepare material for removable formwork - panels, boards and supports. The formwork is installed to the width of the planned fence, secured on both outer sides.
The fence can be built either separately from a standing house or for a fence adjacent to the house
Don't forget about the reinforcement of the structure!
The height of the fence can be arbitrary - it will depend on the height of the formwork structure. The poured solution is allowed to settle for at least a day, after which the formwork is removed and transferred to another area.
This construction system is the simplest. The complexity of the work lies in the preparation of the solution and the installation of the formwork structure.
Making swing gates - tools and materials
Having made sure that we can make them ourselves, we will begin construction.
The required tool for making swing gates and consumables for it.
Tool
Mandatory for the manufacture of the frame and arrangement of racks:
- Bulgarian. Designed for cutting and grinding metal workpieces;
- threaded discs;
- grinding discs;
- welding machine;
- electrodes;
- roulette;
- building level;
- corner;
- hammer;
- shovel;
- Master OK.
Auxiliary:
- compressor, spray gun or brushes for painting racks and/or gates;
- drill. If necessary for fastening the gate trim;
- rivet, as well as rivets for it.
Material
pipe for making a frame. It is preferable to use a profile pipe 60x40x1.5. 40x20x1.5 will also do. The final choice depends on the finishing material and taking into account the wind load;
pipe for making racks. Here you should also be guided by the weight of the finished gate.
General recommendations for selection are:
- gate weight is within 150 kg. and below. A pipe 80x80x4 is suitable;
- gate weight from 150 kg to 300 kg. Pipe – 10x100x5;
- The weight of the gate exceeds 300 kg. Pipe – 140x104x5.
Tip: You can use brick, concrete or even wood for the racks. In any case, correlate the properties of the material with the expected load.
hinges for swing gates. They can be adjustable or unregulated. Must be made of high-quality material and be able to withstand significant loads;
locks. Can be mechanical or electromechanical. The choice is discretionary;
dye. Needed for painting racks and/or trim;
sheathing There is also complete freedom of choice here. The main thing is that it is to your liking and affordable;
automation for swing gates. To be able to make automatic gates. You can not install it at all or install it later. But, if its installation is planned, even in the distant future, it is better to make the frame of the swing gates more durable.
Related article: How to use a window sill in the kitchen (65 photos)
Installation of a fence on screw piles
The method is good for both heavily soaked soils and swampy areas. In places where it is necessary to place fence posts, steel piles are screwed into the ground. They come in two types:
with one wide blade at the end (Fundex type);
Pile "Fundex"
with blades in the form of thread turns, externally resembling a large self-tapping screw.
The first type is preferable to use, since a wide blade, buried to the non-freezing horizon, will serve as a support and at the same time will not allow lateral forces to push the pile upward
Before using screw piles, it is necessary to make 1-2 wells for a geological study of the soil composition. This will make it clear at what horizon the groundwater flows and where the intumescent layer ends. However, such studies must be carried out with any method of installing pillars in order to correctly determine the immersion depth of the racks or piles.
The construction technology is as follows:
- The fence is marked and the locations of the supports are determined.
- The piles are screwed into the ground manually or mechanically to the calculated depth.
- The pile cavities are filled with concrete on fine gravel, after which flat platforms are welded on top.
- The above-ground parts of the poles are attached to the platforms by welding or bolting.
Pillar selection
During operation of the gate, the pillars are constantly subjected to intense loads. They hold the doors during opening and closing, as well as during strong gusts of wind. Also, the supports must constantly hold the gate in the position in which it was installed. The weight of each leaf exerts a constant static pressure on the pillars. For these reasons, only high-quality materials must be used for gate and gate supports of any type.
Most often, when installing gates, metal, brick, asbestos cement or concrete are used. Such supports are quite strong and reliable, they last a long time and are able to withstand environmental influences.
When using metal racks, you should pay attention to pillars with a cross section of 80x60 mm. It is also necessary to take into account the thickness of the metal
It must be at least 3 mm.
Asbestos cement pipes can be the same along the entire perimeter of the fence. However, the pillars used to support the gates should be reinforced with reinforcement, and also placed in the ground much lower than the others. Brick supports are strengthened using a reinforcement cage. Fence and gate posts can be installed fairly quickly. The main thing is to prepare all the tools and materials in advance.
How to concrete fence posts
We concrete the fence posts correctly photo
How to choose a support
Support pole installation diagram
To make a support when installing a fence, the following types are used:
- wooden,
- asbestos-cement,
- metal,
- concrete.
Wooden poles have a number of advantages. This is, first of all, low cost, simple processing and good appearance. But they are very short-lived, even despite treatment with various antiseptics.
Pillars made from asbestos-cement pipes are very fragile. It definitely needs a plug, since water that gets into the pipe at sub-zero temperatures freezes and it bursts.
Metal (steel) pipes are in great demand. They serve for a long time, if treated in a timely manner, do not rot or break. Compared to wooden ones, they have a higher cost.
Concrete pillars are used less often in the manufacture of concrete fences and low decorative fences.
Technological features of installing poles
Pole installation technology and base concreting
Before starting work, it is necessary to conduct a soil study, since this determines which type to choose and whether the pillars need to be concreted. If you have a land plot passport, then this is not necessary, since all the information should be indicated there.
Installation features depend on the type of fence itself.
If it is made of profiled sheets, then metal, brick or concrete pillars will be suitable. The weight of such a structure is small, but it easily succumbs to strong gusts of wind (bends). The last option is considered the most optimal - a concrete support. To increase the strength of such a fence structure, it is better to insert the sheet into a metal frame from a corner.
The situation is completely different when a chain-link mesh is used. Here it is necessary to install concrete supports along the edges, and it is better to place a round metal pipe between them. It can be concreted or driven into the ground.
For a brick fence, it is advisable to make the posts from the same material, using a good foundation, as well as masonry with appropriate dressing of the seams.
Concrete fences require good support that can support the heavy weight of the structure. These can be concrete fence posts or large diameter metal ones.
Regardless of the type of construction chosen, the installation technology does not differ significantly.
Before starting work, many people ask themselves the question: Should fence posts be hammered or concreted? It is difficult to give a definite answer. It all depends on the specific situation.
There are several installation methods:
- driving into the ground,
- backfilling with crushed stone,
- partial concreting,
- full concreting.
Driving the support into the ground
Hammering and thrombosing of support pillars before concreting photo
This is the simplest and most widely known method. It has a number of advantages:
- simple and quick installation,
- you don't need to have any special skills,
- no additional equipment required.
But this method is used only for fences with light weight. This could be a chain-link mesh or a wooden picket fence. Corrugated sheets should not be attached to such a support, as they have a high windage capacity.
The hammering process itself is very simple. You need to prepare the hole first. This can be done using a drill or the old fashioned way, using a shovel. A pipe is driven into the finished hole. It is desirable that the diameter of the hole is slightly larger than its cross-section and is deep enough.
Prolonged rains and heavy snowfalls can slightly weaken (lose) such a support, then you need to correct the situation and deepen the pipe further.
Compacting pillars
On land plots with heavy soil, you can use compaction (backfilling) of pillars with crushed stone. This method allows for drainage of clay and loamy soils. Due to this, all the moisture from the compacted hole seeps into the lower layers, which allows it not to freeze in winter.
Backfilling is simple. As in the previous case, the hole is prepared. But its diameter should be 10-12 cm larger than that of the pipe. The support is installed in the hole, the free space is filled with crushed stone. Compaction is carried out using a special vibrating plate and gradually sprinkled with crushed stone.
This method partially answers the question of whether fence posts need to be concreted.
Concrete supports
The process of pouring the foundation for a pillar
Concreting is carried out using several methods. Before deciding how to concrete fence posts, you need to study the features of this process.
Let's look at how to properly concrete fence posts and why. This work requires a serious approach, since the strength of the fence and its service life depend on the quality of execution.
This type of support has its advantages and disadvantages. It will not become loose or corrode after heavy rainfall, which will significantly increase its service life. However, for land plots where groundwater lies close to the surface, this method may not be suitable. Because the concrete will crack and even be squeezed out of the ground.
Based on the design of the fence, the concreting technology is selected. It can be complete or partial.
Partial concreting is used for light soils in order to obtain the strongest and most reliable support for the structure. The technology itself is similar to that used for driving. The only difference is that the driven support is sprinkled with a little crushed stone and filled with mortar. There is one important point. You need to know to what depth the fence posts are concreted.
If the partial concreting method is used, the depth of the hole should be equal to half the length of the pipe intended for the underground part. The width of the hole should be 10-12 cm larger than the cross-section of the support.
Complete concreting of the support
Types of compaction and complete concreting diagram
If the fence structure is massive, then it is better to use full concreting. This is by far the most effective method. The installation process itself is divided into the following stages:
- Preparing the holes. They should have a diameter of 15 to 25 cm. The depth depends on the length of the pillar of the underground part.
- A base (pillow) is prepared from a layer of crushed stone.
- Installing a post in the hole.
- Filling the hole space with concrete solution.
To further increase the reliability of the support and to avoid distortions after winter, the soil around the base is replaced with sand before pouring the solution. This is especially rational in areas with close groundwater.
It is appropriate to consider another issue here. What is the best way to concrete fence posts? It is better to use cement grade M400 and not lower. The solution is prepared in the following proportion:
- 1 part cement,
- 3 parts sand
- 5 parts crushed stone.
The hole must be filled in parts, periodically sealing it with reinforcement or a metal rod. Experienced craftsmen recommend using roofing material for greater reliability. After the final filling of the solution has been completed, the pillar must be fixed and left for 15-20 days to dry completely.
If the fence structure is heavy and is installed on heavy soils, it is best to make a strip foundation. In this case, the support holes are connected by a trench about 20 cm wide and 40 cm deep, and reinforcement is placed inside to increase reliability. This technology allows for the highest level of strength.
Features of installing supports under gates
Some craftsmen bury the supports, others strengthen them with concreting. If you decide to install brick gate posts, the second option is more suitable. If the fence and gate are not high, there is no need to concrete the base. Experts advise digging recesses that correspond to parameters that exceed the cross-section of the support and have a depth greater than the depth of the buried part of the support.
Please note that the installation of posts fixed under the gate is not possible to adjust the fixation of the supports relative to the height. Then the component is aligned to the level of the fence in compliance with the verticality requirement. Stretch twine or cord between the outer supports
During work, it is important to constantly use a building level, which is applied perpendicularly
If you do the work yourself, use 2 levels. Attach with masking tape to the 2nd level support and continue working.
How is the hole formed correctly where the support will be buried to secure the gate? How to make it, use step-by-step instructions:
- Fill with sand and crushed stone with a fraction of 20-40.
- Compact the layers. They should lie tightly.
Which fence posts to choose?
The main criteria for selection are not only external characteristics, but also technical ones, as well as installation methods, which include additional elements.
- Made of wood - short-lived. They will last an average of 10 years. If you choose this option, treat the supports with antiseptic preparations or copper sulfate solution. This will extend the service life.
- Asbestos cement pillars are characterized by practicality, ease of installation, and affordable price. Suitable for summer cottages or commercial areas. The disadvantage is that the pipe is empty. When it rains, water accumulates inside, and during frost the pipe may burst. The logs are difficult to attach to the base.
- Metal poles are the most practical and popular. Pros: easy to install, reliable, can be used for all types of fences, have a long service life.
- Made of concrete. Finished products are expensive; they are often made independently, since this does not require large investments. They are used often, but require skills to pour the design efficiently the first time.
- Brick pillars are the best decorative material. They are expensive and difficult to work with. Laying of the foundation is required, mutual bandaging, decorative treatment and preventive methods are needed, but the appearance is attractive.
What are the types and how to install screw piles for a fence - read in this article.
Whether it is necessary to concrete posts for a fence made of corrugated board is described in detail here.
If you are interested in how to make wooden fence posts with your own hands, read this article.
Concreting fence posts - how to build a structure that will last forever
Today we will figure out how to correctly and reliably install load-bearing elements for fences of any type. The review examines different options: driving in elements, dry concreting of fence posts and the traditional method of pouring mortar.
Each solution has its pros and cons, but still the last option is used most often, as it is reliable if the work is done correctly.
Installation options and their features
The question of whether to concrete or hammer fence posts causes a lot of controversy both among ordinary developers and among specialists. There is no definite answer here, since each option has its own pros and cons; let’s look at them in more detail.
Preparation for installation
Supports made of asbestos-cement pipes and concrete do not require special preparation before burying or concreting. They are installed immediately. Before installation, traces of corrosion, small irregularities, and scale are removed from metal products. After this, the pillars are degreased and primed. When installing brick supports, you should take care of several nuances at once - laying the foundation, composition of the mortar for masonry and installation of reinforcement.
The main task is to prepare the necessary tools. It is necessary that everything is at hand in advance:
- spacers;
- trowel and tape measure;
- hammer;
- level;
- reinforcement bars.
Also, during the installation of products of any type, you will need sand, crushed stone, brick and waterproofing.
Production of decorative fences
The process of making decorative sections is simple; the main difficulty lies in preparing the necessary materials and tools.
Necessary equipment
- forms for concrete sections;
- concrete mixer;
- vibrating table for forming concrete products;
- vibrating sieve for cement and sand;
- trays for drying finished sections.
This is what a vibrating table for casting concrete products looks like
Raw materials
To make decorative sections you will need the following materials:
- Portland cement grade 500;
- wire reinforcement;
- quartz sand GOST 8736-93;
- crushed stone;
- various plasticizers to speed up the setting process.
Kawabanga!
How to cut aerated concrete - 4 types of cutting devices Return to contents