Do-it-yourself generator from a stepper motor
Pictures from different pages of the site, click on the picture to go to the page
Micro wind generator based on a motor from an inkjet printer
I saw the design of similar windmills on an overseas website and decided to replicate it, and that’s how this baby was born. As a generator, I used a stepper motor from an inkjet printer that had been inactive for a long time and was collecting dust. Having disassembled it, I unscrewed the motor. Then he looked, turned it, twirled it with his hands, measured how much it gave, it gave very little, but the volts rose above 12, which means it could theoretically charge the battery.
Next, I made a mount for the blades from the transistor. The transistor was drilled along the diameter of the shaft on which the gear attachment melted, generally to its dimensions. I put the transistor on the shaft, dropped some glue and twisted it, making sure that everything was smooth. Then I finally fixed it with epoxy. I spread it a little and filled the hole of the transistor, additionally protecting the motor from bad weather by covering the holes in the motor. Below is a photo of this generator.
Next, I cut out blades from a piece of PVC pipe with a diameter of 110 mm, and drew a blank on the pipe, which I cut out with a cutting machine. I took the approximate dimensions: the width was 9cm, and the screw span was 48cm. I drilled holes and screwed the screw to the motor-generator using small bolts.
For the base, I used a piece of 55th PVC pipe, then cut out the tail from plywood, and added a piece from 110th. Mtorchik glued the pipes in. After assembly, the result was a wind power plant like this. I immediately assembled the rectifier. Since this motor did not want to produce a lot of volts at low speeds, I assembled it using a doubling circuit and turned it on in series.
I took HER307 diodes, 3300uF capacitors
I wrapped the circuit in polyethylene and inserted a rectifier into the pipe, then a motor and tied it with wire through the drilled holes, covering the space with silicone. I also covered all the holes on top with silicone, and drilled one hole at the bottom, just in case, so that if anything happens, the water would drain out and the condensation would evaporate.
The tail was secured through with a bolt, the semicircular tail was inserted and tied with wire, and it held on firmly. I found the center of gravity, drilled (dia. 9mm.) I also drilled dia. 6mm two M10 bolts, through, under the axle. (The M10 bolts here serve as the “bearing” of the axle) I screwed the M10 bolts into the pipe from above and below, lubricated the long M6 bolt with grease and twisted everything together, it turned out quite rigidly. I screwed the axle bolt (M6) to the corner, and it to the stick. I put a silicone plug on top of the M10 bolt, now the axis is not afraid of water. The wind generator is complete.
I took several blocks for the mast. which he twisted with self-tapping screws, secured to the windmill and lifted onto the rope. I connected it to the battery, it is charging, but it is very weak, it keeps the battery from naturally discharging. Since the wind was spinning, I was satisfied, at least I’ll know which way the wind is blowing. This option - as it is said on that site - is a little weekend project, that is, a small project for the weekend, for the pleasure of picking something up, especially since I don’t I didn't spend a penny. glue doesn't count. So, in theory, it can light a couple of small LEDs, or charge a mobile phone in a couple of days, but most likely the phone will take such a weak current for a bad contact and turn it off, writing bad connection on the display.
In the future, if I have time and desire, I can do it to illuminate the yard, but I’ll just assemble a second one like this and put in a small battery, or several rechargeable batteries. For this, there is one more stepper left, only this one produces 2x20 volts when cranked by hand, but the current is small. And the second one is on the brushes, immediately permanent. By hand 10 volts, short circuit - 0.5 Ampere. And I’ll still be torturing the autogenerator, but I’ll just wait for the magnets.
CyberPower UPS Inverters
uninterruptible and autonomous power supply systems (boilers, alarms, video surveillance, etc.)
Wind generator 2 W based on a stepper motor
I made this wind generator out of interest and knowledge in wind energy, and did not expect such results. The power of my windmill was about 2 Watts at a voltage of 6 Volts. I decided to adapt it for street lighting, as an environmentally friendly light source, since in the village where I live there is almost always a light wind blowing. I also adapted it to charge my phone.
Technical characteristics of the wind generator: - output stabilized voltage is 5 volts, without a stabilizer it jumps to 13 volts - short-circuit current max. 470 milliamps - power at a wind of 3 m/s 2 watts, from 10 m/s 5 watts
The alternating current from the generator coils is rectified by diode bridges from Schottky diodes (VD1-VD.), then the current flows through the zener diode (VD9) and becomes stable, the capacitor (C1) smoothes the voltage so that the consumer can be connected.
Do-it-yourself generator from a stepper motor
9zip.ru
Radio engineering, electronics and DIY circuits Electric power generator for the apocalypse (end of the world)
| Attention! The contents of this article may be dangerous to your psyche. Are you sure you want to read this? |
In conditions of lack of electrical energy (in the event of a power outage, the end of the world, on a hike or in the country), a device that will generate electricity will be very useful. Such devices, for example, include a wind generator and a solar battery. Such generators require quite a bit of time to design and build. However, a fairly simple generator can be assembled in literally 15 minutes.
To do this, we will take advantage of the fact that an electric motor can be turned into a generator, and if a rectifier and converter are connected to it, this will be enough to power the load. Since the goal is to assemble the simplest source of electricity in a short time, it makes sense to assemble a dynamo, that is, a generator that will be driven manually.
Almost any electric motor that has more or less decent torque is suitable as a generator. Our choice fell on a stepper motor from a five-inch disk drive. You can rotate the engine shaft directly, or you can use an overdrive belt drive, so in one revolution of the drive handle the generator shaft will make a greater number of revolutions, which will increase the efficiency of the system.
The structure of the simplest source of electrical energy can be seen in the photographs. A sheet of multilayer plywood is used as a base. A shaft with a pulley and a handle, as well as a stepper motor with a second pulley are attached to it.
Since the used motor has five terminals, we will use the simplest rectifier circuit with four diodes, for which we can use the most common 1N4007. Using the dialing method, four windings and a common wire are determined. The anodes of the diodes are connected to the four windings, the cathodes are connected, this will be a positive output. The fifth terminal of the motor is a minus.
Low-power wind generator from a stepper motor: a homemade device from a printer
- Creation of a wind generator
- Homemade windmill based on a stepper motor
- Wind generator made from parts from a Blade printer
- Mast
Creation of a wind generator
Creating a wind generator does not necessarily mean creating a large and powerful complex capable of providing electricity to an entire house or a group of consumers. It is possible to make a small windmill, which is, in fact, a working model of a serious installation. The purpose of such an event could be:
- Introduction to the basics of wind energy.
- Joint learning activities with children.
- An experimental sample prior to the construction of a large installation.
Creating such a windmill will not require the use of a large number of materials or tools; you can make do with improvised means. You can’t count on generating significant amounts of energy, but it may be enough to power a small LED lamp. The main problem that exists when creating small wind turbines is the generator. It is difficult to create it yourself, since the dimensions of the device are small. The easiest way is to use a small electric motor, allowing it to be used as a generator.
Homemade windmill based on a stepper motor
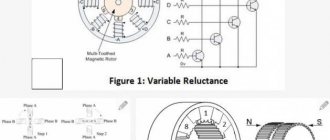
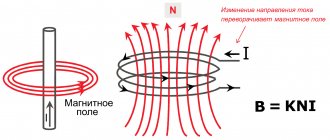
Most often, stepper motors are used the manufacture of low-power wind generators The peculiarity of their design is the presence of several windings. Typically, depending on the size and purpose, motors are made with 2, 4 or 8 windings (phases). When voltage is applied to them in turn, the shaft rotates accordingly at a certain angle (step).
The advantage of stepper motors is their ability to produce sufficiently high current at low rotation speeds. You can install an impeller on a stepper motor generator without any intermediate devices - gears, gearboxes, etc. Electricity will be generated with the same efficiency as on devices of other designs using overdrive gears.
The difference in speeds is quite significant - to obtain the same result, for example, on a commutator motor, a rotation speed of 10 or 15 times higher will be required.
It is believed that using a generator from a stepper motor it is possible to charge batteries or batteries of mobile phones, but in practice, positive results are extremely rare. Basically, power sources for small lamps are obtained.
The disadvantages of stepper motors include the significant force required to start rotation. This circumstance reduces the sensitivity of the entire wind turbine to weak winds, which can be somewhat corrected by increasing the area and span of the blades.
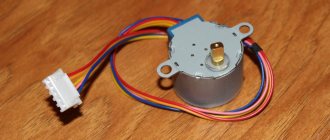
You can find such motors in old floppy drives, scanners or printers. Alternatively, you can purchase a new engine if the required device is not in stock. For greater effect, larger motors should be chosen; they are capable of producing a voltage large enough to be used somehow.
Wind generator made from printer parts
One suitable option is to use a stepper motor from a printer. It can be removed from a failed old device; each printer has at least two of these motors. Alternatively, you can purchase a new one that has not been used. It is capable of generating about 3 watts of power even in light winds, which are typical for most regions of Russia. The voltage that can be achieved is 12 V or more, which allows the device to be considered as a battery charger.
The stepper motor produces alternating voltage. It is necessary for the user to straighten it first. You will need to create a diode rectifier, which will require 2 diodes for each coil. You can directly connect the LED to the coil terminals; if the rotation speed is sufficient, this will be enough.
The easiest way to install the rotor impeller is directly on the motor shaft. To do this, it is necessary to make a central part that can fit tightly onto the shaft. To strengthen the fixation of the impeller, it is necessary to drill a hole and cut a thread in it. Subsequently, a locking screw will be screwed into it.
For the manufacture of blades, polypropylene sewer pipes or other suitable materials are usually used. The main condition is low weight and sufficient strength, since the blades sometimes gain quite decent speed. The use of unreliable materials can create an undesirable situation where the impeller falls apart while running.
Blades
Usually 2 blades are made, but more can be made. It must be remembered that a large area of the blades increases the KIEV of the windmill , but in parallel with this, the frontal load on the impeller, transmitted to the motor shaft, increases. Making small blades is also not recommended, since they will not be able to overcome the sticking of the shaft when starting rotation.
To be able to rotate the windmill around a vertical axis, you need to make a special unit. The difficulty with this lies in the need to ensure that the cable coming from the generator does not move. Since the device has, rather, a decorative purpose, they usually approach the issue in a simpler way - they install the consumer directly on the generator body, eliminating the presence of a long cable. Otherwise, you will have to install a system like a brush collector, which is irrational and time-consuming.
Creation of a wind generator
Creating a wind generator does not necessarily mean creating a large and powerful complex capable of providing electricity to an entire house or a group of consumers. It is possible to make a small windmill, which is, in fact, a working model of a serious installation. The purpose of such an event could be:
- Introduction to the basics of wind energy.
- Joint learning activities with children.
- An experimental sample prior to the construction of a large installation.
Creating such a windmill will not require the use of a large number of materials or tools; you can make do with improvised means. You can’t count on generating significant amounts of energy, but it may be enough to power a small LED lamp. The main problem that exists when creating small wind turbines is the generator. It is difficult to create it yourself, since the dimensions of the device are small. The easiest way is to use a small electric motor, allowing it to be used as a generator.
Wind generator from an old scanner
Below are instructions that will help you recycle your old scanner into an impressive electricity generator.
- Old scanner;
- Rectifying diodes (8 1N4007 diodes were used in the project);
- Capacitor 1000 uF;
- LM7805;
- PVC pipe;
- Plastic parts (see below);
- Aluminum plates (any others can be used).
In addition to the fluorescent tube and electronic components, the scanner has a stepper motor, which is exactly what we need. The photo shows a four-phase stepper motor.
Now that we have all the necessary components, we can begin assembling the rectifier. For each phase we need 2 diodes, i.e. only 8 diodes. The output voltage will be stabilized using a 1000uF capacitor and an LM7805 voltage regulator. Note 1: This generator can freely produce more than 5 volts, but for this project, 5 volts was sufficient to charge mobile devices. Note 2: For USB charging, two 15 kOhm resistors are required on both data buses. See the USB specification or this manual for more details.
Note 3. Free software was used to develop the circuit https://qucs.sourceforge.net/.
We collect the blades. See here for more details.
Unfortunately, there is no diagram of the device, but it is not so difficult to assemble something similar from the photograph.
End! Now all you have to do is wait for a windy day and try out the device, as you can see in the photo - the device stably generates a voltage of 4.95 V. Now you can charge your MP3 player or phone for free!
Translation: Ale)(ander, commissioned by RadioLotsman
Wind generator from an electric motor from a printer
The simplest low-power wind generator can be easily assembled from any equipment containing a stepper motor, for example from an old printer. To make such a wind generator, you will need: 1. an old printer (or scanner); 2. voltage regulator LM7805; 3. capacitor with a capacity of 1000 μF; 4. rectifying diodes (8 diodes 1N4007 or similar); 5. PVC pipe; 6. aluminum plates (any others can be used). 7. plastic parts (see below);
Remove the stepper motor from the printer:
The first step is to assemble the rectifier. The motor is four-phase and for each phase we need 2 diodes, i.e. only 8 diodes. We will stabilize the output voltage using a voltage regulator LM7805 and a capacitor with a capacity of 1000 μF:
In principle, such a wind generator can generate a voltage of more than 5 volts, but for charging the batteries of mobile devices, 5V is quite enough.
Next, we cut out the blades from PVC pipes, and then attach them to the wind generator shaft:
In order for the wind generator to align itself in the direction of the wind, make its tail from a piece of plastic (fiberglass or similar materials).
That's all. The design is, of course, quite primitive, but such a wind generator successfully performs its function. You can start testing!
Source
Do-it-yourself generator from a stepper motor
incl. guests: 86 users: 0
Using the physics of radiative cooling of the sky, the team was able to harvest small but useful amounts of energy from the cold night sky using a simple, inexpensive and non-critical device.
How does deep discharge (down to zero) affect the characteristics of a Li-Ion battery? How harmful is it, or, conversely, is it relatively safe? This article attempts to sort this out. Not on a professional level, of course, but as food for thought.
Continuation of the description of the assembly of a homemade modular storage device using LiFePo4 batteries.
A very good boost converter board that supports fast charging protocols.
Aliexpress quite often sells Chinese counterfeits of well-known brands of batteries, in particular, in the photo, Panasonic 3400mAh. Is it worth buying these batteries? How bad are they, or, conversely, are they quite high quality?
The idea of a universal “battery power supply” periodically appears in the minds of various electronics developers. For example, here is another implementation option.
Description of a “Gauss gun” that is simple in design and understanding, but has good capabilities, which can be easily assembled even by a novice home-made worker.
Principles of use
Wind turbulence in the surface layers, characteristic of the Russian climate, leads to constant changes in its direction and intensity. Large wind generators with a power exceeding 1 kW will be inertial. As a result, they will not have time to fully unwind when the wind direction changes. This is also hampered by the moment of inertia in the plane of rotation. When a side wind acts on an operating wind turbine, it experiences enormous loads, which can lead to its rapid failure.
It is advisable to use a low-power wind generator, made by yourself, which has insignificant inertia. With their help, you can charge low-power mobile phone batteries or use them to illuminate your dacha with LEDs.
In the future, it is better to focus on consumers that do not require conversion of the generated energy, for example, for heating water. A few tens of watts of energy may well be enough to maintain the temperature of hot water or to additionally heat the heating system so that it does not freeze in winter.
GENERATOR FROM ENGINE WITH YOUR OWN HANDS
Since disassembling the CD-rom, a number of brushless DC motors have already accumulated (these are the ones that spin the disk). And they don’t seem to take up much space, but they often catch your eye. Finally I decided that I needed to somehow decide on them.
So, this is a brushless DC motor, the position of the rotor in it is monitored by three Hall sensors and controlled using the BA6849FP (speed control). In theory, everything is simple, but in practice, the impressions can go off scale just from just looking at the scarf on which the engine is actually installed.
Therefore, I did not delve into the purpose of the numerous terminals of the cable, but simply took and halved the engine, and saw its stator. However, a full view of the circuit board was still out of reach. Realizing that he couldn’t do without casualties, he unsoldered the wires (3 pieces) going from the stator windings to the board, and then folded it and broke the board in half along with the metal fastening plate.
The freed stator plopped down on the table and, again for educational purposes, was immediately unwound. Now I can report that the motor had three windings (phases) connected using the “star” method, but it is quite possible that they could be connected using the “delta” method.
Wind generator from a stepper motor
There are many designs of wind generators. This makes it possible to use wind energy not only for minor needs, but also for industrial needs. To understand for yourself the principle of operation of such a device in practice, the following design is proposed for assembly.
The wind generator will consist of a stepper motor, a mast body, a windmill and smaller components. The simplest stepper motor can be taken from old models of scanners or printers, or you can buy them from friends. Its power is enough to demonstrate the visual energy that can be obtained with the help of wind.
You will also need to assemble an electronic circuit that will allow the resulting voltage to be rectified and stabilized for your needs. One of the scheme options is presented below.
The motor terminals are connected to diode bridges, which serve to rectify the voltage. It is advisable to assemble these diode bridges yourself from Schottky diodes, rated for at least 1 A. The capacitor and voltage stabilizer are used to obtain a stabilized constant voltage of 5 V, which is quite enough to charge a mobile phone battery or glow a small LED night light.
It should be noted that this design is not the only one possible. Rather demonstrative. Instead of diode bridges, you can first connect a step-up transformer, and then install a diode bridge and a capacitor, which will be more practical. You can also replace the voltage stabilizer with a voltage multiplier or voltage converter, which will make it possible to obtain the desired voltage.
But, do not forget about hurricanes, which spin the generator blades to significant revolutions per second, which will produce a current of greater strength and voltage. This can damage the entire electronic circuit. Therefore, for beginning radio amateurs, this design is only the first step towards thinking about how you can tame the power of the wind to suit your needs.
Blade and mast design
The rest of the generator is most easily made from PVC pipes. For the blades, take a sewer pipe from which blades are cut, from 2 to 5. More experienced home-made workers argue that the number of blades must be odd. They are attached to a washer or plate that sits on the motor shaft.
The generator also needs a weather vane, which will allow it to independently turn in the direction of the wind.
Next you need to come up with a mast. It can be a reliable pole, which will allow the wind generator to be constantly exposed to the wind without obstacles. The simplest example would be a long wooden block or a plastic pipe if the height is not large.
That's all, actually. The most primitive wind generator is ready. The productivity of the device is affected by absolutely everything, from the design of the engine to the shape of the blades. Perhaps this article will help you take a step towards more serious devices and become on par with such a scientist as Alexey Fedorovich Anipko, who came up with and implemented in reality a unique design of a wind power generator.
The resulting energy does not necessarily need to be used for lighting or charging small batteries. For example, if you design several wind generators, then with their help you can already heat water, thereby, for example, heating a room. And this is just one of the options.
DIY mini wind generator
The size of a wind generator does not necessarily have to amaze the imagination with its grandeur. A small installation made from small improvised parts or devices is also capable of generating current. It can be used as a teaching aid for children, a light source for emergencies, a mobile phone battery charger, etc.
Costs are reduced tenfold, and the efficiency is the same as what was envisioned when the project was created. A mini-wind generator can serve as a trial model to test the technology and gain some experience in creating such devices. For production, you can use a variety of failed or outdated equipment.