LED lighting is actively used in interior and street lighting. This is due to the advantages of LEDs over classical light sources. What types of lighting are used and how to install it will be written in the article.
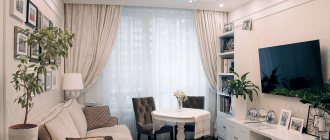
LED lighting performs several functions in the interior - lighting and decor. Using LED tape, you can create unique interior solutions, highlight interesting textures, and visually separate areas of the room. In addition, LED light sources have many advantages over classic lamps.
What is Ice backlight
LED lighting is created using LED light sources. These include lamps, strips, panels and other lighting devices. LED bulbs are used to create general lighting. Multi-level ceilings and design elements are illuminated using LED strips.
Advantages and disadvantages
Lighting using LED products is actively used in the modern world. This is explained by the advantages that LEDs provide:
- stylish appearance of the product;
- high efficiency;
- efficiency;
- long service life;
- low labor intensity during installation;
- environmental friendliness;
- safety;
- functionality;
- compactness, flexibility;
- color variety.
There is only one drawback - LED sources are more expensive than their classic counterparts. But this price pays off due to long operation and low power consumption.
Application area
LED lighting is used everywhere - in apartments, in architecture, on the streets, in advertising banners. LEDs are also used in the backlighting of televisions, smartphones and tablets.
Unusual use of tape
The most unusual use of LEDs in the interior is toilet lighting. Second place can be given to Philips with its LED wallpaper that changes the color and intensity of the glow.
Next, luminous ice cubes began to be used in interior decor. They are most often located in the kitchen. How do you like LED grass on your lawn? The above examples once again prove that the scope of application of LED strip is very wide, and is limited only by human imagination, as well as material capabilities.
Kinds
Ribbons vary in color. There are monochrome products, and there are multi-color ones. They also differ in the type of LEDs used - RGB or SMD.
Single color
Designated as SMD. Such products produce a luminous flux of a certain color. No additional controllers or remotes are required for operation. Single-color devices are cheaper.
Multicolor
RGB tape differs from monochrome tape in the ability to change its color. It operates in conjunction with controllers and a remote control. When a signal is sent from the remote control, the parameters change - color, lighting mode, brightness.
Lighting method
Thanks to the flexibility of the LED strip, you can create unique lighting. With its help, you can zone a room, add volume, and highlight important details. There are 4 ways to create lighting - contour, directional, spot, figured.
Contour
All light sources in this type are located on the same line (for example, along the edge of a multi-level ceiling or on shelves). The light should be directed upward. The illumination is obtained in the form of a continuous strip of light.
Spot
Using spotlights, you can create the effect of a starry sky on the ceiling. LEDs are fixed to the ceiling according to a pre-designed pattern and directed downward.
An additional effect can be created by photo printing on PVC fabric.
Directional lighting
For directional lighting, LEDs are installed on a slope. The light should be directed along the ceiling.
Figured arrangement
In case of figured placement, diodes are installed in ceiling lamps, which are specially designed for this purpose. Such ideas are carried out by designers; ordinary technical knowledge is not enough for implementation.
DIY LED lighting installation
Most often, to install duralight, a special niche made of plasterboard is erected on the ceiling, which will hide the LED strip itself, and then the light from it will not enter the room directly, but will be reflected from the ceiling. It is because of this soft glow that LED strips are so successful.
Installation of a plasterboard niche
A plasterboard niche looks like a cornice that runs along the entire perimeter of the room or along the edge of a multi-level ceiling. This cornice, consisting of plasterboard sheets, is attached to a lathing made of metal profiles.
Before installing the sheathing, you need to make the correct markings: first you need to step back 70-100 mm from the ceiling along the wall and draw an even horizontal line. To do this you need to use a level. Then you need to attach the profile along the drawn line.
To attach the second profile, you need to step back from the wall about 20 cm and also draw a line on the ceiling parallel to the first. A profile is attached to it and thus the internal perimeter is formed.
Then, retreating from the starting profile by 40 or 50 cm, you need to begin installing the sections of the profile that form the sheathing. The length of such segments should correspond to the distance between the base profile and the profile lying at the base of the ceiling.
It looks like this:
The main profile is connected to the starting one using small sections (up to 300 mm), and the supporting cornice will lie on the protrusions that are visible in the photo.
Sheathing with plasterboard sheets
After the profile is ready, it is covered with sheets of plasterboard: first its vertical part, which allows you to hide the wiring. After this, the lower part is also closed, and this is the result:
Installing a cornice is a rather labor-intensive process, so you can take the easier route and install a plinth (fillet) on the ceiling for LED lighting.
It looks like this:
Here you can see that it does not completely cover the space between the wall and the ceiling; this is necessary so that the light from the backlight is visible.
And here is the diagram of its placement:
The plinth is attached very simply, sometimes even with putty or glue. It all depends on the surface to which it will be attached.
Attaching tape
When absolutely everything is ready, you can start attaching the tape. To do this, be sure to clean the surface with alcohol and apply tape. Usually, to do this, it is enough to peel off a special strip from the back of the duralight and carefully press it against the wall.
Important! If the tape covers the entire perimeter of the room, then it cannot be bent too much (no more than 2 cm).
To mount the controller, amplifier and power supply, you need to provide special niches in advance.
Installing LED lighting with your own hands requires responsibility and some knowledge, which can be easily gained by watching several videos and carefully reading all the instructions regarding the duralight installation process. It doesn't take much effort to decorate your home with one of the best design ideas.
Video description of the LED strip design and principles of its control:
Installing a plasterboard niche for illuminating the ceiling with LED strip:
Correct connection of LED strip:
How to make lighting in a house or apartment with your own hands
To create LED lighting, you need to develop a plan for placing light sources. It is necessary to take into account the size of the rooms and work areas. You also need to understand what function the light will perform. After determining the basic requirements, you should purchase the necessary equipment and begin installation.
Required components
First of all, you need to purchase the necessary components. The master will need an LED strip, a power source, a regulator, and a switch. The RGB product will also require a remote control.
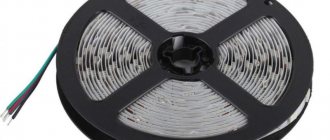
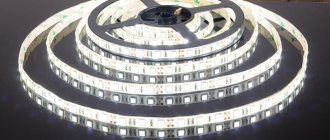
LED Strip Light
The tape is usually sold in 5m reels. You first need to determine what length is required, what type is needed - monochrome or multi-color, and the density of the diodes. It is imperative to determine in which room this or that source will be installed. The choice of moisture protection class depends on this - without protection, with a medium and high degree of protection from water.
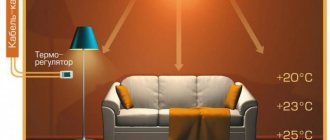
PWM regulator
PWM controllers are used to control the brightness of the tape. The device must be of high quality, otherwise flickering will be noticeable, which can cause eye fatigue and headaches.
Remote controller
RGB requires a dimmer with a remote control. It allows you to control the backlight shade, intensity, and focus.
power unit
The power source is the most important element; without it, the tape will not work. It converts the voltage in a 220 Volt outlet into the necessary power for 12 or 24 Volt LEDs. Power supplies can be sealed, semi-sealed or non-sealed - the choice depends on the microclimate in the room.
Installation of LED lighting for a room
After preparing the necessary components, you can proceed to installation. You can make the connection yourself or call a specialist.
Necessary tool
For installation you will need the following tools:
- LED strip with a full set of components;
- soldering iron;
- electrical tape or heat shrink tubing;
- knife or scissors;
- roulette;
- cables;
- Double-sided tape;
- profile.
A drill and staples may also be required.
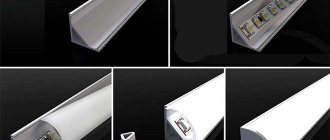
Connection diagram
LED strips are installed in an aluminum profile.
It performs the function of removing heat from light sources. For lighting with low power, which is used for decoration, insulation is not necessary. How to do the installation:
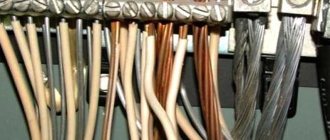
- cut the required length from the tape;
- strip the outer conductors by 1.5 cm;
- solder 2 cables;
- insulate the connection point;
- glue the ICE tape to the profile using double-sided tape;
- install the power supply nearby, connect it to the tape, observing the polarity (especially important for RGB products);
- hide the wires in a plastic box;
- connect the switch.
Next, the functionality of the assembled circuit is checked.
LED ceiling lighting
You can make lighting yourself, and thereby completely change the visual perception of the room.
Read here: DIY trailer: master class on making a homemade trailer for a car
One of the designers' techniques is to visually increase the height of the ceilings. This is achieved by creating multi-level transitions of plasterboard and suspended ceilings.
When you add lighting, a real play of light begins, which can completely transform the room.
What is needed to connect the tape to the facade of the house
LED strip can be used not only in internal, but also in external lighting.
For street lighting you need to know how to choose the right strip and power supply. They must have a high level of moisture and dust resistance, and be in a sealed housing that can withstand any weather. Installation on a building can be done in two ways:
- Making holes in the plastic wall with which the tape will be fixed.
- In brick buildings, installation is more difficult. The tape is installed at the corners of the building and stretched to the maximum possible condition. After this, holes are made in the wall into which the tape is fixed using special fasteners.
Installation work must be carried out carefully so as not to damage the LED strip and components.
Niche design
Niches in the interior are installed not only in the wall. For example, LED lighting can highlight one of the levels of a plasterboard ceiling structure. Modern interiors suggest another unusual solution - lighting a niche in the floor. Recesses in the wall can be illuminated point-by-point or large-scale. LED strips are used for general illumination. Often frosted or transparent glass is installed in niches, behind which an LED is placed.
Wall lighting in the living room
Headboard lighting in the bedroom
If it is necessary to illuminate the ceiling, a plasterboard box should be attached around its perimeter or a hemmed structure should be used. The light source is mounted openly or the tape is hidden in a niche, attaching it to the side wall of the box (hidden installation). LED strip is the final stage of interior design. It does not bear any load and can be easily dismantled. Portals of artificial fireplaces, shelves in plasterboard walls, and arched openings can also act as niches. Remember that in the dark, lighting a niche in the wall looks magical.
Wall lighting in the kitchen
Illumination of the wall with a lamp
Precautionary measures
When working with electrical products, it is important to follow safety precautions. First of all, you need to carefully consider the choice of power supply. It must have a safety margin for load. It must also meet the operating conditions. The device must not be placed in a damp room or outdoors without a high degree of sealing.
It is also worth noting that for every 5 meters of tape there should be 1 power source.
Do not place mechanical stress on the device. Bends and pressure can lead to rapid failure.
When operating the tape, it is important not to exceed the permissible power supply and temperature conditions. Increased voltage leads to premature failure of the device. High temperatures also negatively affect LED crystals, leading to their degradation.
If you have no experience with installing LED strips, it is better to entrust the installation to a specialist. Incorrect installation may result in equipment failure.
Installation nuances
It is important to note that the installation procedure for RGB and SMD tapes is different. Connecting a multi-color product is more complicated - you need to connect the power supply to the controller, then the tape itself. When connecting multi-color tape, polarity must be observed. If you confuse plus and minus, the LEDs will burn out and you will have to change the light source.
The tape should only be cut in the marked places. When cutting, it is important not to damage the conductive tracks and LEDs. The connection must be made by soldering or using special connectors selected for a specific type of tape.
When installing the product on the ceiling, it is important to make sure that it is not visible from below. To do this, use cornices or make special projections from plasterboard. It is recommended to use LEDs on a matte ceiling. They are reflected from the glossy surface as if in a mirror, and even minor dirt will be noticeable.
LED lighting is a profitable and stylish way to illuminate interior spaces, advertising posters, building facades, and monuments. LEDs are actively used due to their advantages - they save energy, provide high efficiency and work for a long time if operating conditions are met. Using an LED strip, you can create unique lighting, highlight decorative elements and create room zoning. Installing the LED strip is not difficult, but you need to have skills in working with a soldering iron.
Useful tips
When creating lighting for walls, it is recommended to adhere to a number of rules:
- The backlight is an additional light, not the main one. Its task is local and decorative lighting. In this regard, the brightness of the backlight should be less intense in comparison with the main lighting.
- A good option for illuminating the wall is LED strip. With its help, they design the entire niche around the perimeter.
- The shade of light is chosen based on the style in which the room is decorated. Pinkish tones are sometimes used to create a romantic mood. Light yellow color creates a feeling of coziness and comfort. White color is used if you want to get a minimalist, high-tech atmosphere.
- In most cases, it is better to opt for soft diffused light. Too intense a glow may look out of place (the illuminated objects will stand out too much). Also, bright light has an irritating effect on the psyche. One more consideration: bright, cool light creates a feeling of formality that is rarely appropriate in a home setting.
- Local lighting is especially important if paintings or photographs are hung on the walls.
- The illumination of shelves on which objects made of metal, porcelain, and glass are located looks impressive. It is especially beautiful when they have a glossy surface.
- The backlight does a good job of balancing out overly bright, noticeable objects that would otherwise attract all the attention. We are talking, for example, about gold, gilded products and crystal objects.
- It is recommended to install the lamps approximately 2 meters from the floor or slightly lower (at eye level). The higher the light sources are installed (for example, under the ceiling), the brighter the lighting in the room, and vice versa.
- Lighting allows you to visually zone the room. For example, lamps installed on only one wall create the feeling of an elongated room. If the lighting is placed near the ceiling, and the luminous flux is directed downward, the room visually increases. A warm glow creates the illusion of objects being closer, while a cold glow creates the illusion of moving them away visually.
Installing lighting for walls is a rather labor-intensive process that requires knowledge and experience. If you decide to carry out the installation yourself, it is still recommended to consult with an electrical specialist.