Why is this necessary?
LED filaments are often sold in stores in large rolls (from 5 meters), and when purchasing, it becomes necessary to cut off some part. Depending on the room in which the LED strip will be installed, sections of different lengths may be needed. Therefore, individual pieces of the required size are cut from the roll so that electricity can be supplied to them on both sides.
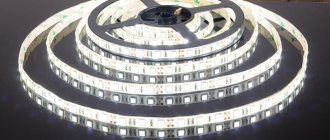
Standard 5 meter roll.
How to cut LED strip?
When working with LED strips, it is often necessary to cut a piece of the required length. Since they sell at least one meter measure, and the design idea does not fit into the templates, the question arises: is it possible to cut the LED strip? A single piece can be easily turned into a Lego constructor from a dozen small segments.
In a silicone tube
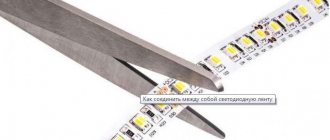
IP68 rated waterproof tapes are housed in a silicone tube. When cutting with scissors, the coating material may stretch unevenly, causing edge deformation, which will create additional difficulties when subsequently connecting the area to the connector. to cut the outer silicone tube with a stationery knife, and the tape itself with scissors.
Where should you cut?
Before you start cutting the LED strip, it is important to understand: the luminous thread can be shortened only along specially marked lines - conductive strips. Structurally, they are made so that they are located between the contact pads of the diodes. Accordingly, there is no threat of damage to the LED strip. Cutting in the wrong place is almost guaranteed to destroy some diodes. If the tape is plugged in, a short circuit may even occur or the power supply will burn out. There are 2 conductive strips along the low- and high-voltage strips, and 4 along the RGB stripes.
Places for cutting on the RGB thread are additionally marked with a dotted line or a scissors icon.
How to connect a cut LED strip?
If you have two pieces, you can connect them together without much effort. There are two ways to splice LED backlights:
- Soldering.
- Applications of LED connector.
In the first case, you can connect individual sections to each other through additional wires, or by directly soldering the contact pads of each of the sections. Let's consider the wireless splicing method.
Before applying rosin to the contacts, you should make sure that they have not oxidized.
Rosin can be applied to contact pads that have not been oxidized. In this case, both the platform on which the LEDs are located and the surface under the protective film applied to the back of the tape must be amenable to processing. For high-quality splicing of segments, the thickness of the solder must be at least 3 mm on each segment of the backlight.
The total length of the spliced tape should not exceed 5 meters.
The input voltage is designed by the manufacturer only to illuminate limited parameters. Its value will decrease as longer printed tracks are formed towards the end of the tape.
This will cause the LEDs at the end of the backlight to burn less brightly than those located closer to the power source.
The simplest connection method is to use a special connector. To attach an additional segment, perform the following algorithm:
- Open the device cover.
- Connect the backlight contacts, observing the polarity.
- Close the connection box cover.
What cutting steps occur
Different strip models have different numbers of LEDs per meter. There can be from 30 to 240. A standard 12-volt LED filament is cut in increments of 3 LEDs, a 24-volt filament is cut in increments of 6 LEDs. For a luminous thread with a voltage of 220 V, the cutting step range ranges from 0.5-2 m. This depends on the manufacturer’s brand.
In metric terms, the cutting step will be:
- for 30 diodes – 10 cm;
- for 60 diodes – 5 cm;
- for 120 diodes – 2.5 cm;
- for 240 diodes - 1.5 cm.
Trimming diode strip for repair
If one diode fails during operation, the entire unit stops lighting. If the strip is 12 V, 3 chips go out, in a 220 V LED strip - 0.5-2 meters. The light source can be restored if the faulty unit is correctly cut off and a new one is installed. You need to cut along the lines located on both sides of the faulty diode.
Attention! To attach a new block, you can use special mounting elements or soldering.
The use of connectors makes it possible to carry out repairs without dismantling. For soldering, a 25 W soldering iron and a wire with a cross-section of 0.5 m2 are required. Acid cannot be used; the wires must be secured using heat shrink tubing.
How to cut LED strip
Now let’s talk about how to properly cut LED strips of different voltages and types.
12 volts
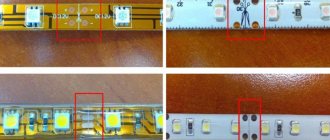
The 12V LED filament has cutting lines between each group of 3 bulbs.
Here you can clearly see the places for the cut every 3 LEDs.
This tape has a thin coating that allows you to use a regular stationery knife or scissors. The main thing is accuracy in work. The tape is cut strictly along the dotted lines, otherwise some of the diodes will fail, and such a luminous device will only have to be thrown away.
How to cut a 12V LED strip?
LED strips, like other LED devices, have an electrical circuit. At the same time, low-voltage lighting differs in design from high-voltage lighting. Flexible and elastic 12V tape consists of individual segments. On each of them there are 3 LEDs with a number of resistances - R1-R3. You can verify this by removing the protective adhesive film from the tape and holding it to the light.
The voltage is distributed between the segments along the backlight.
The thin coating makes it possible to cut the tape into individual sections with a stationery knife or scissors. In this case, the step of separating the segments should be 3 LEDs. If you break it, part of the backlight will not work.
Most manufacturers mark the location for the cut with dotted lines.
Cutting during installation
Sometimes during installation of an LED filament you can inadvertently damage it. After all, this thing is quite fragile, and sometimes you have to bend it a lot. Fortunately, this is not a “death sentence” for the LED strip; such malfunctions are easily fixed. You need to cut off the part that has failed and measure its exact length. Then a new piece of strip is taken and installed in place of the old one using a connector. To connect these two parts, it is best to use a soldering iron. If the adhesion is very noticeable, this area (or the entire tape at once) can be isolated.
Advice. To prevent the LED strip from breaking down during installation, do not bend it to a radius of more than 5 cm, wrap it around objects, or weave shapes or knots.
LED strip device
Today, strip type is a printed circuit board, which is reconnected with a thin elastic type base. On one side, limiting resistors are applied to this tape, which allows you to connect this product to a power source or other device. It is also worth noting that the product has contacts to which, if necessary, connecting wires can be soldered. If you look closely, you will notice that there are lines across three different elements that are located across the product. This is precisely the mark along which the tape can be divided.
There are also tapes that are self-adhesive and with the help of them even a high school student can do installation. In this case, installation does not require screws or any other reinforcing materials; it can be firmly fixed due to its base.
No markings: how to cut such a tape
Sometimes you come across LED strips on the shelves without marking the conductive strips with dotted lines, symbols, letters and other marks. It is best to refrain from buying them. It's not just the lack of clues. Such a device will most likely be of low quality.
If you still have to deal with an LED strip without markings, there is no need to despair. The contact pad will be a reliable reference point. It disrupts the visual “harmony” of the light filament and looks like an extension.
The cut line creates a slight expansion between the diodes.
You need to cut exactly in the middle of this area. Again, in most LED strips, the cut point is located every 3 diodes - you can also rely on this with confidence.
How to cut
Can LED strip be cut anywhere?
LED strip cutting line
LED strip device
An LED strip is a printed circuit board in the form of a flexible strip. Along it there are two, and on RGB devices - four, conductive strips (on RGBW strips - five), between which LEDs are located. In devices connected to a 12 V network, they are assembled in groups of three diodes and a current-limiting resistance.
The number of diodes depends on the supply voltage, and if the supply voltage is higher - 24, 110 or 220 V, then there are more LEDs in the group.
In places where the roll can be cut, there are contact pads on the conductive strips for connecting wires. There are also indications of the cutting location - a dotted line or scissors.
How to cut a regular 12V LED strip
strip cutting area
On the 12V LED strip, the diodes are arranged in groups of three. Between each group there is a cutting area marked with the corresponding icon.
This is where it can be cut into pieces. If you cut arbitrarily, then the LEDs closest to the cut site will not light up and there will be no place for connection on the conductive layer. In this case, you will have to shorten the strip and trim the damaged area.
The strip is cut with a sharp knife or scissors
How to cut color (RGB) LED strip correctly
The structure of an RGB strip is similar to a regular strip. The main difference is that it has four conductive strips. They are marked with the symbols “R”, “G”, “B” and “-”. This is how they differ from a regular strip, on which the contact pads are marked “+” and “-”.
You can cut it in the same way as a regular monochrome one - at the cutting point indicated by the corresponding icon.
In addition to RGB devices, there is RGBW, with five current-carrying strips and LEDs in four colors - red, green, blue and white. They are cut in the same way as regular monochrome ones.
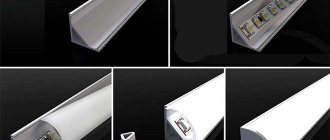
With waterproofing
Tape with waterproofing
If a layer of silicone is applied to the LED strip to increase water resistance, only on top or on both sides, then it is cut as usual. A device of this design with LEDs is no different from a conventional one.
The main difficulty is that when cutting, the silicone does not interfere with this operation exactly in the middle of the contact pad. Therefore, it is better to do this not with scissors, but with a sharp knife:
- cut the top layer of silicone in the intended place;
- cut the strip itself;
- cut the bottom layer of silicone.
After cutting a piece of the required length, you need to trim the ends of the strip for soldering or connecting a connector. This is done with a knife. To solder the wire, it is enough to remove the silicone only from the top. To connect using a connector, the bottom layer of silicone must also be removed.
Cutting LED strip for repair
During operation, one of the diodes may fail. This will cause the entire group to go out - three in a device designed for 12 V or more, in devices that are connected to a different voltage. To repair, you need to cut out the damaged area and replace it with a good one. Such a strip is cut off at the cutting points next to the non-working LEDs.
If there is no marking
If there is no marking of the cutting location, then it is made between adjacent contact pads or in the middle of the pad extended along the conductive layer.
This area looks like an extension of the strip located on the edge of the tape and should be on all strips that are on the device.
They are located side by side, across the strip with LEDs.